In This Chapter
Demystifying yarn overs
Discovering fully fashioned decreases
Having a short lesson in short rows
Whipping up kerchiefs, scarves, blankets, and tops
If you start with a small number of stitches and increase regularly, or start with a large number of stitches and decrease regularly, what do you get? A triangle. These techniques form the basis of kerchiefs and shawls. And most shaping (knitting’s equivalent of tailoring) relies on triangles. A sleeve cap, for instance, is essentially two triangles and a rectangle. V-necks or raglan sleeves? Triangles. This chapter helps you work all the angles.
The basic kerchief pattern uses yarn overs to create decorative eyelets as you increase your way up from tip to top. Use this same technique with a looser gauge and you’ve made the basic shawl. If you’re ready for something a bit more ambitious, try the lacy shawl. Don’t be scared off by the name though — it’s just a few more yarn overs and a few more stitches. Making triangles by increasing is perfect for beginners or fretful knitters because you won’t have to worry about your gauge much, and you simply stop knitting when your project is the right size.
Making triangles is also a great way to discover decreasing. In knitting, there are lots of ways to decrease. And while all the abbreviations might be confusing at first, remember that all decreases do basically the same thing: get rid of a stitch. Knitting the fully fashioned kerchief in this chapter helps you unlock the alphabet soup mystery of decreases. After you get the hang of decreases, take this technique to the next level and knit a halter top that’s made with a cotton-Lycra blend yarn, which gives the top plenty of stretch.
You can also make triangles from the side using short rows. If you’ve never tried short rows before, they may sound complicated. But, like so many other things in knitting, this technique is surprisingly simple once you understand what you’re supposed to do. Use short rows to create a scarf or even a blanket. I show you the steps in this chapter.
The Most Basic Kerchief Ever
This basic kerchief (see Figure 12-1) is knit from the point to the long edge. This project is a great opportunity to get the hang of increasing stitches using yarn overs (see Chapter 6 for more about yarn overs). Because you start at the point, you can try on your kerchief as you go, which allows you to make it exactly the size you want.
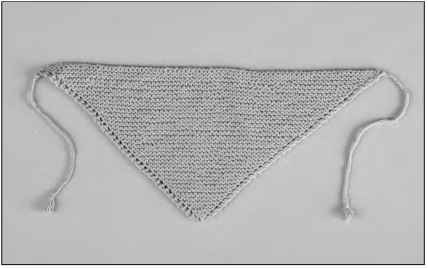
Figure 12-1:
A kerchief worked from tip to top.
Materials and vital statistics
Yarn: Rowan Calmer (75% cotton, 25% acrylic microfiber); 175 yards (161 meters) per 50 grams; 1 ball; color: Kiwi
Needles: US 8 (5 mm) needles, or the size needed to match gauge Other materials: Yarn needle to weave in ends Size: Baby (child, adult)
• Finished width: 12 (15, 17) inches
• Finished length: 5>2 (7K, 9>2) inches from tip to center of widest edge (without braided ties)
Gauge: 16 stitches and 32 rows per 4 inches in garter stitch (if you want to substitute yarns, look for one that lists a gauge of approximately 21 stitches and 30 rows per 4 inches in stockinette stitch)
This kerchief is a quick knit and a great way to practice your yarn overs. Find out how to make yarn overs in Chapter 6, and then whip up a kerchief for yourself or the young girl in your life. Or, because it’s such a forgiving project, help her knit one for herself! Made in a single color, it’s a great backdrop for all kinds of adornments. Consider adding buttons, crocheted designs, or homemade flowers.
Directions
Cast on 2 sts.
Row 1 (RS): K1, yo, k1.
Row 2: K1, yo, k2.
Row 3: K1, yo, knit to end.
Repeat Row 3 until there are 48 (60, 68) sts. Bind off loosely and weave in ends.
Finishing: Finish your kerchief with 2 braided ties. Cut 6 strands of yarn, each 24 inches long. Thread 3 of the strands halfway through the last yarn over on one side, making 6 tails that are 12 inches long. Divide the tails into 3 pairs, braid them, and then knot the bottom. Repeat with remaining strands on the opposite side.
The Most Basic Shawl Ever
The simplest shawls are no more difficult to knit than the kerchief pattern in the previous section. In fact, the most basic kerchief ever becomes the most basic shawl ever if you just keep knitting — you simply start at the point of the triangle and keep knitting until the shawl is 60 inches wide.
But, remember, just because it’s simple to knit doesn’t mean this shawl is ho-hum. I chose a dramatic ribbon yarn and large-gauged needles for a quick shawl with plenty of pizazz. See this beautiful shawl in Figure 12-2.
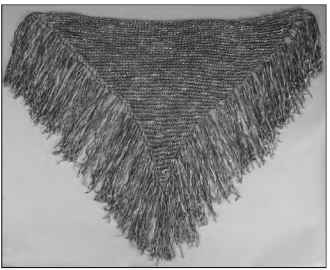
Figure 12-2:
A stunning (and stunningly simple) shawl.
Materials and vital statistics
Yarn: Colinette Giotto (50% cotton, 40% rayon, 10% nylon); 151 yards (140 meters) per 100 grams; 4 hanks; color: Lichen
Needles: US 15 (10 mm) circular needle, 36-inch length or longer, or the size needed to match gauge
Other materials: Crochet hook to attach fringe; yarn needle to weave in ends
Size: 60 inches wide by 40 inches long from tip to center of widest edge (without fringe)
Gauge: 10 stitches and 20 rows per 4 inches in garter stitch
To make this eye-catching wrap, you start with just 2 stitches. From there you increase at the beginning of every row until your shawl is as large as you want it to be. Long, dramatic fringe completes the wrap.
Directions
Cast on 2 sts. Row 1 (RS): K1, yo, kl. Row 2: K1, yo, k2. Row 3: K1, yo, knit to end.
Repeat Row 3 until there are 150 sts (or more). Every 10 sts you add will increase the width by 4 inches.
Bind off loosely.
Finishing: Weave in any ends. Cut 2 20-inch lengths of yarn for each eyelet, and then use these pieces to make fringe. (See Chapter 8 for more information on fringe making.)
Variation: Changing up your yarn
This basic shawl lends itself well to some variations and substitutions in yarns. For example:
Choose any ribbon or tape yarn and a very large needle size to achieve a lacy look. If you’re substituting a thicker yarn, use US 17 or larger needles.
Consider knitting with one yarn and fringing with a second color or texture to vary the look of your shawl. Or you can leave the fringe off all together for a sleeker look.
Variation: Making a poncho
If you’re more of a poncho person, make two shawls, each with a hypotenuse of about 45 inches (or about 115 stitches, if you’re knitting at the same gauge given in the basic pattern). Lay the shawls out so they make a square, as shown in Figure 12-3. Now seam the two hypotenuses together from the points toward the center, leaving a 10-inch wide slit in the center for the neck opening. (To find out how to sew a seam, head to the appendix.)
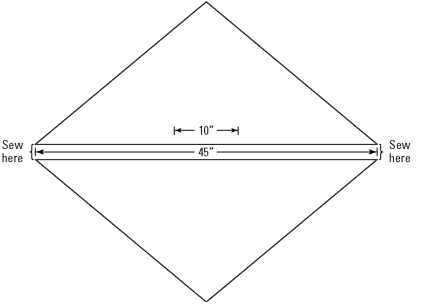
Figure 12-3:
Two smaller triangular shawls make a great poncho.
Fully Fashioned Kerchief
This kerchief, shown in Figure 12-4, is quick to make and is a great way to practice different decreases. It’s a fun project to make for yourself, or you can make matching ones for little sisters or nieces.
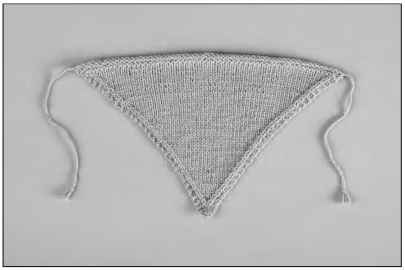
Figure 12-4:
A fully fashioned kerchief.
New skill: Additional teft-stanting decreases
Here’s something you may know about a decrease in knitting: It gets rid of a stitch. On the other hand, here’s something you may not know about a decrease: It’s biased. No, it doesn’t have any sort of political view — it simply slants. Knitting 2 stitches together — abbreviated k2tog — leans to the right (see Chapter 6 for more about k2tog). The fact that it slants really doesn’t matter much if it’s buried in your armpit, but if it shows, it starts to matter.
This slanting matters because decreases tend to be worked in pairs. When you’re shaping a garment, you’ll often work one decrease near the beginning of a row and one near the end of that same row. If you work all your decreases as k2tog, they’ll all slant toward one side of the finished piece. Most knitted pieces are meant to be symmetrical though, and you want the right half and the left half to be mirror images of one another, right down to the way your decreases lean. So your right-leaning k2tog needs to be paired with a left-leaning decrease, just to make things pretty. Decreases that are paired, mirrored, and visible are considered fully fashioned.
Figure 12-5 shows both left- and right-slanting decreases. If you’ve been wondering why someone else’s version of the same sweater looks better than yours, especially around the neck, the answer may lie in the slants of her decreases.
When it comes to left-slanting decreases, you have several choices: ssk (which I cover in Chapter 6), K2tog tbl, and skp. You can choose to use any of them to mirror the k2tog and achieve full fashioning. Like anything else, however, trends do come and go — some designers and even some eras seem to prefer one over another. Which do you prefer? Give them all a try and see what suits your fancy.
For many new knitters, the k2tog tbl (knitting 2 stitches together through the back loops) seems to be easiest to work and easiest to remember because it’s almost the same as k2tog and doesn’t involve multiple steps. But do know that you can choose to substitute one left-slanting decrease for another in just about any pattern.

Figure 12-5:
Paired right-and left-slanting decreases add panache to a simple kerchief.
Follow these steps and check out Figure 12-6 to decrease with k2tog tbl:
1. Insert the right needle from right to left through the back loops of the next 2 stitches.
2. Wrap the yarn around the right-hand needle and knit the 2 stitches together.
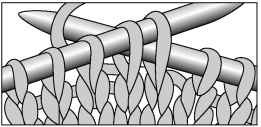
Figure 12-6:
The k2tog tbl stitch leans to the left.
You can also decrease with skp (slip 1, knit 1, pass the slipped stitch over). Some pattern designers use the abbreviation sl 1, k1, psso instead of skp. To decrease with skp, follow these steps (and see Figure 12-7):
1. Slip 1 stitch knitwise.
2. Knit 1 stitch.
3. Pass the slipped stitch over the stitch that was just knit — just like when you bind off.
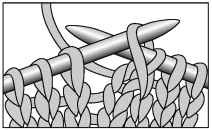
Figure 12-7:
Decreasing with skp.
Regardless of which decrease you use and how much you think it will show, you should always work your decreases in a stitch or two (or 12!) from the edge. Why? Not only will your project look more polished, but decreasing this way will also make things much nicer to seam up later (if you need to). In other words, you’ll have a consistent, smooth edge to sew. Knitters always want to know the secret to good finishing, and this is definitely part of the secret. Even if a pattern in another topic says to decrease at the beginning and end of the row, knit the first and last stitches plain and simple.
Materiats and vitat statistics
Yarn: Rowan Calmer (75% cotton, 25% acrylic microfiber); 175 yards (161 meters) per 50 grams; 1 ball; color: Refresh
Needles: US 8 (5 mm) needles, or the size needed to match gauge Other materials: Yarn needle to weave in ends Size: Baby (child, adult)
• Finished width: 12 (15, 17) inches
• Finished length: 8K (10K, 12) inches
Gauge: 20 stitches and 28 rows per 4 inches in stockinette stitch
This kerchief is knit from the long side to the tip. After working a narrow border in garter stitch, you’ll work your fully fashioned decreases every right-side row. The ties are made of simple braids added on after the knitting’s complete.
Directions
Cast on 60 (76, 86) sts.
Rows 1, 2, and 3: Knit 3 rows.
Row 4 (RS): K2, k2tog tbl, knit to last 4 sts, k2tog, k2.
Row 5 (WS): K2, purl to last 2 sts, k2.
Repeat Rows 4 and 5 until 6 sts remain.
Next row (RS): K2, k2tog, k2.
Next row (WS): K2, p1, k2.
The next two RS rows use a double decrease to get rid of 2 sts at once. Sk2p or sl 1, k2tog, psso combines skp and k2tog.
Next row (RS): K1, slip 1 knitwise, k2tog, pass the slipped st over, k1.
Next row (WS): K3.
Next row (RS): Sl 1, k2tog, psso.
Cut yarn and pull through remaining st to secure. Weave in ends.
Finishing: Cut 6 strands of yarn, each 24 inches long. Thread 3 of the strands halfway through the point on one side of the long edge, making 6 12-inch long tails. Divide the tails into pairs, braid them, and knot at the bottom. Repeat with remaining strands on the opposite point.
Lacy Shawl
Even though this project is called “lacy,” don’t be scared away. You simply work stockinette stitch and yarn overs on a needle large enough to let plenty of light shine through. Worked with two strands of a classic mohair blend held together, this lightweight shawl adds warmth and drama to any outfit (see Figure 12-8).
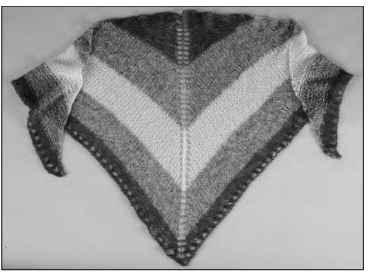
Figure 12-8:
A lacy shawl is dramatic and flattering.
Loads of yarns now on the market shift from one color to the next on their own (and it’s safe to say that I love them all). But you also can create gradual color changes yourself — and control how they change. Changing colors highlights the chevron shape that you create when you knit this shawl.
With this project you use three different colors. So, using two strands of yarn at a time with three colors to choose from means that you can create five different colors — AA, AB, BB, BC, and CC. Choose wild, surprising combinations or colors within the same family. Whatever colors you choose, do think about value as well as hue. In other words, if you want a strong gradient, consider using a very light or very dark color to contrast with two medium-valued colors. (Check out Chapter 8 for the basics of changing colors in a pattern and of using two strands of yarn at once.)
Materials and vital statistics
Yarn: Crystal Palace Yarns Kid Merino (28% kid mohair, 28% merino wool, 44% micro nylon); 240 yards (221 meters) per 25 grams
• Color A: Charcoal; 2 balls
• Color B: Misty Blue; 2 balls
• Color C: Pacific Blue; 2 balls
Needles: US 13 (9 mm) circular needle, 24-inch length or longer, or the size needed to match gauge
Other materials: Yarn needle to weave in ends
Size: 34 inches from tip to center of widest edge by 68 inches wide (see the schematic in Figure 12-9)
Gauge: 10 stitches and 14 rows per 4 inches in stockinette stitch
The lacy shawl starts with just a few stitches at the nape of the neck and grows out in a triangle due to the placement of your increases. You bind off at the two short sides of the triangle. This construction technique means that it’s easy to vary the size of your shawl by knitting more or fewer rows.

Figure 12-9:
Two triangles worked together to create an easy-to-wear shawl.
Directions
With 2 strands of color A held together as if they were 1, cast on 3 sts.
Row 1 (RS): K1, yo, k1, yo, k1. There are 5 sts.
Row 2 and all following WS rows: Purl.
Row 3 (RS): K1, yo, k1, yo, k1, yo, k1, yo, k1. There are 9 sts.
Row 5 (RS): K1, yo, k3, yo, k1, yo, k3, yo, k1. There are 13 sts.
Row 7 (RS): K1, yo, k5, yo, k1, yo, k5, yo, k1. There are 17 sts.
Row 9 (RS): K1, yo, k7, yo, k1, yo, k7, yo, k1. There are 21 sts.
Continue pattern as set, increasing 4 sts every RS row by making yarn overs at each edge and working 2 more sts between each edge and the central pair of yarn overs.
Continue until you’ve worked 28 rows with 2 strands of color A. There are 57 sts.
Switch to 1 strand of color A and 1 strand of color B held together as 1 yarn and work 24 rows of the pattern. There are 105 sts.
Switch to 2 strands of color B held together and work 20 rows of the pattern. There are
145 sts.
Switch to 1 strand of color B and 1 strand of color C held together and work 16 rows of the pattern. There are 177 sts.
Switch to 2 strands of color C held together and work 8 rows of the pattern, and then work the border as follows:
Next RS row: K1, yo, *k2tog, yo, repeat from * to center 3 sts, k1, yo, k1, yo, k1, **yo, k2tog, repeat from ** to last st, yo, k1. There are 197 sts.
Next row: Purl.
Bind off all sts loosely.
Finishing: Weave in ends. Block shawl by wetting it and laying it flat to dry (head to the appendix to find out how to block).
Variation: Knitting through thick and thin
Because this shawl is a triangle right from the start and grows along its outer edges, it’s a great shawl pattern to use with just about any yarn. You can use the yarn I suggest in the original pattern held singly and use smaller needles for a very delicate shawl. Or, you can use a yarn that borders on ridiculously thick and get something interesting — just be sure that the needles you use are large enough to create a shawl that drapes beautifully and lets the light shine though. If you need help choosing the right needles for the job, head to Chapter 1.
Stretchy Hatter Top
A halter top is a fun, summery project to work on. But in creating a pattern for a halter, I wanted to be sure to make one that was both fun and functional — a halter should be comfortable, it should stay in place, and it should provide plenty of coverage in the front while still baring the back. Vents at the side, a front that’s slightly wider than the back, and Lycra all do their parts to make a fit that’s flattering. Figure 12-10 shows this halter.
You’ve probably noticed that this top isn’t a triangle (thank goodness!), but simple triangles worked on the sides of rectangles give this halter its great shape. See the fully fashioned kerchief pattern earlier in this chapter for a full report on fashioning your decreases.
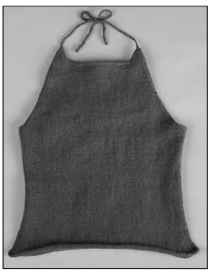
Figure 12-10:
A halter top is great on its own or layered with a shawl or jacket.
Materials and vital statistics
Yarn: Cascade Fixation (98.3% cotton, 1.7 % elastic); 100 yards (92 meters) per 50 grams; 4 (5, 5, 6, 6) balls; color: 3794
Needles: US 7 (4.5 mm) needles, or the size needed to match gauge
Other materials: US H (5 mm) crochet hook; yarn needle to weave in ends
Size: Women’s S (M, L, 1X, 2X) or chest circumference of 34 (38, 42, 46, 50) inches
• Finished circumference (unstretched): 26 (29, 32, 35, 38) inches
• Finished length: 19>2 (20, 21, 22, 23) inches, not including ties
See the schematic in Figure 12-11 (the shape and measurements of the front are shown in bold; the back is indicated with dotted lines)
Gauge: 25 stitches and 40 rows per 4 inches in stockinette stitch, unstretched
Because you want this halter to stretch to fit you (and to stay where you want it to), you need to knit it smaller than your actual chest measurement. Choose the size that will fit you based on your chest circumference, and then follow the directions for that size.
Knitting the front
Cast on 100 (108, 118, 130, 140) sts.
Row 1 (RS): (K1, p1) 2 times, knit to last 4 sts, (p1, k1) 2 times.
Row 2 (WS): (P1, k1) 2 times, purl to last 4 sts, (k1, p1) 2 times.
Row 3 (RS): (K1, p1) 2 times, k2tog tbl, knit to last 6 sts, k2tog, (p1, k1) 2 times.
Row 4: Repeat Row 2.
Repeat these 4 rows 5 more times. 88 (96, 106, 118, 128) sts remain. The front should measure approximately 2K inches.
Switch to stockinette stitch (knit a row, purl a row), and work even until the piece measures 12 inches, ending with a purl row.
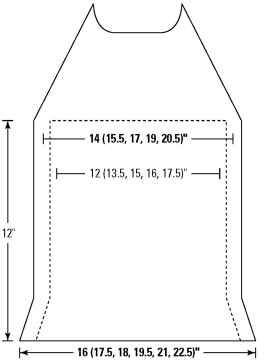
Figure 12-11:
The schematic for the halter top.
Underarm shaping
Bind off 4 (4, 5, 6, 6) sts at beginning of the next 2 rows. There are 80 (88, 96, 106, 116) sts. You now shape the angled sides of the top.
Next row (RS): K1, k2tog tbl, knit to last 3 sts, k2tog, k1.
Rows 1, 2, and 3: Work 3 rows in stockinette stitch, starting with a purl row.
Row 4 (Decrease Row) (RS): K1, k2tog tbl, knit to last 3 sts, k2tog, k1.
Repeat the last 4 rows 13 (13, 14, 15, 16) more times. There are 50 (58, 64, 72, 80) sts.
After the last decrease row, purl 1 row. The front measures approximately 6 (6, 6>2, 7, 7>2) inches from the beginning of the underarm shaping.
Neck shaping
K10 (11, 13, 16, 17), join a new ball of yarn and bind off center 30 (36, 38, 40, 46) sts, knit to end of row. There are 2 sets of 10 (11, 13, 16, 17) sts on the needle, each with an attached ball of yarn. The 2 sets of sts are worked at the same time, each using its own ball of yarn.
You continue shaping the outside edges of the halter while at the same time shaping the neck. Read through these steps before you continue knitting.
On the outside edges: Continue decreasing every 4th row as set at the outside edge of each piece. (You work the next decrease on the next RS row.)
At the same time, shape the neck by decreasing 1 st, 1 st in from neck edge, every RS row. To do so:
On the left side of the neck, end every RS row with k2tog, k1.
On the right side of the neck, start each RS row with k1, k2tog tbl.
Work in this way until 5 sts remain in each set of sts, ending with a purl row.
Work each side of the neck as follows:
Next row (RS): K1, sl 1, k2tog, psso, k1 (3 sts remain).
Next row: Sl 1, k2tog, psso. Cut the yarn and draw it through the last st to secure.
Making the back
Cast on 88 (96, 106, 112, 122) sts, and then work the back as you did the front starting with Row 1. When all decreases are complete, there will be 76 (84, 94, 100, 110) sts.
Work until the back measures 12 inches, ending with a purl row.
Bind off all sts.
Finishing your top
Sew together the front and back with mattress stitch (see the appendix for details on this stitch), leaving the lower 2>2 inches open at either side to create side vents. Beginning where the front and back meet at the left underarm, work a row of single crochet along the left front, across the neck opening, down the right front, and across the back. At the top of each shoulder, crochet a chain that’s 15 inches long. Now cut the yarn and pull it through the last stitch to secure. Weave in any remaining ends. How-to on crochet basics can be found in the appendix.
Short Row Scarf
You can make triangles without increasing or decreasing. You create the triangles in this scarf one at a time (using just one yarn at a time) with short rows. This unique scarf, shown in Figure 12-12, works with almost any yarn. Choose the same yarn in three colors, or choose yarns in the same color with a variety of textures for a different effect. Note that the width of your scarf will vary depending on the yarns you choose.
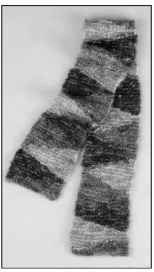
Figure 12-12:
Triangles come together to make a scarf.
New skill: Working short rows
A short row is really nothing mystical. Essentially, when you want to make a short row, you stop knitting somewhere midrow, turn around and knit back in the other direction. This technique was likely first discovered by someone whose knitting group distracted her, causing her to forget which direction she was knitting. Short rows really come in handy when you’re turning a sock’s heel or shaping the bust of a sweater, but this simple project introduces you to the technique.
When you’re knitting short rows, the section with the stitches that are left unknit when you turn around midrow and knit back are two rows shorter than the section with the neighboring stitches the next time you encounter them, which is why we call them short rows! That’s also why you get the pesky little holes associated with the short row technique.
Any discussion of short rows soon turns to wrapping, which involves winding the yarn horizontally around the base of the stitch where you turn so that you prevent a hole from forming. Do you need to wrap or don’t you? My opinion: I always wrap when I knit stockinette stitch, but I usually don’t in garter stitch. How big or visible the holes are depends on the yarn you’re using and how many rows per inch there are. It’s only a question of aesthetics, though. If you don’t like the looks of the little holes formed when you turn your short rows, you should try wrapping.
To wrap a stitch when you work a short row, follow these steps (and see Figure 12-13):
1. Work the number of stitches that are prescribed in the pattern.
2. Slip the next stitch purlwise from the left to the right needle.
3. Bring the yarn from back to front between stitches, and slip the stitch back to the left needle, still unworked.
4. Turn your work so that you’re ready to knit the next row, slip the first stitch purlwise, and start knitting (or purling) back.
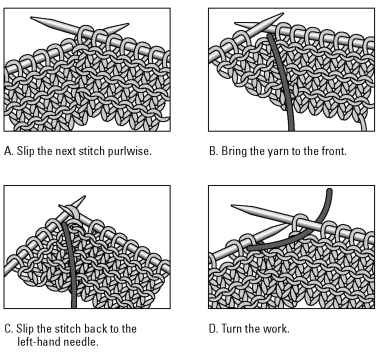
Figure 12-13:
Wrapping a stitch when working short rows.
The second step in short row wrapping is to pick up the wrap you made and knit it together with the wrapped stitch to minimize the hole. When you next encounter a wrapped stitch, follow these steps (and check out Figure 12-14):
1. Slip the wrapped stitch to the right needle without knitting it.
2. Stick the left needle into the horizontal wrap at the base of the stitch and then into the slipped (wrapped) stitch.
3. Knit these 2 stitches together.
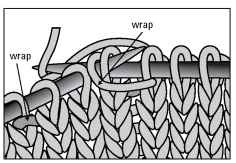
Figure 12-14:
Picking up and knitting the short row wrap.
Materials and vital statistics
Yarn: Curious Creek Fibers Etosha (90% kid mohair, 10% nylon); 220 yards (203 meters) per 50 grams
• Color A: Birches in Norway; 1 skein
• Color B: Purple Mountains Majesty; 1 skein
• Color C: Rock Grotto; 1 skein
Needles: US 11 (8 mm) needles, or the size needed to match gauge
Size: 6 inches wide by 60 inches long (see how the scarf is laid out in Figure
12-15)
Gauge: 13 stitches and 24 rows per 4 inches in garter stitch with 2 strands of yarn held together
When you knit this scarf, you only use one color at a time. It’s knit conventionally, from one short end to the other, but the short row technique allows you to create the triangles as you knit. The scarf begins and ends with triangles that are half as big as the main triangles to square the corners of the scarf. You always have 20 stitches on the needle, but you only knit a fraction of those stitches on most of the rows.

Figure 12-15:
This scarf is made up of triangles knit one at a time.
Directions
Always hold together 2 strands of yarn of the same color as you knit this scarf.
With color A, cast on 20 sts for the first triangle.
Rows 1, 3, 5, 7, and 9: Knit to the end of the row.
Row 2: K16, wrap next st and turn.
Row 4: K12, wrap next st and turn.
Row 6: K8, wrap next st and turn.
Row 8: K4, wrap next st and turn.
Row 10: Knit across all 20 sts, picking up wraps and knitting them together with the wrapped sts.
Use color B for the first full triangle (see Chapter 8 if you want more information about changing colors).
Row 1: Change colors, k4, wrap next st and turn.
Rows 2, 4, 6, 8, 10, 12, 14, 16, and 18: Knit to the end of the row.
Row 3: K8, wrap next st and turn.
Row 5: K12, wrap next st and turn.
Row 7: K16, wrap next st and turn.
Row 9: K20.
Row 11: K16, wrap next st and turn. Row 13: K12, wrap next st and turn. Row 15: K8, wrap next st and turn. Row 17: K4, wrap next st and turn.
Row 19: Knit across all 20 sts, picking up wraps and knitting them together with the wrapped sts.
Repeat these 19 rows, alternating between the 3 colors until the scarf reaches approximately 60 inches or your desired length.
Finish with the final triangle as follows:
Row 1: Change colors, k4, wrap next st and turn.
Rows 2, 4, 6, and 8: Knit.
Row 3: K8, wrap next st and turn. Row 5: K12, wrap next st and turn. Row 7: K16, wrap next st and turn.
Row 9: K20, picking up wraps and knitting them together with the wrapped sts. Row 10: Bind off loosely.
Finishing: Weave in loose ends and block if necessary (check out the appendix for more on blocking).
Harlequin Blanket
You can make a beautiful blanket with the same short row technique used in the previous pattern. A full-sized blanket is awe-inspiring, but consider the smaller size for a decorative throw or baby blanket (check it out in Figure 12-16).
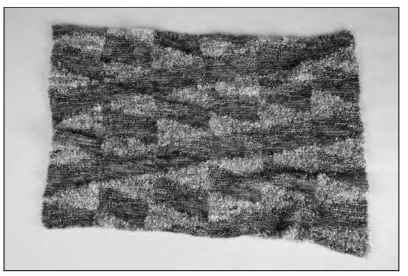
Figure 12-16:
A beautiful blanket made from triangles.
Sewing together a series of similar scarves or strips is one of my favorite ways to create a blanket. The knitting of each strip is no more cumbersome or daunting than knitting a single scarf, so you can easily take it with you. This method also allows you to divide and conquer a communal knitting project for a shower or special gift. And finally, I’m consoled when I remind myself that if I never manage to finish the blanket, I have several great scarves to give as gifts.
If you’re using yarns of different weights, try doubling a finer yarn, as I have with the Etosha. This makes it possible to knit different yarns at the same gauge. If you’re having trouble knitting to the same gauge with different yarns, it’s okay to use differently sized needles for each yarn.
Materials and vital statistics
Yarn: You need the following three yarns for this project:
• Yarn A: Curious Creek Fibers Etosha (90% kid mohair, 10% nylon); 220 yards (203 meters) per 50 grams; 4 (10) skeins; color: Savanna Grasses (note: this yarn is held double throughout)
• Yarn B: Curious Creek Fibers Kilimanjaro (95% mohair boucle, 5% nylon); 121 yards (111 meters) per 100 grams; 3 (9) skeins; color: Birches in Norway
• Yarn C: Curious Creek Fibers Shira (54% mohair, 23% silk, 18% wool, 5% nylon); 86 yards (79 meters) per 50 grams; 5 (14) skeins; color: Savanna Grasses
Needles: US 11 (8 mm) needles, or the size needed to match gauge Size: 36 by 42 (60 by 70 inches); see Figure 12-17 for the blanket layout Gauge: 11 stitches and 20 rows per 4 inches in garter stitch
This blanket pattern works well with almost any yarn combination. A monochromatic palette with a variety of textures is sophisticated, while an easy-care yarn in brightly contrasting colors creates a terrific baby blanket. For the smaller blanket you need about 360 yards of each yarn. For the full-size blanket, get 1,100 yards of each color.
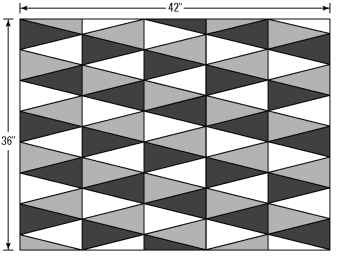
Figure 12-17:
A pleasing layout of triangles in three colors.
Directions
Follow the short row scarf pattern in the previous section to make 6 (10) scarves. Make each strip with 14 (26) full triangles as well as the starting and ending triangles. Each scarf should be approximately 36 (60) inches long.
To create the color arrangement seen in Figure 12-17:
Make 2 (4) scarves with the color sequence A, B, C.
Make 2 (3) scarves with the color sequence B, C, A.
Make 2 (3) scarves with the color sequence C, A, B.
Lay the completed strips next to one another. Using mattress stitch, seam the strips together. Weave in ends. (Get seaming advice in the appendix.)
