In This Chapter
Exploring different kinds of ribs Understanding and creating cables Getting to know lace patterns.Most of what you knit is made up predominantly of basic background stitches, such as stockinette or garter stitch (which I discuss in Chapter 5). Ribbing, cables, and lace are the icing on the cake, so to speak. Even if these stitches are used only as details, such as a couple of inches of ribbing or lace at the hem and cuffs or a single cable twisting up the front of a sweater, it’s these little details that give a finished piece its personality.
What’s really cool about the stitch patterns that I show you how to make in this chapter (and the jaw-dropping number of other stitch patterns that you can find in other topics and online) is that they’re often interchangeable. And swapping one stitch pattern for another is an easy way to create something that you can truly call your own. Altering the stitch patterns you use not only inspires your creativity, but it also keeps knitting interesting and fun, even if you want to rely on a set of tried-and-true patterns. Here are some suggestions to get you thinking about substitutions:
Think of a sweater with classic 2 x 2 ribbing at the hems and cuffs. What if you used the two-stitch rib instead? Or what about using the two-stitch twist miniature cables? You don’t have to alter the pattern’s numbers; you simply use the directions given in this chapter in lieu of the ribbing directions in the pattern.
Consider the loose rib wrap in Chapter 8. If you change the rib pattern or switch to a lace pattern, you’ve created your own design! For a piece like a wrap or scarf, it’s fine to add or subtract a few stitches to the cast-on so that your pattern comes out even. Let your imagination (and the yarn you’ve chosen) inspire you to experiment.
Be aware, though, that different stitch patterns can behave quite differently. For example, using two-stitch twist miniature cables rather than 2 x 2 ribbing may result in a rib that pulls in slightly more. It’s a good idea to swatch the different stitch patterns you’re considering to see how they’ll behave and to prevent unpleasant surprises.
If you’re substituting stitch patterns, verify that you’re working with a number of stitches that adds up correctly. Each stitch pattern in this chapter tells you how many stitches you need. For example, a multiple of 4 plus 2 means that you need a multiple of 4 (such as 12, 32, or 80) plus 2 extra stitches to keep the pattern symmetrical (so 14, 34, or 82).
Lining Up with Ribs
Ribs, in some sense, belong with the simplest stitches in Chapter 5 because, like those stitches, they’re made only of knit and purl stitches with no fancy footwork required. Whenever ribs are used, they create a strong (and flattering) vertical line that moves the eye up and down.
Ribs have function in addition to their form. They don’t roll, so they make great scarves and wraps. Additionally, ribs are the best way to create an elastic fabric that stretches and contracts. Because of this stretch, ribs are the most traditional choice for cuffs, collars, and the bottoms of sweaters. And a whole top worked in rib, such as the shell in Chapter 10, stretches to hug your curves.
The steps to working a rib pattern are essentially the same, regardless of the rib. All ribs are made by working knits and purls in regular columns, and they’re all easy to see or “read” once you get started. In other words, after you work the first couple of rows, it’s easy to see where the knits and purls should go.
Generally speaking, ribs are worked on smaller needles than you would normally use to knit stockinette stitch with the same yarn; knitting with smaller needles helps ribs look tidy and do their job (keeping your cuff out of your dinner plate or keeping wrist warmers in place). Patterns usually tell you which needles to use, but if you’re experimenting, remember that you may want to use smaller needles, typically two sizes smaller than you would for stockinette stitch.
Aside from getting off track and purling knits or knitting purls, the one common problem that comes up when knitters are learning to rib is that they bring the yarn over the needle rather than under when they’re moving the yarn from the knit position to the purl position and back again. Bringing the yarn over the needle results in a yarn over, which creates a hole — called an eyelet — and an extra stitch. (See Chapter 7 for more on yarn overs.)
In the following sections, I show you how to create two types of ribs:
True ribs: A true rib is a rib where the knits are always knit and the purls are always purled. True ribs can be broken down into two groups: even ribs, where the number of knits and purls is the same (knit 2, purl 2), and uneven ribs, where the number of knits and purls is different (knit 4, purl 2). Consider some of the differences:
• Small even ribs, such as 1 x 1 rib and 2 x 2 rib, are the hands-down winners of any sort of ribbing popularity contest. They’re both great at what they do: creating nice elastic fabrics that don’t roll and that go well with just about anything you can dream up.
You can make 3 x 3 ribs (as I have in the shawl collared coat in Chapter 10), 4 x 4 ribs, or even larger ribs, but the ribs will become less stretchy as they get larger.
• Though even ribs win the popularity contest, there’s no reason that the number of knits and purls must be the same in a rib pattern. Indeed, something a bit less regular is often more pleasing to the eye, especially if it’s going to cover a large space (for example, the loose rib wrap in Chapter 8). Try uneven ribs, such as 3 x 1, 4 x 2, or 5 x 3, as nice variations.
The larger your groups of stitches, the fewer ribs you’ll make, which means that a 5 x 3 rib will be less elastic than a 2 x 2 rib.
False ribs: Even though false ribs look like ribs, they don’t have the elasticity of true ribs. They make great choices for allover patterns, or you can use them to substitute for 2 x 2 rib in places where you’d prefer a straight clean line to an edge that pulls in.
While ribbing at the bottom of a sweater is a classic look, many times you don’t really want your sweater to be tighter at the bottom. For women especially, a straighter line gives a more contemporary and flattering look. If you want to keep the classic ribbed look without it fitting like a cinched sack, use a false rib pattern like broken rib or two-stitch rib.
1 x 1 rib
A 1 x 1 rib is a very elastic rib with a subtle texture. In its relaxed state, from both sides you see mostly the knit stitches with the purls hiding behind them. This rib is a great choice for the bottom of a hat or the cuff of a fine-gauged sweater. You can see a 1 x 1 rib in Figure 6-1.
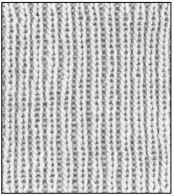
Figure 6-1:
Knit 1, purl 1 creates a classic rib.
Follow these steps to work 1 x 1 rib when you’re knitting flat. To practice with a swatch, cast on any odd number of stitches:
Right-side (RS) rows: *K1, pi, repeat from * to last st, kl. Wrong-side (WS) rows: *P1, k1, repeat from * to last st, p1. Repeat these 2 rows for the pattern.
To knit 1 x 1 rib in the round (see Chapter 11 for details on knitting in the round), use any even number of stitches and knit as follows:
All rounds: *K1, p1, repeat from * to end of round.
2 x 2 rib
Knit 2, purl 2 rib, or 2 x 2 rib, shown in Figure 6-2, is a great rib choice for scarves, hats, socks, and sweaters. This ribbing is elastic, so it easily stays snugly in place and stretches enough to allow you to put the garment on.
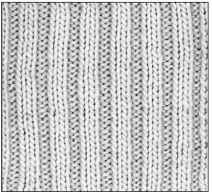
Figure 6-2:
2 x 2 rib adds stretch where you need it.
Follow these steps to work 2 x 2 rib when you’re knitting flat. To practice with a swatch, cast on a multiple of 4 stitches plus 2 more (which makes your piece symmetrical, beginning and ending with 2 knits) and work as follows:
Right-side (RS) rows: *K2, p2, repeat from * to last 2 sts, k2. Wrong-side (WS) rows: *P2, k2, repeat from * to last 2 sts, p2. Repeat these 2 rows for the pattern.
If you’re knitting in the round, you need a multiple of 4 stitches for things to work out evenly. Knit as follows:
All rounds: *K2, p2, repeat from * to end of round.
4 x 2 rib
An example of an uneven rib, 4 x 2 rib, is shown in Figure 6-3. This rib isn’t quite as stretchy as 1 x 1 or 2 x 2 rib, but it still performs nicely on a cuff or collar. It’s also a great choice for any scarf, wrap, or stole that you care to dream up.
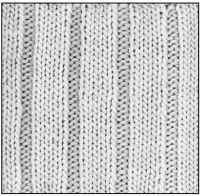
Figure 6-3:
4 x 2 rib creates strong vertical lines.
To work 4 x 2 rib when you’re knitting flat, use a multiple of 6 stitches plus 4 to make it symmetrical and work as follows (you can make a swatch to practice):
Right-side (RS) rows: *K4, p2, repeat from *to last 4 sts, k4. Wrong-side (WS) rows: *P4, k2, repeat from *to last 4 sts, p4. Repeat these 2 rows.
To knit 4 x 2 rib in the round, use a multiple of 6 stitches and knit as follows:
All rounds: *K4, p2, repeat from * to end of round.
Broken rib
Knitting has its share of stitches with poetic or funny names. For instance, how can you knit something called broken rib without suppressing a laugh? What’s broken in this rib (which is a false rib) is the pattern. Only every other row is actually ribbed, making this one quicker and easier to knit than most ribs. It lays flat and has an interesting, though different, look on each side. See an example of broken rib in Figure 6-4.
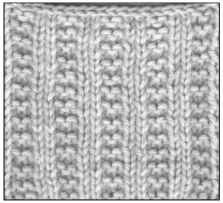
Figure 6-4:
Broken rib is a type of false rib.
Follow these steps to work broken rib when you’re knitting flat. To practice with a swatch, cast on a multiple of 4 stitches plus 2 and work as follows:
Row 1: *K2, p2, repeat from * to last 2 sts, k2. Row 2: Purl.
Repeat these 2 rows for the pattern. To work broken rib in the round, use a multiple of 4 stitches and knit as follows: Round 1: *K2, p2, repeat from * to end of round.
Round 2: Knit.
Repeat these 2 rounds for the pattern.
Two-stitch rib
Two-stitch rib, which is a false rib, is the love child of 2 x 2 rib and seed stitch (see Chapter 5 for more about this stitch). With this rib pattern, you work knit 2, purl 2 all the time, but you always knit the purls and purl the knits, just like you do in seed stitch. As you can see in Figure 6-5, the result is a highly textured pattern with a strong vertical element. The finished fabric from a two-stitch rib looks the same on both sides and lays flat, so it’s a nice choice for a scarf. Its rugged look also makes it a great choice for men’s knits.
Follow these directions to work two-stitch rib when you’re knitting flat. To practice with a swatch, use a multiple of 4 stitches plus 2 and work as follows:
For all rows: *K2, p2, repeat from * to last 2 sts, k2.
To work two-stitch rib in the round, use a multiple of 4 stitches and knit as follows:
Round 1: *K2, p2, repeat from * to end of round. Round 2: *P2, k2, repeat from * to end of round. Repeat these 2 rounds for the pattern.
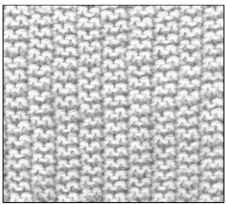
Figure 6-5:
Two-stitch rib combines 2 x 2 rib with seed stitch.
Twisting Away with Cables
Cables are one of the magic parts of knitting. They’re beautiful to look at and are unique to the craft. Just think of those classic sweaters from the Aran Isles. Cables may look complicated, especially when they’re grouped together, and you may feel intimidated by them. But the truth is that after you know the secret to cable construction, you’re good to go — even rookie knitters can master basic cables in no time. Practice some of the cables presented in this section as swatches, or dive right into some of the cabled variations of the projects presented in this topic: the cabled variation of the basic beanie in Chapter 11 or the kid’s top with a horseshoe cable up the front in Chapter 13.
The secret to cables lies in knitting stitches out of order. This sleight of hand creates the twists and turns that make up all cables, from simple to complex. The tiniest cables, or twists, can be knit without any extra tools, but for most cables, it’s easier if you use a cable needle (which may be abbreviated as “cn” in patterns). You can see the different types of cable needles in Chapter 1. Which one you use is only a question of personal preference or what you have on hand.
If you don’t have a cable needle handy, use a short double-pointed needle of approximately the same gauge as the needles that you’re knitting on. A pencil or an unbent paperclip will also do in a pinch!
Here are a few things to know about crafting cables:
Cable twists are usually made with an even number of stitches: 4, 6, 8, 12, or even more. Half of the stitches cross in front (or behind) the other half each time you turn the cable.
A cable looks great on its own, but putting two or more next to one another leads to more intricate-looking designs. Horseshoe cables and chain cables (both of which I describe later in this chapter) are composed of two basic cables that are placed directly next to each other.
You don’t have to turn the cable every row; instead, you turn it every few rows. Here’s a rule of thumb: Turn your cable according to how many stitches are in it. For instance, if there are 4 stitches in the cable, turn it every 4th row. If there are 8 stitches in a cable, turn it every 8th row. And remember that you should always turn your cables on the right side (or public side) of your piece.
You control the twist of a cable by placing the stitches that are held on the cable needle to the front or the back of the work to wait their turn to be knit.
A cable that looks like it twists to the right is made by holding the stitches to the back. A left-twisting cable is made by holding the stitches to the front.
You don’t need to do any extra twisting when it comes to cables. So, remember to slip your stitches purlwise onto the cable needle, and be sure that the knit side of the stitches on the cable needle is showing when you go to knit them.
Cables show up best on light colors. Imagine cream-colored Aran sweaters; the cables show up well on these. If you use black or a dark color, however, the cables are more difficult to see.
Cable directions, like other knitting instructions that have several steps, may be confusing to read the first couple of times. Honestly, deciphering the directions is more difficult for some people than actually turning the cable. Reading through the directions slowly, doing what they say while you read them, can be helpful. Some knitters find the written directions easiest to follow and others prefer the graphic representation of a chart, so I’ve included both for the cables in the following sections. (I discuss chart reading basics in Chapter 4.)
If you’re having trouble managing the needles and reading the directions at the same time, have someone else read the directions aloud so you can concentrate on moving the needles. It’s actually pretty funny to listen to a non-knitter read directions, so feel free to get any handy family member or friend to help you out.
Two-stitch twist
The two-stitch twist is a total cheater cable. It’s easy to work and makes an interesting stand-in for 2 x 2 rib (see it for yourself in Figure 6-6). Try it out in the wrist warmers project in Chapter 11.
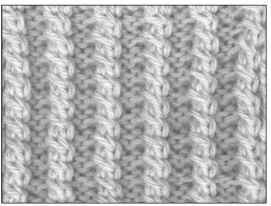
Figure 6-6:
Two-stitch twists worked in a rib pattern.
Because cables are made by knitting stitches out of order, with the two-stitch twist you knit with a slightly unorthodox technique that allows you to work without a cable needle. It feels a bit like a contortion act the first few times you do it, but soon you’ll be making mini cables quickly.
The two-stitch twist technique creates a two-stitch left twist, which I abbreviate as “LT.” Here’s how to do it:
1. Ignore the first stitch on the left-hand needle for a moment and put the right-hand needle into the back of the second stitch on the needle.
Knit this stitch through the back loop, but don’t drop it off the left-hand needle.
2. Bring the needle back around to the front and knit the first stitch normally through the front loop.
3. Drop both stitches from the left-hand needle.
4. Repeat Steps 1-3 each time you need to work a twist.
Here’s how to work the two-stitch twist rib pattern shown in Figure 6-6 (and charted in Figure 6-7). To practice, cast on a multiple of 4 stitches plus 2 to knit it flat and follow these steps:
Right-side (RS) rows: *LT, p2, repeat from * to last 2 sts, LT. Wrong-side (WS) rows: *P2, k2, repeat from * to last 2 sts, p2. Repeat these 2 rows for the pattern.
To work the two-stitch twist pattern when knitting in the round (see Chapter 11 for details on knitting in the round), use a multiple of 4 stitches and knit as follows:
Round 1: *LT, p2, repeat from * to end of round. Round 2: *K2, p2, repeat from * to end of round. Repeat these 2 rounds to form the pattern.
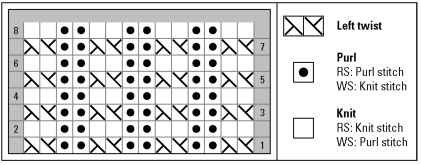
Figure 6-7:
A chart of the two-stitch twist.
Four-stitch cables
Four-stitch front and back cables (abbreviated as C4F and C4B, respectively) are small enough that they can be used as an allover pattern without overwhelming the piece. Remember that C4F looks like it’s twisting to the left and C4B looks like it’s twisting to the right, as you can see in Figure 6-8.
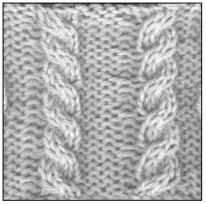
Figure 6-8:
Four-stitch front cable (on the left) and four-stitch back cable (on the right).
To work a four-stitch front cable, follow these steps when you come to the direction C4F in a pattern:
1. Slip the next 2 stitches on the left-hand needle to the cable needle and hold the cable needle to the front of the work.
2. Knit 2 stitches from the left-hand needle.
3. Knit 2 stitches from the cable needle.
Likewise, to turn a four-stitch back cable, follow these steps when you come to the direction C4B in a pattern:
1. Slip the next 2 stitches on the left-hand needle to the cable needle and hold the cable needle to the back of the work.
2. Knit 2 stitches from the left-hand needle.
3. Knit 2 stitches from the cable needle.
To knit a swatch and practice making these cables, cast on 20 stitches and follow these directions or the chart in Figure 6-9:
Rows 1 and 3 (WS): *K4, p4, repeat from * to last 4 sts, k4.
Row 2 (RS): *P4, k4, repeat from * to last 4 sts, p4.
Row 4 (turning row) (RS): P4, C4B, p4, C4F, p4.
Repeat these 4 rows until you get the hang of turning cables.

Figure 6-9:
C4Fand C4B, charted.
Six-stitch cables
A six-stitch left-twisting cable (abbreviated as C6F) and a six-stitch right-twisting cable (abbreviated as C6B) will be a piece of cake if you’ve already practiced with four-stitch cables because you follow the same basic steps (see the previous section for more information). Figure 6-10 shows a left-twisting cable; Figure 6-11 shows a right-twisting cable. In a bulky yarn, a single six-stitch cable can be enough to get attention on a scarf, or you can try several on the cabled beanie variation in Chapter 11.
Here’s what you need to do to work a six-stitch cable when you come to the direction C6F or C6B in a pattern:
1. Slip 3 stitches to the cable needle.
2. Bring the cable needle with its 3 stitches to the front of the work for C6F (or to the back for C6B).
Just let the needle hang there. You don’t need to hold it. If your stitches begin to slip off the cable needle, use a larger one.
3. Knit the next 3 stitches from the left-hand needle.
Slide the stitches on the left-hand needle over a bit so they aren’t in danger of falling off the tip, and then drop the left-hand needle.
4. Pick up the cable needle with your left hand, and without twisting it (the knit side of the stitches will face you), knit the 3 stitches from the cable needle.
5. Put down the cable needle, pick up the left-hand needle, and finish the row.
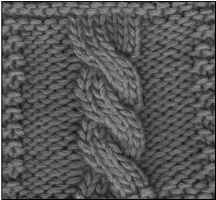
Figure 6-10:
A six-stitch left-twisting cable.
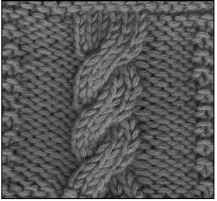
Figure 6-11:
A six-stitch right-twisting cable.
That’s it! Repeat the cable as specified in your pattern. You can practice six-stitch cables by creating a swatch of the horseshoe cable in the following section.
Horseshoe cable
Combining cables can lead to all sorts of interesting effects. For instance, by working a left cable and a right cable next to each other, you create the cool cable shown in Figure 6-12, called a horseshoe cable. If you work the right cable first, you make a horseshoe that points up; if you work the right cable last, you make a horseshoe that points down.
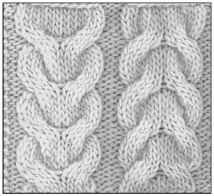
Figure 6-12:
Horseshoe cables.
Horseshoes can be worked over larger or smaller groups of stitches, but 12 stitches (two six-stitch cables) or 8 stitches (two four-stitch cables) are typical choices. To make the horseshoe cable shown on the left in Figure 6-12, you need 12 knit stitches on a background of purl stitches. Even though there are 12 stitches total involved in the horseshoe, each cable uses 6 stitches, so you turn the cables every 6th row.
To practice this horseshoe, cast on 18 stitches. Follow the directions given here, or look at Figure 6-13:
Rows 1 and 3: P3, k12, p3.
Rows 2 and 4: K3, p12, k3.
Row 5 (turning row): P3, sl 3 sts to cn, hold cn to back, k3, k3 from cn, sl 3 sts to cn, hold to front, k3, k3 from cn, p3.
Row 6: K3, p12, k3.
To finish your swatch, repeat the 6 rows of the pattern until you’ve mastered the horseshoe cable.
To make your horseshoe cable point the other direction, as shown on the right side of Figure 6-12, work everything exactly the same, except for the turning row. At the turning row, you knit the cable the opposite way — that is, working the front cable first and the back cable second, like this:
Row 5 (turning row): P3, sl 3 sts to cn, hold cn to front, k3, k3 from cn, sl 3 sts to cn, hold to back, k3, k3 from cn, p3.
Wave cable and chain cable
Wave cables, like the basic cables that I describe earlier in this chapter, can be worked singly, in pairs, or as an allover pattern. Instead of always twisting the cable one way, alternating front and back cable twists causes the line of stitches to wave back and forth. Two wave cables next to one another form a chain cable as shown in the center of Figure 6-14.

Figure 6-13:
Charting a horseshoe cable.
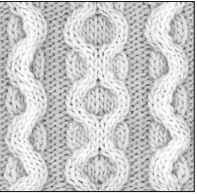
Figure 6-14:
Two wave cables flank a chain cable.
Practice making a single wave cable by casting on 12 stitches (6 stitches for the cable and 3 purl stitches on either side). After casting on, follow these directions (the same information is presented in chart form at the right side of Figure 6-15):
Rows 1 and 3: P3, k6, p3. Rows 2, 4, and 6: K3, p6, k3.
Row 5 (turning row): P3, sl next 3 sts to cn and hold to back, k3, k3 from cn, p3. Rows 7 and 9: P3, k6, p3. Rows 8, 10, and 12: K3, p6, k3.
Row 11 (turning row): P3, sl next 3 sts to cn and hold to front, k3, k3 from cn, p3. Repeat these 12 rows for the wave cable pattern. After you’ve got it down, bind off.
To work a chain cable, as shown in the center of Figure 6-14, make two wave cables next to one another. To practice a chain cable, cast on 18 stitches and knit as follows (refer to Figure 6-15 for the charted directions):
Row 1 and 3: P3, k12, p3. Rows 2, 4, and 6: K3, p12, k3.
Row 5 (turning row): P3, sl 3 sts to cn and hold to back, k3, k3 from cn, sl 3 sts to cn and hold to front, k3, k3 from cn, p3.
Rows 7 and 9: P3, k12, p3.
Rows 8, 10, and 12: K3, p12, k3.
Row 11 (turning row): P3, sl 3 sts to cn and hold to front, k3, k3 from cn, sl 3 sts to cn and hold to back, k3, k3 from cn, p3.
Repeat these 12 rows to create a chain cable. When you’ve got the hang of chain cables, bind off.
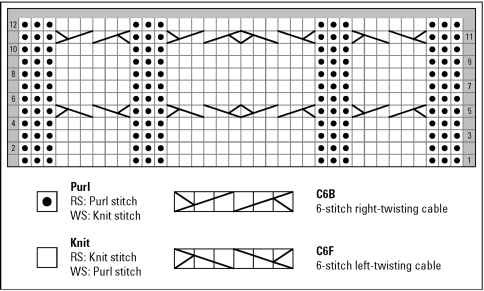
Figure 6-15:
A chart of two wave cables and a chain cable.
Seeing Through Your Knitting with Lace
Lace is a beautiful way to make your knitting spectacular. Lace patterns can range from simple to complex, but they all rely on the same basic maneuvers:
Yarn overs (abbreviated as “yo”) create the eyelets in lace. Because yarn overs are increases, using them without decreases causes your piece to grow, which is how a simple piece like the lacy shawl in Chapter 12 is created.
Lace patterns typically combine yarn overs with decreases to balance out the extra stitches, keeping the stitch count constant. Lace usually uses k2tog (knit 2 together) to slant to the right and ssk (slip, slip, knit) to slant to the left. In some lace patterns the stitch count changes from row to row, but in the patterns I discuss in this section, the stitch counts don’t change, which makes it easier to stay on track.
In the following sections, I explain how to make yarn overs, decreases, and double decreases — all important to making lace. I also show you how to make several different beautiful lace patterns: openwork, feather and fan, climbing vine lace, and arrowhead lace.
Yarn overs
A yarn over is an increase that creates a hole. Knitters call this decorative hole an eyelet (check out Figure 6-16 for an example). Chances are you made lots of yarn overs when you first tried ribbing, but at that point you called them mistakes. The British call the yarn over “yarn forward.” Knowing this fact may help you remember what to do with the yarn.
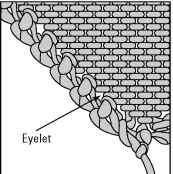
Figure 6-16:
A yarn over creates a hole called an eyelet.
When you come to the spot in your pattern where you make a yarn over (abbreviated “yo” in pattern directions), follow these steps (and check out Figure 6-17):
1. Between 2 knit stitches, bring the yarn forward, as if to purl.
2. Insert the needle into the next stitch knitwise, and knit it.
The working yarn comes up over the right-hand needle and lies diagonally between 2 stitches. You’ve made an extra stitch, and knit the next stitch. Note that the stitch after the yarn over may be something other than a knit, so be sure to look ahead and see what comes next before working your yarn over. The important thing is that you’ve formed a loop of yarn over your right-hand needle.
3. In the next row, knit this new stitch normally.
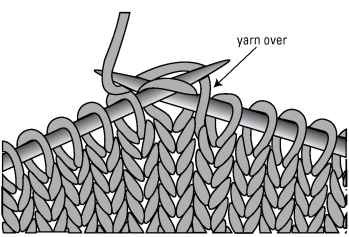
Figure 6-17:
Making a yarn over.
Common decreases used in lace
To make a right-slanting k2tog (as shown in Figure 6-18), follow these steps:
1. Insert the right needle through 2 stitches from left to right, just as you would to knit a single stitch.
2. Wrap the yarn around the right-hand needle as usual and knit the 2 stitches together.
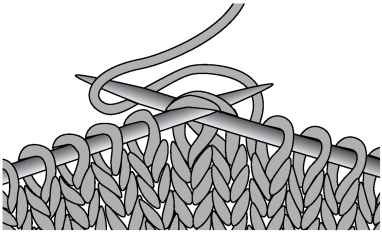
Figure 6-18:
The k2tog stitch slants to the right.
To make a right-leaning decrease when you’re purling, you purl 2 stitches together (p2tog) as follows:
1. Insert the right needle through 2 stitches from right to left, just as you would to purl a single stitch.
2. Wrap the yarn around the right-hand needle as usual and purl the 2 stitches together.
Use these steps to decrease with a left-slanting ssk (slip, slip, knit):
1. Slip 1 stitch knitwise.
2. Slip the next stitch knitwise.
3. Slip the left needle through both slipped stitches from the left so that it crosses in front of the right needle, and then wrap the yarn as usual and knit the 2 stitches together.
You can see how an ssk is worked in Figure 6-19.
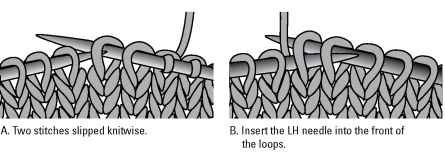
Figure 6-19:
Working the left-slanting ssk stitch.
Double decreases
In knitting, sometimes you need to get rid of 2 stitches at once, particularly in lace patterns. There are a couple ways to remove 2 stitches at once, but usually in lace patterns you see sk2p, which stands for slip 1, knit 2 together, pass the slipped stitch over. This technique combines a left- and right-slanting decrease to get rid of 2 stitches at once. To work this double decrease, you follow three steps:
Slip 1: Slip 1 stitch, as if to knit, to the right-hand needle without knitting it. K2tog: Knit the next 2 stitches together.
Psso (pass the slipped stitch over): Use the tip of the left-hand needle to bring the slipped stitch (the second stitch on the right-hand needle) up and over the first stitch on the right-hand needle.
Other essential lace know-how
Knitting lace requires you to pay attention. If you skip a yarn over or a decrease, your pattern won’t line up; with lace, unfortunately, mistakes show. But for this topic, I’ve chosen lace patterns that aren’t so difficult to follow. There aren’t that many stitches or rows in a pattern repeat, and I’ve intentionally picked patterns that have wrong-side rows without any increases or decreases. I find that plain wrong-side rows really help if you ever have to rip back to correct an error. Also, the patterns all have constant stitch counts. So, you can go through and count your stitches at any time to see if something has gone wrong. If you suspect an error, here’s the general rule: One stitch too many usually means that you’ve skipped a decrease. One stitch too few, on the other hand, suggests that you’ve forgotten a yarn over.
Understanding how to read your knitting is an essential skill for correcting errors. Like anything else, reading your work takes practice. If your lace seems to have gone off track, start at the right-hand side of your row of knitting and read across. For example, your knitting might go something like this: “Knit 2, k2tog (you can see 2 stitches knit together), yarn over (the yarn lies diagonally over the needle), knit 3, yarn over (another diagonal stitch), ssk (2 stitches together) . . .” Compare your reading to the written pattern to keep yourself lined up. Reading your knitting takes time and effort at first, but the better you become at it, the easier it will be to find and correct errors — and then you’ll become a more self-reliant knitter.
Like cables and color patterns, lace often is presented in chart form. Once knitters become familiar with the symbols used, many find that a chart is easier to follow than written directions for lace because you can visualize the lace and begin to understand how the yarn overs and decreases create the pattern. Both charts and line-by-line instructions are presented in this topic, so use whichever one comes more naturally for you. If you haven’t worked from charts before, you can find out the basics of chart reading in Chapter 4.
Openwork
Openwork is made up of the simplest lace unit (a yarn over and a decrease) worked over and over again (see Figure 6-20). On its own, openwork can create a lovely shawl or scarf, or it can form part of a larger piece as it does in the box top pattern in Chapter 8.
Lots of openwork variations exist, but practice making the one pictured in Figure 6-20 (and charted in Figure 6-21) by casting on any odd number of stitches:
Row 1: K1, *yo, k2tog, repeat from * to end. Rows 2 and 4: Purl.
Row 3: *K2tog, yo, repeat from * to last st, k1.
Repeat these 4 rows to form the pattern, and bind off your swatch when you have the hang of it.
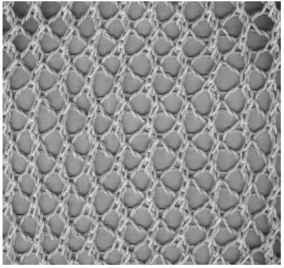
Figure 6-20:
Openwork is a good introduction to lace knitting.
Feather and fan
Feather and fan, or Old Shale, creates an undulating line that’s great for borders, blankets, or wraps. There are many variations, but they all rely on a group of increases followed by a group of decreases to form the waves of the pattern that you see in Figure 6-22. This pattern is lovely in any sort of yarn, but if you use a yarn that shifts colors, or if you change yarns at every pattern repeat, you accentuate the rippled effect of the pattern.
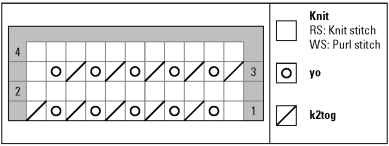
Figure 6-21:
A chart of the openwork pattern.
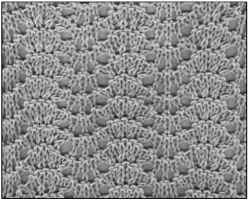
Figure 6-22:
Feather and fan is a beautiful pattern with dozens of variations.
Because the increasing and decreasing only happens every 4th row in this pattern, feather and fan gives you a chance to catch your breath between the lace rows, making it a good choice for beginners.
The following version of feather and fan, shown in Figure 6-22 and charted in Figure 6-23, requires a multiple of 11 stitches:
Row 1: Knit.
Row 2: Purl.
Row 3: *K2tog, k2tog, yo, k1, yo, k1, yo, k1, yo, k2tog, k2tog, repeat from * to end. Row 4: Knit.
Repeat these 4 rows for the pattern.

Figure 6-23:
Feather and fan charted.
If you would like to practice this stitch pattern, cast on 22 stitches with a thicker yarn or 33 stitches with a thin one to make a beautiful, feminine scarf. Follow the directions until the piece measures 60 inches or the desired length.
Climbing vine lace
The climbing vine lace pattern, shown in Figure 6-24, features a strong vertical element. You can use it as a substitute on the lacy V-neck top in Chapter 14, or you can use this lace pattern instead of the rib pattern on the loose rib wrap in Chapter 8. Because you need a multiple of 8 stitches plus 3 for climbing vine lace, try casting on 59 or 67 stitches for the wrap.
The pattern (charted in Figure 6-25) is composed of 4 rows. The wrong-side rows are plain with the exception of the single knit stitch in each repeat. The rest of the pattern is pretty straightforward, and with practice, you’ll soon fall into its rhythm. Note the double decrease on Row 3; I explain how to make a double decrease earlier in this chapter. Here’s how to knit the climbing vine lace:
Row 1 (RS): K1, p1, *k2tog, yo, k3, yo, ssk, p1; repeat from * to last st, k1. Row 2 (WS): P1, *k1, p7; repeat from * to last 2 sts, k1, p1. Row 3 (RS): K1, p1, *k2, yo, sk2p, yo, k2, p1; repeat from *, k1. Row 4 (WS): P1, *k1, p7; repeat from * to last 2 sts, k1, p1. Repeat these 4 rows for the pattern.
To practice the climbing vine lace pattern with a swatch, cast on 27 stitches. Work through the 4 rows of the pattern until the swatch measures 6 inches, and then bind off.
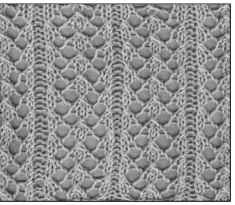
Figure 6-24:
Climbing vine lace.
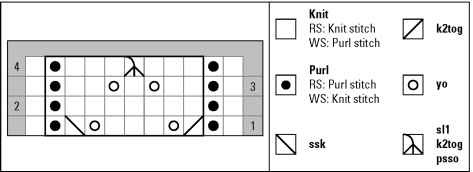
Figure 6-25:
Climbing vine lace chart.
Arrowhead lace
Arrowhead lace, shown in Figure 6-26, features arches that recall leaves or arrowheads. This lace pattern can be substituted directly into the lacy V-neck top pattern in Chapter 14 to vary the look. Or you can try it alone to create a beautiful scarf or stole.
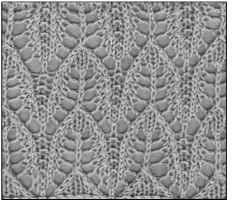
Figure 6-26:
Arrowhead lace.
Note the double decrease in Row 6 (I explain how to make this decrease earlier in this chapter). Using a multiple of 8 stitches plus 3 (see Figure 6-27), follow these directions:
Row 1 and all WS rows: Purl.
Row 2 (RS): K2, *yo, ssk, k3, k2tog, yo, kl, repeat from * to last st, kl.
Row 4 (RS): K3, *yo, ssk, kl, k2tog, yo, k3, repeat from * to end.
Row 6 (RS): Kl, pl, *k2, yo, sk2p, yo, k2, pl, repeat from * to last st, kl.
Rows 8, 10, and 12 (RS): Kl, pl, *ssk, (kl, yo) twice, kl, k2tog, pl, repeat from * to last st, kl.
Repeat these l2 rows for the pattern.
To practice the arrowhead lace pattern and create a scarf, cast on 27 stitches with a fine or sport weight yarn and US 5 needles. Or consider making a stole by casting on 67 stitches. Repeat the l2 rows of the pattern until your scarf or stole measures 60 inches or your desired length, binding off after Row l2.
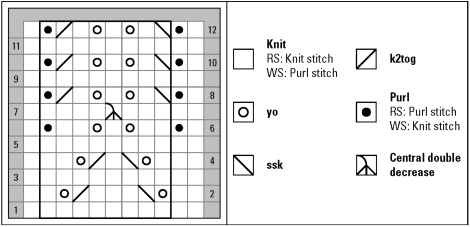
Figure 6-27:
Arrowhead lace chart.
