Even when you’ve been knitting for a while, you may find yourself needing a refresher on how to accomplish basic tasks, such as casting on, knitting, purling, and binding off. This topic gives you guidance on these fundamentals (organized in alphabetical order for easy reference) as well as on a few tasks to finish your knitting in style.
Binding Off
Binding off, or casting off as some knitters call it, is what you do when you’re done with your knitting. You usually bind off at the end of a piece, but sometimes you bind off in the middle of a piece when you need to get rid of some stitches. To bind off (abbreviated as “BO” in some patterns), follow these steps:
1. Knit the first 2 stitches on the left-hand needle.
There are 2 stitches on the right needle.
2. Insert the tip of the left-hand needle into the first stitch (the stitch on the right) on the right-hand needle, as shown in Figure A-1a.
3. Bring this stitch up and over the second stitch on the right-hand needle and off the needle, leaving 1 stitch on the right needle as shown in Figure A-1b.
4. Knit the next stitch so that there are again 2 stitches on the right-hand needle.
5. Repeat Steps 2-4 until the necessary number of stitches are bound off.
If you’re at the end of a piece, cut the yarn, leaving a tail at least 6 inches long. Bring this tail through the last stitch, pulling it to secure the last stitch.
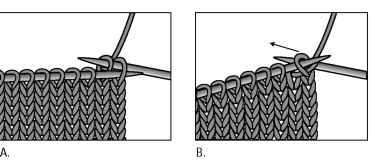
Figure A-1:
Binding off.
Blocking
Blocking sounds fancier than it really is, which either scares people off or sends them running to pricy dry cleaners to have them do the job. In plain terms, blocking involves some water (spritzing, steaming, or soaking) and more or less prodding and pinning things into shape. Then you allow the knitted piece to dry. Sounds pretty easy, right? After reading the directions for light and serious blocking in the following sections, you’ll see why blocking is something you can (and should!) do yourself.
Before you block anything, keep these guidelines in mind:
Don’t expect miracles. Someone may tell you that you can block a garment to fit or that you can block rolled edges. This is only a little true. You can make things smoother and you can even out some irregularities. And, depending on the type of yarn, you can make the garment a bit bigger in some spots and a bit smaller in others. Things look better blocked, it’s true. But don’t expect blocking to make up for the fact that the back is 4 inches longer than the front or that you knit something two sizes too small. You also can’t force stockinette stitch edges not to roll with blocking.
Avoid blocking with heat. Some people block garments by steaming them with an iron (not actually touching the knitting) or a steamer. This method dries faster than wet blocking, but I’m too squeamish most of the time to get a hot iron so close to my hard work. Wool, cotton, and some blends can take the heat, but anything fuzzy (mohair), synthetic (any novelty yarn), or highly textured (cables) is best served by wet blocking. Any damage you do with water can usually be undone. Damage you do with heat, however, may be permanent. Let your degree of risk aversion guide you in deciding.
Find out whether your yarn is colorfast. A few yarns out there aren’t colorfast. If you’ve done color work (see Chapter 7), test the colorfastness of the yarn before getting the completed garment wet. I guarantee you that it’s better to spare yourself the agony of finding out the hard way! Take lengths of the yarn you used (in all of the colors), wet them, and then wrap them in a white cloth or paper towel and let them dry. Check for any signs of bleeding. If you think the yarns aren’t colorfast, you’ll have to send the piece to the dry cleaner.
Always read the yarn label. Not only does the label provide important info about the yarn’s gauge and yardage, but it also serves as your knit’s care tag. (See Chapter 18 for more on caring for your knits.)
It’s up to you to decide when to block your piece. Blocking the components (sleeves, front, back) separately can make them easier to sew up, but this is strictly dealer’s choice. You can also block a piece when it’s complete or any time you wash it.
Light blocking
If your finished piece looks pretty good and just has some hints of unevenness, such as a scarf or shawl with edges that aren’t quite straight, you’ll probably be happy with light blocking, which is the quicker approach. To block a piece lightly, follow these steps:
1. While the piece is still dry, gently pull it in all directions; this stretching helps even out the stitches.
You don’t want to be rough, but it’s definitely okay to tug. Be judicious with fragile yarns, though.
2. Lay a couple of towels on any surface large enough to hold the finished piece.
This surface may be your ironing board, your kitchen table, your guest bed, or even the floor. If you have a blocking board (a special board with a measured grid on it), use it.
3. Put the knitted piece on top of the towels (any stockinette stitch should be right side down, and anything textured should be right side up).
4. Using a spray bottle filled with plain water, spritz the knit liberally, particularly in any problem areas.
5. Use your hands to mold the piece into shape as needed — neatening cables, opening lace, and making things nice and smooth.
As with wet blocking (see the next section), you can use rustproof pins or blocking wires to hold your piece in place while it dries. But for many pieces you can simply pat them into place and move on to the next step.
6. Leave your piece there to dry.
The amount of drying time is extremely variable. Synthetics dry quicker than natural fibers, and thinner pieces dry faster than thicker ones. Assume that it will take most of a day for your knit to dry completely, but it can take even longer in damp weather. Resist temptation and leave the piece flat until it’s completely dry.
Wet blocking
Wet blocking is a bit more serious than a little spritzing and patting. Any garment that’s made of several pieces will surely benefit from wet blocking (as will any piece that features lace, color work, or cables). Okay, pretty much everything looks better and fits better after wet blocking. But, if you just can’t stand waiting three days for your new knit to dry, you can skip blocking and wear it for a while. Just be sure to wash and block your knit using the following steps before you put it away for the winter:
1. While the piece is dry, tug it gently into shape, pulling it lengthwise and widthwise.
If the piece is finished, try it on and note any problem areas. If the neckline seems wonky or the sleeves are an inch too short, you may be able to correct these as you block.
2. Fill the sink with water.
Use water that’s lukewarm or room temperature, and more important, don’t change water temperature when you rinse. Doing so can cause wool to felt.
3. If you want, give your sweater a wash.
Even a new sweater may benefit from a wash if it’s been dragged around in your knitting bag for several months! You can read all about washing your knits in Chapter 18.
4. Let your knit soak for 10 to 20 minutes.
5. Drain the water from the sink, but leave the knit in, allowing the water to drain from it.
Pressing gently on your knit is okay, but don’t wring or squeeze it. Don’t let any part of your knit get pulled into the drain!
6. Pick the piece up from the bottom and place it on a large towel.
Don’t pick the garment up by one sleeve; instead, support the whole thing from the bottom. A wet knit is very heavy, and the wet yarn can be more susceptible to damage. You risk stretching (or worse) if you don’t support the weight of the garment as you remove it from the sink.
7. Roll up the towel and then gently squeeze to remove some of the extra water.
At this point, you aren’t trying to dry the sweater; you’re simply getting it to the no-longer-dripping stage.
8. Put the piece onto a blocking board or more dry towels.
9. Looking at the pattern schematic, gently stretch and pat the piece to the correct measurements (be sure to grab a tape measure!).
You’ll be surprised at how malleable your wet knit is! Start with the width at the chest, and then work on the length. Don’t stretch any ribbing out too much if you want it to remain elastic. Finish with the neckline and collar, neatening the edges and moving things into place. If you want, use waterproof pins or blocking wires to help the garment hold its shape.
10. Let the knit dry.
Drying can take a while, particularly if you live someplace damp. When planning to block, try to choose a dry day if possible. Placing a fan nearby can help also. You can dry pieces outside, weather permitting, but don’t leave your knits out in direct sunlight. Cover the piece with another towel or a sheet to prevent it from fading. It can take a day or two for your piece to dry. Don’t be tempted to skimp on drying time; wait until the knit has dried completely! Check the seams to assess whether the piece is truly dry as these spots take longest to dry.
Casting On
There are a number of ways to get stitches onto the needle, called casting on (abbreviated “CO”). Most knitters use the long-tail cast-on (or Continental cast-on) at the beginning of a piece. It’s attractive and elastic. It’s worked using an extra yarn tail in addition to the working yarn (the yarn coming from the ball), which leads to two disadvantages:
It can be tricky to correctly judge the length of yarn tail needed. It can’t be used in the middle of a piece.
To use the long-tail method, follow these steps:
1. From the end of the yarn, measure off a length of yarn for your tail.
There are two rules of thumb to figure out how much of a tail you need. These general rules don’t always agree with one another, however. Err on the side of too much yarn, because the only thing to do if you run out of tail is start over!
• Calculate about 1 inch per stitch (or more with bulky yarns or big needles). For example, 100 stitches = about 100 inches of yarn
• Calculate a length 4 times the width of the piece you’re making. For example, 20 inches wide x 4 = 80 inches of yarn
2. At the end of that length, make a slip knot.
Insert one needle into the slip knot, and hold it in your right hand.
3. Grasp the two tails with the last two fingers of your left hand, with the tail on the left and the working yarn on the right.
Put your thumb and index finger between the two strands of yarn, and then bring the needle down between your thumb and index finger as shown in Figure A-2a.
4. Bring the needle up through the loop of yarn on your thumb as shown in Figure A-2b.
5. Bring the needle down through the loop on the front of your index finger, pulling the strand of yarn forward and down through the loop on the thumb, as shown in Figure A-2c.
6. Drop the loop off your thumb, leaving a new stitch on the needle.
7. Put your thumb back into position under the yarn in front as shown in Figure A-2d, tightening the stitch slightly and preparing to cast on the next stitch.
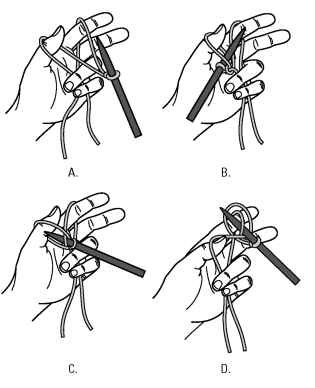
Figure A-2:
Casting on with the long-tail method.
8. Repeat Steps 4-7 until the required number of stitches are cast on.
If you want to try the cable cast-on, see Chapter 10.
Crocheted Edging
Knitting and crocheting are different, but they do have a lot in common. And sometimes a bit of crochet is just what your knit needs. If the edge of a piece looks unfinished to you, you can neaten it up with a row of single crochet as an edging. A crocheted edging around a neck or an armhole keeps it from stretching out over time. You also can try a contrasting colored edge of single crochet on a blanket to protect the edges from wear and tear.
To crochet a simple single crochet edging, use the same yarn as you used for the project (or a contrasting yarn if you prefer) and a crochet hook that’s the same diameter as the knitting needles you used for the project.
Just as the needle size you use affects your knitting gauge, the hook size you use affects your crochet gauge. If your crochet stitches seem too big and the edging is too loose, try a smaller hook; if the crochet stitches are too small and the edging pulls in too much, try a larger hook.
Follow these directions:
1. Make a slip knot with the yarn you’re using for the edging and slip it onto your crochet hook.
2. Stick your hook through the knitted fabric between stitches working from the right side (the public side) to the wrong side.
3. Grab the working yarn with the hook and pull a loop back through to the front as shown in Figure A-3.
There are 2 loops of yarn on the hook.
4. Reach the hook over the edge of the piece and grab the yarn again, and then pull this loop through both loops on the hook.
You now have 1 loop on the hook.
5. Repeat Steps 2-4 around the edge of your piece.
If you’re working on a piece that has corners, like a blanket, make 3 crocheted stitches in each knitted stitch at the outside corners. You also may want to skip a knitted stitch here and there when you’re working on an inside curve.
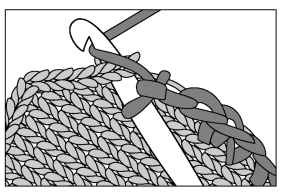
Figure A-3:
Crocheting an edge.
Crocheting a Chain
A crochet chain can be used to make simple straps, ties, or loops. To work a crochet chain, follow these steps:
1. Make a slip knot with the working yarn and place it on your crochet hook.
If you’re crocheting a chain onto a finished piece, skip the slip knot and instead follow Steps 2-3 in the previous directions for crocheted edging.
2. Wrap the yarn around the hook and pull this new loop through the old loop (this is your slip knot for the first stitch) as shown in Figure A-4.
You have chained 1 stitch.
3. Repeat Step 2 until the chain reaches your desired length.
Cut the yarn and pull the tail through the last loop to secure it.
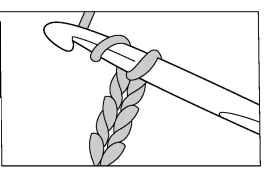
Figure A-4:
Crocheting a chain.
Felting
Felting is a way of transforming your knitting into a dense, sturdy fabric. If you’ve ever (accidentally or purposefully) run a wool sweater through the washing machine, you’ve experimented already with felting. When you do it on purpose, you can make lots of great pieces, including bags and slippers.
To knit something that you’re going to felt, use pure wool or another animal fiber, and knit it at a looser than normal gauge. When the knitting is done and your seams are sewn, here’s how to felt your piece:
1. Place the item in a zippered pillowcase or mesh lingerie bag to protect your washer’s pump from the excess fuzz.
Trust me on this one; I’m the owner of a $300 felted bag.
2. Put the item in the washing machine with a pair of old jeans (the jeans improve the agitation; towels may leave terry-cloth fuzz on your felted item).
Set the washer for a small, hot load and add a small amount of soap. If possible, leave the lid up to stop the cycle before it rinses; this saves on the amount of hot water you use, but isn’t strictly necessary.
3. At the end of the cycle, check on the progress of the felting.
If you can still see the stitches, add a kettle of boiling water and start the wash cycle again (at the same setting as in Step 2). Very hot water makes your item felt faster.
4. When the fabric looks very firm, you can no longer see the stitches, or the item is the correct size, remove it from the washer and rinse it in the sink with water.
The spin cycle of the washer may leave your felted item with permanent creases, so it’s safer to remove the piece before the spin cycle begins.
5. Pull the item into the desired shape and size, using empty cereal boxes wrapped in plastic or something else of the correct size.
6. Allow the item to dry completely before using it.
Keep the item out of direct sunlight. Drying may take a couple of days; placing your felted item near a fan to dry may speed the drying process.
Knit Stitch
The knit stitch is the most basic building block of knitting. It’s the very first thing you learn and the thing that you do most in just about any knitting project.
To knit a stitch, follow these steps:
1. Insert the right-hand needle into the first stitch on the left-hand needle from front to back and from left to right.
The right-hand needle should sit perpendicular to and under the left-hand needle as shown in Figure A-5.
2. Wrap the yarn counterclockwise around the back (right-hand) needle, coming up on the left, over the top, and down on the right as shown in Figure A-6a.
This creates the new stitch.
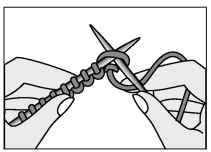
Figure A-5:
Inserting the right-hand needle into the stitch to knit.
3. Keeping some tension on the working yarn held in your right hand, bring the right-hand needle and the newly formed stitch through the old stitch on the left needle, as shown in Figure A-6b.
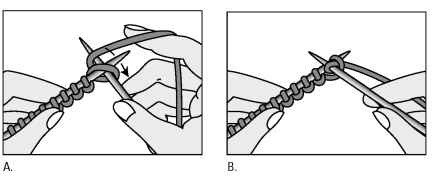
Figure A-6:
Making a new knit stitch.
4. Slide the right-hand needle to the right until the old stitch drops off the needle.
5. Repeat Steps 1-4 to knit.
To get the hang of the knit stitch, you may want to consider repeating the mnemonic phrase used to teach children to knit, “In through the front door, around the back, out through the window, and off jumps Jack.”
Knitting into the Back of a Stitch
Knitting through the back loop (abbreviated as k tbl) twists the stitch. Sometimes this stitch is used decoratively; other times it’s knit as a part of more complex stitches.
To knit through the back loop, follow these steps:
1. Stick the right-hand needle into the next stitch from the center through the back of the stitch, from right to left.
2. Wrap the yarn around the needle counterclockwise and complete the stitch as you would a normal knit stitch.
Making Stitches Knitwise and Purlwise
If a pattern tells you to do something knitwise, it means that you should do it as if you were going to make a knit stitch. So, slipping a stitch knitwise, for example, means that you put the needle into the stitch as though you were going to knit it (from front to back, from left to right), and then you slip it over to the right needle without knitting it.
Doing something purlwise means that you should do it as though you were purling. So, you stick the needle into a stitch from right to left.
Mattress Stitch
I’ve never sewn a mattress, and I have no idea how mattresses relate to knitting, but the tidiest method of sewing a seam in knitting is called mattress stitch. If you’re a seamstress, some elements of this stitch will seem counterintuitive. You work from the right side (public side) with the two pieces next to one another rather than sandwiched together with right sides facing as you would when sewing fabric.
When learning to use mattress stitch, it’s helpful to make a couple of swatches to practice on. Use yarn that’s smooth enough and big enough for you to easily see the stitches. I teach people this technique using a contrasting yarn to sew with. The contrasting color allows you to see what’s going on, and you’ll be impressed with just how invisible the seam is when you’re finished. After you get the hang of the mattress stitch with the swatches and contrasting yarn, you’ll be ready to sew up any project.
Depending on whether you’re sewing together the sides or the ends (where you cast on and bind off), the technique is slightly different, as you find out in the following sections.
Here are a few general principles of sewing up your knitting project:
Don’t be tempted to overdo your seams. Look at the knitted stitches for a moment. The stitches you sew don’t need to be smaller, tighter, or tougher than the stitches you knit.
You can sew things together like a seamstress, with a straight stitch or a whip stitch worked on the wrong side. But knitters usually prefer to work from the right side with the pieces next to one another rather than on top of one another.
‘ Sewing a seam isn’t difficult. The bald truth is that you can sew up your knitting any old way you want as long as you’re satisfied with the way it looks. Sacrilege? Perhaps, but if it makes you sleep better at night, I’m all for it.
Stockinette stitch, side to side
Before you get started, have a close look at your knitting. Gently pull at the edge of your knitted swatch and look between the edge stitch and the next stitch. You should see a ladder of horizontal threads as shown in Figure A-7. The rungs of the ladder on each of the two pieces are where the mattress stitch action happens.
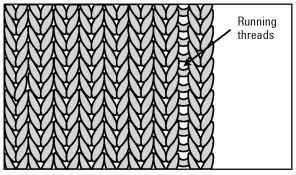
Figure A-7:
Identifying horizontal threads.
To sew a side seam using mattress stitch, follow these steps:
1. Lay out your two pieces with the right sides up and the two edges to be sewn next to one another (the bottom edges should be nearest you).
2. Thread some of the yarn from the project onto your yarn needle.
When sewing up, some people like to use the yarn tail from the cast-on. Others, including me, start with a fresh length of yarn, and then use the tail at the end to tidy up the seam. Either way is fine; you’ll discover which method you prefer as you gain more experience with it.
3. Insert the yarn needle under the bottom rung of the ladder on the left piece, with the needle running parallel to the edge of the knitted piece.
4. Draw the yarn through and insert the needle under the first rung on the right piece, with the needle parallel to the edge.
You don’t need to pull anything tightly. It’s fine to have an inch or so between the two pieces so you can see what you’re doing. You’ll tighten it up later.
5. Go back to the left piece and insert the needle into the ladder at the point where you came out at the beginning of Step 4. Run the needle under two rungs and draw the yarn through.
6. Move to the right piece and insert the needle into the ladder where you came out before. Run the needle under two rungs and draw the yarn as shown in Figure A-8.
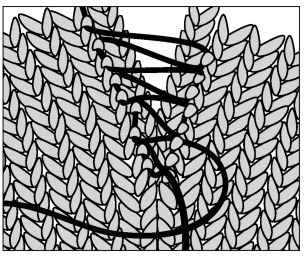
Figure A-8:
A mattress stitch forms an invisible seam.
7. Repeat Steps 5 and 6 until your seam is a couple of inches long.
Pull gently on the two ends of your sewing yarn until the seam closes up and the mattress stitches disappear.
8. Continue in this manner until your seam is finished.
When you’re satisfied with your seam, take the cast-on tail and join the edge with a figure eight as shown in Figure A-9. Weave in any remaining loose ends.
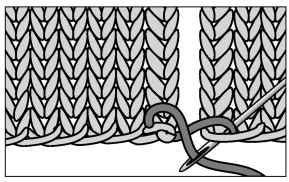
Figure A-9:
Tidying up the cast-on edge.
Garter stitch, side to side
To start sewing two garter stitch sides together, place the two pieces side by side with the right sides up. Match the pieces so that the top and bottom edges are aligned; for a long seam, consider pins or clips to keep things lined up.
Look closely at your garter stitch piece and you’ll see that each stitch is composed of a top bump and a bottom bump. You’ll use these bumps to create your seams:
1. Thread a length of yarn onto a yarn needle.
2. With the two pieces next to one another, put the yarn needle through the bottom bump of the edge stitch in the first row of the left piece and pull the yarn through, leaving a 6-inch tail.
3. Bring the yarn over to the right piece and put the yarn needle through the top bump on the edge stitch in the first row and pull the yarn through as shown in Figure A-10.
There’s no need to pull the yarn tight; it’s easier to work with the stitches slack. You can tighten them up later.
4. Bring the needle back to the left piece, go through the bottom bump of the edge stitch of the next row, and pull the yarn through.
5. Bring the needle to the right piece, go through the top bump of the edge stitch of the next row, and pull the yarn through.
6. Repeat Steps 4 and 5 until the seam is complete.
Gently pull on the two ends of the yarn you sewed the seam with until the seam closes up, and then weave in the ends (which I cover later in this chapter).
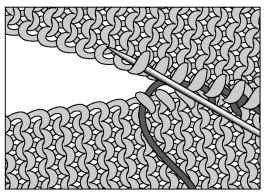
Figure A-10:
Seaming up two garter stitch pieces.
End to end
When you’re joining pieces end to end you can often use the three-needle bind-off and skip the sewing all together. See Chapter 10 for more on this technique.
But sometimes you want to sew two ends together using mattress stitch. To do so, place the two pieces next to each other, right sides (public sides) up. You’ll be working on whole stitches below the bound-off edge. Why? Bound-off edges can often be jagged or untidy, so it’s better to work a row or so down to be sure that you’re hiding these uneven stitches in the seam. Follow these steps to sew two pieces together end to end:
1. Thread the yarn needle and begin at one edge (or use a convenient yarn tail if you prefer).
2. On the first piece, go under 1 stitch (both legs of the V) with your yarn needle.
3. Bring the needle to the second piece and go under 1 stitch.
4. Come back to the first piece, go in with the needle where you came out last time (where you can see the working yarn).
5. Repeat Steps 2-4 until your seam is complete.
Pull the yarn gently to tighten the seam; it shouldn’t be tighter (or looser) than the knitted stitches around it.
End to side
Sewing a bound-off edge to a side seam, as when you’re attaching a sleeve to the body of a sweater, is slightly different from joining two sides or two ends. When both pieces are the same, the stitches match up exactly, and you’re always joining 1 stitch to 1 stitch. (Okay, that’s only in theory.)
When you’re joining an end to a side, however, you need to pay attention to the fact that there are more rows than stitches per inch. See Figure A-11 for an example.
To join an end to a side, follow these steps and see Figure A-11:
1. Thread your needle and place your pieces flat with right sides up and the edges to be seamed next to one another.
If the seam is long, consider pinning or clipping it to help keep you on track.
2. Beginning at the edge of the seam, go under both legs of the first stitch on the top of the first piece with the yarn needle and pull the yarn through, leaving a 6-inch tail.
3. Bring the needle to the other piece and go under one ladder rung between the first and second stitches, and then pull the yarn through.
4. Go back to the first piece and put the needle in where it came out and then under both legs of the next stitch, and pull the yarn through.
5. Repeat Steps 3 and 4, but on every 4th stitch, bring the needle under two ladder rungs rather than just one to make up for the difference between the number of stitches and the number of rows in an inch.
Picking up an extra rung every 4th row works as a general rule because 3 to 4 is roughly the ratio of stitches to rows in stockinette stitch at most gauges. If you want to be precise, think of it this way: If your gauge is 5 stitches and 7 rows per inch, you need to use seven ladder rungs for every 5 stitches. And remember that there’s as much art as there is science to this. Don’t stick to the ratio slavishly; instead, work on keeping your two pieces lined up and your seam relatively even.
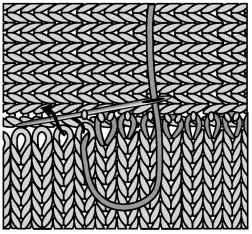
Figure A-11:
Joining a side and an end with mattress stitch.
Purl Stitch
A purl stitch is one of the basic building blocks of knitting. Follow these steps to purl:
1. With the yarn held to the front of the work, put the right-hand needle into the stitch from back to front and from right to left, as shown in Figure A-12a.
2. Wrap the yarn around the right-hand needle counterclockwise, as shown in
Figure A-12b.
This loop will form the new stitch.

Figure A-12:
The first steps in purling.
3. Keeping some tension on the working yarn, bring the right-hand needle and the new stitch down and through the old stitch on the left-hand needle, as shown in Figure A-13a.
4. Slide the right-hand needle to the right until the old stitch drops off the needle, as shown in Figure A-13b.

Figure A-13:
Finishing a purl stitch.
5. Repeat Steps 1-4 to purl.
Ripping Back Stitches
Mistakes happen. If you catch your mistake sooner than later, the easiest way to rectify the problem is to unknit (or rip back) the stitches one by one until you get to the problem. Sometimes knitters call this tinking because tink is knit backwards.
To unknit stitch by stitch to an error in the row that you’re working on, follow these steps:
1. With the knit or purl side facing you, insert the left-hand needle from front to back into the stitch below the one on the right-hand needle, as shown in Figure A-14.
2. Remove the right-hand needle from the stitch and gently pull on the yarn.
3. Repeat Steps 1 and 2 until you come to your error.
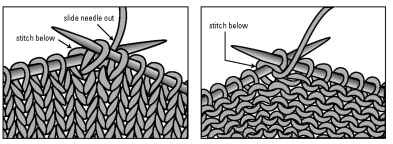
Figure A-14:
Unknitting a stitch.
If your mistake happened several rows back, decide whether it’s something you can live with or whether you need to rip all the way back to the mistake. This is another time to remind yourself that you enjoy the process of knitting and that doing the section over is not really a bad thing.
Take a deep breath and then follow these steps:
1. Pull the needle out of the work and begin unraveling the rows by pulling gently on the working yarn.
Continue until you’ve taken out the mistake and the row with the mistake.
2. To put the stitches back on the needle, hold your work with the working yarn on the right, and put the needle into the first stitch in the second row from back to front as indicated by the arrow in Figure A-15.
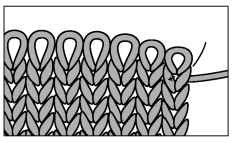
Figure A-15:
Inserting the needle in the row below.
3. Gently pull on the yarn to remove the stitch.
4. Repeat Steps 2 and 3 (see Figure A-16) until you’ve got all the stitches back on the needle, and then carry on with your knitting.
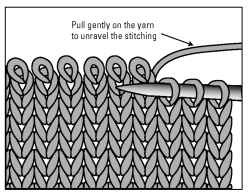
Figure A-16:
Putting your stitches back on the needle.
Slipping Stitches
Slipped stitches (abbreviated “sl”) can be part of decreases (which I cover in Chapters 6 and 12) or can be used as part of stitch patterns, such as linen stitch (see Chapter 10) or mosaics (see Chapter 7). To slip a stitch, simply slide it from the left-hand needle to the right-hand needle without wrapping it or knitting it. The yarn will trail or “float” across the work over (or behind) the slipped stitch. Remember that this float should be 1 stitch wide. Don’t try to pull tight to make it disappear!
When you slip a stitch, you can do it knitwise (putting the right-hand needle into the stitch from left to right) or purlwise (putting the right-hand needle into the stitch from right to left). The rule of thumb on slipping knitwise or purlwise is this: Slip the stitch purlwise unless you’re told otherwise. Slipping purlwise leaves the stitch untwisted. The only times you’ll slip knitwise in this topic are in the ssk and skp decreases. Find out about ssk in Chapter 6 and skp in Chapter 12.
Weaving in Ends
Weaving in your ends is one of the last steps you’ll take with a project. When you finish knitting, you’ll have at least a couple of yarn tails hanging off the work. Don’t be tempted to just cut them off; they can work themselves loose and your knitting will unravel. Instead, weave them in.
There are several approaches to weaving in ends; whichever approach you use, your goal is to hide the tails in the knitted fabric and secure them so they don’t come out. Here are some general guidelines:
Before you weave in your ends, take a look at the knitting around the tails. By gently tugging on the tails, you may be able to even out loose stitches.
Thread your yarn tail onto a yarn needle and work on the wrong side of the piece.
If your piece has seams, you can simply run the needle in and out of the seam a few times to hide the end.
‘ If you don’t have any seams to hide your ends in, a tidy way to weave in your tails is to follow the path that the yarn takes over several stitches as shown in Figure A-17. This is very similar to the embellishment technique known as duplicate stitch (see Chapter 7).
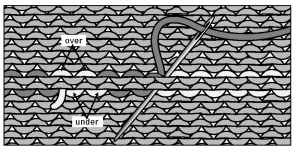
Figure A-17:
Weaving in your ends.
After you weave in 2 to 3 inches of your tail, cut off the remaining yarn close to the work.
