In This Chapter
Introducing the Document Object Model
Responding to form events
Connecting a button to a function
Retrieving data from text fields
Changing text in text fields
Sending data to the page
Working with other text-related form elements
Viewing the source of dynamically generated code
JavaScript is fun and all, but it lives in Web browsers for a reason: to let you change Web pages. The best thing about JavaScript is how it helps
you control the page. You can use JavaScript to read useful information from
the user and to change the page on the fly.
Understanding the Document Object Model
JavaScript programs usually live in the context of a Web page. The contents of the page are available to the JavaScript programs through a mechanism called the Document Object Model (DOM).
The DOM is a special set of complex variables that encapsulate the entire contents of the Web page. You can use JavaScript to read from the DOM and determine the status of an element. You can also modify a DOM variable and change the page from within JavaScript code.
Navigating the DOM
The easiest way to get a feel for the DOM is to load up a page in Firefox and look at the Firebug window’s DOM tab. I do just that in Figure 6-1. In order to see what’s happening with the DOM, I’m using the Firebug extension. Check back to Chapter 1 if you need a refresher on using Firebug. Note also that some versions of Firebug (especially on the Mac) are slightly different, but the general idea is the same.
When you look over the DOM of a very simple page, it’s easy to get overwhelmed. You’ll see a lot of variables listed. Technically, these are all elements of a special object called window. The window object has a huge number of subobjects, all listed in the DOM view. Table 6-1 describes a few important window variables.
| Table 6-1 | Primary DOM Objects | |
| Variable | Description | Notes |
| document | Represents XHTML page | Most commonly scripted element. |
| location | Describes current URL | Change location.href to move to a new page. |
| history | A list of recently visited pages | Access this to view previous pages. |
| status | The browser status bar | Change this to set a message in the status bar. |
Changing DOM properties with Firebug
To illustrate the power of the DOM, try this experiment in Firefox:
1. Load any page.
It doesn’t matter what page you work with. I’ll use simple.html, a very basic page with only an <h1> header.
2. Enable the Firebug extension.
You can play with the DOM in many ways, but the Firebug extension is one of the easiest and most powerful tools for experimentation.
3. Enable the DOM tab.
This shows you a list of all the top-level variables.
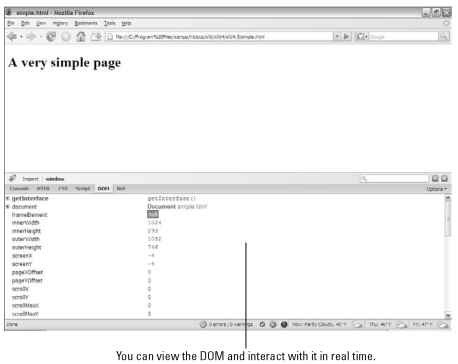
Figure 6-1:
Even a simple page has a complex DOM.
4. Scroll down until you see the status element.
When you find the status element, double-click it.
5. Type in a message to yourself.
In a dialog box that appears, type something in and press Enter.
6. Look at the bottom of the browser.
The status bar at the bottom of the browser window should now contain your message!
7. Experiment on your own.
Play around with the various elements in the DOM list. Many of them can be modified. Try changing window.location.href to any URL and watch what happens. (Don’t worry — you can’t permanently break anything here.)
This DOM experiment doesn’t always work. You might have extensions that block the DOM, or it might not do exactly what you want. If this experiment does not work, just move on. You’ll never really do it this way again. Once you learn how easy it is to manipulate the DOM through code, that’s the only way you’ll want to do it.
Examining the document object
If the window object is powerful, its offspring — the document object — is even more amazing.
Once again, the best way to get a feel for this thing is to do some exploring:
1. Reload simple.html again.
If your previous experiments caused things to get really weird, you might have to restart Firefox. Be sure the Firebug extension is showing the DOM tab.
2. Find the document object.
This is usually early in the window list. When you select document, it expands, showing a huge number of child elements.
3. Look for the document.body.
Somewhere in the document you’ll see the body. Select this to see what you discover.
4. Find the document.body.style.
The document object has a body object, and the body object has a style subobject. Will it never end?
5. Look through the style elements.
Some of the styles will be unfamiliar, but keep going and you’ll see some old friends.
6. Double-click backgroundColor.
Each CSS style attribute has a matching (but not quite identical) counterpart in the DOM. Wow. Type a new color (using a color name or hex color) and see what happens.
7. Marvel at your cleverness.
You can navigate the DOM to make all kinds of changes in the page. If you can manipulate something here, you can write code to do it to.
If you’re lost here, Figure 6-2 shows me modifying the backgroundColor of the style of the body of the document (on a wing on a bird on a branch on a tree in a hole in the ground). A figure can’t really do this process justice, though. You have to experiment for yourself. But don’t be overwhelmed. You don’t really need to master the details of exactly how the Firebug DOM stuff works. Just know it’s there, because it’s the foundation of all the cool stuff you do next.
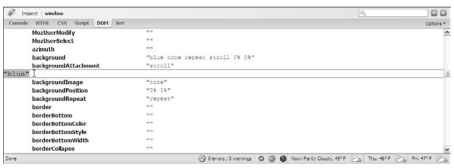
Figure 6-2:
Firebug lets me modify the DOM of my page directly.
Harnessing the DOM through JavaScript
Sure, using Firebug to trick out your Web page is geeky and all, but why should you care? The whole purpose of the DOM is to provide JavaScript magical access to all the inner workings of your page.
Getting the blues, JavaScript-style
It all gets to be fun when you start to write JavaScript code to access the DOM. Take a look at blue.html in Figure 6-3.
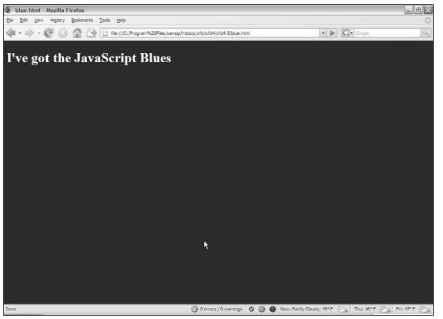
Figure 6-3:
This page is blue (trust me, it is).
But where’s the CSS?
Shouldn’t it be “background-color?”
If you’ve dug through the DOM-style elements, you’ll notice some interesting things. For openers, many of the element names are familiar but not quite identical: background-color becomes backgroundColor and font-weight becomes font Weight. CSS uses dashes to indicate word breaks, and the DOM combines words and uses capitalization for clarity. You’ll find all your old favorite CSS elements, but the names change according to this very predictable formula. Still, if you’re ever confused, just use the Firebug DOM inspector to look over various style elements.
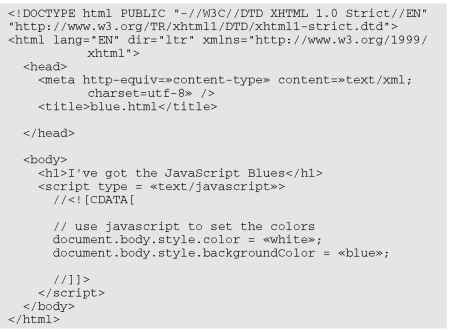
The page has white text on a blue background, but there’s no CSS! Instead, it has a small script that changes the DOM directly, controlling the page colors through code. The script looks like this:
In the first few chapters of this topic I concentrated on JavaScript without worrying at all about the HTML. The HTML code in those programs was unimportant, so I didn’t include it in the code listings. This chapter is about how to integrate code with HTML, so now I incorporate the HTML as well as the
JavaScript segments. Sometimes I still print out code in separate blocks, so (as always) try to look at the code in its natural habitat, on either of the companion Web sites through your browser.
Writing JavaScript code to change colors
The page is pretty simple, but it has a few new features:
It has no CSS. A form of CSS will be dynamically created through the code.
The script is in the body. I can’t place this particular script in the header, because it refers to the body.
When the browser first sees the script, there must be a body for the text to change. If I put the script in the head, there is no body yet when the browser reads the code, so it gets confused. If I place the script in the body, then there is a body, so the script can change it. (It’s really okay if you don’t get this nuance at first. This is probably the only time you’ll see this particular trick, because I’ll show a better way in the next example.)
Use a DOM reference to change the style colors. That long “trail of breadcrumbs” syntax takes you all the way from the document through the body to the style and finally to the color. It’s tedious but thorough.
Set the foreground color to white. You can change the color property to any valid CSS color value (a color name or a hex value). It’s just like CSS, because you are affecting the CSS.
Set the background color to blue. Again, this is just like setting CSS.
Managing Button Events
Of course, there’s no good reason to write code such as blue.html. It’s just as easy to build CSS as it is to write JavaScript. The advantage comes when you use the DOM dynamically to change the page’s behavior after it has finished loading.
Figure 6-4 shows a page called “backgroundColors.html”.
The page is set up with the default white background color. It has two buttons on it, which should change the body’s background color. Click the blue button, and you’ll see that it works, as verified in Figure 6-5.
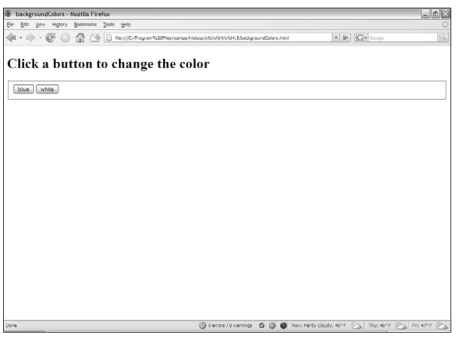
Figure 6-4:
The page is white with two buttons. I’ve gotta click blue.
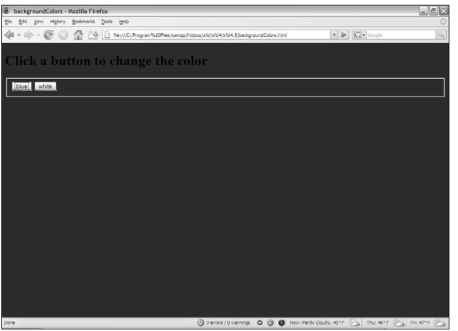
Figure 6-5:
It turned blue! Joy!
Again, the color change isn’t very convincing in a black-and-white topic. You should be able to tell from the figures that the color did indeed change, but look on the Web site for real color-changing action. Some really exciting things just happened:
The page has a form. If you need a refresher on form elements, please check out Bonus Chapter 1 on either of the companion
The button does something. Plain old XHTML forms don’t really do anything; you’ve got to write some kind of programming code to accomplish that. This program does something before your eyes.
There’s a setColor() function. The page has a function that takes a color name and applies it to the background style.
Both buttons pass information to the setColor() function. The color name will be passed as a parameter to the setColor() function.
Setting up the playground
That’s an overview. Take a closer look at the code:
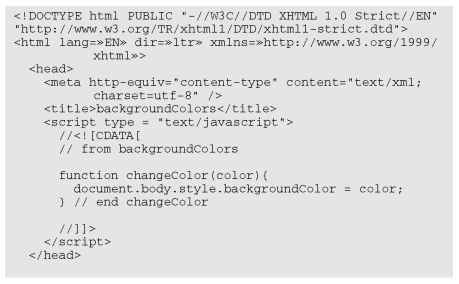
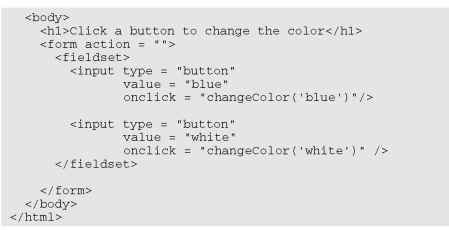
Most Web pages actually treat the XHTML page as the user interface and the JavaScript as the event-manipulation code that goes underneath. It makes sense, then, to look at the HTML code that acts as the playground first.
It contains a form. Note that the form’s action attribute is still empty. You won’t mess with that until you work with the server in Chapter 14.
The form has a fieldset. The input elements need to be inside something, and a fieldset seems like a pretty natural choice.
The page has two buttons. The two buttons on the page are nothing new, but they’ve never done anything before.
The buttons both have onclick attributes. This special attribute can accept one line of JavaScript code. Usually that line calls a function, as I have done in this program.
Each button calls the same function, but with a different parameter.
Both buttons call changeColor(), but one sends the value “blue” and the other “white”.
Presumably, changeColor will change a color. That’s exactly what it will do. In fact, it will change the background color.
Generally I write the XHTML code first before the script. As you can see, the form provides all kinds of useful information that will help me make the script. Specifically, it’s clear that I need to write a function called change-Color(), this function should take a color name as a parameter, and should change the background to the indicated color. With that kind of information established, the function is half-written!
Embedding quotes within quotes
Take a careful look at the onclick lines. There’s one important issue you might not have noticed: onclick is an XHTML parameter, and its value must be encased in quotes. The parameter happens to be a function call that sends a string value. String values must also be in quotes. This could be very confusing if you used double quotes everywhere, because the browser has no way to know the quotes are nested. If your code looks like this . . .
![]()
. . . then XHTML will think the onclick parameter contains the value “changeColor)” and it will have no idea what white”)” is.
Fortunately, JavaScript has an easy fix for this problem: If you want to embed a quote inside another quote, just switch to single quotes. The line is written with the parameter inside single quotes:
![]()
Writing the changeColor function
The changeColor() function is pretty easy to write. Voila .

It goes in the header area as normal. It’s simply a function accepting one parameter called color. The body’s backgroundColor property is set to color.
This time I can write JavaScript in the header that refers to the body because the header code is all in a function. The function is read before the body is in place, but it isn’t activated until the user clicks the button. By this time, there’s a body — and there’s no problem.
Interacting with Text Input and Output
Perhaps the most intriguing application of the DOM is the ability to let the user communicate with the program through the Web page, without all those annoying dialog boxes. Figure 6-6 shows a page with a Web form containing two text boxes and a button.
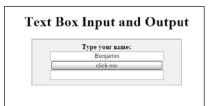
Figure 6-6:
I’ve typed a name into the top text box.
When you click the button, something exciting happens, as demonstrated by Figure 6-7.
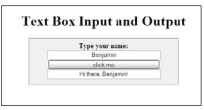
Figure 6-7:
I got a greeting! With no alert box!
Clearly, form-based input and output are preferable to the constant interruption of dialog boxes.
Introducing event-driven programming
Graphic user interfaces usually use a technique called event-driven programming. The idea is simple:
1. Create a user interface.
In Web pages, the user interface is usually built of XHTML and CSS.
2. Identify events the program should respond to.
If you have a button, users will click it. (If you want to guarantee they click it, put the text “launch the missiles” on the button. I don’t know why, but it always works.) Buttons almost always have events. Some other elements do, too.
3. Write a function to respond to each event.
For each event you want to test, write a function that does whatever needs to happen.
4. Get information from form elements.
Now you are accessing the contents of form elements to get information from the user. You’ll need a mechanism for getting information from a text field and other form elements.
5. Use form elements for output.
For this simple example, I also use form elements for output. The output goes in a second text box, even though I don’t intend for the user to type any text there.
Creating the XHTML form
The first step is to create the XHTML framework. Here’s the XHTML code:
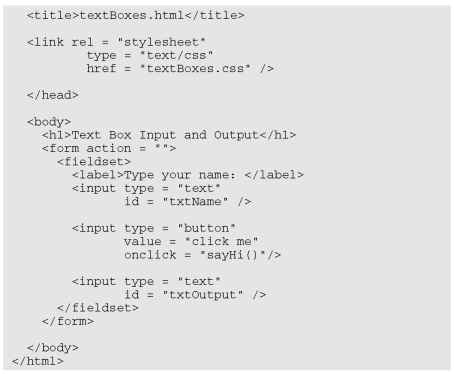
As you look over the code, note a few important ideas:
The page uses external CSS. The CSS style is nice, but it’s not important in the discussion here. It stays safely encapsulated in its own file. Of course, you’re welcome to look it over or change it.
Most of the page is a form. All form elements must be inside a form.
A fieldset is used to contain form elements. input elements need to be inside some sort of block-level element, and a fieldset is a natural choice.
There’s a text field named txtName. This text field will contain the name. I begin with the phrase txt to remind myself that this is a text box.
The second element is a button. It isn’t necessary to give the button an ID (as it won’t be referred to in code), but it does have an onclick() event.
The button’s onclick() event refers to a (yet undefined) function.
The onclick() event is named “sayHiO”.
A second text box will contain the greeting. This second text box is called txtOutput because it’s the text field meant for output.
After you’ve set up the HTML page, the function becomes pretty easy to write, because you’ve already identified all the major constructs. You know you’ll need a function called sayHi(), and this function will read text from the txtName field and write to the txtOutput field.
Using getElementById() to get access to the page
XHTML is one thing, and JavaScript is another. You need some way to turn an HTML form element into something JavaScript can read. The magical getElementByld() method does exactly that. First, look at the first two lines of the sayHi() function (defined in the header as usual):

Every element created in your Web page can be extracted by digging through the DOM. In the old days, this is how we used to access form elements. It was ugly and tedious. Modern browsers have the wonderful getElementByld() function instead. This beauty searches through the DOM and returns a reference to an object with the requested ID.
A reference is simply an indicator where the specified object is in memory. You can store a reference in a variable. Manipulating this variable manipulates the object it represents. If you want, you can think of it as making the text box into a variable.
Note that I call the variable txtName, so its name is just like that of the original text box. This variable refers to the text field from the form, not the value of that text field. When I have a reference to the text field object, I can use its methods and properties to extract data from it and send new values to it.
Manipulating the text fields
When you have access to the text fields, you can manipulate the values of these fields with the value property:
![]()
Text fields (and in fact all input fields) have a value property. You can read this value as an ordinary string variable. You can also write to this property, and the text field will be updated on the fly.
This code, created by the following steps, handles the data input and output:
1. Create a variable for the name.
This is an ordinary string variable.
2. Copy the value of the text box into the variable.
Now that you have a variable representing the text box, you can access its value property to get the value typed in by the user.
3. Create a message for the user using ordinary string concatenation.
4. Send the message to the output text box.
You can also write text to the value property, which will change the contents of the text field on the screen.
Text fields always return string values (just as prompts do). If you want to pull a numeric value from a text field, you might have to convert it with the parseInt() or parseFloat() functions.
Writing to the Document
Form elements are great for getting input from the user, but they are not ideal for output. It really doesn’t make much sense for the output to be placed in an editable field. It would be much better to actually change the Web document.
The DOM supports exactly such a technique. Most XHTML elements feature an innerHTML property. This property describes the HTML code inside the element. In most cases, it can be read from and written to.
So what are the exceptions? Single-element tags (like <img> and <input>) don’t contain any HTML, so obviously it doesn’t make sense to read or change their inner HTML. Table elements can often be read from but not changed directly.
Figure 6-8 shows a program with a basic form.

Figure 6-8:
Wait — there’s no output text field!
This form doesn’t have a form element for the output. Enter a name and click the button, and you’ll see the results in Figure 6-9.

Figure 6-9:
The page has changed itself.
Amazingly enough, this page can make changes to itself dynamically. It isn’t simply changing the values of form fields, but changing the HTML.
Preparing the HTML framework
To see how this is done, begin by looking at the XHTML body for
innerHTML.html:
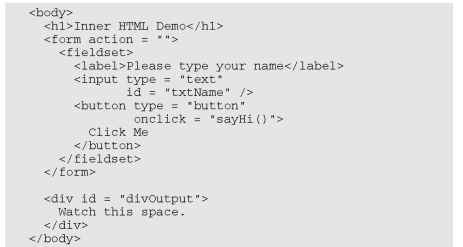
The code body has a couple of interesting features:
The program has a form. The form is pretty standard. It has a text field for input and a button, but no output elements.
The button will call a sayHi() function. The page will require a function with this name. Presumably it will say hi somehow.
There’s a div for output. A div element in the main body is designated for output.
The div has an ID. The id attribute is often used for CSS styling, but it can also be used by the DOM.
Any HTML elements that will be dynamically scripted should have an id field.
Writing the JavaScript
The JavaScript code for modifying inner HTML is pretty easy:

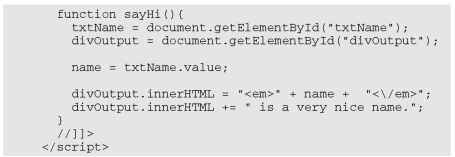
The first step (as usual with Web forms) is to extract data from the input elements. Note that I can create a variable representation of any DOM element, not just form elements. The divOutput variable is a JavaScript representation of the DOM div element.
Finding your innerHTML
As with form elements, divs have other interesting properties you can modify. The innerHTML property allows you to change the HTML code displayed by the div. You can put any valid XHTML code you wish inside the innerHTML property, even HTML tags. Be sure that you still follow the XHTML rules so your code will be valid.
Even with the CDATA element in place, validators get confused by forward slashes (like the one in the </em> tag). Whenever you want to use a / character in JavaScript strings, precede it with a backslash (<\/em>). Doing so helps the validator understand that you intend to place a slash character at the next position.
Working with Other Text Elements
When you know how to work with text fields, you’ve mastered about half of the form elements. Several other form elements work exactly like text fields, including these:
‘ Password fields: Recall that a password field obscures the user’s input with asterisks, but it preserves the text.
‘ Hidden fields: These allow you to store information in a page without revealing it to the user. (They’re used a little bit in client-side coding, but almost never in JavaScript.)
‘ Text areas: These are multi-line text boxes. They can be sized to handle multiple lines of input.
Figure 6-10 is a page with all these elements available on the same form.
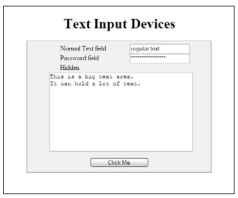
Figure 6-10:
Passwords, hidden fields, and text areas all look the same to JavaScript.
When the user clicks the button, the contents of all the fields (even the password and hidden field) are displayed on the bottom of the page, as illustrated in Figure 6-11.
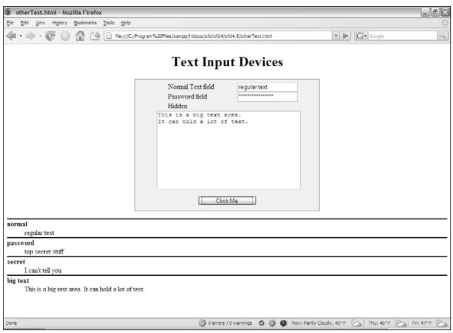
Figure 6-11:
Now you can see what was in everything.
Building the form
Here’s the XHTML that generates the form:
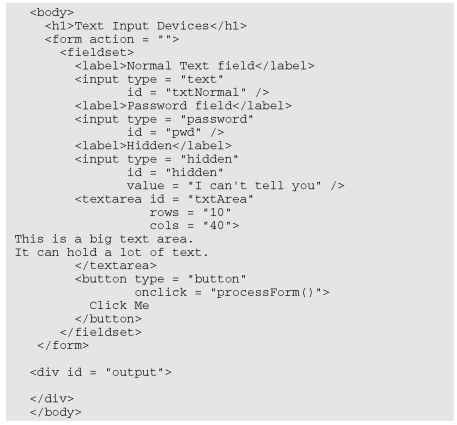
The code should be familiar to you (look over Bonus Chapter 1 if you need more information on form elements). A few things are worth noting for this example:
There’s an ordinary text field. Just for comparison purposes. It has an id so it can be identified in the JavaScript.
The next field is a password field. Passwords display asterisks, but store the actual text that was entered. This password has an id of pwd.
The hidden field is a bit strange. Hidden fields can be used to store information on the page without displaying that information to the user. Unlike the other kinds of text fields, the user cannot modify a hidden field. (She usually doesn’t even know it’s there.) This hidden field has an id of secret and a value (“I can’t tell you”).
The text area has a different format. The input elements are all single-tag elements, but the textarea element is designed to contain a large amount of text, so it has beginning and end tags. The text area’s id is txtArea .
A button starts all the fun. As usual, most of the elements just sit there gathering data, but the button has an onclick event associated with it, which calls a function.
External CSS gussies it all up. The page has some minimal CSS to clean it up. (The CSS isn’t central to this discussion, so I won’t reproduce it.) Note that the page will potentially have a dl on it, so I have a CSS style for it, even though it doesn’t appear by default.
The password and hidden fields seem secure, but they aren’t. Anybody who views the page source will be able to read the value of a hidden field, and passwords transmit their information in the clear. You really shouldn’t be using Web technology (especially this kind) to transport nuclear launch codes or the recipe of your secret sauce. (Hmmm — maybe the secret sauce recipe is the launch code — sounds like a bad spy movie.)
When I create a text field, I often suspend my rules on indentation, because the text field preserves everything inside it, including any indentation.
Writing the function
Now all you need is a function. Here’s the good news: JavaScript treats all these elements in exactly the same way! The way you handle a password, hidden field, or text area is identical to the technique for a regular text field. Here’s the code:
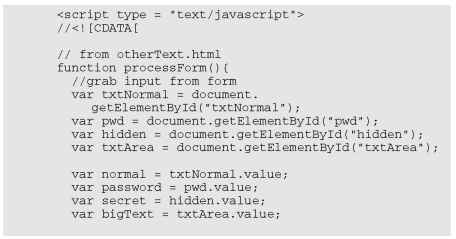
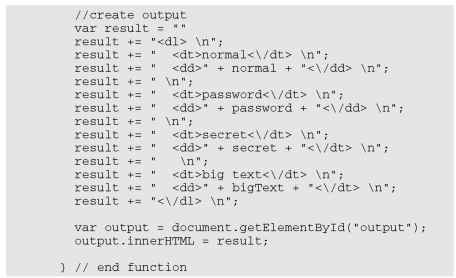
The processForm() function is a bit longer than the others in this chapter, but it follows exactly the same pattern: It extracts data from the fields, constructs a string for output, and writes that output to the innerHTML attribute of a div in the page.
The code has nothing new, but it still has a few features you should consider:
Create a variable for each form element. Use the document.get
ElementByld mechanism.
Create a string variable containing the contents of each element. Don’t forget: The getElementByld trick returns an object. To see what’s inside the object, you have to extract the value property.
Make a big string variable to manage the output. When output gets long and messy like this, concatenate a big variable and then just output it in one swoop.
HTML is your friend. This output is a bit complex, but innerHTML contains HTML, so you can use any HTML styles you want to format your code. The return string is actually a complete definition list. Whatever is inside the text box is (in this case) being reproduced as HTML text; if I want carriage returns or formatting, I’ll have to add them with code.
Don’t forget to escape the slashes. The validator gets confused by ending tags, so add the backslash character to any ending tags occurring in JavaScript string variables (</dl> becomes <\/dl>).
Newline characters (\n) clean up the output. If I were writing an ordinary definition list in HTML, I’d put each line on a new line. I try to make my programs write code just like I do, so I add newline characters everywhere I would add a carriage return in ordinary HTML.
Understanding generated source code
When you run the program, your JavaScript code actually changes the page it lives on. The code that doesn’t come from your server but is created by your program is sometimes called generated source. The generated-code technique is powerful, but it can have a significant problem. Try the following experiment to see what I mean:
1. Reload the page to view it without the form contents showing.
Now view the source.
2. Note that everything is as expected.
The source code shows exactly what you wrote.
3. Click the Click Me button.
Your function will run, and the page will change. You clearly added HTML to the output div, because you can see the output right on the screen.
4. View the source again.
You’ll be amazed. The output div will be empty, even though you’ll be able to clearly see that it has changed.
5. Validators won’t check generated code.
Using the HTML validator extension or the w3 validator won’t check for errors in your generated code. You have to check it yourself, but it’s hard to see the code!
Figure 6-12 illustrates this problem.
Here’s what’s going on: The view source command (on most browsers) doesn’t actually view the source of the page as it currently stands. It goes back to the server and retrieves the page, but displays it as source rather than as rendered output. That means the view source command isn’t useful for telling you how the page has changed dynamically. Likewise, the page validators check the page as it occurs on the server without taking into account things that could have happened dynamically.
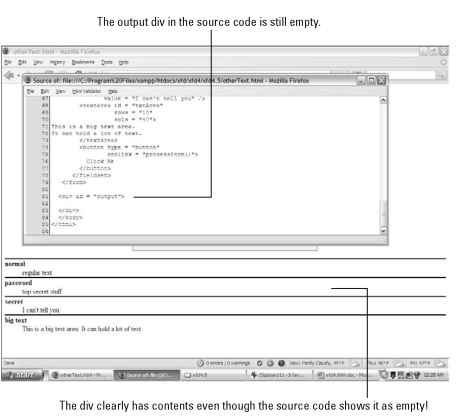
Figure 6-12:
The ordinary command to view source isn’t showing the contents of the div!
When you were building regular Web pages, this wasn’t a problem, because regular Web pages don’t change. Dynamically generated pages can change on the fly, and the browser doesn’t expect that. If you made a mistake in the HTML, you can’t simply view the source to see what you did wrong in the code generated by your script. Fortunately, two easy solutions are available with Firefox plugins:
The Web developer toolbar. This toolbar has a wonderful tool called
view generated source, available on the view source menu. This allows you to view the source code of the current page in its current state, including any code dynamically generated by your JavaScript.
Firebug. Open the Firebug window when a page is open and browse (with the HTML tab) around your page. Firebug gives you an accurate view of the page contents, even when they’re changed dynamically. This can be extremely useful.
These tools will keep you sane when you’re trying to figure out why your generated code isn’t acting right. (I wish I’d had them years ago . . . .)
Figure 6-13 shows the Firebug toolbar — with the dynamically generated contents showing.
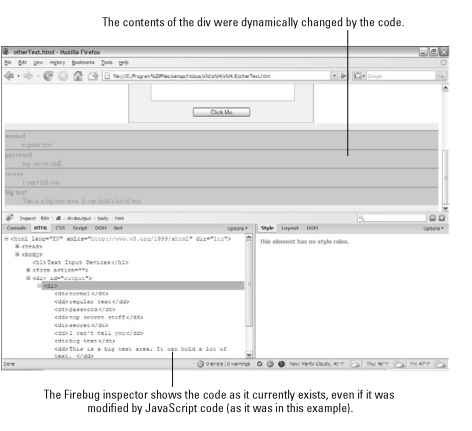
Figure 6-13:
Firebug shows the current status of the page, even if it’s dynamically modified.
