Up until now, you’ve defined the page size using a Rectangle as the value of one of the five different page boundaries that can exist for a page in a PDF document. You’ll learn more about these boundaries in this section, and you’ll work through an example that demonstrates the difference between the two most important page boundaries.
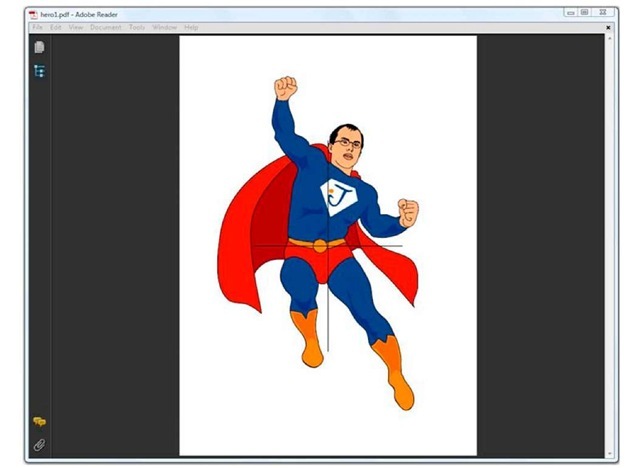
Suppose that I wanted to avoid being accused of false modesty. I could try to print a poster measuring one square meter, featuring myself in a Superman outfit. Seriously! The famous commercial artist Dick Kline once made such a drawing. It was sent to me as a gift by Bill Segraves, a long-time iText user.
The drawing isn’t a raster image. It consists of a sequence of Bezier curves that I’ve copied into a text file named hero.txt. To do this, you’d create a PdfTemplate from such a text file.
Listing 5.15 Hero1.java
As you can see, you can write literal PDF syntax to the direct content using the setLit-eral() method. It accepts a char, a float, or a String value.
WARNING Incorrect use of this method can result in seriously damaged PDF files. Please don’t use it before you’ve read topic 14. In the next topic, we’ll return to this example and find a much better way to reuse existing content.
The original drawing is intended to be added on an A4 page, but I want to put it on an AO document, so I have to scale it with a factor 4 (see ISO-216). I could create a Document with PageSize.A0 like this:
This line defines the media box of the first page in the document.
The media box
So far, you’ve been creating documents with only one type of boundary: the media box.
The media box defines the boundaries of the physical medium on which the page is to be printed. It may include any extended area surrounding the finished page for bleed, printing marks, or other such purposes. It may also include areas close to the edges of the medium that cannot be marked because of physical limitations of the output device. Content falling outside this boundary may safely be discarded without affecting the meaning of the PDF file.
This corresponds to a physical medium measuring 2384 pt x 3370 pt (or 84.10 cm x 118.89 cm, or 33.11 in x 46.81 in).
NOTE The values 2384 and 3370 in this constructor match the width and height of the page, but they really form the coordinates of the upper-right corner of a rectangle. The values for the coordinate of the lower-left corner are omitted because they are zero: the lower-left coordinates are (0,0).
When you learned how to add lines, shapes, and text at absolute positions in topic 3, you assumed that the origin of the coordinate system coincided with the lower-left corner of the page. This assumption is correct as long as the media box is defined with (0,0) as the coordinate for its lower-left corner, but that’s not mandatory. It’s perfectly OK for an application to create a media box with a different origin. It might be interesting to have the origin of the coordinate system in the upper-left corner of the page. Or you could place the origin in the middle of a page, so that you can distinguish four quadrants for your drawing operations. That’s what I did when I created my Superman poster in PDF.
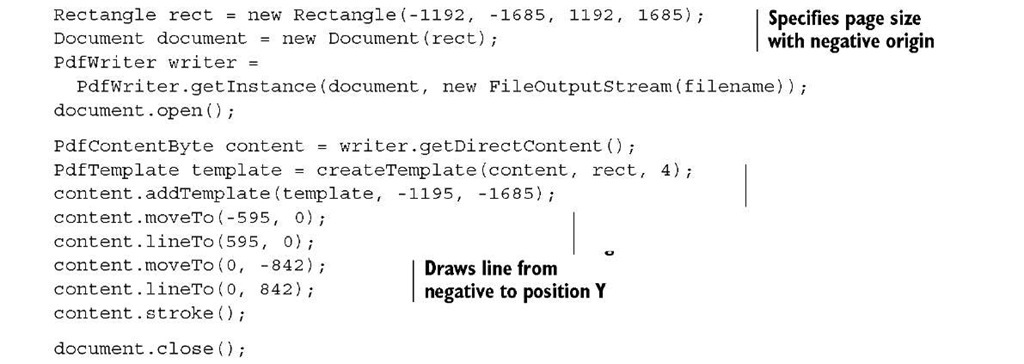
The AO rectangle used in the code line at the end of the previous section is defined like this:
Figure 5.9 A PDF with a different origin
Listing 5.16 Hero1.java
If you look at all the PDFs that can be found in the wild, you’ll discover that the lower-left corner is the origin of the coordinate system for most PDF documents. This example proves that you shouldn’t assume that this is true for every possible PDF. Knowing this will be important when you start manipulating existing PDFs in the next topic. When you add content at an absolute position, you’ll need to take the (x,y) value of the origin into account if it’s different from (0,0). Otherwise, you risk adding content in the wrong place, maybe even outside the visible area of the page.
You also have to make sure not to add anything outside the crop box of the page.
The crop box
The crop box is another type of boundary that can be defined as a rectangle that differs from the media box.
The crop box defines the region to which the contents of the page shall be clipped (cropped) when displayed or printed. Unlike the other boxes, the crop box has no defined meaning in terms of physical page geometry or intended use; it merely imposes clipping on the page contents. However, in the absence of additional information …, the crop box determines how the page’s contents shall be positioned on the output medium. The default value is the page’s media box.
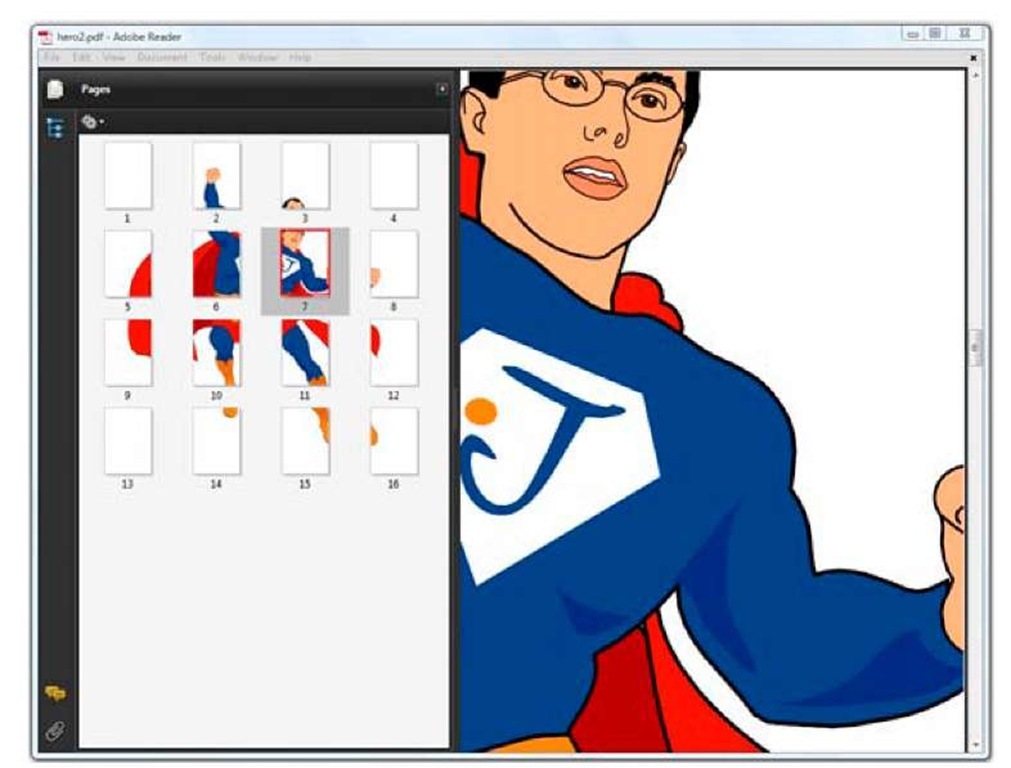
Suppose I want to print my A0 Superman poster, but I have a printer that is only able to print A4 pages. As defined in ISO-216, an A4 page can be obtained by folding an A0 page 4 times. My printing problem could be solved if I manage to split the single page shown in figure 5.9 into 16 smaller pages. See figure 5.10 for the result.
Now I can print the A0 as 16 separate pages, and I can start gluing them together into one large page. To achieve this, I’ll specify a media box with size A0, but I’ll use the setCropBox() method to define a crop box with size A4.
The cross that is drawn in figure 5.9 (close to my navel) marks the origin of the coordinate system.
Figure 5.10 An A0 sized page divided into 16 A4 pages
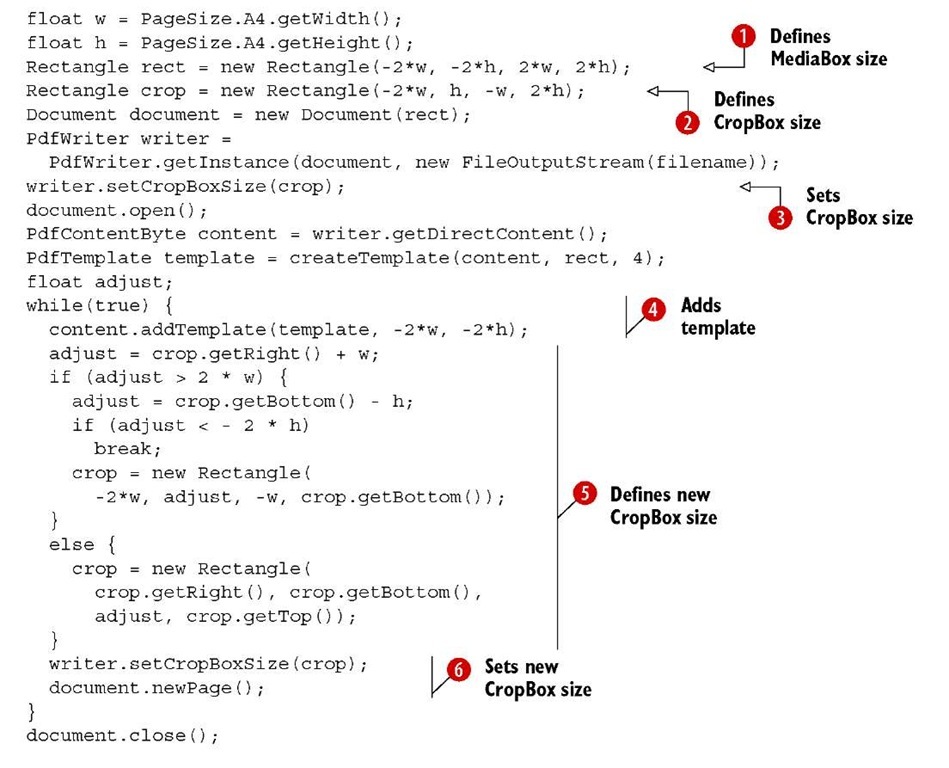
Listing 5.17 Hero2.java
This code snippet crops the large image into smaller parts, sixteen times in a row. First I create a Rectangle that is about the size of an A0 page O. I’ll use this object as the media box. Note that this line defines an origin with a negative X and Y, just like in the previous example. Then I create a page that’s the size of an A4 page ©. Compared to the Rectangle defined in O, it’s positioned in the top-left corner of the media box. I’ll use this second rectangle as the crop box .
Next, I add the Superman template multiple times to the document in a loop ©. Because of the crop box, the first page will be blank. The visible area on the A0 poster is cropped to the size of an A4 page in the upper-left corner. For the next pages, I redefine the crop box . I continue with the next A4 rectangle that fits inside the A0 page to the right of the previous page. If that’s not possible, I start with the first A4 rectangle on the next row. As long as I can create valid A4 pages, I use these rectangles to set a new crop box value that will be valid for the next page ©.
The result will be a PDF document with 16 pages, each page clipped to an A4 that reveals part of the complete A0 poster.
But suppose that I don’t want to print the poster myself. Instead I want to send the PDF to a graphical designer, asking them to add a nice caption, some publicity for this topic, and so on. However, I don’t want the image altered or overwritten, so I need to define a region that is preserved for the Superman drawing. I could use an art box to pass this information to a third party. That’s one of the three remaining page boundaries discussed in the next section.
Other page boundaries
You can set the media box in the Document constructor, or with the setPageSize() method. You can define a crop box with the setCropBox() method, but there’s also a setBoxSize(String boxName, Rectangle size) method that’s more generic. Allowed names for boxName are crop, bleed, trim, and art.
The bleed box defines the region to which the contents of the page shall be clipped when output in a production environment. This may include any extra bleed area needed to accommodate the physical limitations of cutting, folding, and trimming equipment. The actual printed page may include printing marks that fall outside the bleed box.. The default value is the page’s crop boxx.
The trim box defines the intended dimensions of the finished page after trimming. It may be smaller than the media box to allow for production-related content, such as printing instructions, cut marks, or color bars. The default value is the page’s crop boxx.
The art box defines the extent of the page’s meaningful content (including potential white space) as intended by the page’s creator. The default value is the page’s crop boxx.
Note that the crop, bleed, trim, and art boxes shouldn’t extend beyond the boundaries of the media box. If they do, they are reduced to their intersection with the media box.
Listing 5.18 Hero3.java
In the first example of the next section, you’ll use the art box to retrieve information that can be used to add a header and footer.


