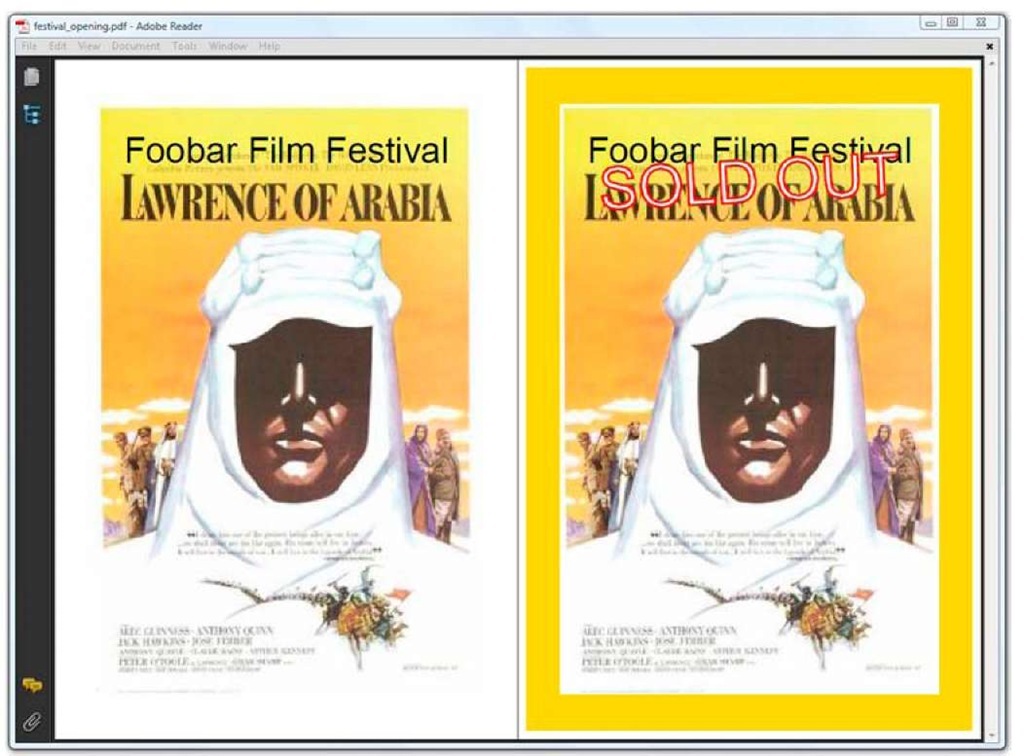
As a first example, you’ll use high-level objects to create a postcard inviting people to the movie that will open the Foobar Film Festival; then you’ll add extra content at absolute positions in the document using low-level methods.
The page to the left in figure 3.1 is created by adding a Paragraph with the text "Foobar Film Festival" and an Image of the poster of Lawrence of Arabia. The Image was positioned using the setAbsolutePositions() method. The order in which these Elements were added doesn’t matter; document.add() always adds images to the image layer under the text layer.
To the right is another page with the same Paragraph and Image, but now with a colored rectangle added under the image layer, and the text "SOLD OUT" added over the text layer. This can be achieved by writing to the direct content.
Figure 3.1 Adding content using low-level methods to a page created with high-level objects
Direct content layers
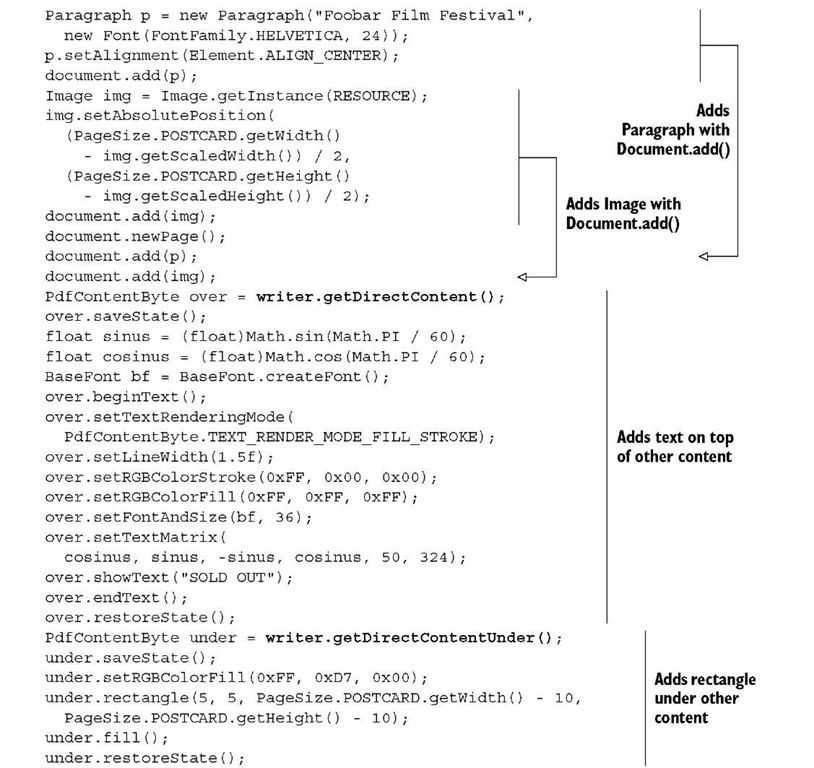
Here is the source code used to create the PDF shown in figure 3.1.
Listing 3.1 FestivalOpening.java
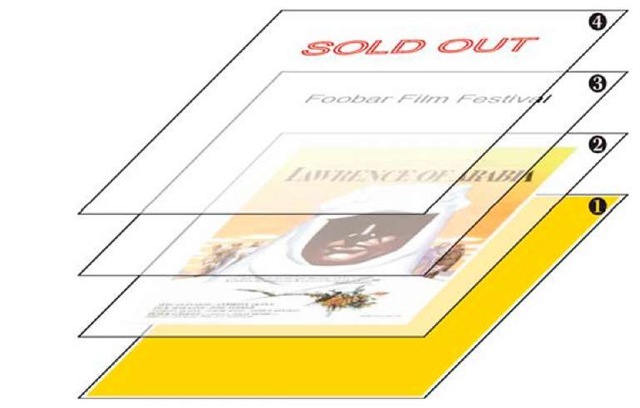
How does this work? When you add content to a page—be it with Document.add() or otherwise—iText writes PDF syntax to a ByteBuffer that is wrapped in a PdfContent-Byte object. When a page is full, these buffers are added to the PDF file in a specific order. Each buffer can be seen as a separate layer, and iText draws these layers in the sequence indicated in figure 3.2.
When a page is initialized, two PdfContentByte objects are created for the basic building blocks:
G A PdfContentByte object for text—The content of Chunks, Phrases, Paragraphs, and so on
A PdfContentByte for graphics—The background of a Chunk, Images, the borders of a PdfPCell, and so forth
Figure 3.2 The four content layers: 2 and 3 for the high-level objects; 1 and 4 for direct content
You can’t access the PdfContentByte objects of layers C and © directly—these layers are managed by iText internally. But there are two extra PdfContentByte objects: layers and .
O A layer that goes on top of the text and graphics—You can get an instance of this upper layer with the method PdfWriter.getDirectContent(). A layer that goes under the text and graphics—You can get access to this lower layer with the method PdfWriter.getDirectContentUnder().
In iText terminology, adding content to these extra layers is called writing to the direct content, or low-level access because you’re performing low-level operations on a PdfContentByte object, as shown in listing 3.1. You’re also going to change the state, draw lines and shapes, and add text at absolute positions. But before you can do any of that, you need to know what the PDF reference says about the graphics state.
Graphics state and text state
The graphics state stack is defined in ISO-32000-1, section 8.4.2, as follows:
A PDF document typically contains many graphical elements that are independent of each other and nested to multiple levels. The graphics state stack allows these elements to make local changes to the graphics state without disturbing the graphics state of the surrounding environment. The stack is a LIFO (last in, first out) data structure in which the contents of the graphics state may be saved and later restored.
Let’s analyze this by means of a simple example.
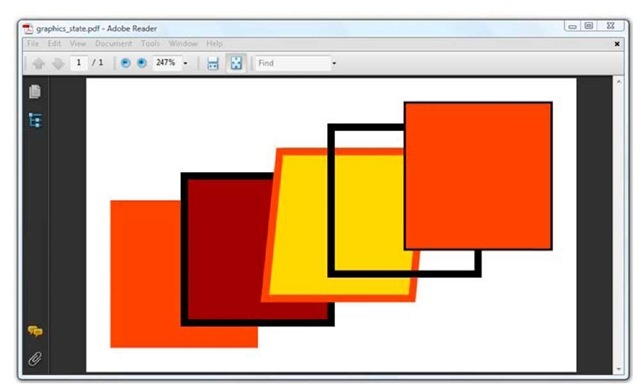
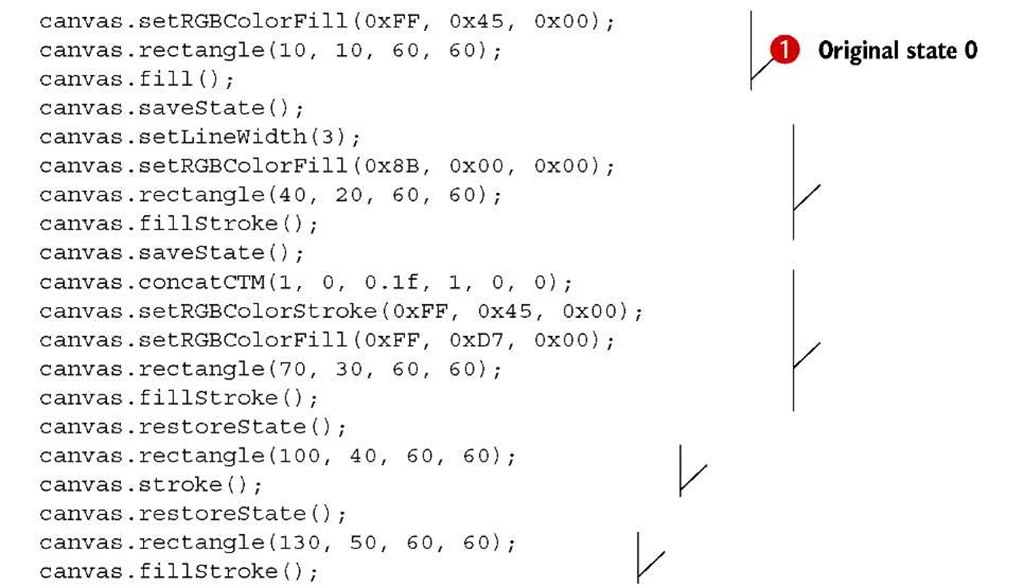
In listing 3.1 you constructed a rectangle to be drawn under the existing content using the rectangle() method. This rectangle is a graphical element, and you’ll add five of them in the next example. See figure 3.3 and the next listing.
Here you’ll change the way the graphical objects are rendered by changing the graphics state. In between, you’ll also save or restore the previous state.
Figure 3.3 Repeating the same rectangle using different graphics states
Listing 3.2 GraphicsStateStack.java
This is how the code should be interpreted: O The first element is a rectangle measuring 60 by 60 user units—a square with sides of 60 pt. The square doesn’t have a border; it’s filled with the color orange, because you use the fill() method after changing the fill color to orange (#FF450 0). The second square is colored dark red (#8B0000). It has a border in the default line color—black—because you use the fillStroke() method. Note that the border is 3 pt thick because you change the line width with the setLineWidth() method.
G This line width is kept for the third element, but the stroke color is changed to orange (#FF4500). The fill color is gold (#FFD700), but the shape is no longer a square. You use the same rectangle() method with the same width and height as before, but you change the current transformation matrix (CTM) in such a way that the square is skewed. The CTM will be discussed in detail in section 14.3.3. O All the changes made to the graphics state to draw the third element are now discarded, and the graphics state used for the second element is restored. You might expect a square that is identical to the second element, but because you use stroke() instead of fillStroke() only the border is drawn, and the shape isn’t filled. For the final element, the original graphics state is restored. You use the fill-Stroke() method, so a border is drawn in the default line color, with the default line width: 1 user unit.
It’s important that the saveState() and restoreState() methods are balanced in your code. You can’t invoke restoreState() if you haven’t performed a saveState() first; for every saveState(), you need a restoreState(). If they aren’t balanced, an Illegal-PdfSyntaxException will be thrown by the PdfContentByte.sanityCheck() method .
NOTE In this topic, you’re adding content at absolute positions. These absolute positions are defined with (x,y) coordinates with the lower-left corner of the page as the origin of the coordinate system.
The graphics state stack also applies to text.
Text state is a subset of graphics state. In section 2.2, you learned that a computer font is a program that knows how to draw glyphs. These glyphs are shapes that are filled with a fill color. No borders are drawn unless you change the text-rendering mode with setTextRenderingMode(). You used this text state operator in listing 3.1 to draw the words "SOLD OUT" in white letters with a red border. You also used setFontAnd-Size() to choose a font and a font size, setTextMatrix() to change the text matrix, and showText() to draw the glyphs. You’ll find an overview of all the possible graphics state and text state operators in section 14.4.
In the next section, you’ll add three tables to the film database and use the content of those tables to create a real-world example involving direct content.
A real-world database: three more tables
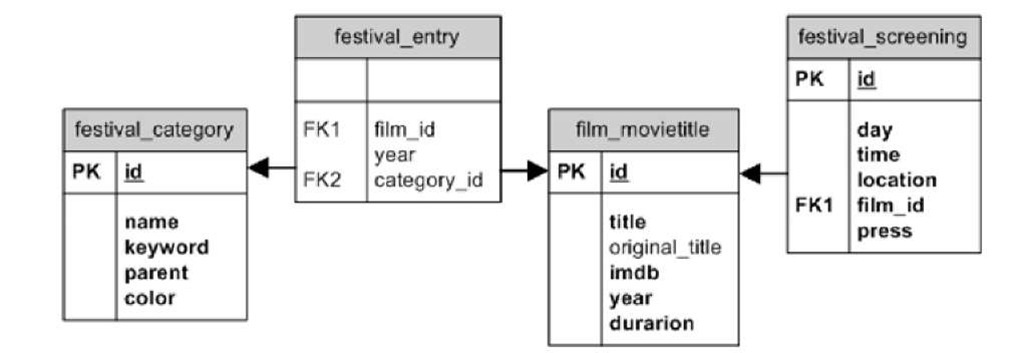
Figure 3.4 shows the ERD diagram of a film festival database. You’ll recognize one table: film_movietitle. That’s the same table you used in topic 2. It is now connected to three new tables with a "festival_" prefix. These tables contain extra information about a movie in the Foobar Film Festival.
The festival_entry table will help you find the movies that are shown at a certain edition of the film festival. Currently, the database only contains entries for the 2011 edition of the Foobar Film Festival, but you could easily add entries for other years. Every festival entry also refers to a category.
Figure 3.4 Festival database entity relationship diagram
All the categories are described in the festival_category table. Categories have a name, a short keyword, possibly a parent—because there’s a hierarchy in the categories— and a color code that will be used when drawing movies on a timetable.
Every movie can have multiple screenings, listed in the festival_screening table. A screening is defined by a day, a time, and a place. Some screenings are reserved for the press only.
The Foobar Film Festival involves three movie theaters: Cinema Paradiso, Googolplex, and The Majestic. Any resemblance to theaters in movies, or to the favorite multiplex cinema in The Simpsons, is purely coincidental.
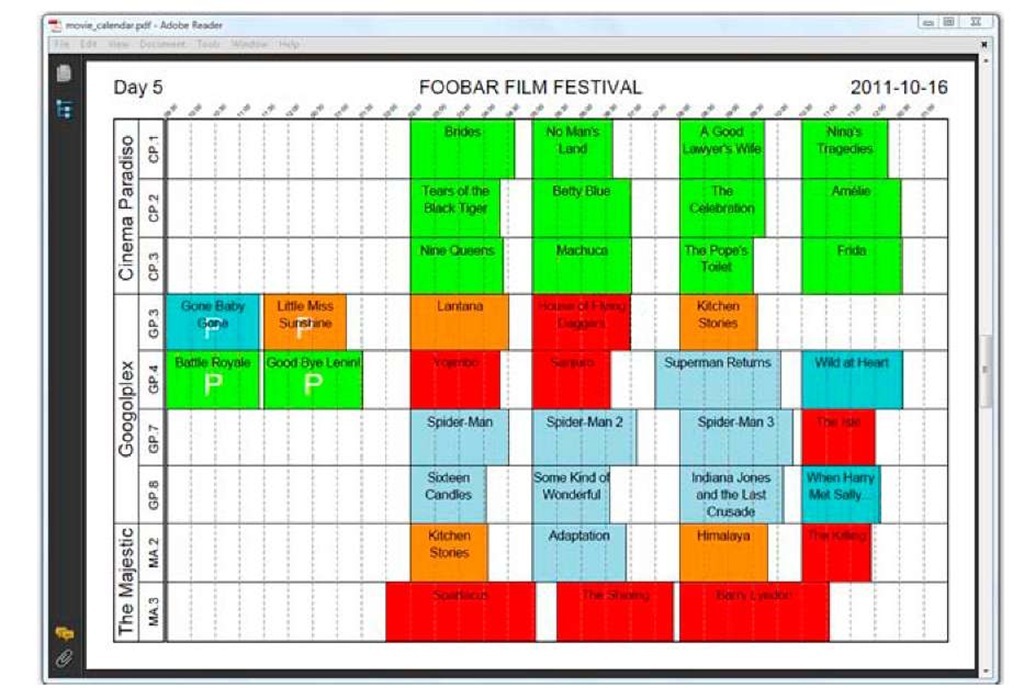
In the examples that follow, you’ll create a timetable that looks like figure 3.5.
Figure 3.5 Film festival timetable
Observe that three screens are reserved for the festival at Cinema Paradiso: CP.1, CP.2, and CP.3; four screens at the Googolplex: GP.3, GP.4, GP.7, and GP.8; and two at The Majestic: MA.2 and MA.3. During the film festival, different movies will be projected on these screens between 9:30 a.m. and 1:30 a.m. the next day.
You’ll start by drawing the grid with the different locations and time slots, using a series of graphics state operators and operands. DRAWING THE GRID
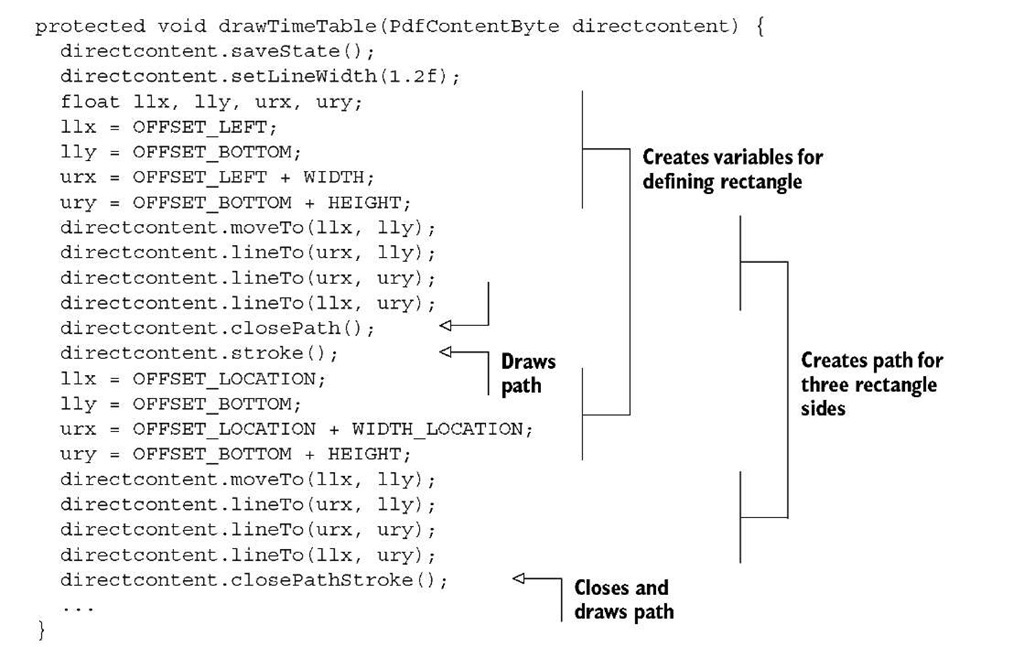
In listing 3.2, you drew rectangles using the rectangle() method. Now you’ll use a sequence of moveTo(), lineTo(), and closePath() operators to construct a path that will be drawn with the stroke() method.
Listing 3.3 MovieTimeTable.java
In this case, it would have been simpler to use the rectangle() method, but as soon as you need to draw other shapes, you’ll use these methods to draw straight lines. You’ll use the different curveTo() methods to draw curves.
Listing 3.3 also shows that you can combine closePath() and stroke() in one close-PathStroke() method. Or, in PDF syntax, the h and the S operators can be replaced by s. This is an example of a shorthand notation inherent to the PDF specification.
iText also offers convenience methods that combine operators to compensate for operations that can’t be done with only one PDF operator. For instance, there’s no operator to draw an arc or a circle in the PDF syntax. In iText, you can use the methods arc(), ellipse(), and circle(), which will invoke a sequence of curveTo() methods to draw the desired shape.
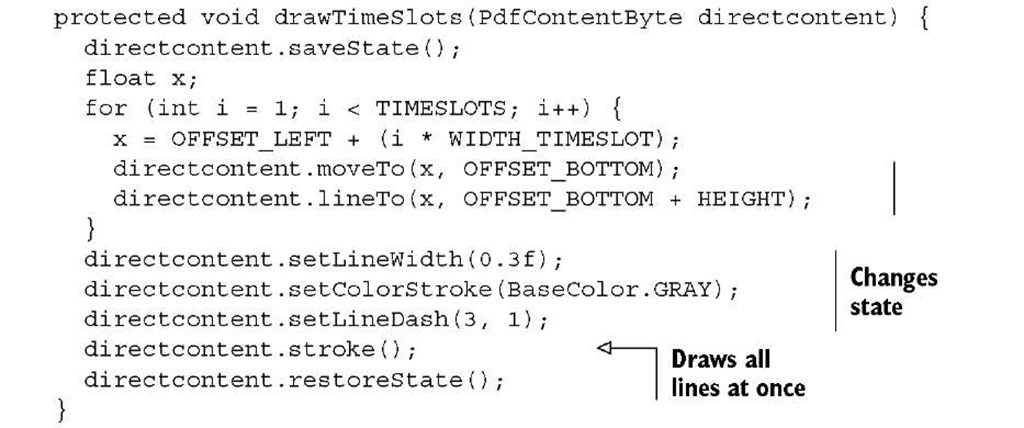
Next you need to draw the dashed lines for the time slots. The width of each time slot, defined in the constant WIDTH_TIMESLOT, corresponds to half an hour.
Listing 3.4 MovieTimeTable.java
In listing 3.3, you used stroke() or closePathStroke() after drawing every shape, but that wasn’t really necessary. You can postpone changing the state until after you’ve constructed all the paths. When you call stroke() in listing 3.4, the lines are drawn as 0.3 pt thick, gray dashed lines.
You’ve constructed the grid using the methods drawTimeTable() and draw-TimeSlots(); now it’s time to add screenings to the grid. DRAWING TIME BLOCKS
Just like you did on many occasions in topic 2, you can let the PojoFactory query the database for you. Besides Movie, Director, and Country objects, the PojoFactory can create collections of Category, Entry, and Screening POJOs. Here you’ll use a method that returns a List of locations (String objects) and festival days (java.sql.Date).
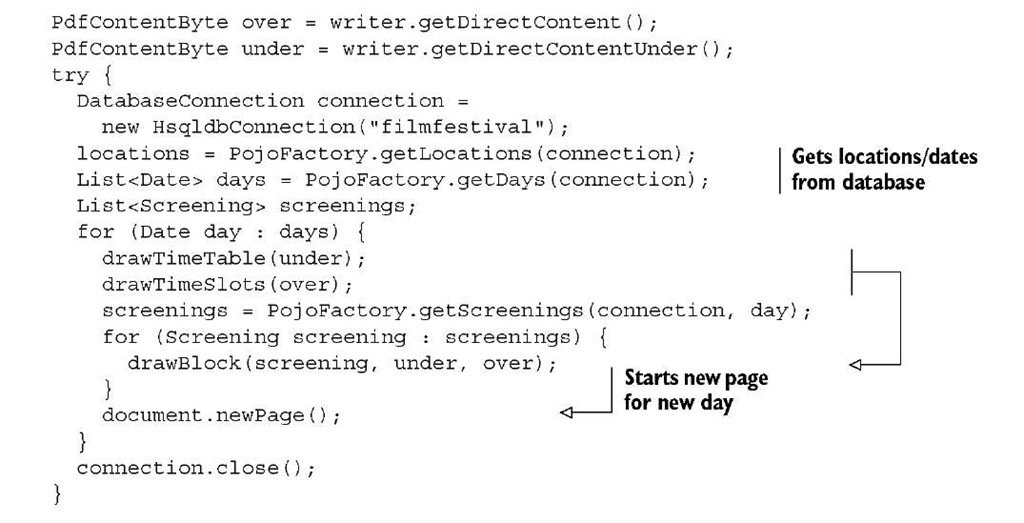
Listing 3.5 MovieTimeBlocks.java
You reuse the drawTimeTable() method from listing 3.3 to draw the table to the lowest direct content layer, and the drawTimeSlots() method to draw dashed lines to the upper direct content layer.
The drawBlock() method that is called for every screening shouldn’t hold too many secrets for you.
Listing 3.6 MovieTimeBlocks.java
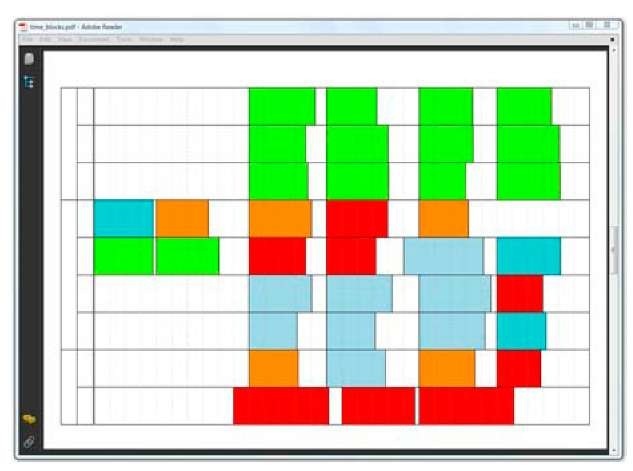
The fill color will correspond to the color of the category; see the color field in the festival_category table. The position, a Rectangle object, will be calculated based on the location and time stored in the festival_screening table. The "paint" of the rectangle will be added to the lower direct content layer. The border will be drawn in the default state (black, 1 pt thick) to the upper direct content layer. This means that the border will cover some of the dashed lines of the time slots, but the dashed lines will cover the colored rectangle. That way, you’ll be able to estimate the run length of each movie, based on the number of time slots intersecting with the rectangle. Figure 3.6 shows the results so far.
Figure 3.6 Timetable with movie time blocks
This timetable isn’t very useful because you haven’t yet added any text. You’ll do this in the next section, using the convenience methods available to add text to the direct content.
