One of the great things about a MobileMe account is that you can sync email, contacts, calendars, and topicmarks wirelessly.Whenever your iPhone can access the Internet via a cellular connection or Wi-Fi network, no matter where you are, the sync process can occur.
Of course, to be able to sync information with MobileMe, you must have a MobileMe account. See Chapter 1,”Getting Started with Your iPhone,”for information about obtaining a MobileMe account.
If you have a MobileMe account, it is very simple to access your MobileMe information on your iPhone by configuring the account on the iPhone and configuring its sync options. Here’s how.
![]()

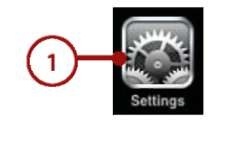
1. On the Home screen,tap Settings.
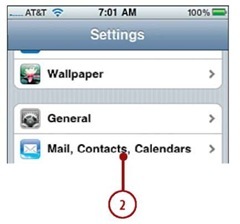
2. Tap Mail,Contacts,Calendars.
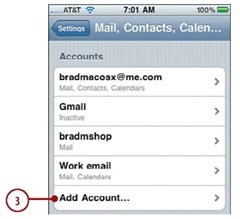
3. Tap Add Account.
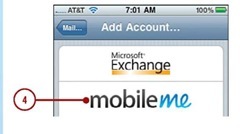
4. Tap mobileme.
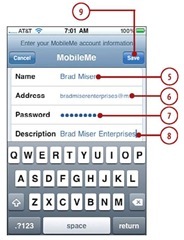
5. Enter your name.
6. Enter your MobileMe email address.
7. Enter your MobileMe account password.
8. Change the default description, which is your email address,if you want to. This description appears on various lists of accounts.
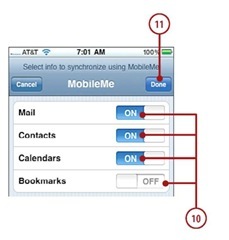
9. Tap Save.Your account information is verified.When that process is complete,you see the MobileMe screen that you use to choose which elements of your MobileMe account are going to be synchronized on iPhone.
10. Tap OFF next to each kind of information you want to sync on the iPhone; its status becomes ON to show you that information will be synced. If you leave a type’s status set to OFF, that information is ignored during the sync.
11. Tap Done. The account is synced to the iPhone.You return to the Mail,Contacts,Calendar screen where you see your account on the Accounts list.The account is ready to use. Configure how and when informaton is synced.
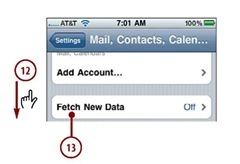
12. Scroll down the screen.
13. Tap Fetch New Data.
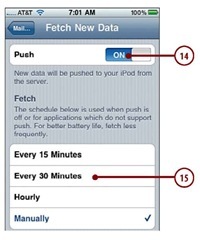
14. To enable information to be synced with your iPhone whenever there are updates and the iPhone is connected to the Internet, ensure the Push status is ON (if it isn’t, tap OFF to turn it on); or to disable Push to extend battery life, tap ON so the status becomes OFF.
15. Tap the amount of time when you want an iPhone to sync information when Push is OFF and for those accounts that don’t support Push;tap Manually if you want to sync manually only.
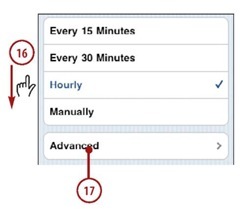
16. Scroll down the screen.
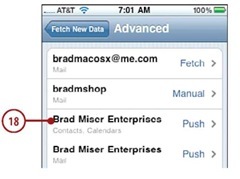
17. Tap Advanced.You see a list of all your active accounts.Next to each account, you see if it is configured to use Push,Fetch,or Manual. MobileMe accounts are listed twice. One instance is for just email and is labeled Mail on the list.The other listing is for contacts and calendars.You can configure how new data is retrieved for each of these independently.
18. Tap the Contacts,Calendars instance of the MobileMe account.
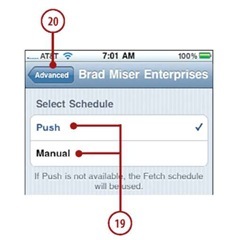
19. Tap the option you want to use for contact and calendar syncing; the options are Push or Manual. If you choose Push,syncing will occur when the iPhone is connected to the Internet and there is new information on the iPhone or in the MobileMe cloud. If you choose Manual,information is synced only when you manually start the process.
20. Tap Advanced.
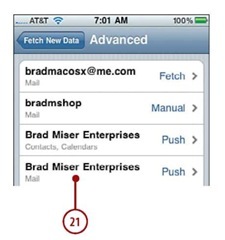
21. Tap the mail instance of the MobileMe account.
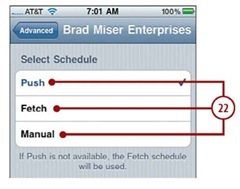
22. Tap the option you want to use for email syncing;the options are Push,Fetch,or Manual. If you choose Push,syncing will occur when the iPhone is connected to the Internet and there is new information on the iPhone or in the MobileMe cloud. If you choose Fetch,email syncing will occur according to the time you selected in step 15. If you choose Manual,emails are synced only when you manually start the process. The MobileMe account sync settings are complete.
Syncing Information with MobileMe (Iphone)
Next post: Managing Contacts (Iphone)
Previous post: Syncing Information with iTunes (Iphone)
