In Chapter 3,”Moving Audio, Video, and Photos onto Your iPhone,”you learned how to move audio and video content from your iTunes Library onto an iPhone. Using a similar process,you can move email accounts, calendars, contacts, and topicmarks from your computer onto your iPhone.This information gets synced each time you connect to the computer, so any changes you make on the iPhone move back to the computer and vice versa.
The only downside to syncing with iTunes is that you have to physically connect the iPhone to a computer, but that usually isn’t too big of a deal.The primary benefit is that you don’t need any special accounts to be able to sync this information.
Go Wireless
Using MobileMe or an Exchange account are better ways to sync information because you don’t have to connect an iPhone to a computer.
As with some other tasks, the details to use iTunes to sync information are slightly different on a Mac than they are on a Windows PC, so read the section that applies to the kind of computer you use.
![]()
Using iTunes to Sync Information on Macs

To set up information syncing on a Mac, perform the following steps.
1. Connect the iPhone to your Mac.
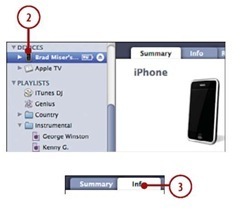
2. Select the iPhone on the Source
list.
3. Click the Info tab.
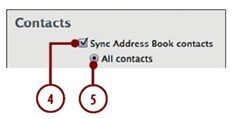
4. To sync your Address topic contacts, check Sync Address topic contacts; if you don’t want to sync this information (such as if you use MobileMe),skip to step 11 instead.
5. To sync all contact information, click All contacts and skip to step 8.
No Duplicates Please
You don’t need to set up the same information to sync in more than one way. For example, if you have a MobileMe account, use that to sync your contact and calendar information rather than iTunes because with MobileMe,your information is synced wirelessly. Some information,such as gmail and other email accounts that aren’t provided via MobileMe or Exchange, can be synced only via iTunes.
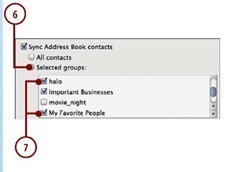
6. If you organize your contact information in groups and want to move only specific ones onto the iPhone, click Selected groups.
7. Check the check box next to each group you want to move to the iPhone. If you leave a group’s check box unchecked, the contacts it contains will be ignored during the sync process.
iCal for calendars, Mail for email, or Address topic for contact information are I the only Mac applications that you can directly sync with the iPhone via the I iTunes sync process. If you use Entourage, a tip later in the chapter helps you sync your information.
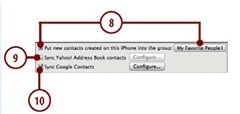
8. If you want contacts you create on the iPhone to be moved into a specific Address topic group when you sync, check the Put new contacts created on this iPhone into the Group check box and select the group on the pop-up menu. If you don’t want them placed into a specific group, leave the check box unchecked.
9. To sync with your contacts stored on Yahoo!, check Sync Yahoo! Address topic contacts, click Agree, and follow the onscreen prompts to log in to your Yahoo! Address topic.
10. To sync with your contacts stored in your Google account, check Sync Google Contacts, click Agree, and follow the onscreen prompts to log in to your Google account.
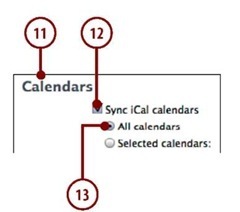
11. Scroll down until you see the Calendars section.
12. Check Sync iCal calendars; if you don’t want to sync calendar information (such as if you use MobileMe),skip to step 17 instead.
13. If you want all the calendars you access in iCal to be synced on the iPhone,click the All calendars radio button and skip to step 16.
How Am I Syncing?
When you are syncing information via MobileMe or Exchange, you see a text message saying so in the related section. For example,if you use Exchange to sync your calendar information,you see the text,”Your calendars are being synced
with Microsoft Exchange over the air.”This message doesn’t stop you from also syncing the same information using
iTunes, but you should be thoughtful about this so you don’t sync the same information twice.
Syncing Entourage
If you use Entourage,you can sync its information with your iPhone indirectly by syncing its information with Address topic and iCal,which in turn are synced with your iPhone via iTunes. Open Entourage’s Preferences and configure the Sync Services preferences to synchronize contacts with Address topic and events with iCal.Then,configure Address topic and iCal syncing in iTunes as described in these steps.To sync your Entourage email, simply manually configure your email account on the iPhone,as described in Chapter 7,”Emailing.”
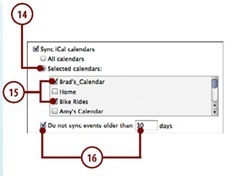
14. If you want only selected calendars to move onto the iPhone, click the Selected calendars radio button.
15. Check the check box next to each calendar that you want to sync on the iPhone.
16. If you want to prevent older events from syncing,check the Do not sync events older than check box and enter the number of days in the box.
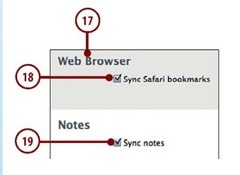
17. Scroll down until you see the Web Browser section.
18. Check the Sync Safari topicmarks check box if you want to move your Safari topicmarks,so you can use them with the iPhone’s Web browser; if you don’t want this, skip this step.
19. If you want any notes you create with the iPhone’s Notes application to be moved onto the com-puter,check the Sync Notes check box;if not,skip this step.
It’s Not All Good
If you prefer Firefox as your web browser,you can’t sync your bookmarks via iTunes.That’s really too bad and is quite annoying for those of us who use Firefox regularly.There’s currently no simple way to move bookmarks to or from an iPhone from or to Firefox. (There are ways to do this, but they are clunky and require more room to explain than I have here.) Hopefully, Apple will remove this web browser discrimination in an update to its software soon.
Locating Synced Notes?
When you sync notes, they are stored in the Mail application under the Notes subsection of the Reminders section shown in the mailbox pane on the left side of the window. If you don’t see your notes, expand the Notes item and select On My Mac. You should see your notes in the List pane at the top of the Mail window. Select a note on the list to read it in the Reading pane at the bottom of the window.
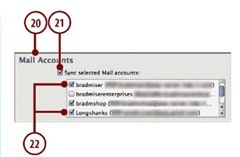
20. Scroll down until you see the Mail Accounts section.
21. Check Sync selected mail accounts if you want to configure email accounts that are configured in Mail on the iPhone;skip to step 23 if you don’t want them configured (such as for MobileMe or Exchange accounts).
22. Check the check box for each account you want to move onto iPhone.You can choose to move any or all of your email accounts to the iPhone.
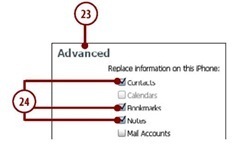
23. Scroll down to the Advanced section.
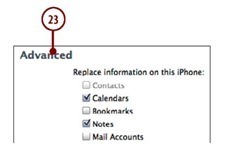
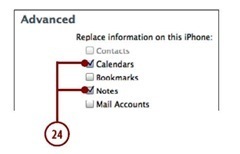
24. Check the check boxes next to any information that you want to be replaced on the iPhone with information from the computer.If you don’t check a check box,its information will be merged with that information on the iPhone instead. (If information is grayed out,you aren’t syncing that information with iTunes so it isn’t an appropriate choice.)
Sync Versus Apply
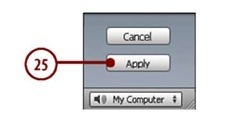
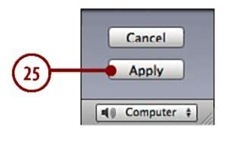
Whenever you make changes to the sync settings for the iPhone,the Apply button appears.When you click this, the new settings are saved and used for subsequent syncs,a sync is per-formed,and the button becomes Sync. Click Sync to perform a sync using the current settings.
25. Click Apply.A sync is performed, and the information you selected is moved onto the iPhone.
Each time you sync the iPhone (automatically when you connect the iPhone to your Mac),any updated information included in the sync settings on the computer is moved to the iPhone,and updated information on the iPhone is moved onto the computer.
Syncing with More Than One Source
If you configured your iPhone to sync with more than one source of contact information, perhaps Outlook on a Windows PC and Address topic on a Mac, when you sync,you’re prompted to replace or merge the information. If you select Replace Info, the existing information in whatever you are syncing with replaces all the information on your iPhone. If you choose Merge Info, the information you are syncing moves onto your iPhone and merges with the existing information.
Using iTunes to Sync Information on Windows
You can sync information on a Windows PC with an iPhone by performing the following steps.
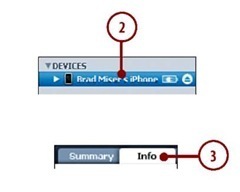
1. Connect the iPhone to your computer.
2. Select the iPhone on the Source
list.
3. Click the Info tab.
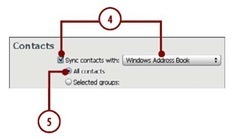
4. To sync your contacts, check Sync contacts with and choose the application containing the contact information you want to sync on the drop-down list.The options are Windows Address topic,Yahoo! Address topic, Google Contacts,or Outlook. If you choose Yahoo! or Google, log in to your account at the prompt. If you don’t want to sync contact information stored on your computer (such as if you use MobileMe), skip to step 9 instead.
5. To sync all contact information, click All contacts and skip to step 8.
No Duplicates Please
You don’t need to set up the same information to sync in more than one way. For example, if you have a MobileMe account, use that to sync your contact and calendar information rather than iTunes because with MobileMe, your information is synced wirelessly. Some information, such as email accounts that aren’t provided via MobileMe or Exchange, can be synced only via iTunes.
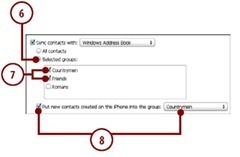
6. If you organize your contact information in groups and want to move only specific ones onto the iPhone, click Selected groups.
7. Check the check box next to each group you want to move into the iPhone. If you leave a group’s check box unchecked, the contacts it contains will be ignored during the sync process.
8. If you want contacts you create on the iPhone to be moved into a specific contact group when you sync, check the Put new contacts created on this iPhone into the Group check box and select the group on the pop-up menu. If you don’t want them placed into a specific group,leave the check box unchecked.
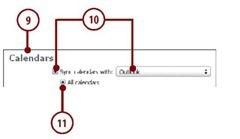
9. Scroll down until you see the Calendars section.
10. Check Sync calendars with and choose the calendar application that contains the calendars you want to sync with; if you don’t want to sync calendar information (such as if you use MobileMe), skip to step 15.
11. If you want all the calendars you access in the application you selected to be synced on the iPhone, click the All calendars radio button and skip to step 14.
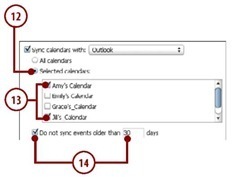
12. If you want only selected calendars to move onto an iPhone,click the Selected calendars radio button.
13. Check the check box next to each calendar that you want to sync on the iPhone.
14. If you want to prevent older events from syncing, check the Do not sync Events older than check box and enter the number of days in the box.
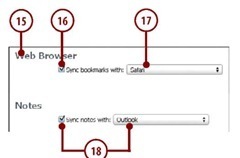
15. Scroll down until you see the Web Browser section.
16. Check the Sync topicmarks with check box if you want to sync your topicmarks so you can use them with the iPhone’s web browser; if you don’t want this, skip to step 18.
17. Select Safari or Internet Explorer on the drop-down list to choose the browser containing the topicmarks you want to sync.
18. If you want any notes you create with the iPhone’s Notes application to be moved onto the computer, check the Sync notes with check box and select the application where the synced notes should be stored on the dropdown list; if you don’t want to move your notes onto the com-puter,skip this step.
If you prefer Firefox as your web browser, you can’t sync your topicmarks via iTunes.That’s really too bad and is quite annoying for those of us who use Firefox regularly.There’s currently no simple way to move topicmarks to or from an iPhone from or to Firefox. (There are ways to do this, but they are clunky and require more room to explain than I have here.) Hopefully, Apple will remove this web browser discrimination in an update to its software soon.
Synced Notes?
In the current version of iTunes, Outlook is the only Windows application that supports notes syncing. When you sync notes, they are stored in the Notes area, which you can access by clicking the Notes icon.
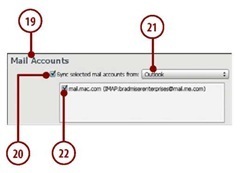
19. Scroll down until you see the Mail Accounts section.
20. Check Sync selected mail accounts from if you want to configure email accounts that are configured on your computer on the iPhone; skip to step 23 if you don’t want them configured (such as if you use MobileMe or Exchange email accounts).
21. Select the email application containing the accounts you want to sync on the drop-down list.
22. Check the check box for each account you want to move onto iPhone.You can choose to move any or all of your email accounts to the iPhone.
23. Scroll down to the Advanced section.
24. Check the check boxes next to any information you want to replace on the iPhone with information from the computer. If you don’t check a check box, that information will be merged with the information on the iPhone instead. (If a check box is grayed out, that information isn’t included in the sync so that option doesn’t apply.)
25. Click Apply. A sync is performed, and the information you selected is moved onto the iPhone.
Each time you sync the iPhone (automatically when you connect the iPhone to your computer),any updated information included in the sync settings on the computer is moved to the iPhone,and updated information on the iPhone is moved onto the computer.
