The syncing is normally automatic when you plug in your iPhone to your computer’s USB port. The only exception is if you have disabled the automatic sync.
Keeping Track of the Sync
At the top of iTunes, inside the Status window, you can see what is happening with the sync.
Handling Sync Conflicts
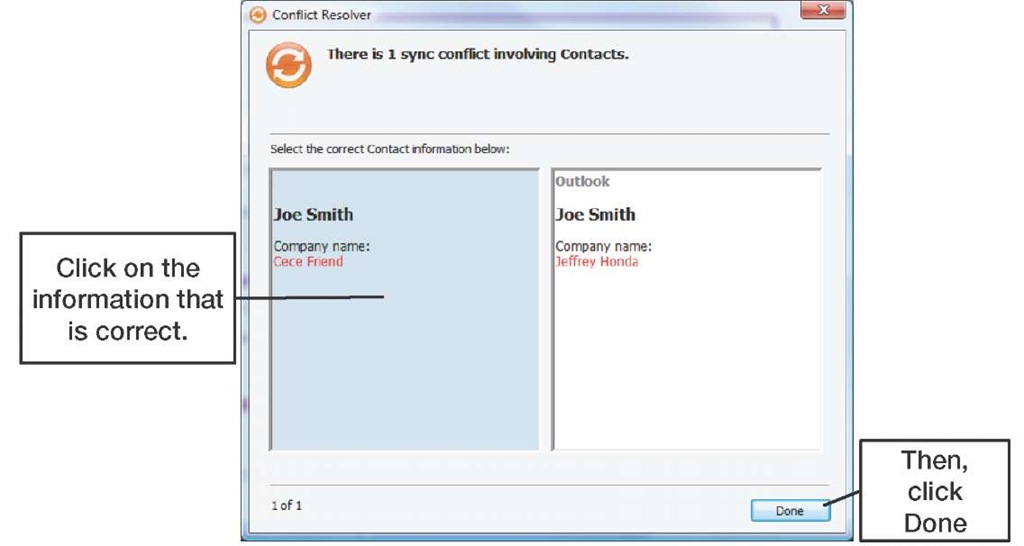
Sometimes, the iTunes sync will detect conflicts between the data in your computer and on your iPhone, such as the same contact entry with two different company names, or the same calendar entry with two different notes. Handling these conflicts is fairly straightforward.
1. In the Conflict Resolver window, click on the information that is correct. This turns the background a light blue, while the side not selected is white. See Figure 3-12.
2. If there are any more conflicts, click the Next button until you finish resolving all conflicts.
Figure 3-12. iTunes sync Conflict Resolver
3. Click Done to close the window.
4. All your selections will be applied to the next sync with your iPhone. As Figure 3-13 shows, the next screen gives you the choice to Sync Now or Sync Later.
Figure 3-13. Conflict Resolver final screen
NOTE: Conflicts can cause the sync to stop in mid-process. Contacts are synced first, then the Calendar. So if a Contacts sync conflict is found, the Calendar will not sync until the Contacts conflict is resolved. Make sure to resync your iPhone after you resolve conflicts to complete the sync.
Cancelling a Sync in Progress
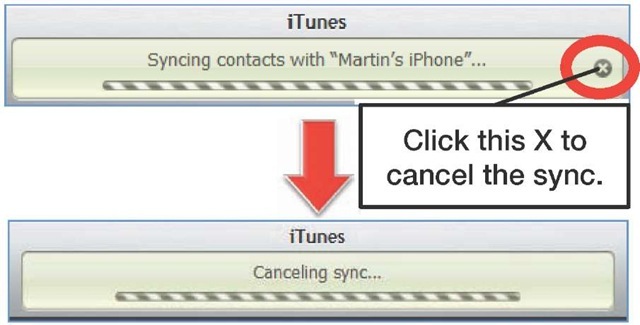
You can cancel a sync from iTunes or from your iPhone. To cancel the sync from iTunes on your computer:
Click the X inside the sync status window, as shown in Figure 3-14.
Figure 3-14. Clicking the X in the status window in iTunes to cancel the sync To cancel the sync from the iPhone:
Slide the slider bar at the bottom of the screen that says Slide to Cancel. This is in the same place as the normal Slide to Unlock message.
Why Might I Not Want to Use iTunes Automatic Sync?
There could be a few reasons to sync manually instead of automatically:
1. You don’t want to fill up your iPhone with too many music and video files.
2. The sync and backup process takes a long time, so you don’t want it to happen every time you connect your iPhone to your computer.
3. You plug your iPhone into various computers to charge it up, but don’t want to be asked if you want to erase and resync your music every time.
NOTE: If you want to drag and drop music and videos, you need to make sure to check the box next to Manually manage music and videos in the Summary tab in iTunes.
Manually Stopping the Auto Sync Before It Starts
There may be times you want to connect your iPhone to your computer without the auto sync starting up. This could be because you don’t have much time and want to quickly drag and drop a few new songs to your iPhone without syncing everything else.
To stop the normal auto sync of your iPhone, you can press certain keys on your computer keyboard while connecting your iPhone to your computer.
On a Windows PC:
Press and hold Shift + Ctrl while connecting your iPhone to your computer. On a Mac:
Press and hold Command + Option while connecting your iPhone.
Turning Off the Auto Sync Permanently
You can turn off the auto sync permanently in iTunes. You might want to do this if you prefer to have manual control over all the sync processes.
CAUTION: Turning off the auto sync also disables the automatic backup of your iPhone every time you connect it to your computer. This setting is best for a secondary computer, which you might use to charge your iPhone but would never want to sync.
To turn off the auto sync in iTunes, follow these steps:
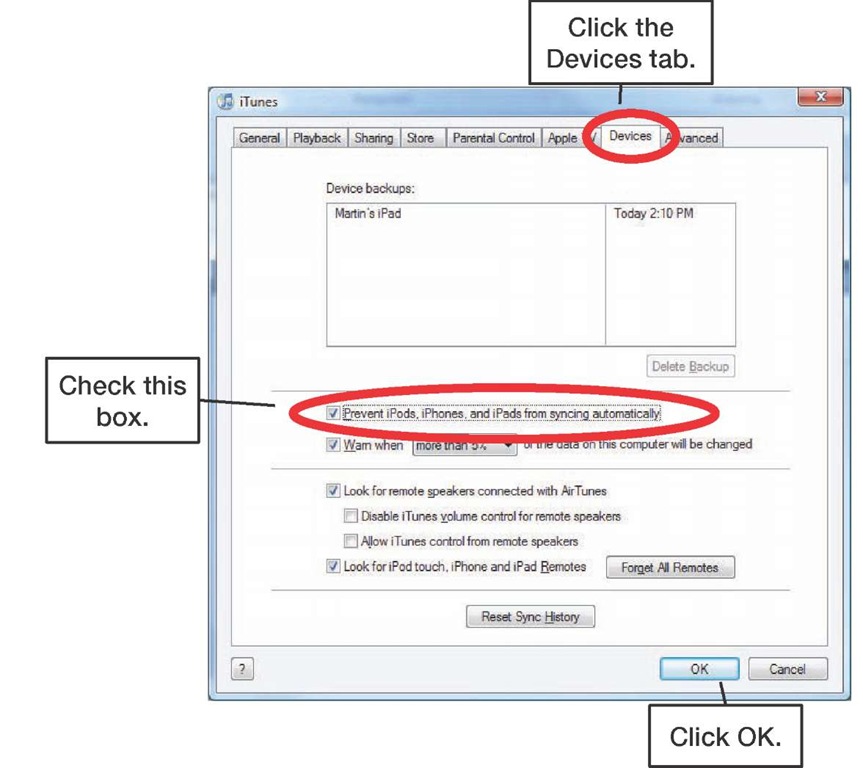
1. From the iTunes menu, select Edit and then Preferences.
2. Click on the Devices tab at the top.
3. Check the box next to Prevent iPods, iPhones and iPads from syncing automatically (see Figure 3-15).
4. Click the OK button to save your settings.
Figure 3-15. Disabling auto sync in iTunes
Getting a Clean Start with the Sync
Sometimes you’ll have issues with the sync and just need to get a fresh start. There are a few things you can do in this regard with iTunes: you can erase or reset the sync history so iTunes thinks it is syncing for the first time with your iPhone, and you can force all information on the iPhone to be replaced with information from your computer.
Reset Sync History (Make iTunes Think It Is Syncing for the First Time)
To reset your sync history in iTunes, follow these steps:
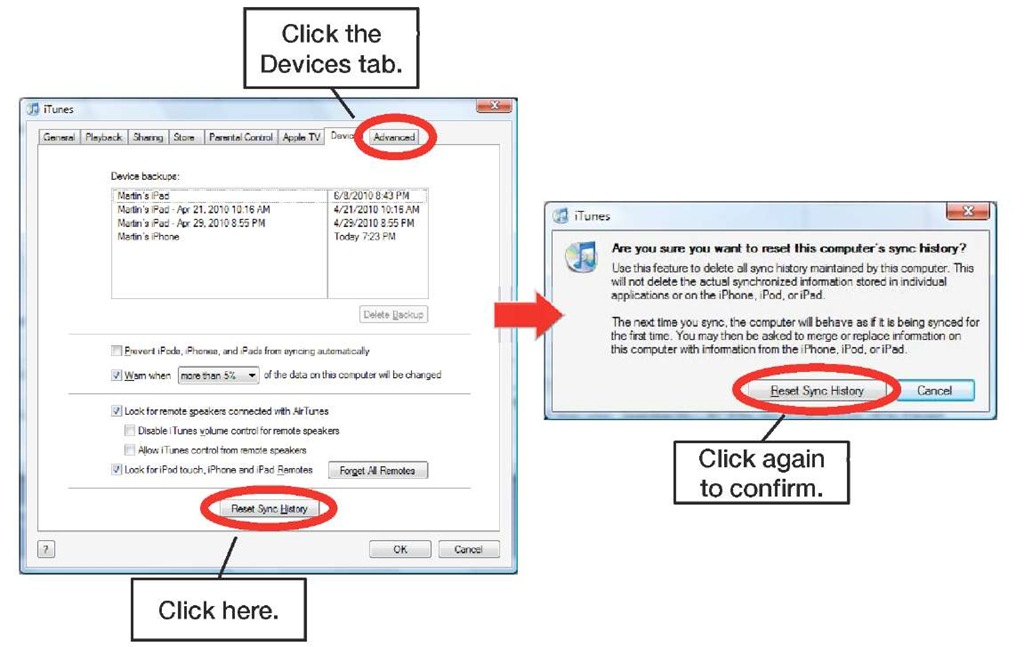
1. Select the Edit menu and then click on Preferences.
2. Click the Devices tab at the top of the iTunes Preferences window.
3. Click the Reset Sync History button at the bottom, as shown in Figure 3-16.
4. Confirm your selection by clicking Reset Sync History in the pop-up window.
Figure 3-16. Resetting sync history in iTunes
Replace All Information on the iPhone (Next Sync Only)
Sometimes you may need to get a fresh start with your iPhone information. For whatever reason, you want to get rid of all the information on your iPhone in one or all the synced apps and just start over. Follow steps.
1. As you did to set up the sync previously, connect your iPhone to your computer, start iTunes, click on your iPhone in the left nav bar, and click the Info tab at the top of the main window.
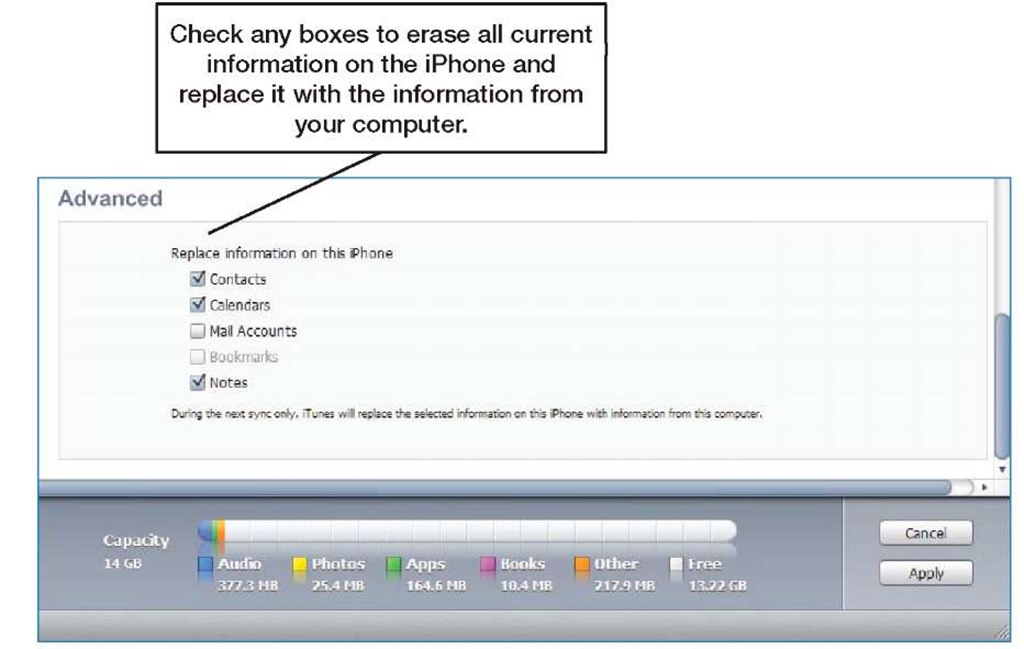
2. Scroll all the way down to the Advanced section (see Figure 3-17).
3. Check one, some, or all of the boxes as you desire.
Figure 3-17. In the Advanced area, select the information you want to replace.
4. When you are ready, click the Apply button in the lower-right corner. The sync should happen immediately. All of the information for the apps you have checked will be erased from the iPhone and replaced with the information from these your computer.

