Set Up Your iPhone
After your registration is complete, the first time you connect your iPhone, you will see the screen shown in Figure 1-11.
Figure 1-11. Set Up Your iPhone screen
1. If you would like to set this up as a new iPhone, do the following:
a. Click the selection next to Set up as a new iPhone.
b. Click the Continue button and skip to Step 3.
NOTE: If you want to keep your existing iPhone and/or iPod touch and set up your new iPhone, then you should select Setup a New iPhone, as shown.
2. If you would like to restore from a backup of another iPhone or device (iPad/iPod touch), do the following:
CAUTION: We have heard of people experiencing problems (lock-ups, lower battery life, etc.) when they restored a backup from a non-iPhone (iPad/iPod touch) to the iPhone. Also, selecting Restore here assumes you have first made a backup of your old device (iPad/iPod touch) in order to restore the latest information to your new iPhone.
a. Click the button next to Restore from the backup of.
b. Select the particular backup file from the drop-down menu.
c. Click the Continue button to restore data to your iPhone from the backup file.
d. Now you are done with the initial setup of your iPhone.
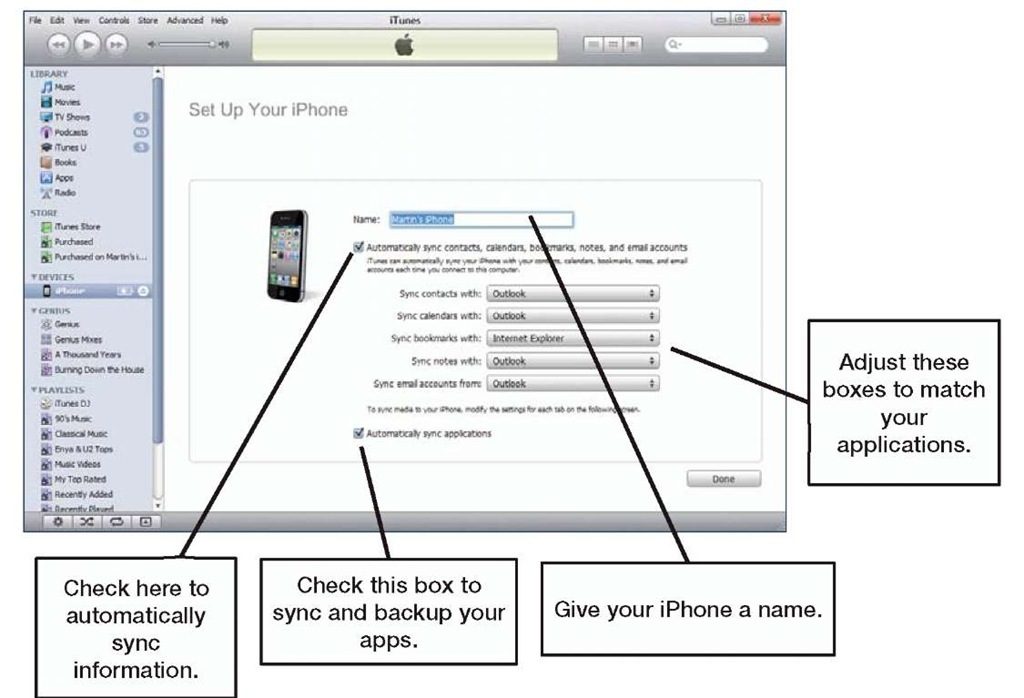
3. As shown in Figure 1-12, you have the option of naming your iPhone and setting up basic sync options in iTunes.
4. Give your iPhone a Name. Each time you plug in your iPhone—to this or any other computer—your iPhone will show the name you choose here.
Figure 1-12. Set Up Your iPhone screen—naming your iPhone and selecting sync options
TIP: To Get Moving Quickly and Not Sync Anything
The first sync to your iPhone can take a long time (15 minutes or more). If you want to start playing with your new iPhone quickly, uncheck both boxes shown in Figure 1-12 and click Done. Don’t worry—you can check or uncheck these boxes in iTunes later. We show you the details in topic 3, "Sync Your iPhone with iTunes."
5. To use iTunes to sync information between your computer and your iPhone, leave the box checked next to Automatically sync contacts, calendars, bookmarks, notes and email accounts.
6. To adjust the application selected to sync or turn off the sync, click the drop-down next to the item and select the appropriate action. In the image shown here, we are changing our bookmarks sync to none because we don’t want to sync bookmarks.
CAUTION: Your iPhone does not have as much memory as your computer, so be careful selecting automatically sync when you have thousands of songs, photos, or videos in your computer iTunes library.
7. Leave the box checked next to Automatically sync applications, if you would like applications you purchase on your iPhone backed up to your computer. We recommend leaving this checked. This option allows you to update apps from iTunes on your computer and be able to manage and arrange your app icons and Home screens using iTunes on your computer.
8. Click Done to complete the Set Up screen.
Setup Complete: The iPhone Summary Screen
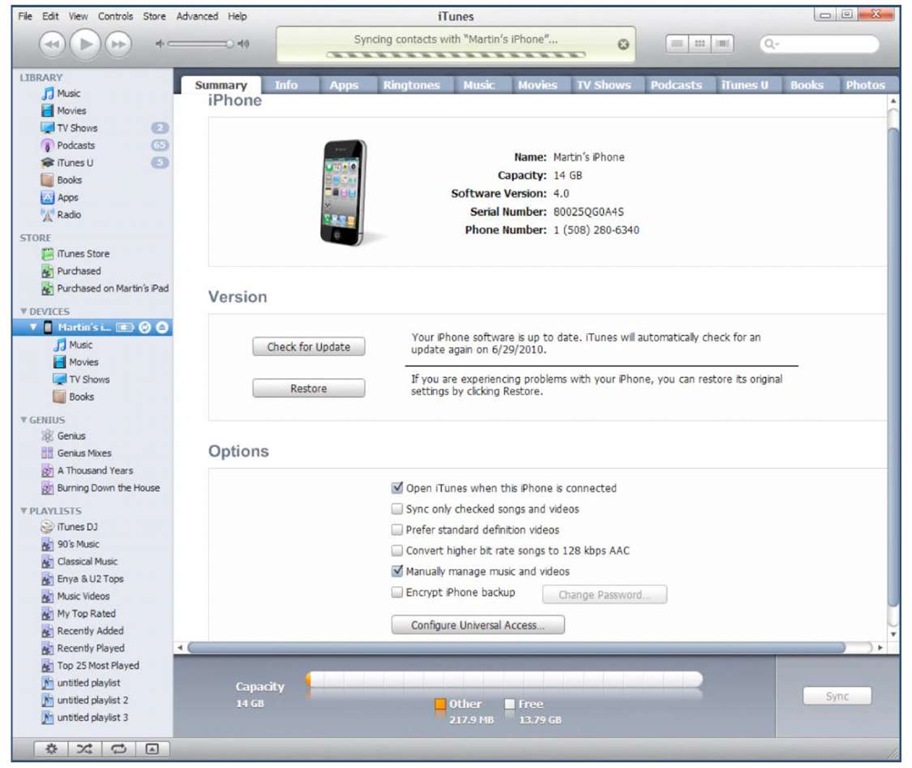
Once you confirm your choices and click Done (Figure 1-12), you will be taken to the main Summary screen (Figure 1-13).
Figure 1-13. iPhone Summary screen in iTunes


![tmp27-96_thumb[2] tmp27-96_thumb[2]](http://what-when-how.com/wp-content/uploads/2011/08/tmp2796_thumb2_thumb.jpg)

