Now that you know some of the basics about your iPhone and how to get the most out of your battery, you are ready to start enjoying it. Connecting it to iTunes is the next step. iTunes allows you to activate and register your iPhone and tie it to your Apple ID (iTunes account). Once you do that, you can buy songs, movies, books, and just about anything else right from your iPhone or in iTunes on your computer.
You can also use iTunes to load up your music and videos and even backup your iPhone and later restore it. If you don’t have iTunes, you will need to install the latest version (9.2 at time of writing).
Knowing If You Need to Activate Your iPhone
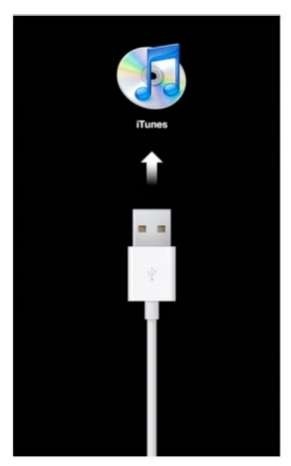
You need to connect your iPhone to iTunes to activate it if you see the black screen similar to the one here, showing the USB cable plugging into iTunes, and only emergency calls are allowed.
Skip to the "iTunes and Your iPhone" section later in this topic to find out how to get your iPhone going.
Slide to Unlock and Your Home Screen
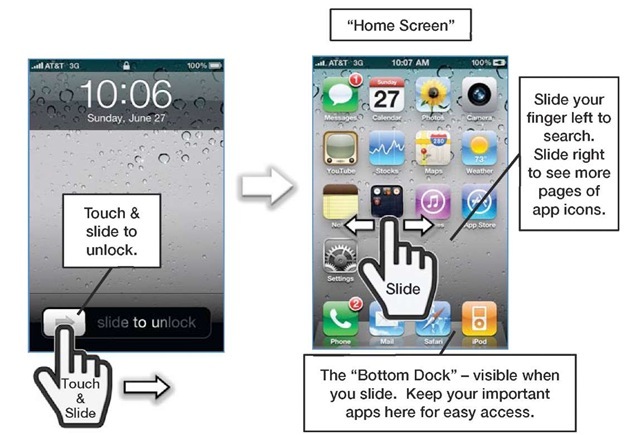
Once your iPhone has been activated, you will see the Slide to Unlock screen, as shown in Figure 1-3. Touch your finger to the screen and follow the path of the arrow to slide the unlock button to the right.
Once you do that, you will see your Home screen.
Notice that the four icons locked in the Bottom Dock (Figure 1-3, bottom-right) do not move while the rest of the icons can move back and forth in "pages." Learn how to move your favorite icons into the Bottom Dock in our "Moving Icons" section in topic 7.
Figure 1-3. Slide to unlock, moving around your Home screen and the Bottom Dock
Install or Upgrade iTunes on Your Computer
If you do not have iTunes loaded on your computer, then open a web browser and go to www.itunes.com/download. Download the software from the link provided.
TIP: We have detailed instructions showing you how to install iTunes in the "How to Download and Install iTunes" section and also how to upgrade iTunes in the "iTunes Upgrade" section in topic 30, "iTunes User Guide."
If you already have iTunes installed on your computer, you should check to see if an updated version is available. Version 9.2 was the latest at publishing time.
1. Start iTunes.
2. If you are a Windows user, select Help from the menu, and then Check for Updates.
3. If you are a Mac user, select iTunes from the menu, and then Check for Updates.
4. If an update is available, then follow the instructions to update iTunes.
Connecting Your iPhone to iTunes the First Time
Once you have installed or upgraded to iTunes version 9.2 or higher, you are ready to connect your iPhone to iTunes on your computer.
TIP: Using the iTunes Home Sharing feature, you can share your purchased content from the same iTunes account (music, apps, videos, iBooks, and more) across authorized computers on your home network. Also, any of the same content can be synced to any iPod/iPhone/iPhone under the same iTunes account. Learn more about syncing content using iTunes in topic 3, "Sync with iTunes," and learn about Home Sharing in topic 30, "iTunes User Guide."
By connecting your iPhone to iTunes, you will register or associate your iPhone (via the device serial number) to a particular iTunes account (Apple ID).
TIP: The bonus of this approach is that if you have purchased apps for another iPhone or iPod touch and other content (music, videos, and more), then you can run all those apps on your new iPhone! Note that all content you sync to your iPhone has to originate from a single computer. So you need to select your "main" computer to sync with your iPhone.
If you do not yet have an iTunes Account (Apple ID), we will show you how to create one.
Start Up iTunes
If iTunes is not already running, double-click the iTunes icon on your desktop.
■ Mac users, you may have to click the Finder icon, select the Go menu, and then select Applications to look for iTunes. (The Mac shortcut is Shift+Command+A to get to Applications.)
■ Windows users, click on the Start menu or Windows logo in the lower left corner, select All Programs, and then select iTunes.
After you start iTunes, it should open, with the left and main window nav bars looking similar to the image shown in Figure 1-4. The main window content may look quite different.
Figure 1-4. iTunes software main window (selections shown: iTunes Store and App Store)
NOTE: What is shown in the main window on your iTunes will look quite different depending on what you select in the left navigation bar and the top navigation bar. In Figure 1-4, the iTunes Store is selected in the left nav bar and the App Store is selected in the main nav bar so we see App Store-related content in the main window.
Registering or Activating Your iPhone the First Time
Once you have iTunes installed or updated on your computer, you are ready to connect your iPhone for the first time and get it registered or activated so you can start using it.
NOTE: If your iPhone has already been registered (you see the "Slide to Unlock" message or your Home screen of icons when you tap the Home button on the bottom of your device), then you can skip this Registration section and jump to the "Set Up Your iPhone" section later in this topic.
1. Start up iTunes on your computer.
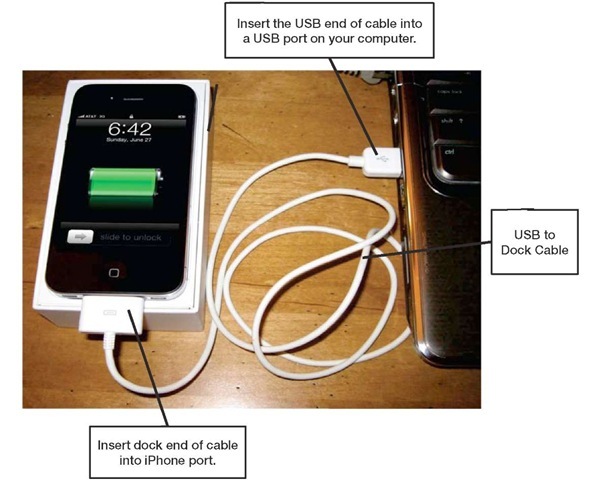
2. Connect your iPhone to your computer, as shown in Figure 1-5. Plug in the wide end of the white USB cable to the bottom port on your iPhone and the small USB connector end into an available USB port on your computer.
Figure 1-5. Connecting your iPhone to your computer with the USB cable
NOTE: You need to use the USB cable instead of Bluetooth or Wi-Fi to connect your iPhone to iTunes on your computer.
3. When you connect your iPhone to your computer the first time, your Windows computer should automatically install the necessary drivers. If you are on a Mac computer, you may see messages recommending you upgrade to the latest version of the operating system before using your iPhone. Follow the steps shown on the screen to complete the process.
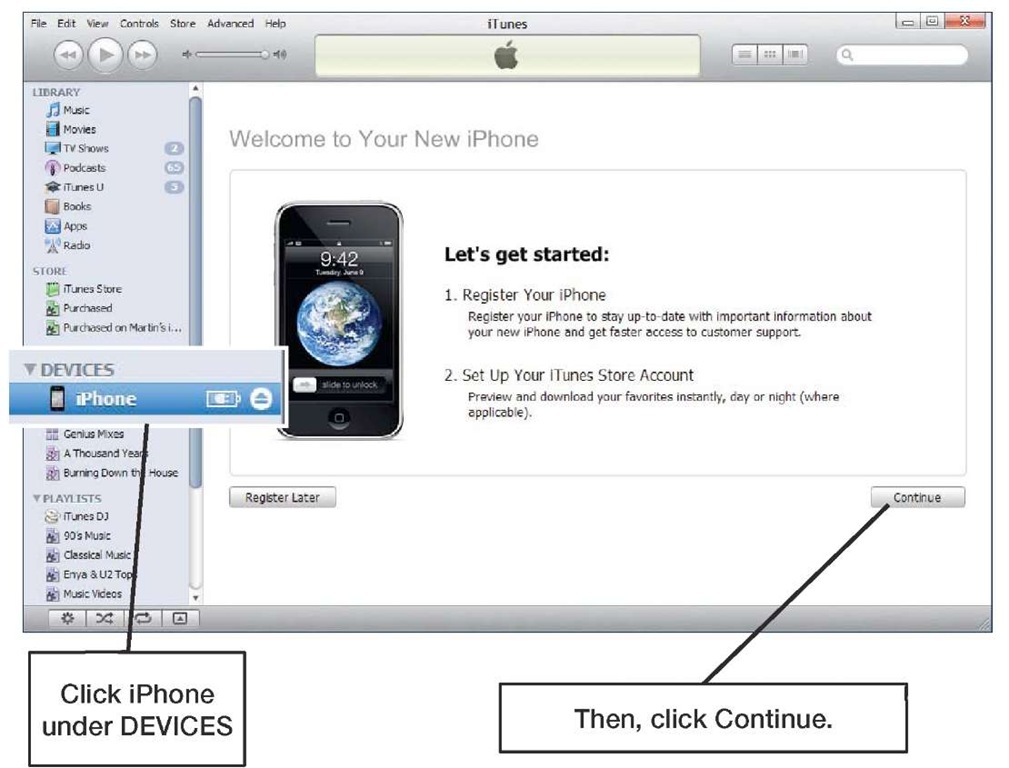
4. In order to see the Setup screen you may need to click iPhone under DEVICES in the left nav bar. Then you should see the new iPhone Setup screen, as shown in Figure 1-6.
Figure 1-6. iPhone first time setup window in iTunes after clicking on "iPhone" in the left navigation bar
5. Click the Continue button to see the Apple iPhone License Agreement, as shown in Figure 1-7.
Figure 1-7. iPhone first time setup License Agreement screen
6. In order to continue, check the box under the license agreement and click the Continue button.
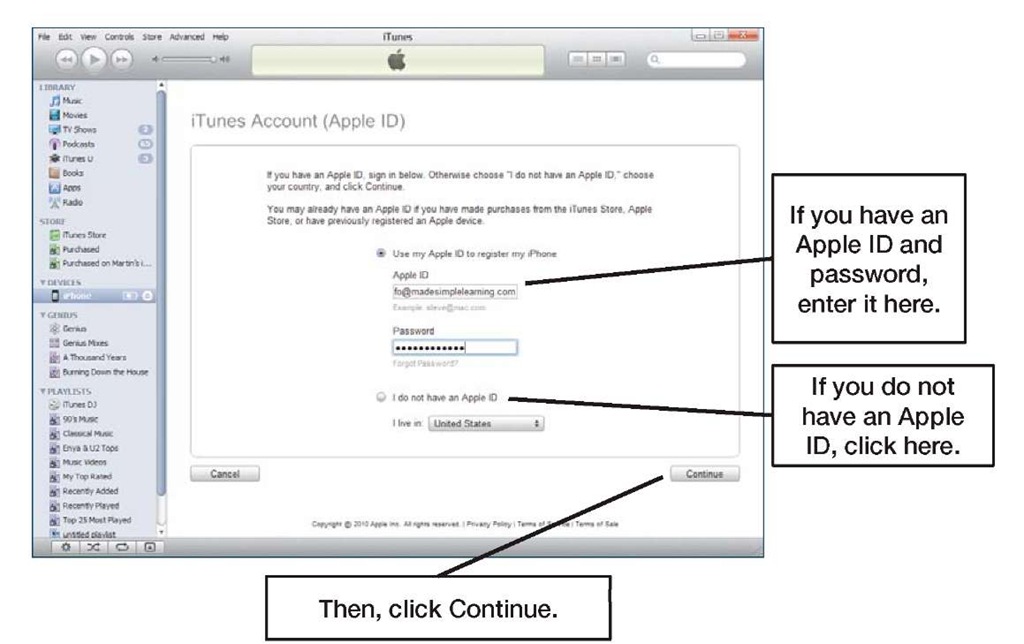
7. You will then be given the opportunity to sign in using your Apple ID or create a new Apple ID (Figure 1-8).
Figure 1 -8. iPhone first time setup login or create Apple ID
8. Enter your Apple ID and password or click I do not have an Apple ID and select your country.
9. Then click the Continue button.
■ If you tried to enter your Apple ID and password and received an error message about "additional security information is required," then read the "Troubleshooting: Fixing the Apple ID Security Error" section in topic 30, "iTunes User Guide."
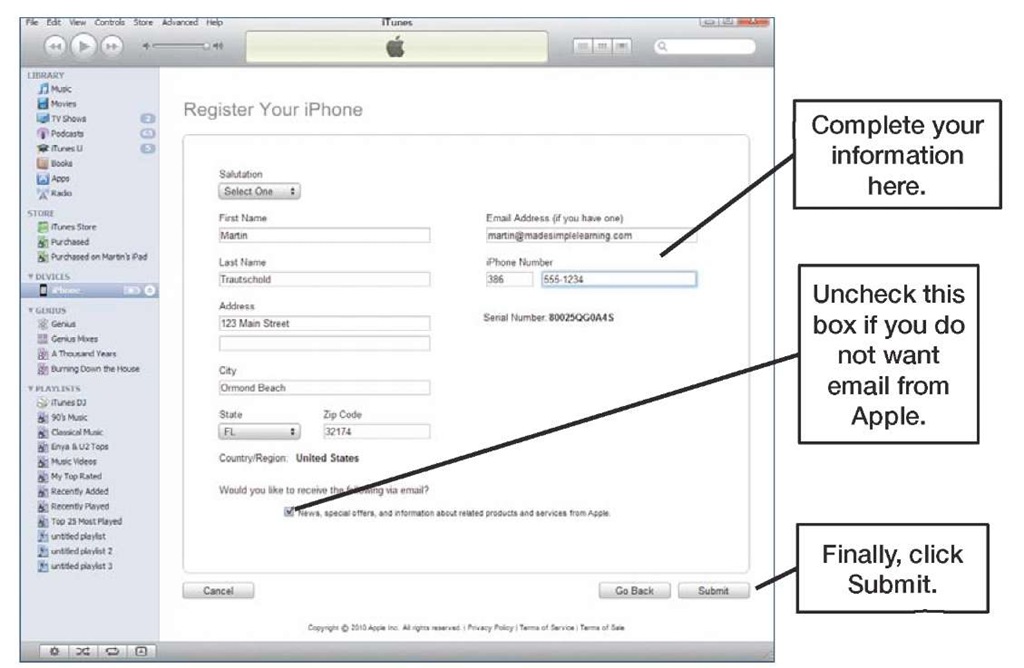
10. You should now see the Registration screen shown in Figure 1-9.
Figure 1-9. iPhone Registration screen, without an Apple ID
11. Type in your information and click Submit to complete your registration.
If everything has been entered correctly, you will see either the MobileMe ad (Figure 110) or the Set Up Your iPhone screen (Figure 1-11).
Apple’s MobileMe Sync Service
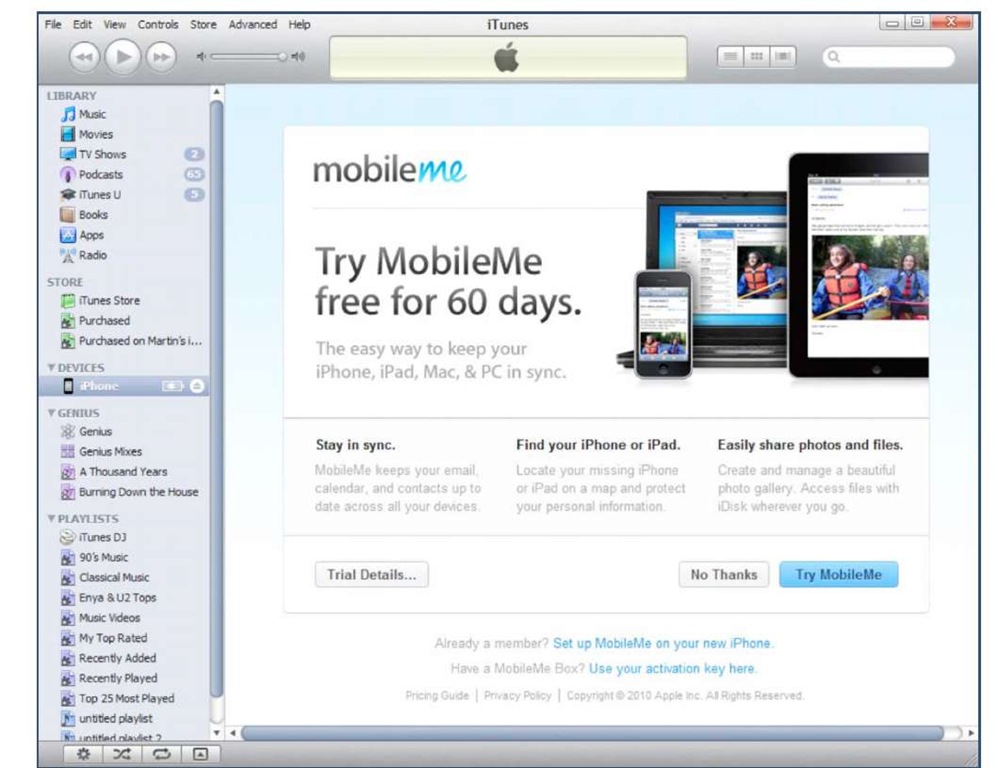
After registering your iPhone for the first time, you will probably see a screen advertising MobileMe, as shown in Figure 1-10.
Figure 1-10. iTunes MobileMe ad page (usually appears after registering your iPhone)
To keep setting up your iPhone, click the No Thanks button to continue to the next screen.
What is MobileMe?
MobileMe is free for a limited time (currently 60 days), and then it costs US $99.00 for a single user or US $149.00 for a family plan. MobileMe provides a way to keep your email, contacts, calendar, web bookmarks shared across all your computers and mobile devices. You can even use MobileMe to locate a missing iPhone! At publishing time, photo sharing is limited to Mac computers with MobileMe iPhoto folders. See our MobileMe Tour section in topic 5, "Other Sync Methods."
