To Animate
To draw frame by frame in Photoshop, you will need a blank video layer on which to draw:
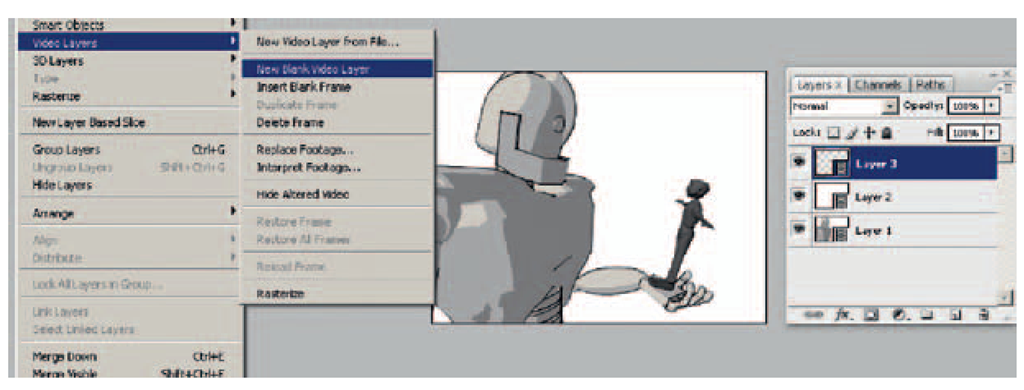
1. Click Layer > Video Layers > New Blank Video Layer. Note the new blank video layer in the layer palette.
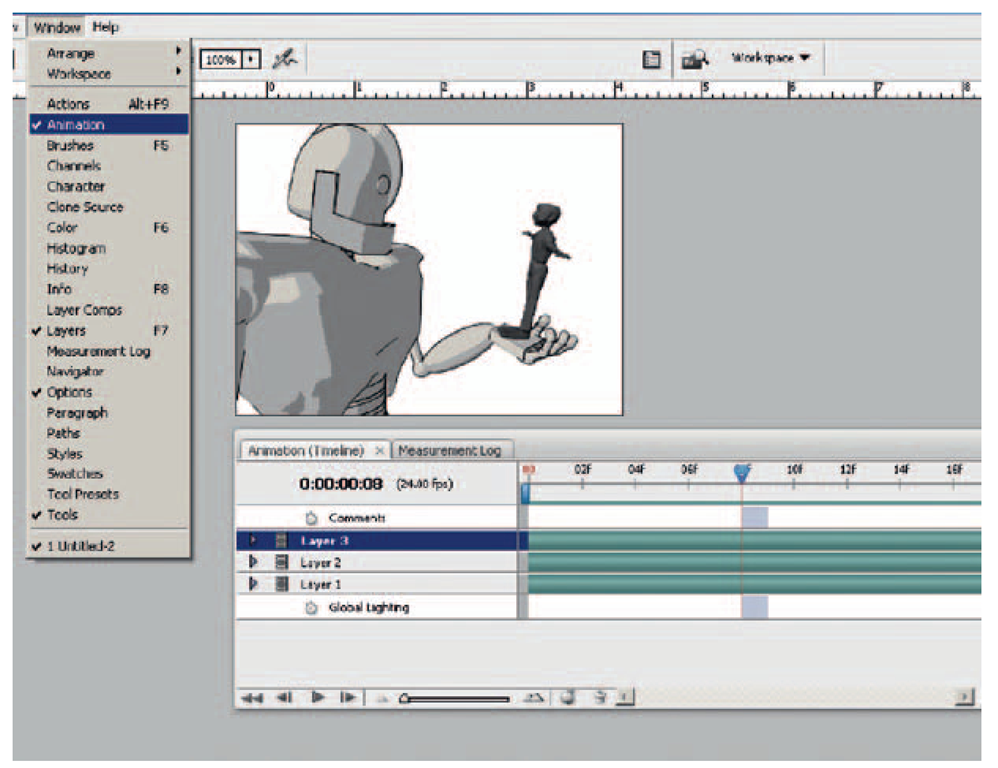
2. To be able to see the frames, you need to click Window > Animation. This will open the timeline animation window.
3. To see different frames, scrub through the timeline frames by clicking and dragging on the blue arrow.
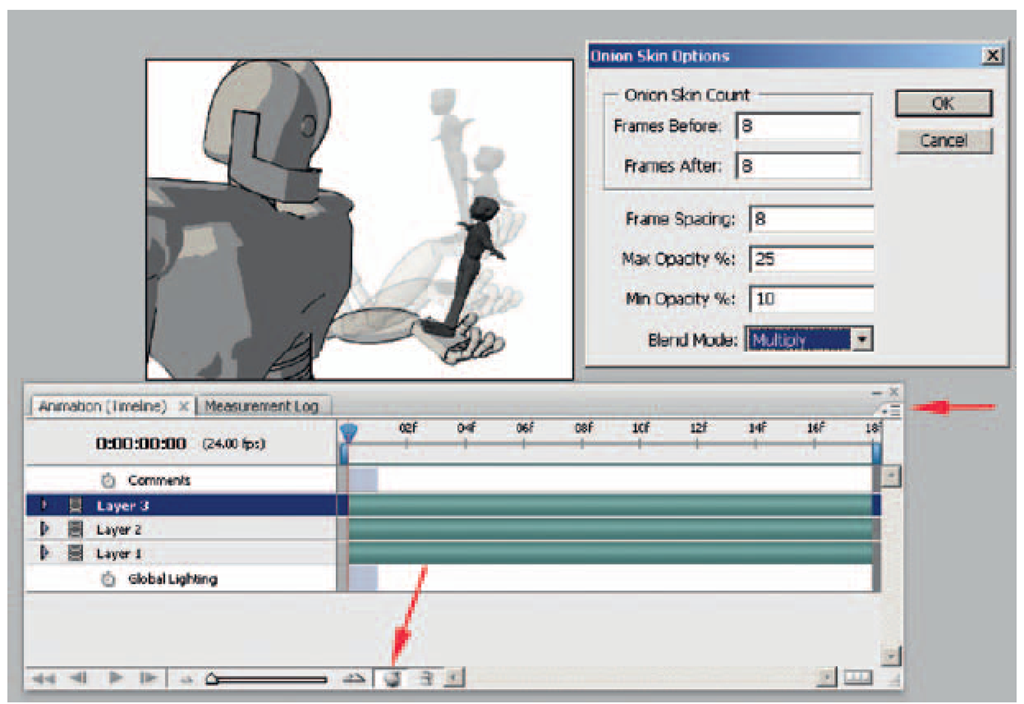
4. You can do straight ahead animation easily, or to do pose-to-pose animation, you will want to turn onion skinning on so that you can see keyframes before and after the breakdown.
FIGURE 3.31 Blank video layer to draw on.
FIGURE 3.32 Animation window.
Turn on onion skinning by clicking on the onion icon at the bottom of the animation window. To change the settings of how many drawings you see before and after, click on the arrow at the top right of the animation window and choose Onion Skin settings.
5. Set brush size and style.
Dig Deeper
If you want to know a lot more about how to control the line look in Photoshop, check out Creative Photoshop: Digital Illustration and Art Techniques Covering Photoshop CS3 by Derek Lea.
FIGURE 3.33 Onion skinning.
6. Animate by drawing on each frame. If you have keyframes with the 3D reference character posed, it helps the 2D animator tie down the contact points more clearly.
A note on animating in Photoshop: this topic is using timeline keyframes. The other method of using Photoshop to animate is frame animation. In our classroom experience we have found that half of the room prefers using the timeline and the other half prefers frame animation. Frame animation is the original implementation of animation; timeline was developed later. If you wish to use the older version of animation, take a look at the Photoshop documentation. You can guess what side of the room I am on.
If you are using CS4 or later, you can use hotkeys to advance to the next frame or go back to the previous frame (super handy when animating). The hotkeys are the arrow keys, and you will need to turn on timeline hotkeys by clicking on the option arrow in the upper right corner of the animation window and turning on Enable Timeline Short-Cut Keys.
Rendering
When you are done animating, you will want to save out your file as individual images. These images can then be composited together with the other levels in the compositing package of your choice.
1. First, HIDE the reference layers. (Otherwise they will render with your drawn images. OOPS!)
2. Save the PSD file to retain the video layers for future changes.
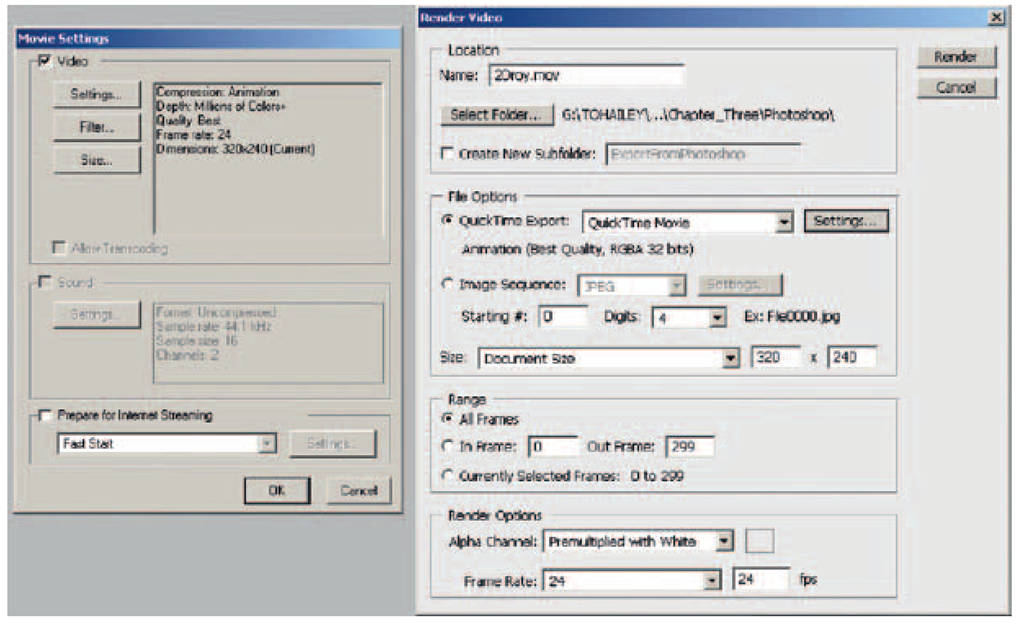
3. Select File > Export > Render Video.
Use the following settings:
1. Set name and folder.
2. You can render out to quick time or individual frames. The only way to get alpha channels is to use QuickTime Movie.
3. To keep from losing render quality, click QuickTime Settings.. Make sure the compression setting is set to Animation and Millions of Colors. This will not compress your images. (I would prefer to use .tifs, but at the moment Adobe packages do not seem to support .tif rgba.)
4. Set the Alpha Channel to be Premultiplied with White.
5. Warning! Watch out for the frame rate option at the bottom of the menu!
6. Click Render.
This will save a movie file of your animation with alpha channels. Note that you do not have an image for each frame. Instead, you have a movie file and that file can get quite large. It is the same difference—100 individual frames or one big file.
FIGURE 3.34 Rendering options.
Maya and corel Painter
If you want to use Corel Painter to animate in, it takes a few more button clicks, but you get the added bonus of animating in Painter. The paintbrushes and paper textures can add a great look to your animated film.
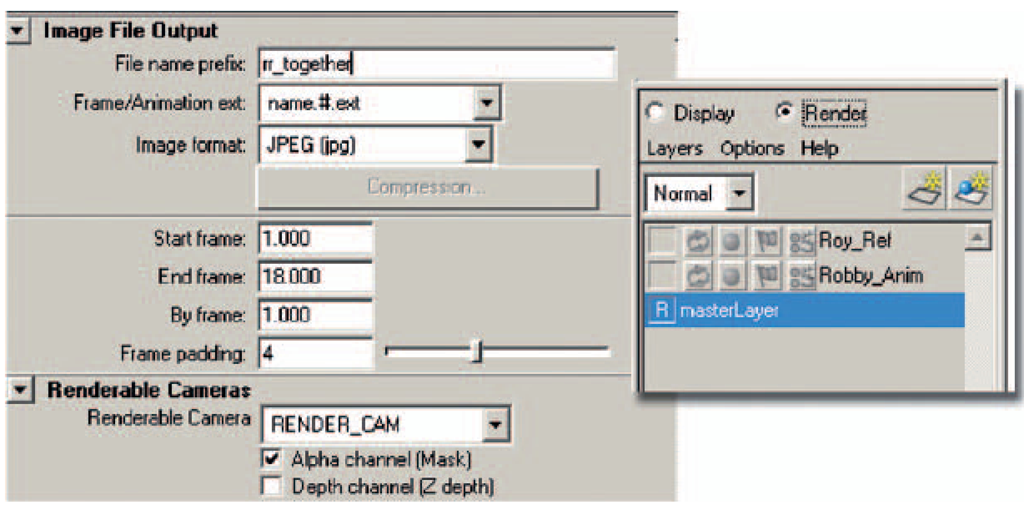
There are some issues with Corel Painter. Unlike Photoshop, you cannot bring in separate image layers as video reference. (If you find a way to do so, post it on the forum!) Second, I find that reading in .tifs causes Painter to crash. So instead, you will want a render from Maya that is a jpg and is not using render layers.
Re-Render
You can use Photoshop to composite the Robby and Roy reference images together or re-render in Maya. It is up to you. In this topic, we’ll use Maya very quickly to re-render.
1. Open the Maya file of your completed animation or our file Robby_3DLeads2D_5.mb.
2. Freak out because you only see Roy and not the Robot. (I did. I thought I had lost something. One shouldn’t work so late at night. It makes you jumpy.)
3. Go to the Render Layer area and click masterLayer so that everything shows.
4. Turn off Options > Render All Layers.
5. In the render layers, make sure that an R is only on the master-Layer or you will wonder why you don’t have the master layer rendered.
6. Change the render settings so that you output a jpg image.
7. Batch Render.
FIGURE 3.35 Render Settings to output for Corel Painter.
