In This Chapter
Finding out when to use custom dialog boxes Understanding UserForm objects Displaying a custom dialog box
Creating a custom dialog box that works with a useful macro custom dialog box is useful if your VBA macro needs to get information from a user. For example, your macro may have some options that can be specified in a custom dialog box. If only a few pieces of information are required (for example, a Yes/No answer or a text string), the techniques I describe in Chapter 15 may do the job. But if you need to obtain more information, you must create a custom dialog box. In this chapter, you find out what essential skills you need to create and work with custom dialog boxes.
Knowing When to Use a Custom Dialog Box (Also Known as UserForm)
This section describes a situation in which a custom dialog box is useful. The following macro changes the text in each cell in the selection to uppercase letters. It does this by using the VBA built-in UCase function.

You can make this macro even more useful. For example, it would be nice if the macro could also change the text in the cells to either lowercase or proper case (capitalizing the first letter in each word). One approach is to create two additional macros (one for lowercase and one for proper case). Another approach is to modify the macro to handle the other options. Regardless of the approach, you need some method of asking the user which type of change to make to the cells.
The solution is to display a dialog box like the one shown in Figure 16-1. You create this dialog box on a UserForm in the VBE and display it using a VBA macro. In the next section, I provide step-by-step instructions for creating this dialog box. But before I get into that, I set the stage with some introductory material.

Figure 16-1:
You can get information from the user by displaying a custom dialog box.
In Excel, the official name for a custom dialog box is a UserForm. But a UserForm is really an object that contains what’s commonly known as a dialog box. This distinction isn’t important, so I tend to use these terms interchangeably.
Creating Custom Dialog Boxes: An Overview
To create a custom dialog box, you usually take the following general steps:
1. Determine how the dialog box will be used and where it will be displayed in your VBA macro.
2. Press Alt+F11 to activate the VBE and insert a new UserForm object.
A UserForm object holds a single custom dialog box.
3. Add controls to the UserForm.
Controls include items such as text boxes, buttons, check boxes, and list boxes.
4. Use the Properties window to modify the properties for the controls or for the UserForm itself.
5. Write event-handler procedures for the controls (for example, a macro that executes when the user clicks a button in the dialog box).
These procedures are stored in the Code window for the UserForm object.
6. Write a procedure (stored in a VBA module) that displays the dialog box to the user.
Don’t worry if some of these steps seem foreign. I provide more details in the following sections, along with step-by-step instructions for creating a custom dialog box.
Working with UserForms
Each custom dialog box that you create is stored in its own UserForm object — one dialog box per UserForm. You create and access these UserForms in the Visual Basic Editor.
Inserting a new UserForm
Insert a UserForm object with the following steps:
1. Activate the VBE by pressing Alt+F11.
2. Select the workbook in the Project window.
3. Choose InsertOUserForm.
The VBE inserts a new UserForm object, which contains an empty dialog box.
Figure 16-2 shows a UserForm — an empty dialog box.
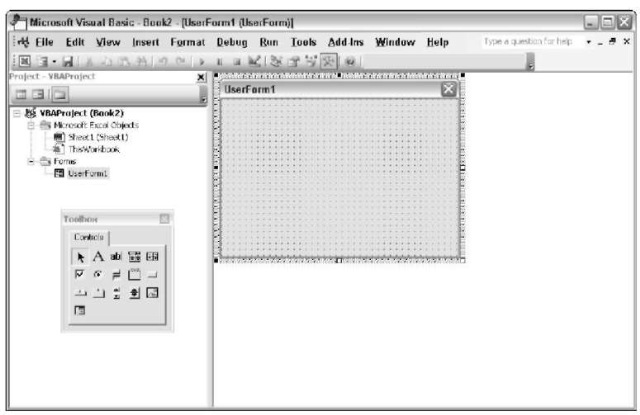
Figure 16-2:
A new UserForm object.
Adding controls to a UserForm
When you activate a UserForm, the VBE displays the Toolbox in a floating window, as shown in Figure 16-3. You use the tools in the Toolbox to add controls to your custom dialog box. Just click the desired control in the Toolbox and drag it into the dialog box to create the control. After you add a control, you can move and resize it using standard techniques.
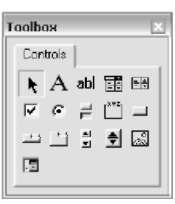
Figure 16-3:
You use the tools in the Toolbox to add controls to a UserForm.
Table 16-1 indicates the various tools, as well as their capabilities. To determine which tool is which, hover your mouse button over the control and read the small pop-up description.
| Table 16-1 | Toolbox Controls |
| Control | What It Does |
| Label | Stores text |
| TextBox | Allows the user to enter text |
| ComboBox | A drop-down list |
| ListBox | A list of items |
| CheckBox | Useful for on/off or yes/no options |
| OptionButton | Used in groups, allows the user to select one of sev- |
| eral options | |
| ToggleButton | A button that is either on or off |
| Frame | Contains other controls |
| CommandButton | A clickable button |
| TabStrip | Displays tabs |
| MultiPage | Tabbed container for other objects |
| ScrollBar | Draggable bar |
| SpinButton | Clickable button often used for changing a value |
| Image | Contains an image |
| RefEdit | Allows the user to select a range |
Changing properties for a UserForm control
Every control you add to a UserForm has a number of properties that determine how the dialog box looks or behaves. You can change these properties with the Properties window, shown in Figure 16-4. The Properties window appears when you press F4, and the properties shown in this window depend on what is selected. If you select a different control, the properties change to those appropriate for that control. To hide the Properties window, click the close button in its title bar.
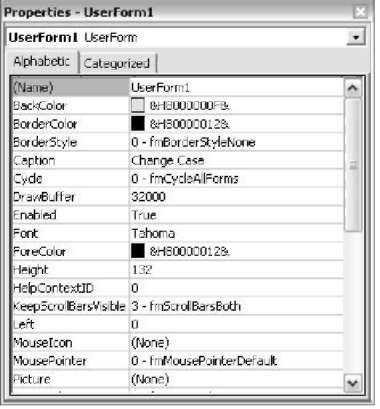
Figure 16-4:
Use the Properties windows to change the properties of UserForm controls.
Properties for controls include the following:
Name
Width
Height
Value
Caption
Each control has its own set of properties (although many controls have many common properties). The next chapter tells you everything you need to know about working with dialog box controls.
If you select the UserForm itself (not a control on the UserForm), you can use the Properties window to adjust UserForm properties.
Viewing the UserForm Code window
Every UserForm object has a Code window that holds the VBA code (the event-handler procedures) executed when the user works with the dialog box. To view the Code window, press F7. The Code window is empty until you add some procedures. Press Shift+F7 to return to the dialog box.
Another way to switch between the Code window and the UserForm display: Use the View Code and View Object buttons in the Project window’s title bar. You find out more about the Code window in Chapter 17.
Displaying a custom dialog box
You can display a custom dialog box by using the UserForm’s Show method in a VBA procedure.
The macro that displays the dialog box must be in a VBA module — not in the Code window for the UserForm.
The following procedure displays the dialog box named UserForm1:

When Excel displays the dialog box, the macro halts until the user closes the dialog box. Then VBA executes any remaining statements in the procedure. Most of the time, you won’t have any more code in the procedure. As you later see, you can put your macro code in the Code window for the UserForm.
Using information from a custom dialog box
The VBE provides a name for each control you add to a UserForm. The control’s name corresponds to its Name property. Use this name to refer to a particular control in your code. For example, if you add a CheckBox control to a UserForm named UserForml, the CheckBox control is named CheckBoxl by default. The following statement makes this control appear with a check mark:
![]()
Your VBA code can also check various properties of the controls and take appropriate actions. The following statement executes a macro named PrintReport if the check box (named CheckBoxl) is checked:
![]()
I discuss this topic in detail in the next chapter.
A Custom Dialog Box Example
This section’s UserForm example is an enhanced version of the ChangeCase macro from the beginning of the chapter. Recall that the original version of this macro changes the text in the selected cells to uppercase. This modified version uses a custom dialog box to ask the user which type of change to make: uppercase, lowercase, or proper case.
This dialog box needs to obtain one piece of information from the user: the type of change to make to the text. Because the user has three choices, your best bet is a custom dialog box with three OptionButton controls. The dialog box also needs two more buttons: an OK button and a Cancel button. Clicking the OK button runs the code that does the work. Clicking the Cancel button causes the macro to halt without doing anything.
This workbook is available at the topic’s Web site. However, you get more out of this exercise if you follow the steps provided here and create it yourself.
Creating the custom dialog box
These steps create the custom dialog box. Start with an empty workbook.
1. Press Alt+F11 to activate the VBE.
2. If multiple projects are in the Project window, select the project that corresponds to the workbook you’re using.
3. Choose InsertOUserForm.
The VBE inserts a new UserForm object with an empty dialog box.
4. Press F4 to display the Properties window.
5. In the Properties window, change the dialog box’s Caption property
to Change Case.
6. The dialog box is a bit too large, so you may want to click it and use the handles to make it smaller.
Step 6 can also be done after you position all the controls in the dialog box.
Adding the CommandButtons
Ready to add two CommandButtons — OK and Cancel — to the dialog box? Follow along:
1. Make sure the toolbox is displayed. If it isn’t, choose ViewOToolbox.
2. If the Properties window isn’t visible, press F4 to display it.
3. In the toolbox, drag a CommandButton into the dialog box to create a button.
As you see in the Properties box, the button has a default name and caption: CommandButtonl.
4. Make sure the CommandButton is selected. Then activate the Properties window and change the following properties:
Property Change To
Name OKButton
Caption OK
Default True
5. Add a second CommandButton object to the UserForm and change the following properties:
Property Change To
Name CancelButton
Caption Cancel
Cancel True
6. Adjust the size and position of the controls so your dialog box looks something like Figure 16-5.
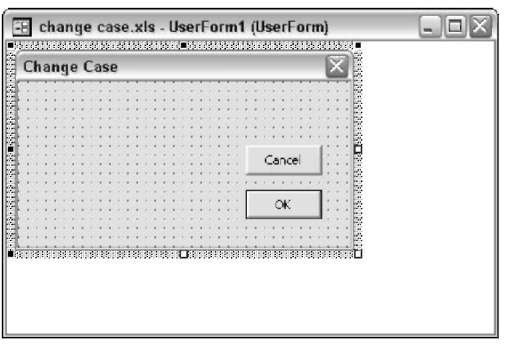
Figure 16-5:
The UserForm with two Command-Button controls.
Adding the OptionButtons
In this section, you add three OptionButtons to the dialog box. Before adding the OptionButtons, you add a Frame object that contains the OptionButtons. The Frame isn’t necessary, but it makes the dialog box look better.
1. In the toolbox, click the Frame tool and drag in the dialog box.
This creates a frame to hold the options buttons.
2. Use the Properties window to change the frame’s caption to Options.
3. In the Toolbox, click the OptionButton tool and drag in the dialog box (within the Frame).
This creates an OptionButton control.
4. Select the OptionButton and use the Properties window to change the following properties:
Property Change To
Name OptionUpper
Caption Upper Case
Accelerator U
Value True
Setting the Value property to True makes this OptionButton the default.
5. Add another OptionButton and use the Properties window to change the following properties:
Property Change To
Name OptionLower
Caption Lower Case
Accelerator L
6. Add a third OptionButton and use the Properties window to change the following properties:
Property Change To
Name OptionProper
Caption Proper Case
Accelerator P
7. Adjust the size and position of the OptionButtons, Frame, and dialog box.
Your UserForm should look something like Figure 16-6.
The Accelerator property determines which letter in the caption is underlined. For example, you can select the Lower Case option by pressing Alt+L because the L is underlined.
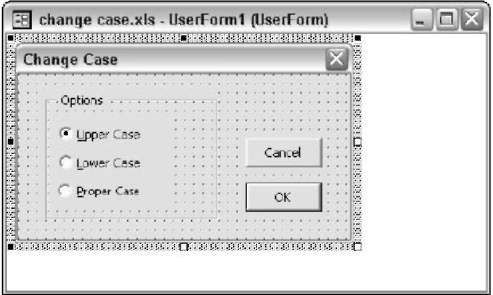
Figure 16-6:
This is the UserForm after adding three Option Button controls inside a Frame control.
You may wonder why the OptionButtons have accelerator keys but the CommandButtons go without. Generally, OK and Cancel buttons never have accelerator keys because they can be accessed from the keyboard. Pressing Enter is equivalent to clicking OK because the control’s Default property is True. Pressing Esc is equivalent to clicking Cancel, because the control’s Cancel property is True.
Adding event-handler procedures
Here’s how to add an event-handler procedure for the Cancel and OK buttons:
1. Double-click the Cancel button.
VBE activates the Code window for the UserForm and inserts an empty procedure:
![]()
The procedure named CancelButton_Click is executed when the Cancel button is clicked, but only when the dialog box is displayed. In other words, clicking the Cancel button when you’re designing the dialog box won’t execute the procedure. Because the Cancel button’s Cancel property is set to True, pressing Esc also triggers the CancelButton_Click procedure.
2. Insert the following statement inside the procedure (before the End Sub statement):
![]()
This statement simply closes the UserForm when the Cancel button is clicked.
3. Press Shift+F7 to return to the UserForm.
4. Double-click the OK button.
VBE activates the code window for the UserForm and inserts an empty Sub procedure called
![]()
Clicking OK executes this procedure. Because this button has its Default property set to True, pressing Enter also executes the OKButton_Click procedure.
5. Enter the following code inside the procedure:
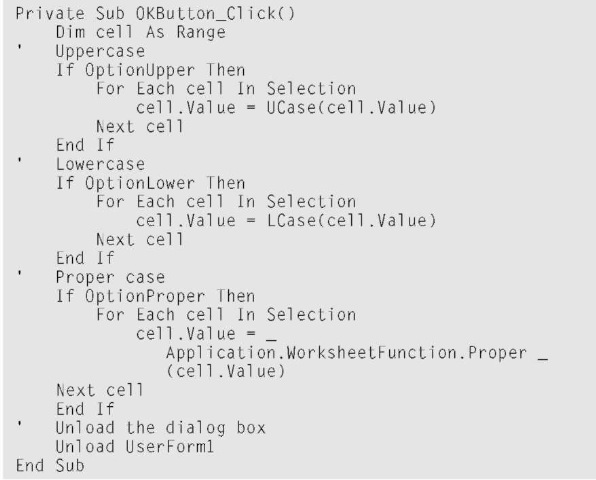
The preceding code is an enhanced version of the original ChangeCase macro that I presented at the beginning of the chapter. The macro consists of three separate blocks of code. This code uses three If-Then structures; each one has a For Each loop. Only one block is executed, according to which OptionButton the user selects. The last statement unloads (closes) the dialog box after the work is finished.
Notice that VBA has a UCase function and an LCase function, but not a function to convert text to proper case. Therefore, I use Excel’s PROPER worksheet function (preceded by Application.WorksheetFunction) to do the actual
conversion. Another option is to use the VBA StrConv function. (See the Help system for details.) The StrConv function is not available in all Excel versions, so I used the PROPER worksheet function instead.
Creating a macro to display the dialog box
The only thing missing is a way to display the dialog box. Follow these steps to make the procedure that makes the dialog box appear:
1. In the VBE window, choose Insert Module.
The VBE adds an empty VBA module (named Modulel) to the project.
2. Enter the following code:

This procedure is simple. It checks to make sure that a range is selected. If not, the macro ends with no action. If a range is selected, the dialog box is displayed (using the Show method). The user then interacts with the dialog box and the code stored in the UserForm’s Code pane is executed.
Making the macro available
At this point, everything should be working properly. But you still need an easy way to execute the macro. Assign a shortcut key (Ctrl+Shift+C) that executes the ChangeCase macro:
1. Activate the Excel window via Alt+F11.
2. Choose Tools Macro Macros or press Alt+F8.
3. In the Macros dialog box, select the ChangeCase macro.
4. Click the Options button.
Excel displays its Macro Options dialog box.
5. Enter an uppercase C for the Shortcut key.
See Figure 16-7.
6. Enter a description of the macro in the Description field.
7. Click OK.
8. Click Cancel when you return to the Macro dialog box.
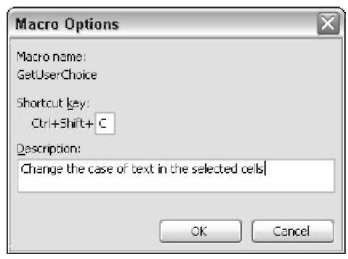
Figure 16-7:
Assign a shortcut key to execute the Change-Case macro.
After you perform this operation, pressing Ctrl+Shift+C executes the ChangeCase macro, which displays the custom dialog box if a range is selected.
Testing the macro
Finally, you need to test the macro and dialog box to make sure they work properly:
1. Activate a worksheet (any worksheet in any workbook).
2. Select some cells that contain text.
3. Press Ctrl+Shift+C.
The custom dialog box appears. Figure 16-8 shows how it should look.
4. Make your choice and click OK.
If you did everything correctly, the macro makes the specified change to the text in the selected cells.
Figure 16-9 shows the worksheet after converting the text to uppercase.
As long as the workbook is open, you can execute the macro from any other workbook. If you close the workbook that contains your macro, Ctrl+Shift+C no longer has any function.
If the macro doesn’t work properly, double-check the preceding steps to locate and correct the error. Don’t be alarmed; debugging is a normal part of developing macros. As a last resort, download the completed workbook from this topic’s Web site.
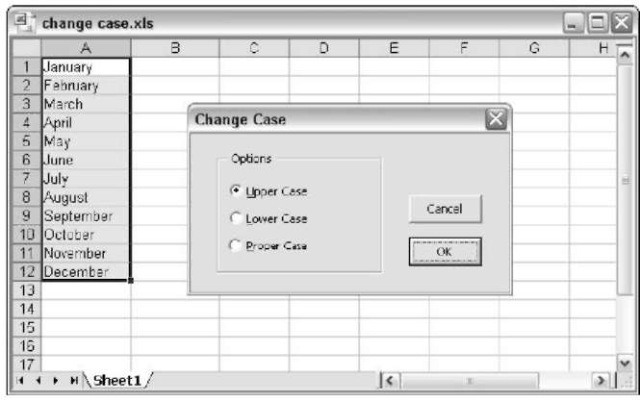
Figure 16-8:
The custom dialog box is in action.
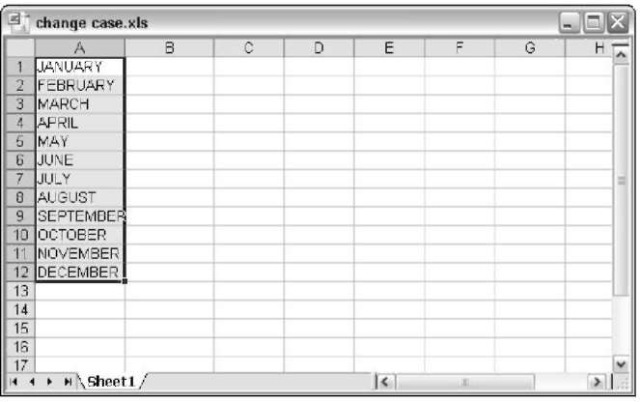
Figure 16-9:
The text has been converted to uppercase.
