In This Chapter
Using toolbars in Excel
► Customizing toolbars in different ways Creating different images on toolbar buttons
► Manipulating toolbars with VBA
Excel is definitely not a toolbar-challenged product. It comes with dozens of built-in toolbars, and constructing new toolbars is very easy. This chapter shows you how to manipulate toolbars with VBA.
Introducing CommandBars
When programming in Excel, a toolbar is technically known as a CommandBar object. In fact, a toolbar is just one of the three types of CommandBar objects:
Toolbar. A floating bar with one or more clickable controls. This chapter focuses on this type of CommandBar.
Menu bar. The two built-in menu bars are the Worksheet menu bar and the Chart menu bar. See Chapter 20.
Shortcut menu. These menus pop up when you right-click an object. See Chapter 20.
Customizing Toolbars
The following list summarizes the ways you can customize toolbars. (I discuss these topics in detail later in this chapter.)
Remove toolbar controls from built-in toolbars. You can get rid of toolbar controls that you never use, reduce screen clutter, and free up a few pixels of screen space, to boot.
Add toolbar controls to built-in toolbars. You can add as many toolbar controls as you want to any toolbar. The controls can be custom buttons or buttons copied from other toolbars, or they can come from the stock of toolbar controls that Excel provides for you. And, of course, you can attach your VBA macros to these buttons.
Create new toolbars. You can create as many new toolbars as you like, with toolbar buttons (or other types of controls) from any source.
Change the functionality of built-in toolbar controls. You do this by attaching your own macro to a built-in toolbar button.
Change the image that appears on any toolbar button. Excel includes a rudimentary but functional toolbar button editor. You can also change a toolbar’s image by using several other techniques.
Don’t be afraid to experiment with toolbars. If you mess up a built-in toolbar, you can easily reset it to its default state:
1. Choose View Toolbars Customize.
2. Select the toolbar in the list.
3. Click the Reset button.
How Excel handles toolbars
When you start Excel, it displays the same toolbar configuration that was in effect the last time you used the program. Did you ever wonder how Excel keeps track of this information?
When you exit Excel, it updates a file called EXCEL11.XLB. The exact location (and even the name) of this file varies, but you can use Windows’ Find File feature to locate the file. (Search for *.XLB.) This file stores all of your custom toolbars, as well as information about the on-screen location of each toolbar and which toolbars are visible.
If you need to restore the toolbars to their previous configuration, choose FileOOpen and open your XLB file. This restores your toolbar configuration to the way it was when you started the current session of Excel. You also can make a copy of the XLB file and give it a different name. Doing so lets you store multiple toolbar configurations that you can load any time. And if you’ve made lots of toolbar changes and want to return to Excel’s original toolbar state, just delete your XLB file and restart Excel. It creates a new one for you.
Working with Toolbars
As you probably know, you can display as many toolbars as you like. A toolbar can be either docked or floating. A docked toolbar is fixed in place at the top, bottom, left, or right edge of Excel’s workspace. Floating toolbars appear in an always-on-top window, which means that they are never obscured by other windows. You can change the dimensions of a floating toolbar by dragging a border.
As shown in Figure 19-1, right-clicking any toolbar or toolbar button displays a shortcut menu that lets you hide or display a toolbar. This shortcut menu, however, does not display the names of all toolbars. For a complete list of toolbars, use the Customize dialog box. This dialog box lets you hide or display toolbars (among other things).
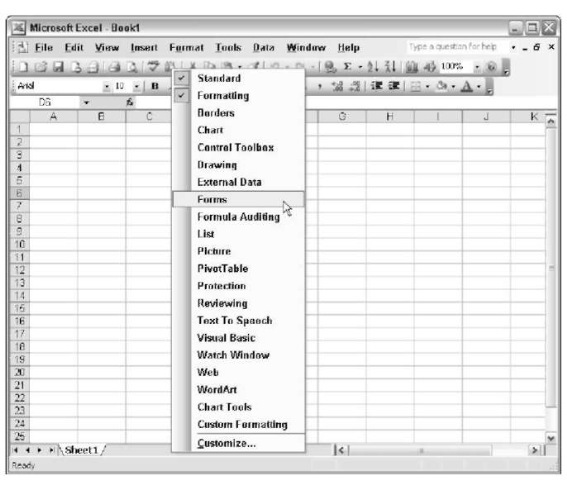
Figure 19-1:
Right-clicking a toolbar or a toolbar button displays this shortcut menu.
You can access the Customize dialog box in two ways:
Choose View Toolbars Customize.
Right-click a toolbar and choose Customize from the shortcut menu.
The Toolbars tab
The Customize dialog box’s Toolbars tab, shown in Figure 19-2, lists all the available toolbars, including toolbars you have created. This dialog box also lists the two menu bars (Worksheet and Chart), which are similar to toolbars.
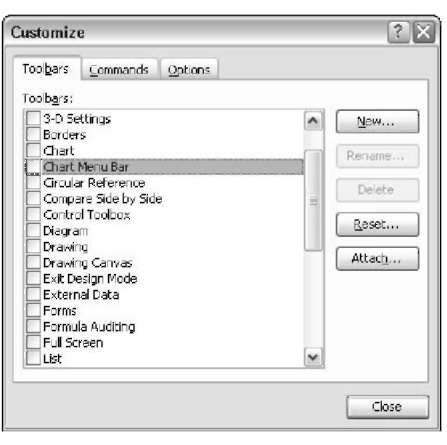
Figure 19-2:
The Toolbars tab is in the Customize dialog box.
This section describes how to perform various procedures that involve toolbars.
Hiding or displaying a toolbar: The Toolbars tab displays every toolbar (built-in toolbars and custom toolbars). Add a check mark to display a toolbar; remove the check mark to hide it. The changes take effect immediately.
Creating a new toolbar: Click the New button and enter a name in the New Toolbar dialog box. Excel creates and displays an empty toolbar. You can then add buttons (or menu commands) to the new toolbar. See “Adding and Removing Toolbar Controls” later in this chapter.
Figure 19-3 shows a custom toolbar that I created. This toolbar, called Custom Formatting, contains the formatting tools that I use most frequently. Notice that this toolbar includes drop-down menus as well as standard toolbar buttons.
Renaming a custom toolbar: Select the custom toolbar from the list and click the Rename button. In the Rename Toolbar dialog box, enter a new name. You can’t rename a built-in toolbar.
Deleting a custom toolbar: Select the custom toolbar from the list and click the Delete button. You can’t delete a built-in toolbar.
Deleting a toolbar is one of the few actions in Excel that cannot be undone.
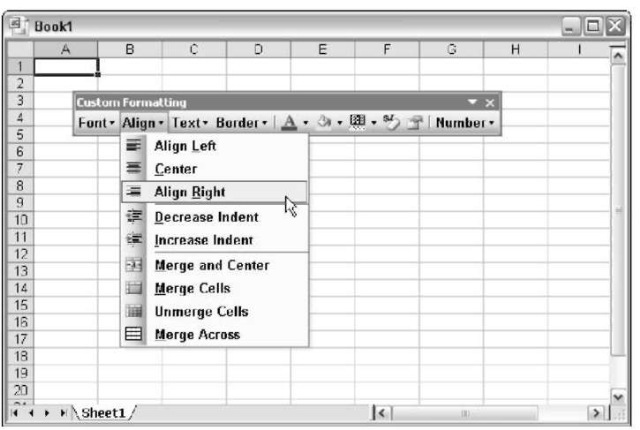
Figure 19-3:
A custom toolbar.
Resetting a built-in toolbar: Select a built-in toolbar from the list and click the Reset button. The toolbar is restored to its default state. Any added custom tools are removed. Any removed default tools are restored. The Reset button is not available when a custom toolbar is selected.
Attaching a toolbar to a workbook: You can share a custom toolbar by attaching it to a workbook. Click the Attach button and you get a new dialog box that lets you select toolbars to attach to a workbook. You can attach any number of toolbars to a workbook — but remember, attaching toolbars increases the size of your workbook. For more about this, see “Distributing Toolbars,” later in this chapter.
Toolbar autosensing
Normally, Excel displays a particular toolbar automatically when you change contexts. This is called autosensing. For example, when you activate a chart, the Chart toolbar appears. When you activate a sheet that contains a pivot table, the PivotTable toolbar appears.
You can easily defeat autosensing by hiding the toolbar: Click its Close button. After you do so, Excel no longer displays that toolbar when you
switch to its former context. You can restore this automatic behavior by displaying the appropriate toolbar when you’re in the appropriate context. Thereafter, Excel reverts to its normal automatic toolbar display when you switch to that context.
You can simulate this type of behavior by writing VBA code. Refer to “Displaying a toolbar when a worksheet is activated,” later in this chapter.
The Commands tab
The Commands tab of the Customize dialog box contains a list of every available tool. Use this tab when you customize a toolbar. This feature is described later in this chapter in “Adding and Removing Toolbar Controls.”
The Options tab
Figure 19-4 shows the Options tab of the Customize dialog box. The options on this tab control how both menus and toolbars behave. The options that affect toolbars are as follows:
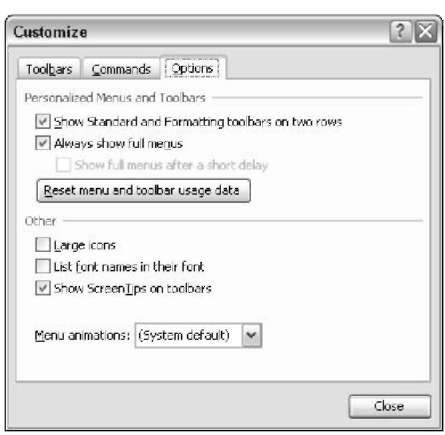
Figure 19-4:
The Options tab of the Customize dialog box.
Using one row for two toolbars: You can save a little bit of valuable screen space by removing the checkmark from the Show Standard and Formatting Toolbars on Two Rows check box to force Excel to stuff both toolbars on a single row. Go ahead with this if you’re running your system at a high screen resolution; you can get more on the screen horizontally. However, you may not want to choose this option if you’re running in a lower screen resolution.
Showing full menus: Perhaps one of Microsoft’s dumbest ideas is adaptive menus. In other words, the software hides menu items that are not used frequently. I’ve never met anyone who likes this. If you find that your menus seem to be missing some commands, select the Always Show Full Menus check box.
Changing the icon size: To change the size of the icons used in toolbars, select or deselect the Large Icons check box. This option affects only the images in buttons. Buttons that contain only text (such as buttons in a menu) are not changed.
Display fancy font names: Some people like the feature for which the drop-down Font list on the Formatting toolbar shows names using the actual font; others despise it. The List Font Names In Their Font check box controls whether Excel does this. Personally, I think using the fonts slows down Excel if you’re working with a lot of fonts.
Toggling the ScreenTips display: ScreenTips are the pop-up messages that display the button names when you pause the mouse pointer over a button. If you find the ScreenTips distracting, deselect the Show ScreenTips on Toolbars check box.
Changing the menu animations: When you select a menu, Excel animates its menu display. Choose whichever animation style you prefer.
Adding and Removing Toolbar Controls
When the Customize dialog box is displayed, Excel is in a special customization mode. You have access to all the commands and options in the Customize dialog box. In addition, you can perform the following actions:
Reposition a control on a toolbar
Move a control to a different toolbar
Copy a control from one toolbar to another
Add new controls to a toolbar using the Commands tab of the Customize dialog box
Change lots of toolbar control attributes
Moving and copying controls
When the Customize dialog box is displayed, you can copy and move toolbar controls freely among any visible toolbars. To move a control, drag it to its new location. The new location can be within the current toolbar or on a different toolbar.
To copy a control, press Ctrl while dragging the control to another toolbar. You can copy a toolbar control within the same toolbar, but you’ve no reason to have multiple copies of a button on the same toolbar.
Inserting a new control
To add a new control to a toolbar, use the Customize dialog box’s Commands tab shown in Figure 19-5.
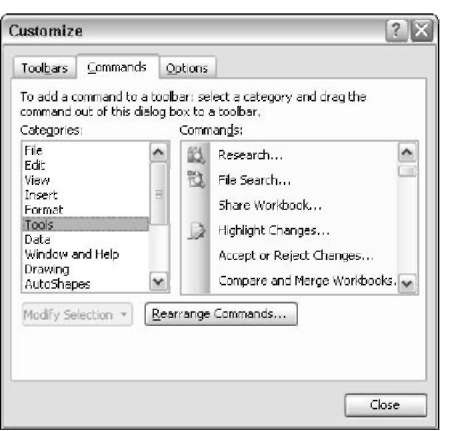
Figure 19-5:
The Commands tab contains a list of every available control.
The controls are arranged in 17 categories. When you select a category, the controls in that category appear to the right. Previous versions of Excel had a Description button that, when clicked, described the selected control’s function. For reasons known only to Microsoft, that Description button was removed in Excel 2003.
To add a control to a toolbar, locate it in the Commands tab, click it, and drag it to the toolbar.
Using other toolbar button operations
When Excel is in customization mode (that is, when the Customize dialog box is displayed), you can right-click a toolbar control to display a shortcut menu of additional actions. Figure 19-6 shows the shortcut menu that appears when you right-click a button in customization mode.
These commands are described in the following list. (Note that some of these commands are unavailable for certain toolbar controls.)
Reset: Resets the control to its original state.
Delete: Deletes the control.
Name: Lets you change the control’s name.
Copy Button Image: Copies the control’s image and places it on the Clipboard.
Paste Button Image: Pastes the image from the Clipboard to the control.
Reset Button Image: Restores the control’s original image.
Edit Button Image: Lets you edit the control’s image using the Excel button editor.
Change Button Image: Lets you change the image by selecting from a list of different button images.
Default Style: Displays the control using its default style. (For buttons, the default is image only. For menu items, the default is both image and text.)
Text Only (Always): Always displays text (no image) for the control.
Text Only (In Menus): Displays text (no image) if the control is in a menu bar.
Image and Text: Displays the control’s image and text.
Begin a Group: Inserts a divider in the toolbar. In a drop-down menu, a separator bar appears as a horizontal line between commands. In a toolbar, a separator bar appears as a vertical line.
Assign a Hyperlink: Lets you assign a hyperlink that activates when the control is clicked.
Assign a Macro: Lets you assign a macro that executes when the control is clicked.

Figure 19-6:
In customization mode, right-clicking a toolbar control displays this shortcut menu.
Distributing Toolbars
If you want to distribute a custom toolbar to other users, store it in a workbook. To store a toolbar in a workbook file, follow these steps:
1. Create the custom toolbar and test it to make sure it works correctly.
2. Activate the workbook that will store the new toolbar.
3. Choose View Toolbars Customize.
4. In the Customize dialog box, click the Toolbars tab.
5. Click the Attach button.
Excel displays the Attach Toolbars dialog box shown in Figure 19-7. This dialog box lists all custom toolbars stored on your system.
6. To attach a toolbar, select it and click the Copy button.
When a toolbar in the Toolbars in Workbook list (right side of the dialog box) is selected, the Copy button changes to a Delete button. You can click the Delete button to remove the selected toolbar from the workbook.
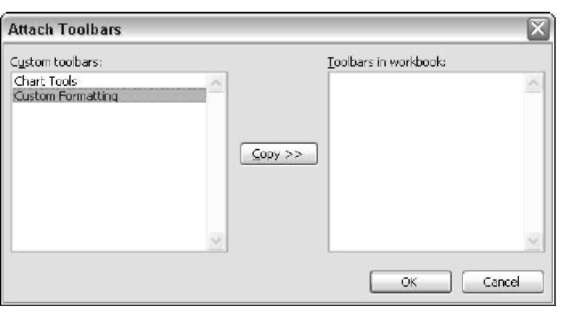
Figure 19-7:
The Attach Toolbars dialog box lets you attach one or more toolbars to a workbook.
A toolbar that’s attached to a workbook appears automatically when the workbook is opened, and that toolbar is then saved in the user’s XLB file when Excel closes down. If the user’s workspace already has a toolbar by the same name, however, the toolbar attached to the workbook does not replace the existing one.
The toolbar that’s stored in the workbook is an exact copy of the toolbar at the time you attach it. If you modify the toolbar after attaching it, the changed version is not stored in the workbook automatically. You must manually remove the old toolbar and then attach the new one.
Using VBA to Manipulate Toolbars
As you may expect, you can write VBA code to do things with toolbars. In this section, I provide some background information that you simply must know before you start mucking around with toolbars.
Commanding the CommandBars collection
You manipulate Excel toolbars (and menus, for that matter) by using objects located in the CommandBars collection. The CommandBars collection consists of
All Excel built-in toolbars
Any other custom toolbars that you create
A built-in menu bar named Worksheet menu bar, which appears when a worksheet is active
A built-in menu bar named Chart menu bar, which appears when a chart sheet is active
Any other custom menu bars that you create All built-in shortcut menus
As I mention at the beginning of this chapter, the three types of CommandBar are differentiated by their Type properties. The Type property can be any of these three values:
msoBarTypeNormal: A toolbar (Type = 0) msoBarTypeMenuBar: A menu bar (Type = 1) msoBarTypePopUp: A shortcut menu (Type = 2)
Listing all CommandBar objects
If you’re curious about the objects in the CommandBars collection, enter and execute the following macro. The result is a list of all CommandBar objects in the CommandBars collection, plus any custom menu bars or toolbars. For each CommandBar, the procedure lists its Index, Name, and Type. (The Type can be 0, 1, or 2).
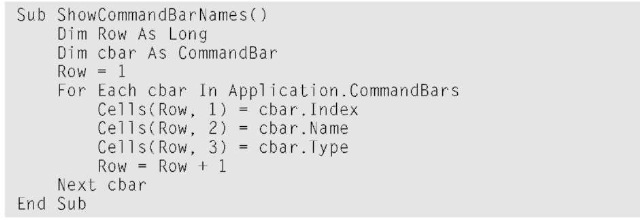
Figure 19-8 shows a portion of the result of running this procedure, which is available at this topic’s Web site. As you can see, Excel has a lot of CommandBars.
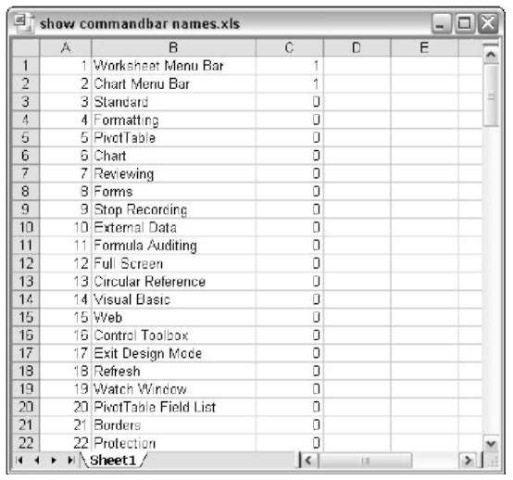
Figure 19-8:
A VBA macro produced this list of all CommandBar objects.
Referring to CommandBars
You can refer to a particular CommandBar by its Index or by its Name. For example, the Standard toolbar has an Index of 3, so you can refer to the toolbar one of two ways:
![]()
or
![]()
For some reason, Microsoft isn’t consistent with CommandBar index numbers across versions of Excel. Therefore, it’s better to refer to a CommandBar by its Name, rather than by its Index.
Referring to controls in a CommandBar
A CommandBar object contains Control objects, which are buttons, menus, or menu items. The following procedure displays the Caption property for the first Control in the Standard toolbar:

When you execute this procedure, you see the message box shown in Figure 19-9.
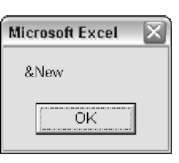
Figure 19-9:
Displaying the Caption property for a control.
In some cases, these Control objects can contain other Control objects. For example, the first control on the Drawing toolbar contains other controls. (This also demonstrates that you can include menu items on a toolbar.) The concept of Controls within Controls becomes clearer in Chapter 20, when I discuss menus.
Properties of CommandBar controls
CommandBar controls have a number of properties that determine how the controls look and work. This list contains some of the more useful properties for CommandBar controls:
Caption: The text displayed for the control. If the control shows only an image, the Caption appears when you move the mouse over the control.
FaceID: A number that represents a graphics image displayed next to the control’s text.
BeginGroup: True if a separator bar appears before the control.
OnAction: The name of a VBA macro that executes when the user clicks the control.
BuiltIn: True if the control is an Excel built-in control. Enabled: True if the control can be clicked.
ToolTipText: Text that appears when the user moves the mouse pointer over the control.
When you work with toolbars, you can turn on the macro recorder to see what’s happening in terms of VBA code. Unless you’re editing button images, the steps you take while customizing toolbars generate VBA code. By examining this code, you can discover how Excel arranges the object model for toolbars. The model is pretty simple.
VBA Examples
This section contains a few examples of using VBA to manipulate the Excel toolbars. These examples give you an idea of the types of things you can do, and they can all be modified to suit your needs.
Resetting all built-in toolbars
The following procedure resets all built-in toolbars to their original state:

Using the Reset method on a custom toolbar has no effect (and does not generate an error).
Be careful with the preceding routine. Executing it erases all of your customizations to all built-in toolbars. The toolbars will be just as they were when you first installed Excel.
Displaying a toolbar when a worksheet is activated
Assume that you have a workbook (named Budget) that holds your budget information. In addition, assume that you’ve developed a custom toolbar (named Budget Tools) that you use with this workbook. The toolbar should be visible when you work on the Budget sheet; otherwise, it should remain hidden and out of the way.
The following procedures, which are stored in the code window for the This Workbook object, display the Budget Tools toolbar when the Budget workbook is active and hide the toolbar when the Budget workbook is deactivated:

For this example go to this topic’s Web site. For more information about using automatic procedures, go to Chapter 11.
Ensuring that an attached toolbar is displayed
As I explained earlier in this chapter, you can attach any number of toolbars to a workbook. But I also noted that the attached toolbar won’t replace an existing toolbar that has the same name.
In some cases, the failure to display a toolbar can present a problem. For example, assume that you distribute a workbook to your coworkers, and this workbook has an attached toolbar that executes your macros. Later, you update the workbook and add some new controls to your attached toolbar. When you distribute this new workbook, the updated toolbar doesn’t display because the old toolbar already exists!
One solution is to simply use a new toolbar name for the updated application. Perhaps a better solution is to write VBA code to delete the toolbar when the workbook closes. That way, the toolbar isn’t stored on the user’s system and you’re assured that the latest copy of your toolbar is always displayed when the workbook opens.
The following procedure, which is stored in the code window for the This Workbook object, displays the toolbar named Budget Tools when the workbook is opened. The Budget Tools toolbar is attached to the workbook.

The next procedure, which is also stored in the code window for the This Workbook object, deletes the toolbar named Budget Tools when the workbook is closed:

Notice that I use an On Error Resume Next statement to avoid the error message that appears if the toolbar has already been deleted.
Hiding and restoring toolbars
In some cases, you may want to remove all the toolbars when a workbook is opened. It’s only polite, however, to restore the toolbars when your application closes. In this section I present two procedures, both stored in the code window of the This Workbook object.
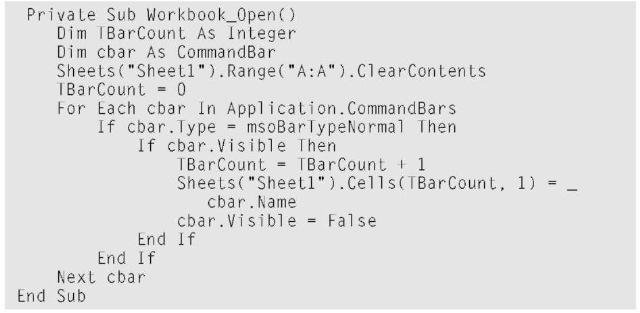
The Workbook_Open procedure, available at this topic’s Web site, is executed when the workbook is opened. This procedure saves the names of all visible toolbars in column A of Sheet1 and then hides all the toolbars:
The following procedure is executed before the workbook is closed. This routine loops through the toolbar names stored on Sheet1 and changes their Visible property to True:

Notice that the Workbook_Open routine saves the toolbar names in a worksheet range rather than in an array, ensuring that the toolbar names are still available when the Workbook_BeforeClose routine is executed. Values stored in an array may be lost between the time the Workbook_Open procedure is executed and the Workbook_BeforeClose procedure is executed.
