In This Chapter
Saving time by using any of several alternatives to custom dialog boxes Using the InputBox and MsgBox functions to get information from the user Getting a filename and path from the user
Writing VBA code to display any of the Excel built-in dialog boxes
You can’t use Excel very long without being exposed to dialog boxes.
They seem to pop up almost every time you select a command. Excel — like most Windows programs — uses dialog boxes to obtain information, clarify commands, and display messages. If you develop VBA macros, you can create your own dialog boxes that work just like those built into Excel.
This chapter doesn’t tell you anything about creating custom dialog boxes. Rather, it describes some techniques you can use in place of custom dialog boxes. (The next three chapters tell you everything you need to know to jazz up your applications with some award-winning dialog boxes.)
Why Create Dialog Boxes?
Some of the VBA macros you create behave the same every time you execute them. For example, you may develop a macro that enters a list of your employees into a worksheet range. This macro always produces the same result and requires no additional user input.
You might develop other macros, however, that behave differently under various circumstances or that offer the user options. In such cases, the macro may benefit from a custom dialog box. A custom dialog box provides a simple means for getting information from the user. Your macro then uses that information to determine what it should do.
Custom dialog boxes can be quite useful, but creating them takes time. Before I cover the topic of creating custom dialog boxes in the next chapter, you need to know about some time-saving alternatives.
VBA lets you display four different types of dialog boxes that you can sometimes use in place of a custom dialog box. You can customize these built-in dialog boxes in some ways, but they certainly don’t offer the options available in a custom dialog box. In some cases, however, they’re just what the doctor ordered.
In this chapter you read about
The MsgBox function
The InputBox function
The GetOpenFileName method
The GetSaveAsFileName method
I also describe how to use VBA to display the Excel built-in dialog boxes — the dialog boxes that Excel itself uses to get information from you.
The MsgBox Function
You’re probably already familiar with the VBA MsgBox function — I use it quite a bit in the examples throughout this topic. The MsgBox function, which accepts the arguments shown in Table 15-1, is handy for displaying information and getting simple user input.
Here’s a simplified version of the syntax for the MsgBox function:
| Table 15-1 | MsgBox Function Arguments |
| Argument | What It Does |
| prompt | Supplies the text Excel displays in the message box |
| buttons | Specifies which buttons appear in the message box (optional) |
| title | Defines the text that appears in the message box’s title bar |
| (optional) |
Displaying a simple message box
You can use the MsgBox function by itself or assign its result (that is, the button clicked by the user) to a variable. If you use this function by itself,
don’t include parentheses around the arguments. The following example simply displays a message and does not return a result:

Figure 15-1 shows how this message box looks.
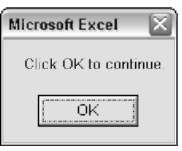
Figure 15-1:
A simple message box.
Getting a response from a message box
Your VBA code can also determine which button was clicked in a message box. You can assign the result of the MsgBox function to a variable. In the following code, I use some built-in constants (which I describe later in Table 15-2) that make it easy to work with the values returned by MsgBox:

When you execute this procedure, the Ans variable is assigned a value of either vbYes or vbNo, depending on which button the user clicks. The Select Case statement uses the Ans value to determine which action the routine should perform.
You can also use the MsgBox function result without using a variable, as the following example demonstrates:
Customizing message boxes
The flexibility of the buttons argument makes it easy to customize your message boxes. You can specify which buttons to display, determine whether an icon appears, and decide which button is the default. Table 15-2 lists some of the built-in constants you can use for the buttons argument. If you prefer, you can use the value rather than a constant (but I think using the built-in constants is a lot easier).
| Table 15-2 | Constants Used in the MsgBox Function | |
| Constant | Value | What It Does |
| vbOKOnly | 0 | Displays OK button only |
| vbOKCancel | 1 | Displays OK and Cancel buttons |
| vbAbortRetrylgnore | 2 | Displays Abort, Retry, and Ignore buttons |
| vbYesNoCancel | 3 | Displays Yes, No, and Cancel buttons |
| vbYesNo | 4 | Displays Yes and No buttons |
| vbRetryCancel | 5 | Displays Retry and Cancel buttons |
| vbCritical | 16 | Displays Critical Message icon |
| vbQuestion | 32 | Displays Warning Query icon |
| vbExclamation | 48 | Displays Warning Message icon |
| vblnformation | 64 | Displays lnformation Message icon |
| vbDefaultButtonl | 0 | First button is default |
| vbDefaultButton2 | 256 | Second button is default |
| vbDefaultButton3 | 512 | Third button is default |
| vbDefaultButton4 | 768 | Fourth button is default |
| vbSystemModal | 4096 | System modal; all applications are suspended until the user responds to the message box |
To use more than one of these constants as an argument, just connect them with a + operator. For example, to display a message box with Yes and No buttons and an exclamation icon, use the following expression as the second MsgBox argument:
![]()
Or, if you like to make things more difficult for yourself, use a value of 52 (4 + 48).
The following example uses a combination of constants to display a message box with a Yes button and a No button (vbYesNo) as well as a question mark icon (vbQuestion). The constant vbDefaultButton2 designates the second button (No) as the default button — that is, the button that is clicked if the user presses Enter. For simplicity, I assign these constants to the Config variable and then use Config as the second argument in the MsgBox function:

Figure 15-2 shows the message box Excel displays when you execute the GetAnswer3 procedure. If the user clicks the Yes button, the routine executes the procedure named RunReport (which is not shown). If the user clicks the No button (or presses Enter), the routine ends with no action. Because I omitted the title argument in the MsgBox function, Excel uses the default title, Microsoft Excel.
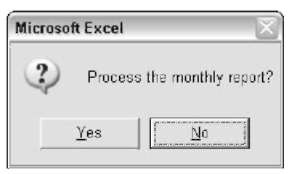
Figure 15-2:
The MsgBox function’s buttons argument determines what appears in the message box.
The following routine provides another example of using the MsgBox function:
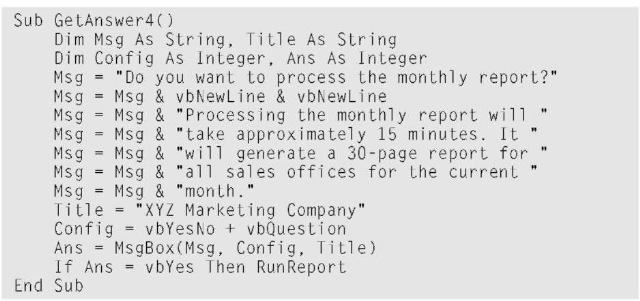
This example demonstrates an efficient way to specify a longer message in a message box. I use a variable (Msg) and the concatenation operator (&) to build the message in a series of statements. The vbNewLine constant inserts a line break character that starts a new line. I also use the title argument to display a different title in the message box. Figure 15-3 shows the message box Excel displays when you execute this procedure.

Figure 15-3:
The dialog box displayed by the MsgBox function.
Previous examples have used constants (such as vbYes and vbNo) for the return value of a MsgBox function. Besides these two constants, Table 15-3 lists a few others.
| Table 15-3 | Constants Used as Return Values |
| for the MsgBox Function | |
| Constant | Value What It Means |
| vbOK | 1 User clicked OK. |
| vbCancel | 2 User clicked Cancel. |
| vbAbort | 3 User clicked Abort. |
| Constant | Value | What It Means |
| vbRetry | 4 | User clicked Retry. |
| vblgnore | 5 | User clicked Ignore. |
| vbYes | 6 | User clicked Yes. |
| vbNo | 7 | User clicked No. |
The InputBox Function
The VBA InputBox function is useful for obtaining a single value from the user. This is a good alternative to developing a custom dialog box when you need to get only one value.
InputBox syntax
Here’s a simplified version of the syntax for the InputBox function:
![]()
The InputBox function accepts the arguments listed in Table 15-4.
| Table 15-4 | InputBox Function Arguments |
| Argument | What It Does |
| prompt | Supplies the text displayed in the input box |
| title | Specifies the text displayed in the input box’s title bar (optional) |
| default | Defines the default value (optional) |
An InputBox example
Here’s an example showing how you can use the InputBox function:
![]()
When you execute this VBA statement, Excel displays the dialog box shown in Figure 15-4. Notice that this example uses only the first two arguments and
does not supply a default value. When the user enters a value and clicks OK, the routine assigns the value to the variable TheName.
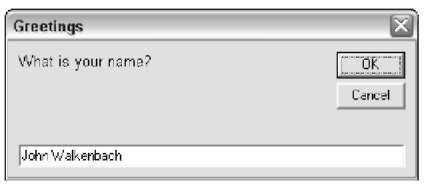
Figure 15-4:
The InputBox function displays this dialog box.
The following example uses the third argument and provides a default value. The default value is the username stored by Excel (the Application object’s UserName property).

VBA’s InputBox function always returns a string, so you might need to convert the result to a value. You can convert a string to a value by using the Val function.
The following example uses the Val function to convert the user’s entry to a value:
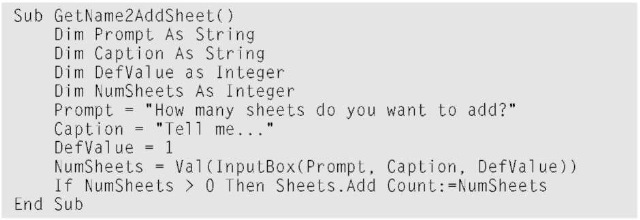
Figure 15-5 shows the dialog box that this routine produces.
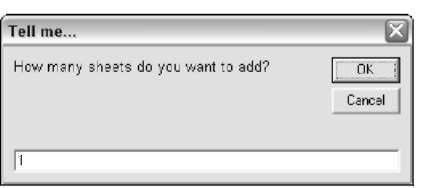
Figure 15-5:
Another example of using the lnputBox function.
The information presented in this section applies to VBA’s InputBox function. In addition, you have access to the InputBox method, which is a method of the Application object. One advantage of using the InputBox method is that your code can prompt for a range selection. Here’s a quick example that prompts the user to select a range. (The Help system has complete details.)

The GetOpenFilename Method
If your VBA procedure needs to prompt the user for a filename, you could use the InputBox function. An InputBox usually isn’t the best tool for this job, however, because most users find it difficult to remember paths and directory names, and typographic errors often result.
For a better solution to this problem, use the GetOpenFilename method of the Application object, which ensures that your application gets a valid filename, including its complete path. The GetOpenFilename method displays the familiar Open dialog box (the same dialog box Excel displays when you choose FileOOpen). The GetOpenFilename method doesn’t actually open the specified file. This method simply returns the user-selected filename. Then you can write code to do whatever you want with the filename.
The syntax
The official syntax for this method is as follows:

The GetOpenFileName method takes the optional arguments shown in Table 15-5.
| Table 15-5 | GetOpenFileName Method Arguments |
| Argument | What It Does |
| fileFilter | Determines the types of files that appear in the dialog box |
| (for example, *.TXT). You can specify several different fil- | |
| ters from which the user can choose. | |
| filterIndex | Determines which of the file filters the dialog box displays |
| by default. | |
| title | Specifies the caption for the dialog box’s title bar. |
| buttonText | Ignored (used only for the Macintosh version of Excel). |
| multiSelect | If True, the user can select multiple files. |
A GetOpenFilename example
The fileFilter argument determines what appears in the dialog box’s files of Type drop-down list. This argument consists of pairs of file filter strings followed by the wildcard file filter specification, with commas separating each part and pair. If omitted, this argument defaults to the following:
![]()
Notice that this string consists of two parts:
![]()
and
![]()
The first part of this string is the text displayed in the Files of Type dropdown list. The second part determines which files the dialog box displays. For example, *.* means all files.
The code in the following example brings up a dialog box that asks the user for a filename. The procedure defines five file filters. Notice that I use the VBA
line continuation sequence to set up the Filter variable; doing so helps simplify this rather complicated argument.
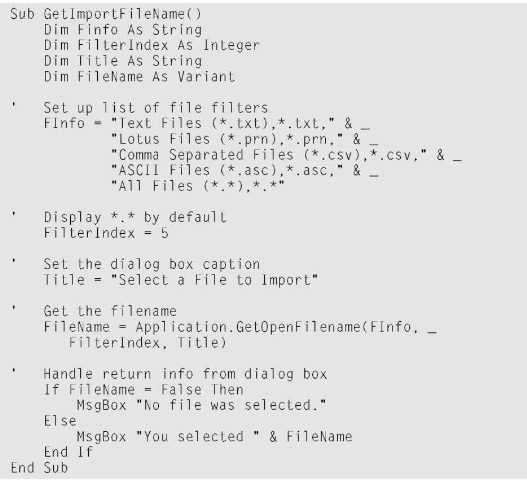
Figure 15-6 shows the dialog box Excel displays when you execute this procedure. In a real application, you would do something more meaningful with the filename. For example, you may want to open it using a statement such as
this:
![]()
Notice that the FileName variable is declared as a variant data type. If the user clicks Cancel, that variable contains a Boolean value (False). Otherwise, FileName is a string. Therefore, using a variant data type handles both possibilities.
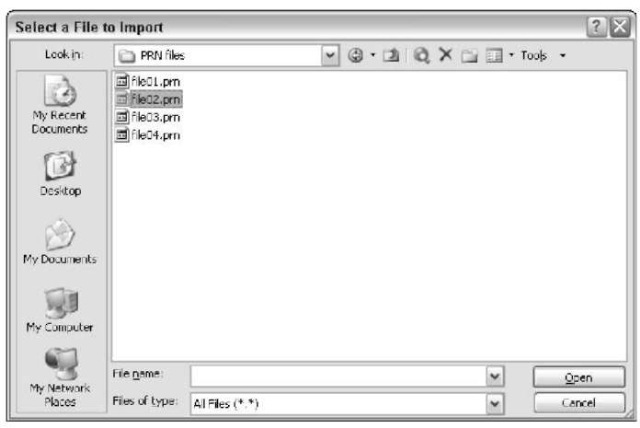
Figure 15-6:
The GetOpenFile name method displays a customizable dialog box and returns the selected file’s path and name. It does not open the file.
Selecting multiple files
If the MultiSelect argument for the GetOpenFilename method is True, the user can select multiple files in the dialog box. In this case, the GetOpenFilename method returns an array of filenames. Your code must loop through the array to identify each selected filename, as the following example demonstrates:
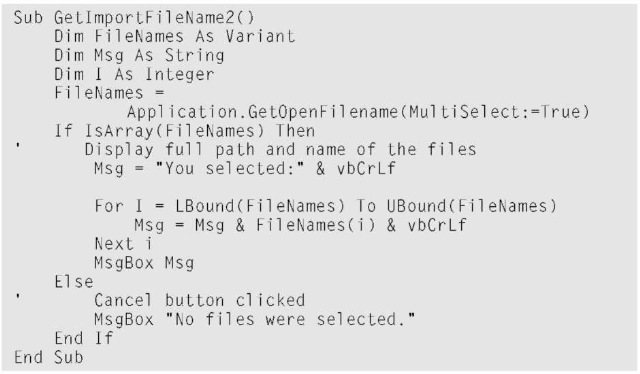
Figure 15-7 shows the result of running this procedure. The message box displays the filenames that were selected.
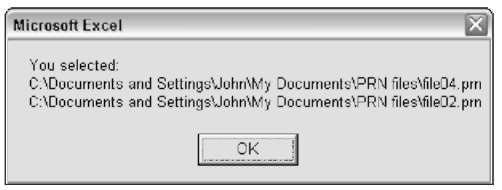
Figure 15-7:
Select multiple filenames using the GetOpenFile name method.
Notice that I used a named argument for the GetOpenFilename method. I set the MultiSelect argument to True. The other arguments are omitted, so they take on their default values. Using named arguments eliminates the need to specify arguments that aren’t used.
The FileNames variable is defined as a variant data type. I use the IsArray function to determine whether FileName contains an array. If so, the code uses the VBA UBound function to determine the array’s upper bound and build a message that consists of each array element. If FileNames is not an array, the user clicked the Cancel button. Remember that the FileNames variable contains an array even if only one file is selected.
The GetSaveAsFilename Method
The Excel GetSaveAsFilename method works just like the GetOpenFilename method, but it displays the Excel Save As dialog box instead of its Open dialog box. The GetSaveAsFilename method gets a path and filename from the user but doesn’t do anything with it.
The syntax for this method follows:

The GetSaveAsFilename method takes Table 15-6′s arguments, all of which are optional.
| Table 15-6 | GetSaveAsFilename Method Arguments |
| Argument | What It Does |
| initialFilename | Specifies a default filename that appears in the File Name |
| box. | |
| fileFilter | Determines the types of files Excel displays in the dialog |
| box (for example, *.TXT). You can specify several different | |
| filters from which the user can choose. | |
| filterIndex | Determines which of the file filters Excel displays by |
| default. | |
| title | Defines a caption for the dialog box’s title bar. |
Displaying Excel’s Built-in Dialog Boxes
You can write VBA code that performs the equivalent of selecting an Excel menu command and making choices in the resulting dialog box — although Excel doesn’t actually display the dialog box.
For example, the following statement has the same effect as choosing the EditOGo To command, specifying a range named InputRange, and clicking OK:
![]()
When you execute this statement, the Go To dialog box does not appear. This is almost always what you want to happen; you don’t want dialog boxes flashing across the screen while your macro executes.
In some cases, however, you may want your code to simply display one of Excel’s many built-in dialog boxes and let the user make the choices in the dialog box. You can do this by using the Application object’s Dialogs property. Here’s an example:
![]()
When executed, this statement displays the Go To dialog box, as shown in Figure 15-8. The user can specify a named range or enter a cell address. This dialog box works exactly as it does when you choose EditOGo To or press F5.
You may think that the value assigned to the Result variable is the range that the user selects in the Go To dialog box. Actually, the value assigned to Result is True if the user clicks OK and False if the user clicks Cancel or presses Escape.
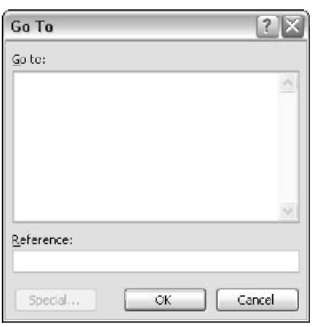
Figure 15-8:
The GoTo dialog box, displayed by using VBA code.
The preceding example uses the predefined constant xlDialogFormulaGoto. This constant determines which dialog box Excel displays. You can get a list of available dialog box constants by using the Object Browser. Follow these steps:
1. In the VBE, press F2.
The Object Browser appears.
2. In the Project/Library drop-down list (the one at the upper-left corner of the Object Browser), select Excel.
3. In the Search Text drop-down list (just below the Project/Library dropdown list) type xlDialog.
4. Click the Search button (the button with the binoculars).
Figure 15-9 shows the Object Browser displaying a list of the dialog box constants.
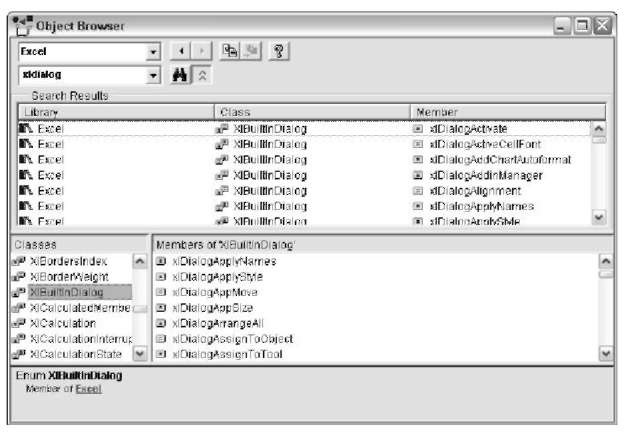
Figure 15-9:
Use the Object Browser to get a list of the dialog box constants.
Unfortunately, these dialog box constants are not documented in the Help system. Therefore, you may need to use a bit of trial and error to figure out which is appropriate for your needs.
If you try to display a built-in dialog box in an incorrect context, Excel displays an error message. For example, one of the dialog box constants is xlDialogAlignment. This dialog box sets text alignment in a cell. If you try to display this dialog box when something other than a range is selected, Excel displays an error message because that dialog box is appropriate only for worksheet cells.

