In This Chapter
Discovering methods for controlling the flow of your VBA routines Finding out about the dreaded GoTo statement Using If-Then and Select Case structures Performing looping in your procedures
5ome VBA procedures start at the code’s beginning and progress line by line to the end, never deviating from this top-to-bottom program flow. Macros that you record always work like this. In many cases, however, you need to control the flow of your code by skipping over some statements, executing some statements multiple times, and testing conditions to determine what the procedure does next. Ready or not, you find out how to do all that stuff in this chapter.
Going with the Flow, Dude
Some programming newbies can’t understand how a dumb computer can make intelligent decisions. The secret is in several programming constructs that most programming languages support. Table 10-1 provides a quick summary of these constructs. (I explain all of these later in this chapter.)
| Table 10-1 | Programming Constructs for Making Decisions |
| Construct | How It Works |
| GoTo statement | Jumps to a particular statement |
| If-Then structure | Does something if something else is true |
| Select Case | Does any of several things, depending on something’s value |
| For-Next loop | Executes a series of statements a specified number of times |
| Do-While loop | Does something as long as something else remains true |
| Do-Until loop | Does something until something else becomes true |
The GoTo Statement
A GoTo statement offers the most straightforward means for changing a program’s flow. The GoTo statement simply transfers program control to a new statement, which is preceded by a label.
Your VBA routines can contain as many labels as you like. A label is just a text string followed by a colon. (See Chapter 7 for more label information.)
The following procedure shows how a GoTo statement works:

The procedure uses the InputBox function to get the user’s name. If the user enters a name other than Bill Gates, the program flow jumps to the WrongName label, displays an apologetic message, and the procedure ends. On the other hand, if Mr. Gates signs on, the procedure displays a welcome message and then executes some additional code (not shown in the example). The Exit Sub statement ends the procedure before the second MsgBox function has a chance to work.
This simple routine works, but VBA provides several better (and more structured) alternatives than GoTo. In general, you should use GoTo only when you have no other way to perform an action. In practice, the only time you really need to use a GoTo statement is for trapping errors. (I cover this in Chapter 12.)
Many hard-core programming types have a deep-seated hatred for GoTo statements because using them tends to result in difficult-to-read “spaghetti code.” Therefore, you should avoid this subject when talking with other programmers.
Decisions, decisions
In this section, I discuss two programming structures that can empower your VBA procedures with some impressive decision-making capabilities: If-Then and Select Case.
The If-Then structure
Okay, I’ll say it: If-Then is VBA’s most important control structure. You’ll probably use this command on a daily basis (at least I do). As in many other aspects of life, effective decision making is the key to success in writing programs. If this topic has the effect I intend, you’ll soon share my philosophy that a successful Excel application boils down to making decisions and acting upon them.
What is structured programming? Does it matter?
If you hang around with programmers, sooner or later you hear the term structured programming. This term has been around for decades, and programmers generally agree that structured programs are superior to unstructured programs. So, what is structured programming? And can you write such things using VBA?
The basic premise of structured programming is that a routine or code segment should have only one entry point and one exit point. In other words, a block of code should be a stand-alone unit. A program cannot jump into the middle of this unit, nor can it exit at any point except the single exit point. When you write structured code, your program progresses in an orderly manner and is easy to follow — unlike a program that jumps around in a haphazard fashion. This pretty much rules out using the GoTo statement.
In general, a structured program is easier to read and understand. More importantly, it’s also easier to modify when the need arises.
VBA is indeed a structured language. It offers standard structured constructs such as If-Then-Else, For-Next loops, Do-Until loops, Do-While loops, and Select Case structures. Furthermore, it fully supports module code constructions. If you’re new to programming, you should try to develop good structure programming habits early on. End of lecture.
The If-Then structure has this basic syntax:
![]()
Use the If-Then structure when you want to execute one or more statements conditionally. The optional Else clause, if included, lets you execute one or more statements if the condition you’re testing is not true. Sound confusing? Don’t worry; a few examples make this crystal clear.
If-Then examples
The following routine demonstrates the If-Then structure without the optional Else clause:

The GreetMe procedure uses VBA’s Time function to get the system time. If the current system time is less than .5 (in other words, before noon), the routine displays a message. If Time is greater than or equal to .5, the routine ends and nothing happens.
To display a different greeting if Time is greater than or equal to .5, add another If-Then statement after the first one:

Notice that I used >= (greater than or equal to) for the second If-Then statement. This covers the extremely remote chance that the time is precisely 12:00 p.m.
An If-Then-Else example
Another approach to the preceding problem uses the Else clause. Here’s the same routine recoded to use the If-Then-Else structure:

Notice that I use the line continuation character (underscore) in the preceding example. The If-Then-Else statement is actually a single statement. But VBA provides a slightly different way of coding If-Then-Else constructs that use an End If statement. Therefore, the GreetMe procedure can be rewritten as:

In fact, you can insert any number of statements under the If part, and any number of statements under the Else part.
What if you need to expand the GreetMe routine to handle three conditions: morning, afternoon, and evening? You have two options: Use three If-Then statements or use a nested If-Then-Else structure. Nesting means placing an If-Then-Else structure within another If-Then-Else structure. The first approach, the three statements, is simplest:

The Msg variable gets a different text value, depending on the time of day. The final MsgBox statement displays the greeting: Good Morning, Good Afternoon, or Good Evening.
The following routine performs the same action but uses a nested If-Then-Else structure:

The example works fine but could be simplified a bit by omitting the last If-Then part. Because the routine has already tested for two conditions (morning and afternoon), the only remaining condition is evening. Here’s the modified procedure:

Using Elself
In both of the previous examples, every statement in the routine is executed — even in the morning. A more efficient structure would exit the routine as soon as a condition is found to be true. In the morning, for example, the procedure should display the Good Morning message and then exit — without evaluating the other superfluous conditions.
With a tiny routine like this, you don’t have to worry about execution speed. But for larger applications in which speed is important, you should know about another syntax for the If-Then structure. The ElseIf syntax follows:

Here’s how you can rewrite the GreetMe routine using this syntax:
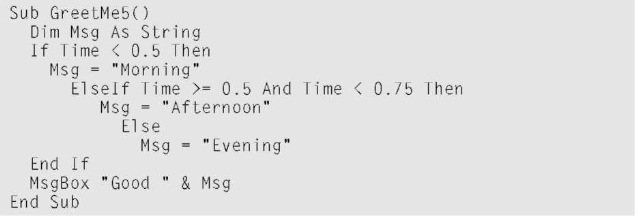
When a condition is true, VBA executes the conditional statements and the If structure ends. In other words, VBA doesn’t waste time evaluating the extraneous conditions, which makes this procedure a bit more efficient than the previous examples. The trade-off (there are always trade-offs) is that the code is more difficult to understand. (Of course, you already knew that.)
Another If-Then example
Here’s another example that uses the simple form of the If-Then structure. This procedure prompts the user for a quantity and then displays the appropriate discount, based on the quantity the user enters:

A workbook that contains this section’s examples can be downloaded from this topic’s Web site.
Notice that each If-Then statement in this routine is executed and the value for Discount can change as the statements are executed. However, the routine ultimately displays the correct value for Discount.
The following procedure performs the same tasks by using the alternative ElseIf syntax. In this case, the routine ends immediately after executing the statements for a true condition.
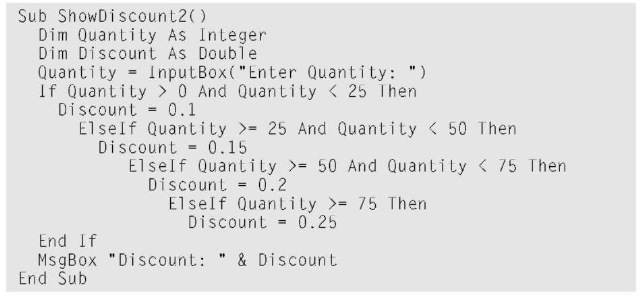
Personally, I find these multiple If-Then structures rather cumbersome. I generally use the If-Then structure for only simple binary decisions. When a decision involves three or more choices, the Select Case structure offers a simpler, more efficient approach.
The Select Case structure
The Select Case structure is useful for decisions involving three or more options (although it also works with two options, providing an alternative to the If-Then-Else structure).
The syntax for the Select Case structure follows:

Don’t be scared off by this official syntax. Using the Select Case structure is quite easy.
A Select Case example
The following example shows how to use the Select Case structure. This also shows another way to code the examples presented in the previous section:
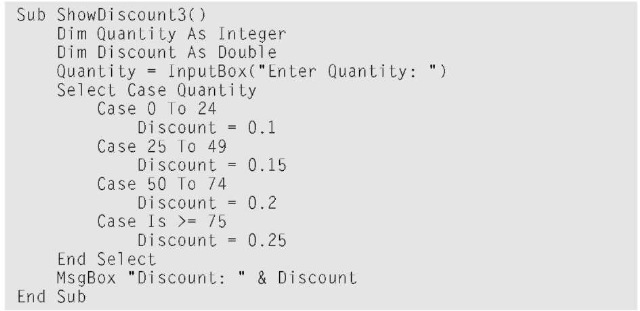
In this example, the Quantity variable is being evaluated. The routine is checking for four different cases (0 to 24, 25 to 49, 50 to 74, and 75 or greater).
Any number of statements can follow each Case statement, and they all are executed if the case is true. If you use only one statement, as in this example, you can put the statement on the same line as the Case keyword, preceded by a colon — the VBA statement separator character. In my opinion, this makes the code more compact and a bit clearer. Here’s how the routine looks using this format:
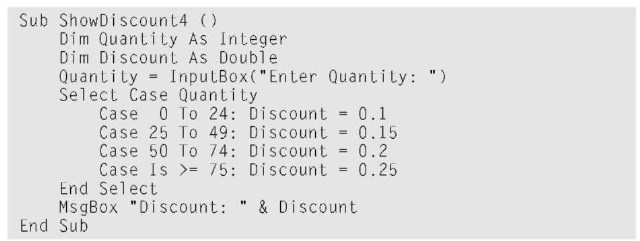
When VBA executes a Select Case structure, the structure is exited as soon as VBA finds a true case.
A nested Select Case example
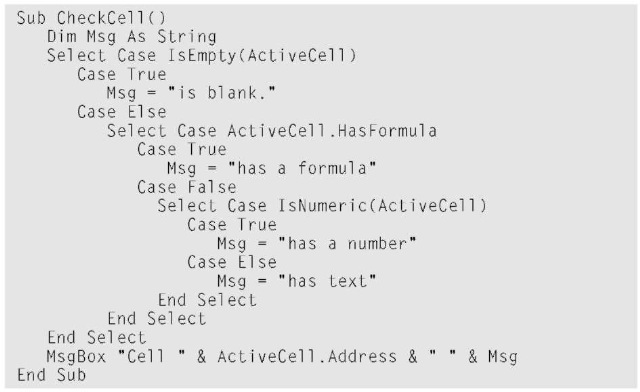
As demonstrated in the following example, you can nest Select Case structures. This routine examines the active cell and displays a message describing the cell’s contents. Notice that the procedure has three Select Case structures and each has its own End Select statement.
This example is available at this topic’s Web site.
The logic goes something like this:
1. Find out whether the cell is empty.
2. If it’s not empty, see whether it contains a formula.
3. If there’s no formula, find out whether it contains a numeric value or text.
When the routine ends, the Msg variable contains a string that describes the cell’s contents. As shown in Figure 10-1, the MsgBox function displays that message.
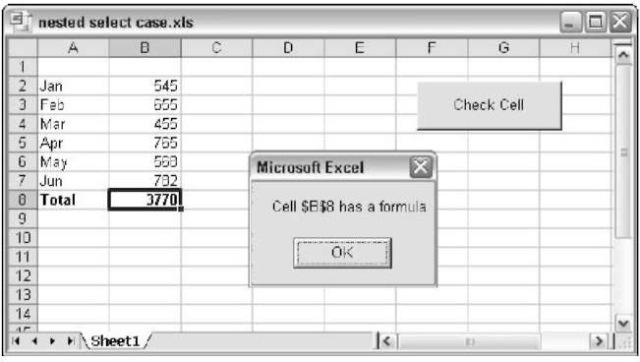
Figure 10-1:
A message displayed by the Check Cell procedure.
You can nest Select Case structures as deeply as you need, but make sure that each Select Case statement has a corresponding End Select statement.
As you can see, indenting makes this potentially confusing code much more understandable. If you don’t believe me, take a look at the same procedure without any indentation:
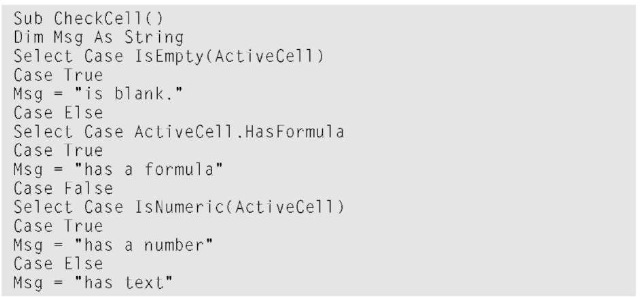

Fairly incomprehensible, eh?
Knocking Your Code for a Loop
The term looping refers to repeating a block of VBA statements numerous times. You may know how many times your program needs to loop, or variables used in your program’s may determine this.
There are two types of loops: good loops and bad loops. (Good loops get rewarded, and bad loops get sent to their room.)
The following code demonstrates a bad loop. The procedure simply enters consecutive numbers into a range. It starts by prompting the user for two values: a starting value and the total number of cells to fill. (Because InputBox returns a string, I convert the strings to integers by using the CInt function.) This loop uses the GoTo statement to control the flow. The Cell Count variable keeps track of how many cells are filled. If this value is less than the number requested by the user, program control loops back to Do Another.
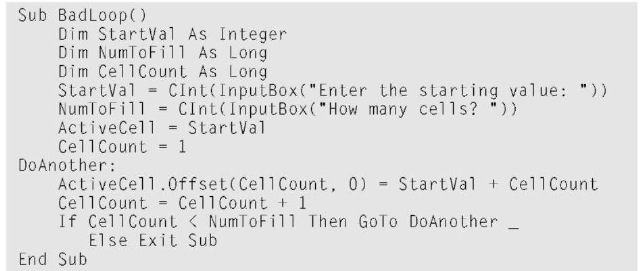
This routine works as intended, so why is it an example of bad looping? As I mention earlier in this chapter, avoid using a GoTo statement unless it’s absolutely necessary. Using GoTo statements to perform looping
Is contrary to the concept of structured programming. (See the sidebar earlier in this chapter, “What is structured programming? Does it matter?”)
Makes the code more difficult to read.
Is more prone to errors than using structured looping procedures.
VBA has enough structured looping commands that you almost never have to rely on GoTo statements for your decision making. Again, the exception is for error handling.
Now you can move on to a discussion of good looping structures.
For-Next loops
The simplest type of loop is a For-Next loop. Here’s the syntax for this structure:

The looping is controlled by a counter variable, which starts at one value and stops at another value. The statements between the For statement and the Next statement are the statements that get repeated in the loop. To see how this works, keep reading.
A For-Next example
The following example shows a For-Next loop that doesn’t use the optional Step value or the optional Exit For statement. This routine loops 100 times and uses the VBA Rnd function to enter a random number into 100 cells:

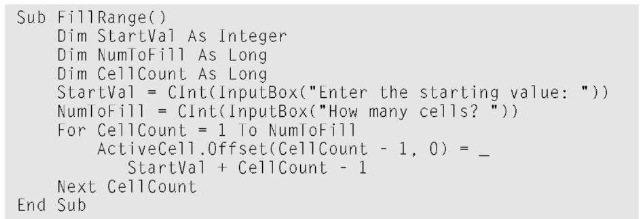
In this example, Count (the loop counter variable) starts with a value of 1 and increases by 1 each time through the loop. Because I didn’t specify a Step value, VBA uses the default value (1). The Offset method uses the value of
Count as an argument. The first time through the loop, the procedure enters a number into the active cell offset by zero rows. The second time through (Count = 2), the procedure enters a number into the active cell offset by one row (Count -1), and so on.
Because the loop counter is a normal variable, you can change its value within the block of code between the For and the Next statements. This, however, is a very bad practice. Changing the counter within the loop can have unpredictable results. Take special precautions to ensure that your code does not directly change the value of the loop counter.
A For-Next example with a Step
You can use a Step value to skip some values in a For-Next loop. Here’s the same procedure as in the preceding section, rewritten to insert random numbers into every other cell:

This time, Count starts out as 1 and then takes on a value of 3, 5, 7, and so on. The final Count value is 99. The Step value determines how the counter is incremented.
This chapter introduces looping via the BadLoop example, which uses a GoTo statement. Here’s the same example, which is available on this topics Web site, converted into a good loop by using the For-Next structure:
A For-Next example with an Exit For statement
A For-Next loop can also include one or more Exit For statements within the loop. When VBA encounters this statement, the loop terminates immediately.
The following example, available on the topics Web site, demonstrates the Exit For statement. This routine identifies which of the active worksheet’s cells in column A has the largest value:
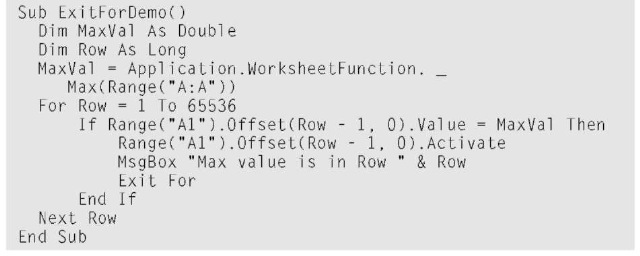
The routine calculates the maximum value in the column by using Excel’s MAX function and assigns the result to the MaxVal variable. The For-Next loop then checks each cell in the column. If the cell being checked is equal to MaxVal, the routine doesn’t need to continue looping (its job is finished), so the Exit For statement terminates the loop. Before terminating the loop, the procedure activates the cell with the maximum value and informs the user of its location.
A nested For-Next example
So far, all this chapter’s examples use relatively simple loops. However, you can have any number of statements in the loop and nest For-Next loops inside other For-Next loops.
The following example uses a nested For-Next loop to insert random numbers into a 12-row-by-5-column range of cells, as shown in Figure 10-2. Notice that the routine executes the inner loop (the loop with the Row counter) once for each iteration of the outer loop (the loop with the Col counter). In other words, the routine executes the Cells(Row, Col) = Rnd statement 60 times.

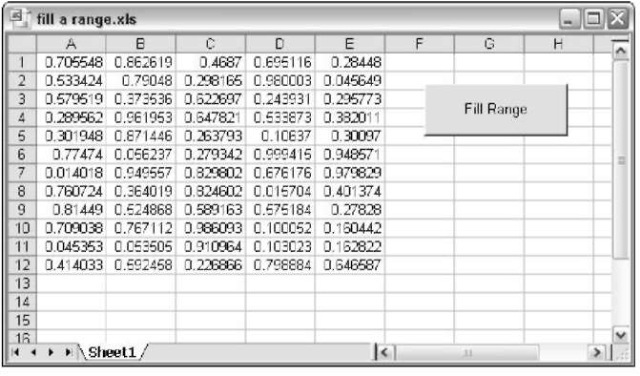
Figure 10-2:
These cells were filled using a nested For-Next loop.
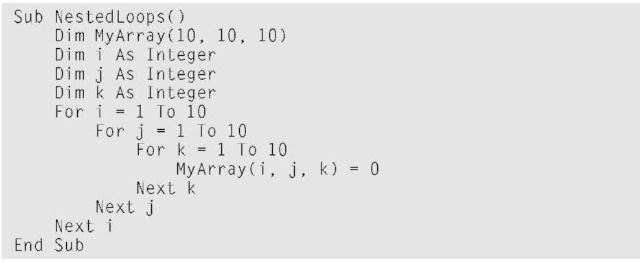
The next example uses nested For-Next loops to initialize a three-dimensional array with zeros. This routine executes the statement in the middle of all the loops (the assignment statement) 1,000 times, each time with a different combination of values for i, j, and k:
Refer to Chapter 7 for information about arrays.
Do-While loop
VBA supports another type of looping structure known as a Do-While loop. Unlike a For-Next loop, a Do-While loop continues until a specified condition is met. Here’s the Do-While loop syntax:

The following example uses a Do-While loop. This routine uses the active cell as a starting point and then travels down the column, multiplying each cell’s value by 2. The loop continues until the routine encounters an empty cell.

Some people prefer to code a Do-While loop as a Do-Loop While loop. This example performs exactly as the previous procedure but uses a different loop syntax:

Remember this key difference between the Do-While and Do-Loop While loops: The Do-While loop always performs its conditional test first. If the test is not true, the instructions inside the loop are never executed. The Do-Loop While loop, on the other hand, always performs its conditional test after the instructions inside the loop are executed. Thus, the loop instructions are always executed at least once, regardless of the test. This difference can make a profound difference in how your program functions.
Do-Until loop
The Do-Until loop structure is similar to the Do-While structure. The two structures differ in their handling of the tested condition. A program continues to execute a Do-While loop while the condition remains true. In a Do-Until loop, the program executes the loop until the condition is true.
Here’s the Do-Until syntax:

The following example is the same one presented for the Do-While loop but recoded to use a Do-Until loop:

You may encounter a different form of the Do-Until loop — a Do-Loop Until loop. The following example, which has the same effect as the preceding procedure, demonstrates an alternate syntax for this type of loop:

There is a subtle difference in how the Do-Until loop and the Do-Loop Until loop operate. In the former, the test is performed at the beginning of the loop, before anything in the body of the loop is executed. This means that it is possible that the code in the loop body will not be executed if the test condition is met. In the latter version, the condition is tested at the end of the loop. This means, at a minimum, the Do-Loop Until loop always results in the body of the loop being executed once.
Looping through a Collection
VBA supports yet another type of looping — looping through each object in a collection. Recall that a collection consists of a number of the same type of object. For example, each workbook has a collection of worksheets (the Worksheets collection), and Excel has a collection of all open workbooks (the Workbooks collection).
When you need to loop through each object in a collection, use the For Each-Next structure. The syntax is

The following example loops through each worksheet in the active workbook and deletes the first row of each worksheet:

In this example, the variable WkSht is an object variable that represents each worksheet in the workbook. Nothing is special about the variable name WkSht — you can use any variable name that you like.
The example that follows loops through the cells in a range, checking each one. The code switches the sign of the values (negative values are made positive; positive values are made negative). It does this by multiplying each value times -1. Note that I used an If-Then construct, along with the VBA Is Numeric function, to ensure that the cell contains a numeric value:

Here’s another example that loops through each chart on Sheet1 (that is, each member of the Chart Objects collection) and changes each chart to a line chart. In this example, Cht is a variable that represents each Chart Object. If Sheetl has no Chart Objects, nothing happens.

