In This Chapter
Knowing the event types that can trigger an execution Finding out where to place your event-handler VBA code Executing a macro when a workbook is opened or closed Executing a macro when a workbook or worksheet is activated you have a number of ways to execute a VBA Sub procedure. One way is to arrange for the Sub to be executed automatically. In this chapter, I cover the ins and outs of this potentially useful feature, explaining how to set things up so that a macro is executed automatically when a particular event occurs. (No, this chapter is not about capital punishment.)
Preparing for the Big Event
What types of events am I talking about here? Good question. An event is basically something that happens in Excel. Following are a few examples of the types of events that Excel can deal with:
A workbook is opened or closed.
A window is activated.
A worksheet is activated or deactivated.
Data is entered into a cell or the cell is edited.
A workbook is saved.
A worksheet is calculated.
An object, such as button, is clicked.
A particular key or key combination is pressed.
A cell is double-clicked.
A particular time of day occurs.
An error occurs.
Most Excel programmers never need to worry about most of the events in this list. You should, however, at least know that these events exist because they may come in handy someday. In this chapter, I discuss the most commonly used events. To simplify things, I talk about two types of events: workbook and worksheet.
Table 11-1 lists most of the workbook-related events. You can access the complete list if you follow these directions:
1. Choose the This Workbook object in the Project window.
2. Display the Code window.
Choose View Code or press F7 to do this.
3. Choose the Workbook object in the Object drop-down list (at the top-left of the Code window).
4. Expand the Procedure drop-down list (at the top-right of the Code window).
| Table 11-1 | Workbook Events |
| Event | When Ifs Triggered |
| Activate | The workbook is activated. |
| Addinlnstall | An add-in is installed (relevant only for add-ins). |
| AddinUninstall | The add-in is uninstalled (relevant only for add-ins). |
| BeforeClose | The workbook is closed. |
| BeforePrint | The workbook is printed. |
| BeforeSave | The workbook is saved. |
| Deactivate | The workbook is deactivated. |
| NewSheet | A new sheet is added to the workbook. |
| Open | The workbook is opened. |
| SheetActivate | A sheet in the workbook is activated. |
| SheetBefore DoubleClick | A cell in the workbook is double-clicked. |
| SheetBefore RightClick | A cell in the workbook is right-clicked. |
| Event | When Ifs Triggered |
| SheetCalculate | A sheet in the workbook is recalculated. |
| SheetChange | A change is made to a cell in the workbook. |
| SheetDeactivate | A sheet in the workbook is deactivated. |
| SheetFollowHyperlink | A hyperlink in a worksheet is clicked. |
| SheetSelectionChange | The selection is changed. |
| WindowActivate | The workbook window is activated. |
| WindowDeactivate | The workbook window is deactivated. |
| WindowResize | The workbook window is resized. |
Table 11-2 lists most of the worksheet events. These events are accessible if you follow these directions:
1. Choose a Worksheet object in the Project window.
2. Display the Code window.
3. Choose the Worksheet object in the Object list (at the top of the Code window).
4. Expand the Procedure drop-down list.
| Table 11-2 | Worksheet Events |
| Event | When Ifs Triggered |
| Activate | The worksheet is activated. |
| BeforeDoubleClick | A cell in the worksheet is double-clicked. |
| BeforeRightClick | A cell in the worksheet is right-clicked. |
| Calculate | The worksheet is recalculated. |
| Change | A change is made to a cell in the worksheet. |
| Deactivate | The worksheet is deactivated. |
| FollowHyperlink | A hyperlink is activated. |
| SelectionChange | The selection is changed. |
Are events useful?
At this point, you may be wondering how these events can be useful. Here’s a quick example.
Suppose you have a workbook that other people use for data entry. Any values entered must be greater than 1,000. You can write a simple macro that Excel executes whenever someone enters data into a cell. (Entering data is an event.) If the user enters a value less than 1,000, the macro displays a dialog box reprimanding the user.
The Data Validation command in Excel provides another way to perform this type of data-entry checking — without even using VBA. However, as you see later in this chapter (see “A data validation example”), using VBA for data validation offers some distinct advantages.
This is just one example of how you can take advantage of an event. Keep reading for some more examples.
Programming event-handler procedures
A VBA procedure that executes in response to an event is called an event-handler procedure. These are always Sub procedures (as opposed to Function procedures). Writing these event-handlers is relatively straightforward after you understand how the process works. It all boils down to a few steps, all of which I explain later:
1. Identify the event you want to trigger the procedure.
2. Press Alt+F11 to Activate the Visual Basic Editor.
3. In the VBE Project Window, double-click the appropriate object listed under Microsoft Excel Objects.
For workbook-related events, the object is This Workbook. For a workbook-related event, the object is a Worksheet object (such as Sheet1).
4. In the Code window for the object, write the event-handler procedure that is executed when the event occurs.
This procedure will have a special name that identifies it as an event-handler procedure.
These steps become clearer as you progress through the chapter. Trust me.
Where Does the VBA Code Go?
It’s very important to understand where your event-handler procedures go. They must reside in the Code window of an Object module. They simply won’t work if you put them in a standard VBA module.
Figure 11-1 shows the VBE window with one project displayed in the Project window. (Refer to Chapter 3 for some background on the VBE.) Notice that the project consists of several objects:
One object for each worksheet in the workbook (in this case, three Sheet objects)
An object labeled This Workbook
A VBA module that I inserted manually using the Insert Module command
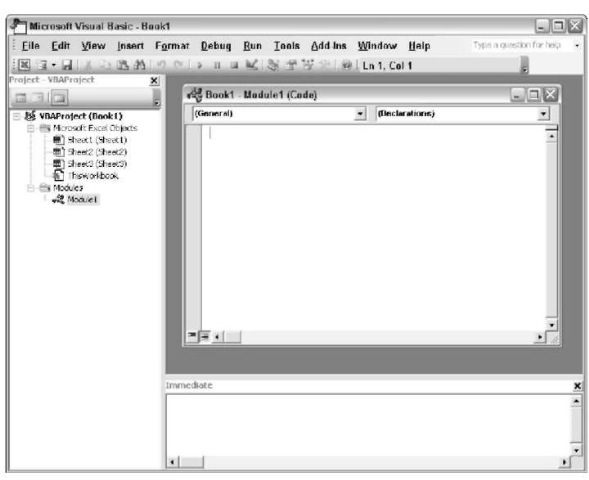
Figure 11-1:
The VBE window displays items for a single project.
Double-clicking any of these objects displays the code associated with the item, if any.
The event-handler procedures that you write go into the Code window for the This Workbook item (for workbook-related events) or one of the Sheet objects (for worksheet-related events).
Writing an Event-Handler Procedure
The VBE helps you out when you’re ready to write an event-handler procedure; it displays a list of all events that Excel can recognize.
Figure 11-2 shows a Code window for the This Workbook object (the code window is maximized to fill the entire code window area). To display this empty Code window, double-click the This Workbook object in the Project window. This Code window has two drop-down lists at the top.
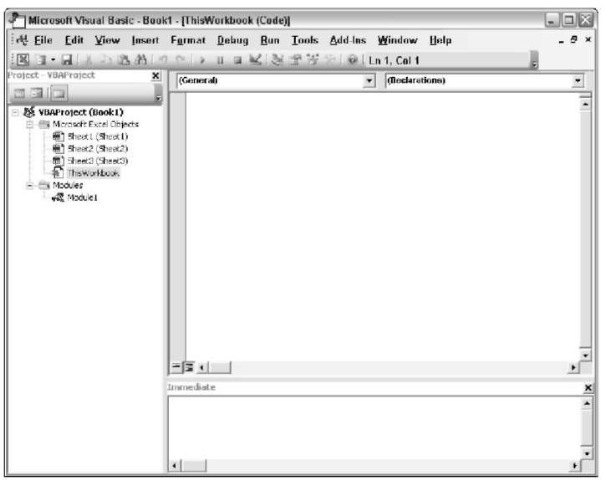
Figure 11-2:
An empty Code window for the This Workbook object.
By default, the Object (left) drop-down list in the Code window displays General. To write an event-handler procedure, you need to select Workbook from the Object drop-down list. (Workbook is the only other item in the list.) If the event-handler is for a worksheet, double-click the appropriate Sheet item in the Project window before selecting Worksheet from the Object dropdown list.
Figure 11-3 shows the right drop-down list, which consists of all the workbook-related events that Excel recognizes. When you select an event from the list, VBE automatically starts creating an event-handler procedure for you. (When you first selected Workbook from the Object list, VBE assumed that you wanted to create an event-handler procedure for the Open event and created it. You can see this in Figure 11-3.)

Figure 11-3:
The dropdown list displays all the workbook-related events.
VBE’s help goes only so far, however. It writes the Sub statement and the End Sub statement. Writing the VBA code that goes between these two statements is your job.
Some event-handler procedures use one or more arguments in the Sub statement. For example, if you select Sheet Activate from the event list for a Workbook object, VBE writes the following Sub statement:
![]()
In this case, Sh is the argument passed to the procedure and is a variable that represents the sheet in the activated workbook. Examples in this chapter clarify this point.
Introductory Examples
In this section, I provide a few examples so that you can get the hang of this event-handling business.
The Open event for a workbook
One of the most commonly used events is the Workbook Open event. Assume that you have a workbook that you use every day. The Workbook_Open procedure in this example is executed every time the workbook is opened. The
procedure checks the day of the week; if it’s Friday, the code displays a reminder message for you.
To create the procedure that is executed whenever the Workbook Open event occurs, follow these steps:
1. Open the workbook.
Any workbook will do.
2. Press Alt+F11 to activate the VBE.
3. Locate the workbook in the Project window.
4. Double-click the project name to display its items, if necessary.
5. Double-click the This Workbook item.
The VBE displays an empty Code window for the This Workbook object.
6. In the Code window, select Workbook from the Object (left) dropdown list.
The VBE enters the beginning and ending statements for a Workbook_Open procedure.
7. Enter the following statements:

The Code window should look like Figure 11-4.

Figure 11-4:
The event-handler procedure is executed when the workbook is opened.
Workbook_Open is executed automatically whenever the workbook is opened. It uses VBA’s WeekDay function to determine the day of the week. If it’s Friday (day 6), a message box reminds the user to perform a weekly file backup. If it’s not Friday, nothing happens.
If today isn’t Friday, you might have a hard time testing this procedure. Here’s a chance to test your own skill at VBA. You can modify this procedure any way you like. For example, the following version displays a message every time the workbook is opened. This gets annoying after a while, trust me.

A Workbook_Open procedure can do almost anything. These event-handlers are often used for the following:
Displaying welcome messages (such as the one to Frank) Opening other workbooks
Activating a particular worksheet in the workbook Setting up custom menus Displaying or hiding toolbars
Keep in mind that event-handler procedures are not executed if the user disables macros when the workbook is opened. In other words, you can’t count on the fact that your event-handler procedures will always work.
The Before Close event for a workbook
Here’s an example of the Workbook_Before Close event-handler procedure, which is automatically executed immediately before the workbook is closed. This procedure is located in the Code window for a This Workbook object:
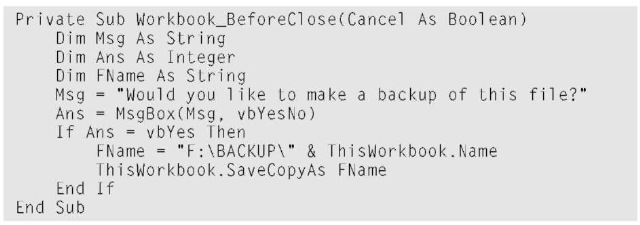
This routine uses a message box to ask the user whether he would like to make a backup copy of the workbook. If the answer is yes, the code uses the Save Copy As method to save a backup copy of the file on drive F. If you adapt this procedure for your own use, you probably need to change the drive and path.
Excel programmers often use a Workbook_Before Close procedure to clean up after themselves. For example, if you use a Workbook_Open procedure to change some settings when you open a workbook (hiding the status bar, for example), it’s only appropriate that you return the settings to their original state when you close the workbook. You can perform this electronic housekeeping with a Workbook_Before Close procedure.
The Before Save event for a Workbook
The Before Save event, as its name implies, is triggered before a workbook is saved. This event occurs when you use either the File Save or File Save As command.
The following procedure, which is placed in the Code window for a This Workbook object, demonstrates the Before Save event. The routine updates the value in a cell (cell A1 on Sheet1) every time the workbook is saved. In other words, cell A1 serves as a counter to keep track of the number of times the file was saved.

Notice that the Workbook_Before Save procedure has two arguments, Save As UI and Cancel. To demonstrate how these arguments work, examine the following macro, which is executed before the workbook is saved. This procedure prevents the user from saving the workbook with a different name. If the user chooses the File Save As command, then the Save As UI argument is True.
When the code executes, it checks the Save As UI value. If this variable is True, the procedure displays a message and sets Cancel to True, which cancels the Save operation.

Examples of Activation Events
Another category of events consists of activating and deactivating objects — specifically, sheets and windows.
Activate and Deactivate events in a sheet
Excel can detect when a particular sheet is activated or deactivated and execute a macro when either of these events occurs. These event-handler procedures go in the Code window for a Sheet object.
The following example shows a simple procedure that is executed whenever a particular sheet is activated. This code simply pops up a message box that displays the name of the active sheet:

Here’s another example that activates cell A1 whenever the sheet is activated:

Although the code in these two procedures is about as simple as it gets, event-handler procedures can be as complex as you like.
The following procedure (which is stored in the Code window for the Sheet1 object) uses the Deactivate event to prevent a user from activating any other sheet in the workbook. If Sheet1 is deactivated (that is, another sheet is activated), the user gets a message and Sheet1 is activated.

Activate and Deactivate events in a workbook
The previous examples use events associated with a worksheet. The This Workbook object also handles events that deal with sheet activation and deactivation. The following procedure, which is stored in the Code window
for the This Workbook object, is executed when any sheet in the workbook is activated. The code displays a message with the name of the activated sheet.

The Workbook_Sheet Activate procedure uses the Sh argument. Sh is a variable that represents the active Sheet object. The message box displays the Sheet object’s Name property.
The next example is contained in a This Workbook Code window. It consists of two event-handler procedures. Workbook_Sheet Deactivate is executed when a sheet is deactivated. It stores the sheet that is deactivated in an object variable. (The Set keyword creates an object variable.) The Workbook_Sheet Activate code checks the type of sheet that is activated (using the Type Name function). If the sheet is a chart sheet, the user gets a message and the previous sheet (which is stored in the Old Sheet variable) is reactivated. The effect is that users cannot activate a chart sheet (and are always returned to the previous sheet if they try).
A workbook that contains this code is available at this topic’s Web site.

Workbook activation events
Excel also recognizes the event that occurs when you activate or deactivate a particular workbook. The following code, which is contained in the Code window for the This Workbook object, is executed whenever the workbook is activated. The procedure simply maximizes the workbook’s window.

The Workbook_Deactivate code, shown next, is executed when a workbook is deactivated. This procedure minimizes the workbook’s window:

Notice that I didn’t use Active Window in this code. That’s because the workbook is no longer the active window when it’s deactivated. Therefore, I used This Workbook, which refers to the workbook that contains the code.
Other Worksheet-Related Events
In the preceding section I present examples for worksheet activation and deactivation events. In this section I discuss three additional events that occur in worksheets: double-clicking a cell, right-clicking a cell, and changing a cell.
The Before Double Click event
You can set up a VBA procedure to be executed when the user double-clicks a cell. In the following example (which is stored in the Code window for a Sheet object), double-clicking a cell makes the cell bold (if it’s not bold) or not bold (if it is bold):

The Worksheet_Before Double Click procedure has two arguments: Target and Cancel. Target represents the cell (a Range object) that was double-clicked. If Cancel is set to True, the default double-click action doesn’t occur.
Notice that I set the Cancel argument to True. This prevents the default action from occurring. In other words, double-clicking the cell won’t put Excel into cell edit mode.
The Before Right Click event
The Before Right Click event is similar to the Before Double Click event, except that it consists of right-clicking a cell. The following procedure checks to see whether the cell that was right-clicked contains a numeric value. If so, the
code displays the Format Number dialog box and sets the Cancel argument to True (avoiding the normal shortcut menu display). If the cell does not contain a numeric value, nothing special happens — the shortcut menu is displayed as usual.

Notice that the code, which is available on this topic’s Web site, makes an additional check to see if the cell is empty. This is because VBA considers empty cells to be numeric.
The Change event
The Change event occurs whenever any cell on the worksheet is changed. In the following example, the Worksheet_Change procedure effectively prevents a user from entering a non-numeric value into cell A1. This code is stored in the Code window for a Sheet object.

The single argument for the Worksheet_Change procedure represents the range that was changed. The first statement sees whether the cell’s address is $A$1. If so, the code uses the Is Numeric function to determine whether the cell contains a numeric value. If not, a message appears and the cell’s value is erased. Cell A1 is then activated — useful if the cell pointer moved to a different cell after the entry was made. If the change occurs in any cell except A1, nothing happens.
Why not use the Excel Data Validation command?
You may be familiar with the Data Validation command. This is a handy feature that makes it easy to ensure that only data of the proper type is entered into a particular cell or range. Although the Data Validation command is useful, it’s definitely not foolproof. To demonstrate, start with a blank worksheet and perform the following steps:
1. Select the range A1:C12.
2. Choose Data Validation.
3. Set up your validation criteria to accept only whole numbers between 1 and 12, as shown in Figure 11-5.
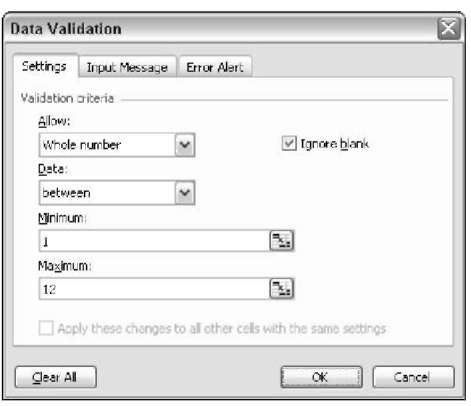
Figure 11-5:
These settings allow only whole numbers between 1 and 12.
Now, enter some values in the range A1:C12. The data validation works as it should. But to see it fall apart at the seams, try this:
1. Enter -1 into any cell outside the validation range (any cell not in A1:C12).
2. Choose Edit Copy to copy the negative number to the Clipboard.
3. Select any cell in the validation range.
4. Choose Edit Paste.
You find that the paste operation is allowable. Look a little closer, however, and you find that the cell into which you pasted the negative value no longer has any validation criteria. Pasting wipes out the data validation criteria! The severity of this flaw depends on your application. In the next section I describe how to use the Change event to provide for better validating.
Pasting wipes out data validation because Excel considers validation a format for a cell. This means it is in the same classification as font size, color, or other similar attributes. When you paste a cell, you are replacing the formats in the target cell with those of the source cell. Unfortunately, those formats also include your validation rules.
A data validation example
The next procedure demonstrates a better alternative to the Excel Data Validation command. It ensures that only positive values are entered into the range A1:C12.
A workbook that contains this code is available at this topic’s Web site:
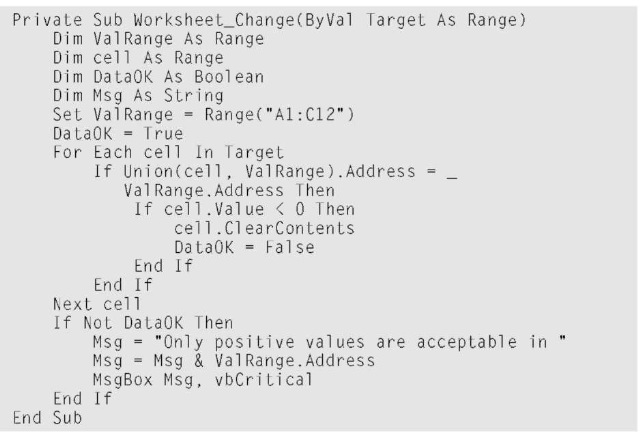
The procedure starts by creating an object variable (ValRange) that represents the range to be validated. DataOK is a Boolean variable initially set to True. The For-Next loop examines each cell in Target (which is the cell or range that was changed). I use the Union function to determine whether the cell is contained in ValRange. If so, an If statement determines whether the cell’s value is less than 0. If so, the contents are erased and DataOK is set to False.
When all the cells have been checked, another If statement checks the DataOK value. If it was set to False, one or more cells in the changed range were negative. Therefore, the user gets a message. This routine works even when data is copied and pasted to the validation range.
Events Not Associated with Objects
The events that I discuss previously in this chapter are associated with either a workbook object or a worksheet object. In this section, I discuss two types of events that are not associated with objects: time and key presses.
Because time and key presses aren’t associated with a particular object such as a workbook or a worksheet, you program these events in a normal VBA module (unlike the other events discussed in this chapter).
The OnTime event
The OnTime event occurs when a particular time of day occurs. The following example demonstrates how to program Excel so that it beeps and then displays a message at 3:00 p.m.:

In this example, I use the OnTime method of the Application object. This method takes two arguments: the time (0.625 or 3:00 p.m.) and the code to execute when the time occurs (Display Alarm).
This procedure is quite useful if you tend to get so wrapped up in your work that you forget about meetings and appointments. Just set an OnTime event to remind yourself.
Most people (this author included) find it difficult to think of time in terms of the Excel numbering system. Therefore, you may want to use the VBA Time Value function to represent the time. TimeValue converts a string that looks like a time into a value that Excel can handle. The following statement shows an easier way to program an event for 3:00 p.m.:
![]()
If you want to schedule an event relative to the current time — for example, 20 minutes from now — you can use a statement like this:
![]()
You can also use the OnTime method to run a VBA procedure on a particular day. You must make sure that your computer keeps running and that the workbook with the procedure is open. The following statement runs the Display Alarm procedure at 5:00 p,m, on December 31, 2005:

This particular code line could come in handy to warn you that you need to go home and get ready for the New Year’s Eve festivities.
The OnTime method has two additional arguments. If you plan to use this method, you should refer to the online help for complete details.
Keypress events
While you work, Excel constantly monitors what you type. Because of this, you can set up a keystroke or a key combination to execute a procedure.
Here’s an example that reassigns the PgDn and PgUp keys:
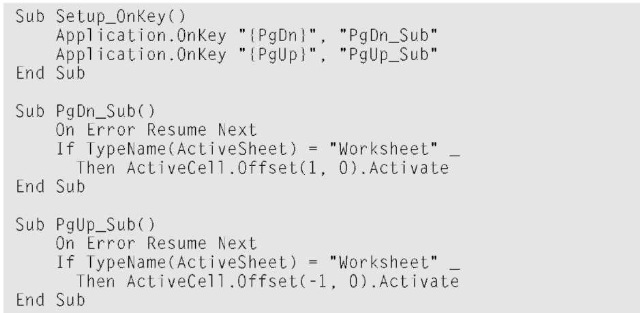
After setting up the OnKey events by executing the Setup_OnKey procedure, pressing PgDn moves you down one row. Pressing PgUp moves you up one row.
Notice that the key codes are enclosed in braces, not parentheses. For a complete list of keyboard codes, consult the Help system. Search for OnKey.
In this example, I use On Error Resume Next to ignore any errors that are generated. For example, if the active cell is in the first row, trying to move up one row causes an error that can safely be ignored. Also, notice that the procedures check to see which type of sheet is active. The routine reassigns the PgUp and PgDn keys only when a worksheet is the active sheet.
By executing the following routine, you cancel the OnKey events:

Using an empty string as the second argument for the OnKey method does not cancel the OnKey event. Rather, it causes Excel to simply ignore the keystroke. For example, the following statement tells Excel to ignore Alt+F4. The percent sign represents the Alt key:
![]()
Although you can use the OnKey method to assign a shortcut key for executing a macro, you should use the Macro Options dialog box for this task. For more details, see Chapter 5.
