Compound Pipes and Pipes with Surfacing
Another example of measuring the residual stresses by ultrasonic method is associated with compound pipes. Compound pipes are used in various applications and they are made by fitting under pressure one pipe with an outer diameter into a pipe with approximately the same inner diameter. For residual stress measurement, rings were cut-off from a number of compound pipes of different diameters. The width of the rings was 16 mm. Residual stresses were measured across the prepared cross-sections in three different locations at 120 degrees to each other with a subsequent averaging of the measurement results. Depending on the differences between the inner diameter D1 of the outer pipe and the outer diameter D2 of the inner pipe, the measurements were made in 3 to 5 points along the radius. The distribution of residual stresses as measured across the wall thickness of the compound pipe is presented in Figure 8.
Figure 7. Distribution of residual stresses induced by local heating in a specimen made of an aluminum alloy with a fatigue crack: L – distance from the center of specimen [10]
Figure 8. Residual stress distribution in a compound ring with the following dimensions [10]: inner ring: D1 = 160mm and D2 = 180mm; outer ring: D1 = 180mm and D2 = 220mm (D1- inner diameter, D2- outer diameter)
The results of the residual stress measurement by using ultrasonic method in rings cut-off from the pipes with inner surfacing are presented in Figure 9.
Measurement of Residual Stresses in Welded Samples
The residual stresses were measured in a specimen measuring 1000x500x36 mm, representing a butt-welded element of a wind tunnel. The distribution of biaxial residual stresses was investigated in X (along the weld) and Y directions after welding and in the process of cyclic loading of the specimen [7]. Figure 10 represents the distribution of longitudinal (along the weld) and transverse components of residual stresses along the weld toe. Both components of the residual stress reached their maximum levels in the central part of the specimen: longitudinal – 195 MPa, transverse – 110 MPa.
Figure 9. Residual stress distribution in rings with inner surfacing [10]: a) ring with D1 = 150mm and D2 = 180mm; b) ring with D1 = 180mm and D2 = 220mm (D1- inner diameter, D2- outer diameter, width of the rings – 16 mm)
Figure 10. Distribution of longitudinal (along the weld) and transverse components of residual stresses along the butt weld toe [7]
The ultrasonic method was applied also for residual stress measurement in a specimen measuring 900x140x70 mm and made of low-alloyed steel, representing the butt weld of a structure [8]. The distribution of residual stress components in X3 (along the weld) and X2 (perpendicular to the weld) directions as well as through the thickness of the specimen near the weld (X1direction) are presented on Figure 11.
Measurement of Residual Stresses in Welded Structures
The developed ultrasonic equipment could be used for RS measurement for both laboratory/factory and field conditions.
Figure 11. Welded specimen (A) and distribution of the residual stresses along the butt weld I-I (B), perpendicular to the weld II-II (C) and through the thickness near the weld III-III (D) [8]:![]()
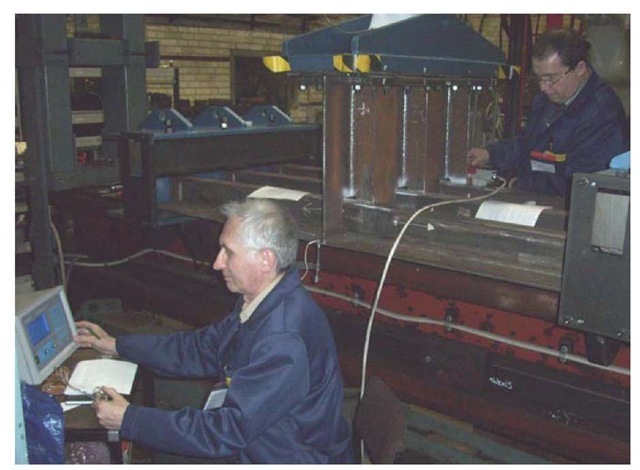
The residual stresses were measured by the ultrasonic method in large-scale welded panels in as-welded condition and during the fatigue loading of the panels [11]. The objectives of the study were to identify the residual stress distribution and relaxation in specimens with welded longitudinal attachment and welded panel that represent large scale models of ship structural detail, and compare the results of experimental and numerical analyses. During the fatigue testing the residual stresses were measured after 1, 2, 10 and 2010 cycles of loading. Figure 12 shows the process of residual stress measurement after certain number of cycles of loading. Figure 13 illustrates the distributions of the residual stress in large-scale welded panel near the weld that is critical from the fatigue point of view in as-welded condition and after 2010 cycles of loading.
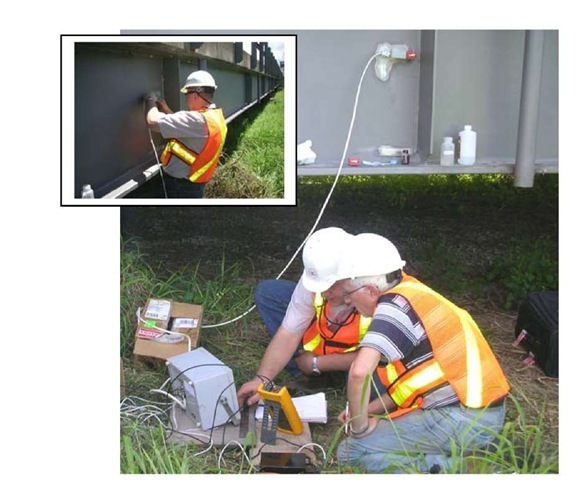
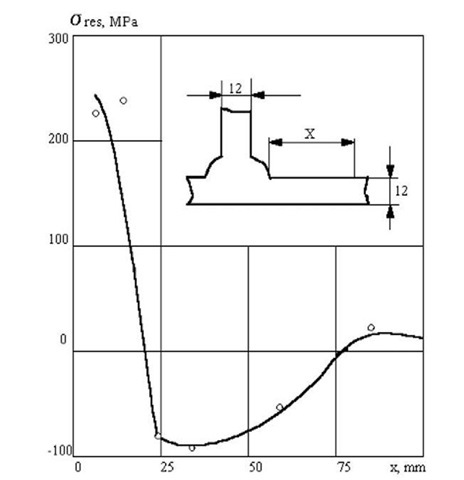
The process and some of the results of ultrasonic measurement of residual stresses in welded elements of a bridge are shown in Figures 14 and 15. The residual stresses were measured by ultrasonic method in the main wall of the bridge span near the end of one of welded vertical attachments. In the vicinity of the weld the measured levels of harmful tensile residual stresses reached 240 MPa. Such high tensile residual stresses are the result of thermo-plastic deformations during the welding process and are one of the main factors leading to the origination and propagation of the fatigue cracks in welded elements.
Figure 12. Measurement of residual stresses using UltraMARS system in large-scale welded panel in as-welded condition and during the fatigue loading of the panel
Figure 13. The distributions of residual stress in large-scale welded panel near the weld that is critical from the fatigue point of view in as-welded condition and after 2010 cycles of loading [11]
Based on the ultrasonic method the stresses were measured in the bridge both in conditions of no traffic on the bridge as well as in condition when a few heavy loaded trucks were put in certain locations to determine the total stress.
Figure 14. Process of measurement of residual stresses in a welded bridge
Figure 15. Distribution of longitudinal (oriented along the weld) residual stresses near the fillet weld in bridge span: x – distance from the weld toe
SUMMARY
1. Residual stresses play an important role in operating performance of materials, parts and structural elements. Their effect on the engineering properties of materials such as fatigue and fracture, corrosion resistance and dimensional stability can be considerable. The residual stresses, therefore, should be taken into account during design, fatigue assessment and manufacturing of parts and welded elements.
2. Certain progress has been achieved during the past few years in improvement of traditional techniques and development of new methods for residual stress measurement. The developed advanced ultrasonic method, based on it portable instrument and the supporting software can be used for non-destructive measurement of applied and residual stresses in laboratory samples and real parts and structural elements in many applications for a wide range of materials. The developed ultrasonic technique was successfully applied in construction industry, shipbuilding, railway and highway bridges, nuclear reactors, aerospace industry, oil and gas engineering and in other areas during manufacturing, in service inspection and repair of welded elements and structures.
![Distribution of residual stresses induced by local heating in a specimen made of an aluminum alloy with a fatigue crack: L - distance from the center of specimen [10] Distribution of residual stresses induced by local heating in a specimen made of an aluminum alloy with a fatigue crack: L - distance from the center of specimen [10]](http://what-when-how.com/wp-content/uploads/2011/07/tmpA77_thumb1_thumb1_thumb.jpg)
![Residual stress distribution in a compound ring with the following dimensions [10]: inner ring: D1 = 160mm and D2 = 180mm; outer ring: D1 = 180mm and D2 = 220mm (D1- inner diameter, D2- outer diameter) Residual stress distribution in a compound ring with the following dimensions [10]: inner ring: D1 = 160mm and D2 = 180mm; outer ring: D1 = 180mm and D2 = 220mm (D1- inner diameter, D2- outer diameter)](http://what-when-how.com/wp-content/uploads/2011/07/tmpA78_thumb_thumb_thumb.jpg)
![Residual stress distribution in rings with inner surfacing [10]: a) ring with D1 = 150mm and D2 = 180mm; b) ring with D1 = 180mm and D2 = 220mm (D1- inner diameter, D2- outer diameter, width of the rings - 16 mm) Residual stress distribution in rings with inner surfacing [10]: a) ring with D1 = 150mm and D2 = 180mm; b) ring with D1 = 180mm and D2 = 220mm (D1- inner diameter, D2- outer diameter, width of the rings - 16 mm)](http://what-when-how.com/wp-content/uploads/2011/07/tmpA79_thumb_thumb_thumb.jpg)
![Distribution of longitudinal (along the weld) and transverse components of residual stresses along the butt weld toe [7] Distribution of longitudinal (along the weld) and transverse components of residual stresses along the butt weld toe [7]](http://what-when-how.com/wp-content/uploads/2011/07/tmpA80_thumb2_thumb.jpg)
![Welded specimen (A) and distribution of the residual stresses along the butt weld I-I (B), perpendicular to the weld II-II (C) and through the thickness near the weld III-III (D) [8]: Welded specimen (A) and distribution of the residual stresses along the butt weld I-I (B), perpendicular to the weld II-II (C) and through the thickness near the weld III-III (D) [8]:](http://what-when-how.com/wp-content/uploads/2011/07/tmpA81_thumb13_thumb.jpg)

![The distributions of residual stress in large-scale welded panel near the weld that is critical from the fatigue point of view in as-welded condition and after 2010 cycles of loading [11] The distributions of residual stress in large-scale welded panel near the weld that is critical from the fatigue point of view in as-welded condition and after 2010 cycles of loading [11]](http://what-when-how.com/wp-content/uploads/2011/07/tmpA86_thumb2_thumb.jpg)


