EXPERIMENTAL RESULTS
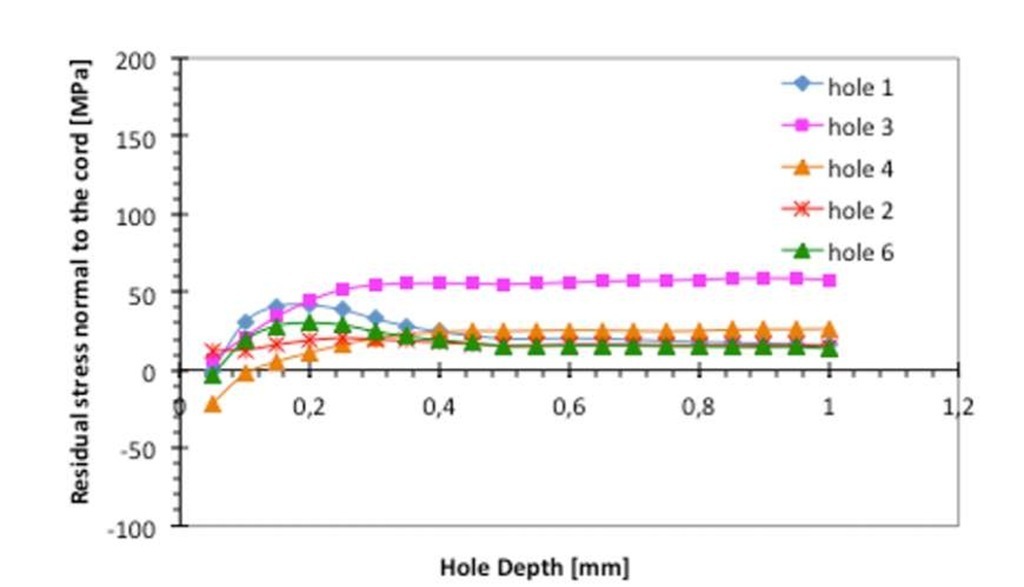
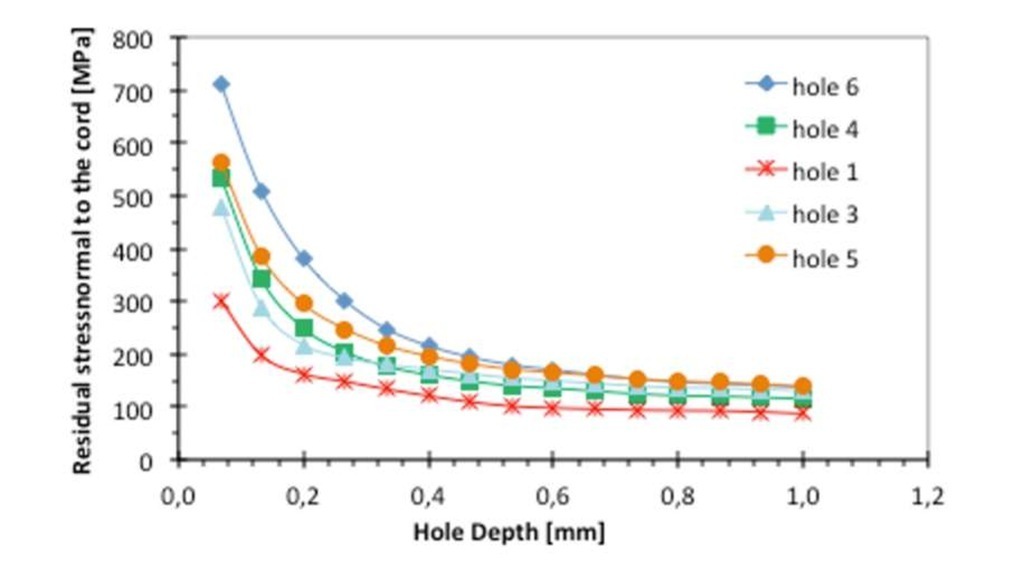
Figures 5 and 6 show calculated residual stress in the transversal directions with respect to the weld cord. Stresses are plotted against the hole depth h. Plotted residual stresses are calculated by power series method. Some "strange" values have been measured at the first drilling steps probably produced during the surface preparation for strain gage bonding. Experimental data show a more regular residual stress trend at higher depth. Residual stress value in the direction normal to the cord and at location 1 (same location of XRD measurements) is about 90 MPa (0.8 mm depth) in case of laser plates and 15 MPa in case of hybrid ones.
Fig. 5 – Calculated residual stresses transversal to the cord on hybrid welded plate (residual stress on location 1 and at 0.8 mm depth is about 15 MPa)
Fig. 6 – Calculated residual stresses transversal to the cord on laser welded plate (residual stress on location 1 and at 0.8 mm depth is about 90 MPa)
Residual stress measured by means of HDM gives the average stress related to the area (the hole diameter range between 1.8 and 2.0 mm) where the material is drilled. Moreover, this value of stress is usually read at a hole depth of about 1 mm, that is where the strain gage signal is steady and stress values are stabilized.
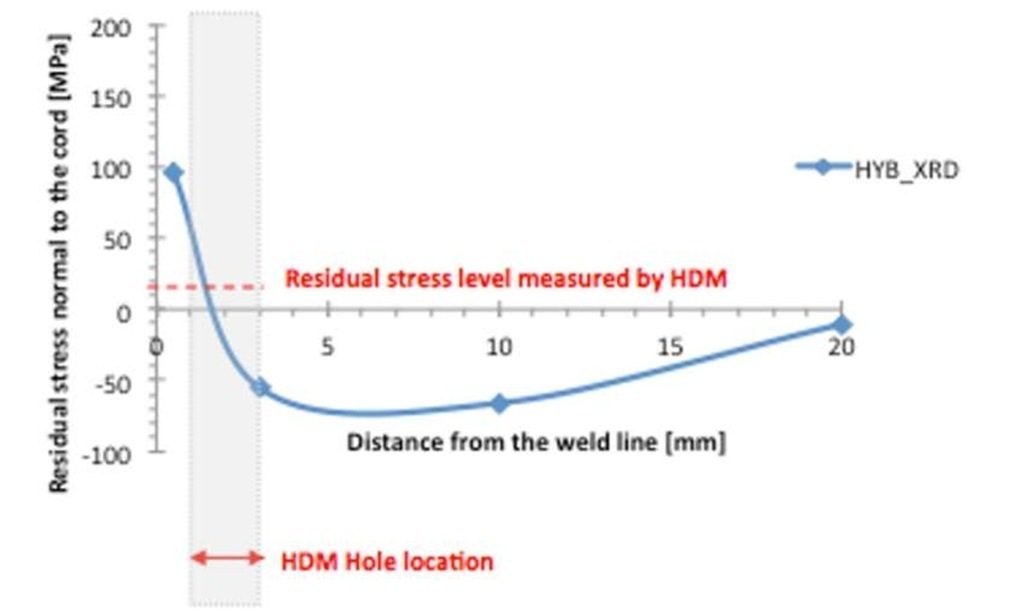
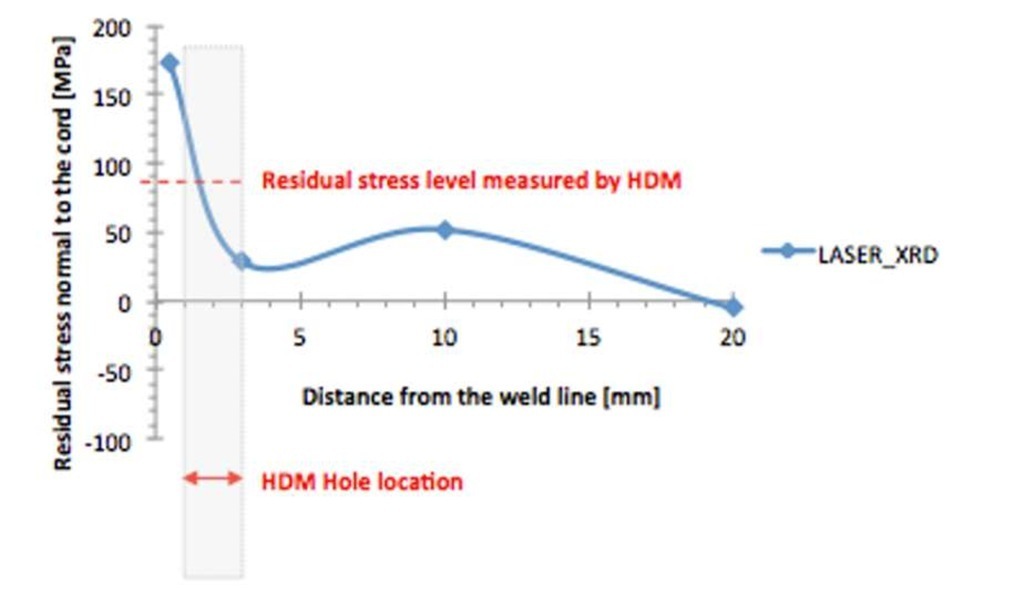
Figure 7 and 8 show values of residual stress normal to the weld cord in the case of XRD measurements. In this case, locations of measurements have been chosen at progressive distance from the weld cord. XRD values are commonly referred to the surface of specimen and indicate local concentrated residual stress.
Fig. 7 – Residual stress values measured by means of XRD in different position on the HYB plate
Fig. 8 – Residual stress values measured by means of XRD in different position on the LASER plate
Experimental data show that residual stresses on laser welded plates are higher than on hybrid plates, both in case of XRD and HDM measurements, that is both on surface of specimen and in depth. This result should be correlated to the extension of heat affected zone: it seems that hybrid plates, having a larger heat affected zone and larger distortions, allow thermal stresses to distribute on a larger area, so reducing the stress level restrained in the material at the end of welding thermal process. The area corresponding to the hole drilled by HDM is marked in Fig. 7-8. It can be observed that the XRD measurements no. 1 and 2 are localized at 0.5 and 3 mm from the weld line, while HDM hole cover the area between 1 and 3 mm from the cord, due to the inherent limitation laying in the size of strain gage rosette. Residual stress levels given by HDM, corresponding to 0.8 mm depth, seem to be an intermediate value.
CONCLUSION
Titanium alloy Ti6Al4V can be used in different fields ranging from chemical, aerospace, naval and biomedical engineering. Recently, welding technology has been improved and it is possible to assemble titanium parts. However, an important drawback associated with welding of Ti-based alloys results from their poor thermal conductivity, which leads to the generation of a steep thermal gradient across the weld region, and hence results in high residual stresses. Two different welding techniques have been considered in this work: laser and hybrid (laser/MIG).
Residual stress measurements have been executed by means of hole drilling method and X-ray diffractometer, which gives a concentrated localized value of stress. Measured points are located along the weld cord and along a direction transversal to the cord.
Analysis of residual stresses measured values suggests the following considerations:
- HDM measurements show that residual stress value in the direction normal to the cord, in the center of the welded plate (location 1) is about 90 MPa (0.8 mm depth) in case of laser plates and 15 MPa in case of hybrid ones.
- XRD measurements confirmed that residual stresses are higher in the case of laser welded plates (175 MPa with respect of 95 MPa of hybrid plates at 0.5 mm from the weld line).
- These different magnitude of residual stresses should be correlated to the different level of energy involved during welding process, that affects also the extension of heat affected zone and distortions of welded plates.


