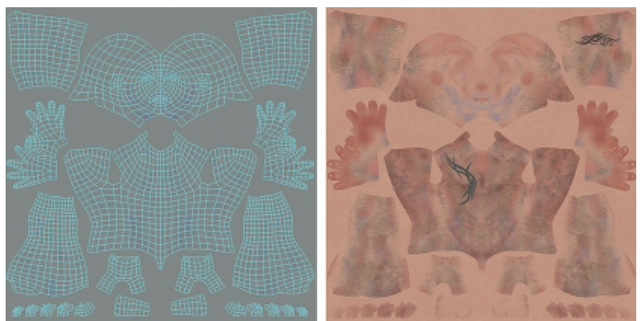
In addition to a comprehensive sculpting toolset, Mudbox also features a professional three-dimensional (3D) paint system. In 3D painting, colors and textures are directly applied to the surface of a 3D model in real time. 3D painting in Mudbox is intuitive, easy to use, and analogous to how real-word objects are painted. In this topic, you will review UV mapping.
It is important to understand UV mapping because Mudbox relies on UV coordinates to paint textures on the surface of a model and also to extract displacement maps (reviewed in the next topic). So, it goes without saying that to paint textures on a model in Mudbox, the model must first be UV mapped. UVmapping is a modeling process whereby the pixels in a 2D image are assigned to the geometry of a 3D model using UV coordinates. Much like a poster is tacked onto a wall, where the poster is the 2D image, the UV is the tack, and the wall is the 3D model. In essence, UV mapping tells the painting or modeling program where to place a 2D image on the surface of a 3D model (Figure 5.1).
FIG 5.1 Models to Be Painted In Mudbox Must Be UV Mapped. In This Figure, You Can See the Correlation of the Model’s UV Map and the Diffuse or Color Textures Painted in Mudbox (Diffuse Maps Are Shown as One Layer for Clarity).
The models that come with Mudbox like the Basic Head or the Human Body are already UV mapped, so they are ready to be painted. However, models that are imported into Mudbox must be UV mapped in a separate program like 3ds Max, modo, or Deep UV. The process of UV mapping or UV editing involves cutting and unfolding (also referred to as unwrapping) a representation of the 3D model into 2D UV space – which is an art unto itself. As mentioned earlier, in the tutorial that follows.
There are a few guidelines you should know when UV mapping a model for painting in Mudbox:
• UVs should be arranged (referred to as packing) to fill the UV tile as much as possible to improve the texture resolution.
• UV faces should be about the same size relative to each other and to the size of the polygons on the model, so that most UV faces are allotted about the same number of pixels in the 2D image. In some cases, such as painting textures for a character, certain areas like the head and hands will take up more room in the UV tile because of the greater detail required for these areas.
• In general, UVs should not overlap. The exception occurs when the UVs of a symmetrical model that uses the same texture on opposite halves are purposely overlapped to save UV space.
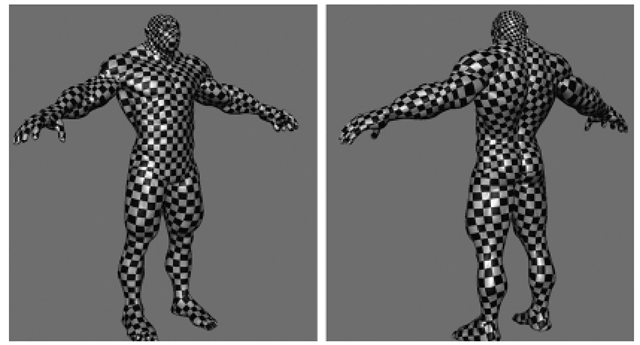
• UVs should have a four- to six-pixel space from the tile edge and from other UVs to make room for edge bleeding. UV mapping on a model may be visually checked by applying a checkered texture (Figure 5.2). On a well UV-mapped model, the checkers should appear about the same size and should be as square as possible.
FIG 5.2 A Checkered Pattern May Be Used to Visually Check for Distortions, Seams, and Properly Proportioned UVs. The Checkers Are Smaller on the Head because the Head Takes Up More UV Space.
Mudbox supports UV mapping on multiple UV tiles. When multiple UV tiles are used, sections of the model are UV mapped in adjacent tiles. For instance, the head and torso could be packed in one tile, and the legs, arms, hands, and feet could be packed in an adjacent tile (Figure 5.3). Using multiple UV tiles reduces some of the problems introduced by UV mapping on one tile such as having UVs of varying sizes, and it improves texture resolution. However, when UV mapping on multiple UV tiles, you must make sure that all applications in your pipeline support multiple-tile UV mapping. The model in the tutorial that follows is UV mapped using one UV tile.


