The main muscle masses of the torso, upper body, the upper limbs, and hands were sculpted at subdivision level 2. The model was then subdivided to level 3 and the muscle masses of the lower limb and feet and then the head and face were sculpted. Now that the model is at a higher resolution, revisit the torso, upper body, and upper limbs to add details. However, as you sculpt, make sure that the fundamental proportions remain unaltered and always check how changes in one area affect another. It is a good idea to create new layers for the details you are about to sculpt. For instance, for new torso details, you may add a layer named Torso Details; for new upper arm details, add a new layer named Upper Arm Details; and so on. This way, if something goes wrong or you want to try something different, you have not altered your original work. Also remember to save incremental files as you progress.
Refining the Torso and Upper Limbs
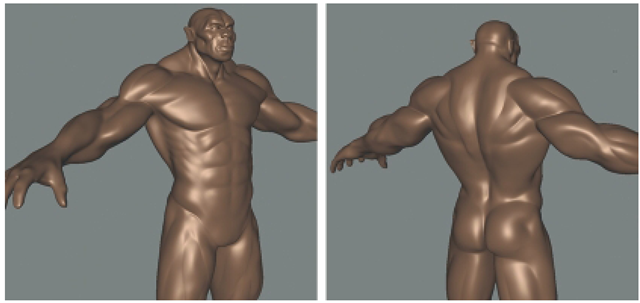
Using the Wax tool, build up the serratus anterior and the superior aspects of the external oblique muscles. Then, use the Contrast tool to make the intersections between these muscles more distinct as shown in Figure 4.29. Use the Pinch tool to define the insertion of the External oblique at the iliac crest. Refine the pectoralis major muscles by adding striations created by the muscle bundles at the origin and insertion points. Because the creature is very muscular, the clavicle is not as pronounced as it would be in someone with less bulk. Nonetheless, suggest the head and superior aspects of the clavicle (Figure 4.29).
Add detail to the deltoid by sculpting the separations between the anterior, lateral, and posterior bundles. Work down to the upper arm and refine the muscle groups using the Contrast and Pinch tools, and do the same with the forearm. Remember that the three groups that you sculpted for the forearm are composed of many muscles. You may suggest some of these muscles by emphasizing the separations between them. However, don’t arbitrarily add muscle details but instead use references to correctly indicate where the muscles are located. As you work your way to hand, emphasize details such as tendons and bony prominences (Figure 4.29).
FIG 4.29 Take Advantage of the Higher Subdivision Level to Sculpt Details on the Torso, Upper Body, and Upper Limbs.
Refining the Hands
Because hands are a source of expression and are an area of focus in the human figure, they should have a moderate-to-high level detail. In this section, you will sculpt the skin creases and folds on the fingers and palm, refine the knuckles and tendons, and sculpt the fingernails. To sculpt these details, subdivide the model twice to subdivision level 5. At this subdivision level, the model has 2,673,664 polygons. Before moving on, create a new layer to sculpt the hand details.
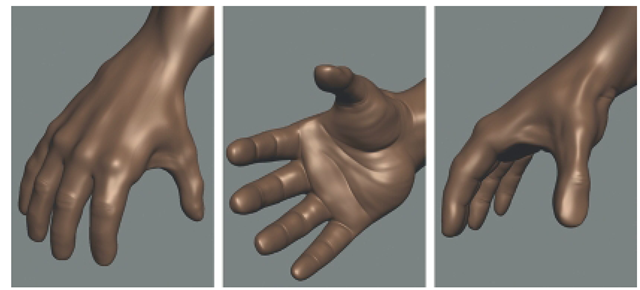
To sculpt the skin creases on the dorsal side of the knuckles, select the Wax tool, and from the Stamp tray, choose the bw-fiber.tif stamp. With the stamp loaded, the Wax tool will sculpt using the pattern in the stamp. Rotate the camera so you can see the knuckles on the four fingers and sculpt the creases as shown in Figure 4.30. When you are done with the fingers, sculpt the creases on the thumb knuckle. You may make these creases as deep or as shallow as you like because there is much variability to the pattern of creases from person to person. You may also use an inverted Bulge tool set to a very small size (about 0.3) to break up the pattern created by the stamp. Rotate the camera so you that can see the ventral side (palm side) of the fingers. Use the Wax tool without the stamp to build up the fleshy sections between each joint. Use an inverted Bulge tool to sculpt the creases at each knuckle bend, and then use the Wax tool with the bw-fiber.tif stamp to break up the creases a bit. Don’t forget to sculpt the creases on the ventral side of the thumb also. Once the creases on both sides of the fingers and thumb are sculpted, use the Contrast tool to make these features stand out.
FIG 4.30 Detailed Hands Add to the Overall Realism and Character of the Creature.
To sculpt the skin creases on the palm, use an inverted Bulge tool. Then, use the Smooth tool to smooth out any unwanted artifacts, and then, use the Pinch tool to cinch up the crease. Use the Wax tool to sculpt subtle folds of skin that follow the contours of the palm. To sculpt the creases on the wrist, use the same techniques that you used to sculpt the creases on the palm. Rotate the camera so that you can see the dorsum of the hand and refine the large knuckles and tendons leading to the forearm.
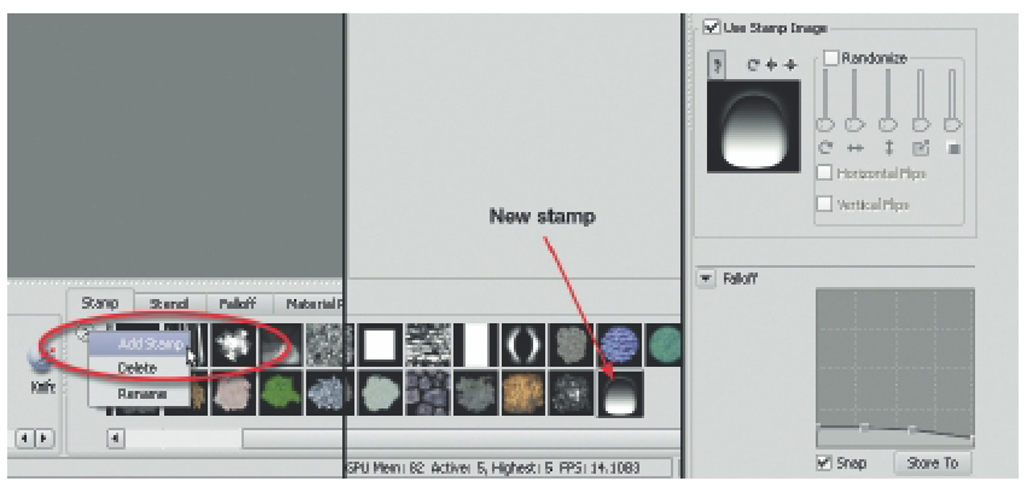
Sculpting the fingernails is challenging, but it can be accomplished fast with a stamp shortcut. First, take time to study the appearance of fingernails. Take a look at your own fingernails, and look at pictures of various types of fingernails. You will find that there is a wide range of variability to human fingernails. However, healthy fingernails fall within a spectrum that is considered normal, so unless you are going to sculpt diseased fingernails, nonhuman fingernails, or claws, make sure that you have good references for typical fingernails.In the Stamp tray, click on the menu button and select Add Stamp, then browse to the file that you had just downloaded, and add it to the Stamp tray (Figure 4.31).
The fingernail stamp is a custom gray scale image that will displace the mesh in the general shape of a fingernail. This provides a starting point from which each fingernail may be refined, thus saving time because each fingernail doesn’t have to be started from scratch. Create a new layer and name it as Fingernails. Rotate the camera until you can clearly see the fingertips of either hand up close. Select the Imprint tool and turn off Mirroring, then select the fingernail stamp from the Stamp tray. Set the Imprint tool strength to about 40 (the size value does not matter) and adjust the Falloffas shown in the last panel of Figure 4.31.
FIG 4.31 Download and Add the Custom Stamp that Will Be Used to Sculpt the Fingernails to the Stamp Tray. Customize the Falloff Profile for the Imprint Tool to Get a Good Displacement.
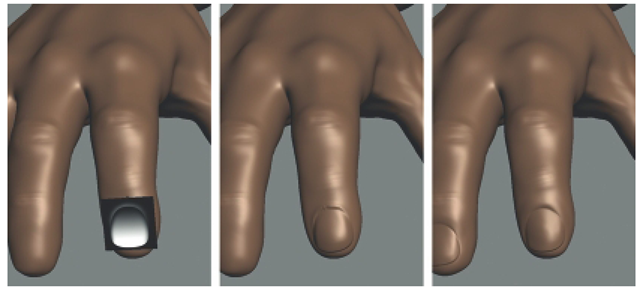
FIG 4.32 Apply the Imprint with a Custom Fingernail Stamp to Rough In the Basic Fingernail Shape. Then, Refine the Fingernail by Using the Smooth, Wax, Contrast, and Pinch Tools.
To customize the falloff profile, click and drag on the control points. The falloff profile tapers so that the edges of the fingernail will also taper. Now, select one of the fingertips on which you will create the first fingernail. Rotate the camera so that you are looking directly at one of the fingertips. Place the mouse over the tip of the finger and left-click (you should see the stamp), then drag to set the size of the fingernail and then release the left mouse button to create imprint. It may take a few attempts to imprint the nail in the correct position on the fingertip, but with a bit of practice, you will learn it.
Once you are happy with the placement of the fingernail, you need to refine it a bit. Use the Smooth tool set to a low strength value (about 10) and smooth out any jagged edges. Then, use the Pinch tool and run it along the edges of the fingernail and under the cuticle. If you smooth out details, for instance, you smooth out the cuticle, then use the Wax tool to sculpt it back in. If parts of the fingernail or fingertip need to be repositioned, use the Grab tool (Figure 4.32).
Refining the Feet
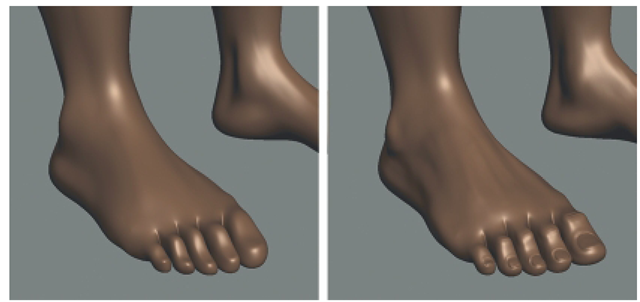
Use the Wax tool with the bw_fibers.tif stamp and the Bulge tool to create the creases on the toe knuckles just like you did for the fingers. Use the Bulge tool to sculpt the tendons running along the dorsum of the foot as shown in Figure 4.33. To emphasize the details on the foot, use the Contrast tool. The toenails are sculpted in the same way as the fingernails. However, you may use mirroring across the x axis so that you only have to sculpt five toenails instead of ten. The trick to sculpting natural toenails is, first, to study what toenails look like and then prepare the nail bed on each toe by making it flat on top and making room for the toenail.
FIG 4.33 Details on the Foot and the Toenails Are Sculpted the Same Way as with the Hands.
You have probably noticed that no sculpting is being done on the soles of the feet. This is because the soles of the feet are rarely seen. There is a cardinal rule in modeling and that says never sculpt anything that is not necessary. First, adding unnecessary details adds to computing overhead in terms of memory usage and file size. Second, sculpting details to a part of the model that will not be seen takes time, and in a production setting, you typically don’t have time to waste. However, if you like, you may sculpt details on the soles of the feet, and try the same techniques used to add details to the palms of the hands.
Refining the Face and Ear
At subdivision level 5, it is possible to sculpt more details in the face and to finish the ear. Depending on your head and face design, you may add details such as skin creases, folds, wrinkles, and even scars. The Wax tool is great for adding larger skin folds, while a small inverted Bulge tool can create nice wrinkles. Remember that you may use Stamps or Stencils to add some details. Use the Contrast and Pinch tools to make details stand out. Very fine skin details like pores or exceptionally small wrinkles may be beyond the mesh resolution at subdivision level 5. But, in the next topic, you will use bump maps to simulate small details without having to sculpt them. The creature in the figures has a somewhat elfin human-like ear.
FIG 4.34 At Subdivision Level 5, It Is Possible to Add More Details to the Face and to Finish the Ear.
