If you are familiar with Maya, 3ds Max, Cinema 4D, or any other threedimensional (3D) program, you will be right at home in Mudbox and will begin sculpting in a matter of minutes. However, if you are new to 3D and digital sculpting, Mudbox is still the perfect choice because of its artist-friendly interface, shallow learning curve, and intuitive sculpting and painting workflows. In the first part of this topic, you will briefly review important parts of the Mudbox interface like menus, tools, windows, and camera navigation. After the interface overview, you will be reviewing the basics of 3D computer graphics. Then, you will complete the first tutorial in this topic that will introduce various sculpting tools, layers, and provide you with hands-on experience with Mudbox.
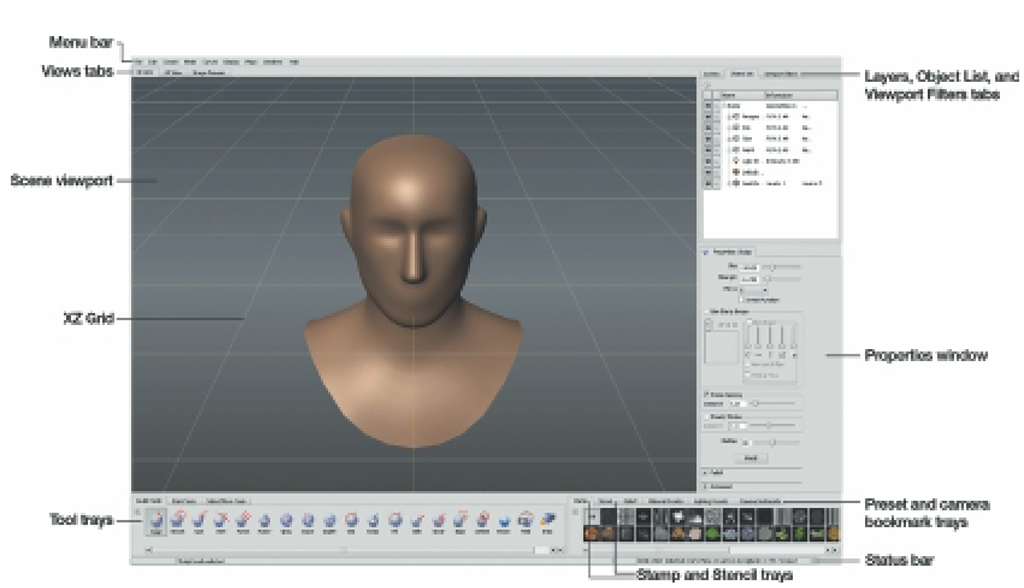
Upon launching Mudbox, you will see the Welcome window, which provides quick access to the Learning Movies, the models that come with Mudbox, and any recent Mudbox files worked on. You may turn off the Welcome window by checking the “Do not show this Welcome window again" option in the lower left corner. If you choose to turn it off, you will still have access to all of the same data through the menus. For now, select the Basic Head model from the “Start a new sculpture section" in the Welcome window. You should see the Basic Head model in the scene as shown in Figure 2.1.
FIG 2.1 Mudbox Has a Standard, intuitive interface and Straightforward Sculpting and Painting Workflows.
By default, you should be looking through the perspective camera into the scene, which is contained in the 3D View. The 3D View is one of three main views in Mudbox. The other two are the UV View and the Image Browser. The 3D View is where you do sculpting and painting work, and it is analogous to viewports in other 3D programs. In most standard 3D modeling programs, you can view the scene through multiple cameras or viewports, but in Mudbox, there is one viewport. Nonetheless, you may use Mudbox’s camera bookmarks, which you will learn about later, to quickly switch between the camera views. Next to the 3D View tab is the UV View, which displays the UV coordinates of the selected model. The third tab is the Image Browser, which allows you to preview and organize images and assign them to various tools. For example, you could browse to an image on your hard drive, load it into the Image Browser for inspection, and then assign it to be used as a stencil to detail a model. The Image Browser is also useful for viewing specialized types of files such as image-based lighting files and displacement maps.
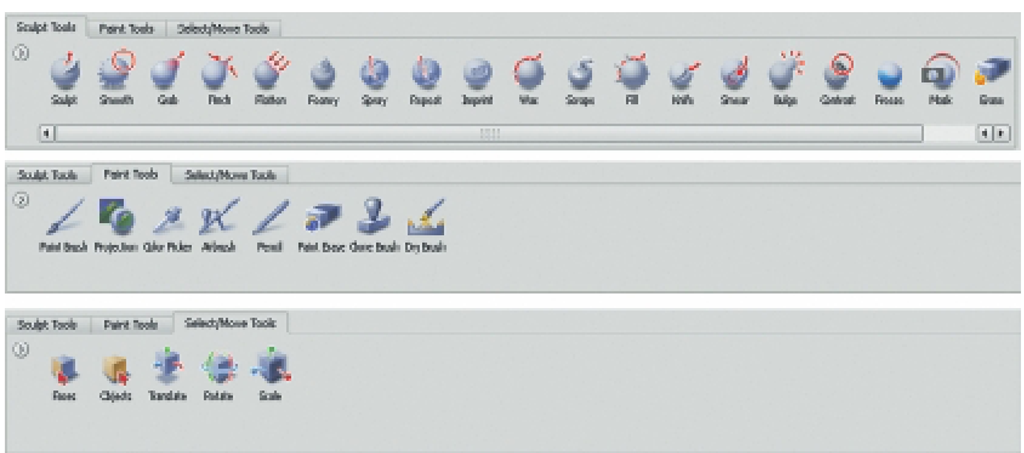
At the bottom of the interface, you will find a collection of customizable trays that organize the Sculpt, Paint, and Select/Move Tools along with an assortment of trays for storing stamps, stencils, bookmarks, and various presets. The Sculpt, Paint, and Select/Move Tools comprise the three leftmost trays (Figure 2.2).
Faces and Objects are selection tools, and the Translate, Rotate, and Scale tools are collectively known as the transform tools. You may customize any of the tool trays by adding, deleting, or renaming tools, as well as building custom trays with your favorite tools for quick access. The first nine sculpting tools may be accessed by simply pressing the numbers 1 through 9 on your keyboard.
FIG 2.2 Mudbox Features a Comprehensive Set of Sculpting and Painting Tools. The Main Selection Tools Are Faces and Objects, and the Translate, Rotate, and Scale Tools Comprise the Select/Move Tools.
The first two trays on the right organize images that can be used as stamps or stencils in conjunction with various sculpting and painting tools. Mudbox ships with an assortment of stamps and stencils, but you can create your own tools and add them to the trays. Next is the Falloff tray, which stores presets that manage sculpting and painting tool profiles. At this point, it is worth mentioning that the falloff parameter is an important property of the Mudbox tools because falloffs dictate the shape of the stroke created by the tool. In other words, the same tool with different falloffs will create different effects.
The last three trays on the right are the material presets, lighting presents, and the camera bookmarks.
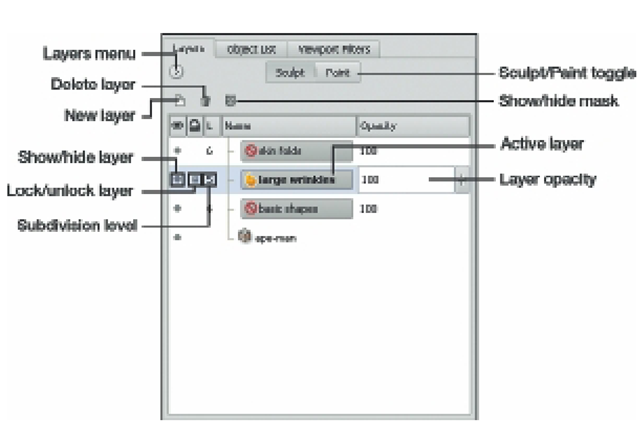
The next important area in the Mudbox interface is the tabs and windows to the far right of the interface. Starting at the top, there are the Layers, Object List, and Viewport Filters tabs. The Layers tab is composed of the Sculpt and Paint layers. You may add, delete, merge, and restack the sculpting layers as needed. These may also be locked, hidden, or have their effect attenuated by adjusting the layer opacity. Much of the work you will do in Mudbox is directly tied to managing the sculpting layers efficiently. The tutorial in the topic will introduce you to layer basics, and the tutorials that follow will cover layers in detail (Figure 2.3).
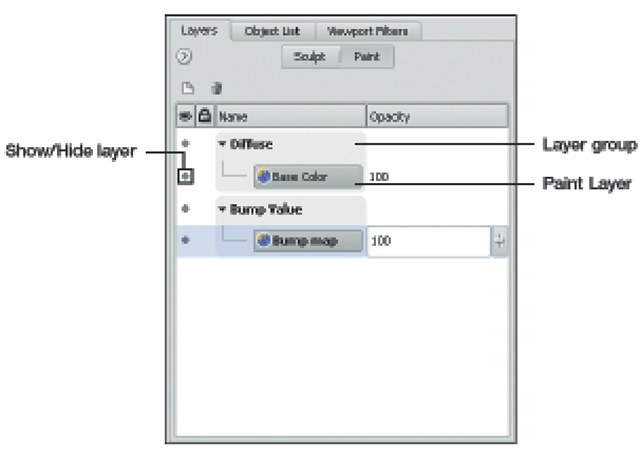
To switch to the paint layers, press the Paint button in the Layers tab. The paint layers organize the various texture types that may be painted on a model.
For instance, you may paint several diffuse textures, as well as specular, gloss, bump, and reflection textures. Like the sculpt layers, the paint layers may also be restacked, locked, hidden, or have their opacity adjusted (Figure 2.4).
FIG 2.3 To Effectively Sculpt in Mudbox, You Must Learn to Manage the Sculpt Layers.
FIG 2.4 Paint Layers Organize the Different Types of Textures, Such as Diffuse, Bump, and Specular, that Mudbox Can Paint.
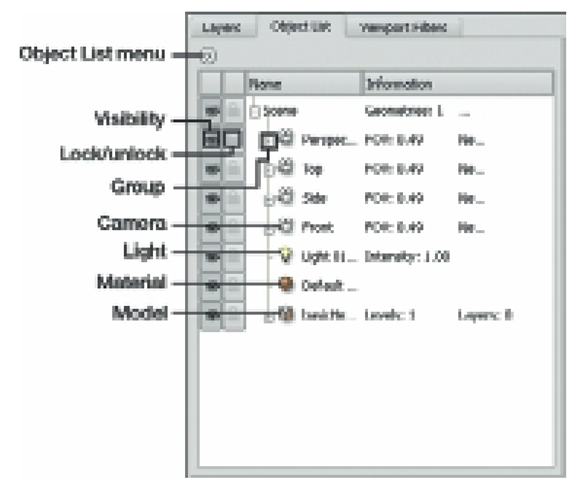
The Object List organizes, manages, and displays information about all of the objects in the scene including lights, cameras, and materials (Figure 2.5).
For instance, you may choose a different camera to look through, as well as select, rename, or delete objects from the scene. Last in this set of tabs is the Viewport Filters. The first three Viewport Filters simulate various render environments through controls for lighting, depth of field, and ambient occlusion. The Screen Distance filter displays a gray scale depth map of the model based on the distance from the camera. The Normal Map filter previews the normal map, and the Non-photorealistic filter simulates a sketchy render.
FIG 2.5 The Object List Is the Central Hub Where You Can Find Information about Any Object In the Scene.
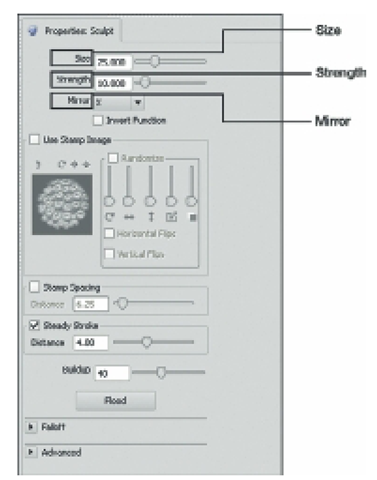
FIG 2.6 The Properties Window Displays Information about the Active Tool or Selected Object. The Strength, Size, and Mirror Properties Are Highlighted because They Are Often Used to Adjust the Mudbox Tools.
Below the Layers, Object List, and Viewport Filter tabs is the Properties window (Figure 2.6). The Properties window is context sensitive in that it will display attributes of selected objects or tools. For instance, if you select the Foamy tool, all of the properties for that tool will be displayed in the Properties window; if you then select a camera from the Object List, then the properties for the camera are displayed. It is important to highlight the Size, Strength, and Mirror properties of the sculpting and painting tools. You will be referring to these properties a lot in the following tutorials.
The menu bar is located along the top left corner of the interface (see Figure 2.1). These menus organize different commands by task. The File and Edit menus organize standard file-management commands, as well as selection commands. The Create menu sorts all of the different objects that may be created, and the Mesh menu provides quick access to subdivision commands. For now, we will skip over the Curves menu and move on to the Display menu. The top one-third of the Display menu holds the commands to hide and show objects, and the bottom two-thirds features commands for customizing how objects are displayed and how the scene looks. You may access the commands in the bottom two-thirds of the Display menu by right-clicking anywhere in the scene.And finally, the Windows menu allows you to display different tabs as floating windows. Some users may prefer to have specific windows handy all the time – by selecting them from the Windows menu, the selected window persists in the interface. The Preferences command in the Windows menu allows you to customize just about every part of Mudbox. If you are using the Macintosh version of Mudbox, the menus are slightly different. For example, the Preferences will be located in the Apple menu and not in the Windows menu.
Camera navigation is an integral part of working in Mudbox; it involves moving around the scene by panning, rotating, and zooming the camera. See Table 2.1 for hotkeys to navigate the camera. Later on in this topic, you will be prompted to set up your graphics tablet. Once you have finished, you will use the buttons on the tablet’s stylus (pen) to navigate the camera throughout the scene.
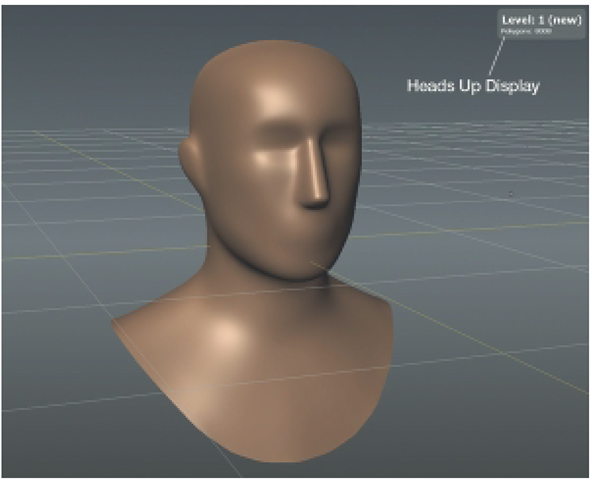
A couple of last interface items that we will discuss are the Heads-Up Display (HUD) and the Status bar. When working in Mudbox, you will often see the HUD display important information about what you are doing.
For instance, when you subdivide a model, the HUD will display the new number of polygons and subdivision level. Certain error messages are also displayed through the HUD, as well as information about different tools, like instructions when using stencils (Figure 2.7). The far left end of the Status bar displays a blue progress bar that indicates how much of a specific operation has been completed. This is usually noticeable when performing operations that can be time consuming like when extracting displacement maps. On the right side of the Status bar is information about the scene and, occasionally, you will see the far right end of the Status bar flashing to remind you to save your work (you can turn that off if you find it annoying).
In this section, you have briefly reviewed the Mudbox interface, so that you can effectively work through the tutorial, later in this topic. However, there is much more to the Mudbox interface that is not specifically covered here, but you will eventually come across many of those features later in this topic. If you are curious now and want to know more, go to the Help menu and select Mudbox Help and choose User Interface to learn more about the Mudbox interface.
FIG 2.7 The HUD Displays important information about Current Operations.
