So far, the focus has been on creating a movie from video clips and still images. At some point, you will want to share your video with others. Other parts of the topic provide steps to share movies electronically. In this part of the topic, you learn how to create and burn a DVD.
When you watch a commercially produced DVD from one of the major motion picture studios, you may notice several common elements. Each menu screen includes a background, text links to the DVD contents, a menu soundtrack, and navigational buttons. Sonic MyDVD provides tools for creating all these features.
If your PC doesn’t have a DVD burner, Sonic MyDVD still provides a solution for distributing your finished movie in a professional-looking package by allowing you to save it as a VCD using a CD burner. VCDs are very similar to DVDs, in that they support an organized menu structure; however, due to the space limitations of burnable CDs (650-700MB compared with the standard 4.7GB found on a DVD), the image quality of a VCD is more comparable to VHS video.
After adding your finished movie to a DVD project, MyDVD provides tools to create navigational menus, customize buttons for accessing special features, insert special features, and burn the completed DVD or VCD. By the time you finish this section, you will have created a complete DVD menu structure and burned a DVD or VCD.
Sonic MyDVD for DVD Authoring
Starting Sonic MyDVD
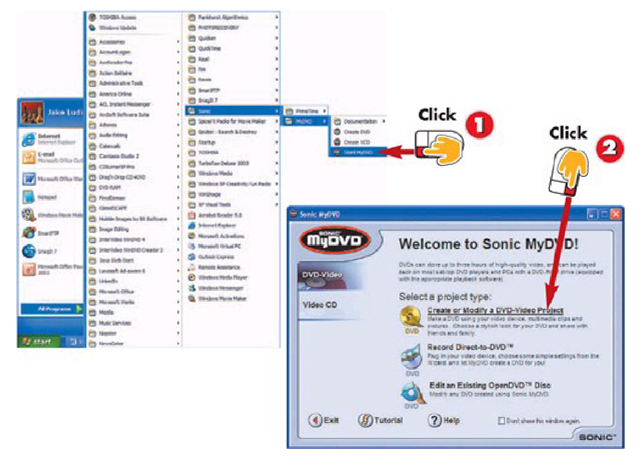
1 Open MyDVD by clicking Start, AU Programs, and then locate the Sonic folder and choose MyDVD, Start MyDVD.
2 Click Create or Modify a DVD-Video Project.
INTRODUCTION
Sonic MyDVD can be obtained at virtually any electronics store or by purchasing it from http: //www.sonic.com. Opening MyDVD is the first step to creating DVDs from your movies. MyDVD can also be used to create menus for CD projects.
TIP
Don’t Show This
Clicking Don’t show this window again on the MyDVD welcome screen will result in the program opening to a new project each time it is launched, instead of offering you choices. To restore this welcome screen, choose Preferences from the File menu, and check the box next to Show the wizard everytime MyDVD starts in the Wizard section of the General preferences tab.
Inserting Movies in a DVD Project
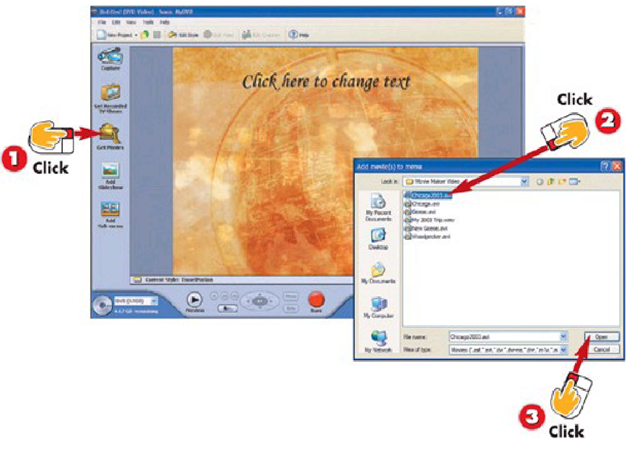
1 Click Get Movies.
2 Browse to the folder where your movie file is stored.
3 Select the movie file and click Open.
INTRODUCTION
One of the most important steps in creating your DVD project is adding the finished movie. Without a movie, a DVD is just a series of menu screens that never provide the user with any real meat. Adding edited movie files to a DVD project is a simple, albeit important, step in the DVD creation process.
TIP Add Multiple Movies
MyDVD allows you to add as many movies as a DVD will hold. To see how much space is available on the DVD, look at the bottom left corner of the MyDVD project space, which indicates how much space is remaining on the disk.
Changing the Main Menu Text
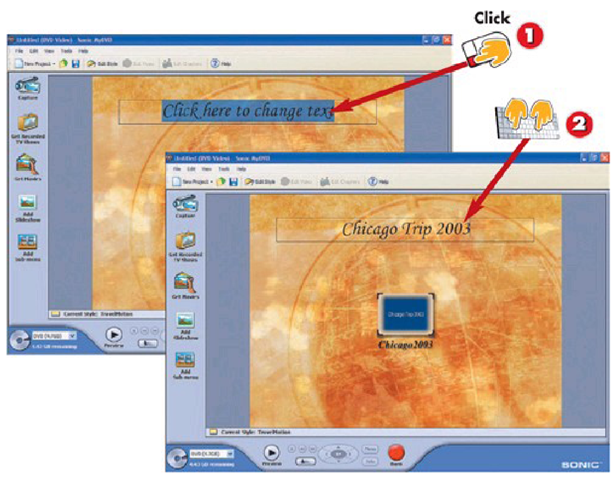
1 Click the text on the menu screen to add your own text.
2 Type in the text space to create your own menu title.
INTRODUCTION
Sonic MyDVD starts a new project each time the application is opened and you click the Create or Modify a DVD-Video Project option on the opening screen. Because the project is new, the menu title defaults to Click here to change text. At this point, we will begin the process of creating our custom DVD menu.
TIP
Opening a Saved Project
By default, MyDVD saves project files in a folder called MyDVDs under your My Documents folder. You can open a saved project by browsing to this folder from the Open File dialog box (File, Open) and clicking Open. Or you can open a project by double-clicking on its .dvd project file in the MyDVDs folder.
Changing the Main Menu Style
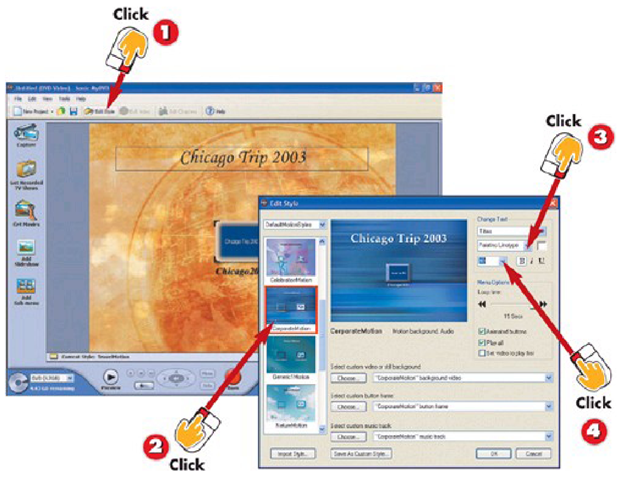
1 Click the Edit Style button on the toolbar.
2 Select a style from the list on the left side of the window.
3 Change the Menu title font by selecting from the Font drop-down listunder Change Text.
4 Adjust the Menu title font size by choosing a new size under Change Text.
INTRODUCTION
DVD menus simplify the navigation of the movie content and extras on a DVD. MyDVD menu styles allow you to customize the appearance of your DVD menus. Each element of the style may be changed either in a style group or individually.
TIP
Create a Custom Menu Style
To reuse your style settings in future projects, click the Save As Custom Style when all your changes are complete.
Customizing Menu Buttons
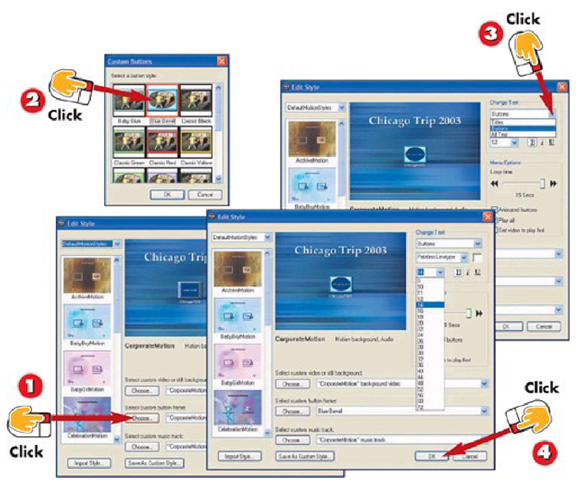
1 Under Select custom button frame, click the Choose button.
2 Select a new button frame style from the list of choices and click OK.
3 Modify the button font by selecting Buttons from the top Change Text drop-down menu.
4 Select a new font and size from the drop-down menus under Change Text. Click OK.
INTRODUCTION
Buttons are the navigational elements of a MyDVD menu used for selecting a specific content element. Think of them like links on a Web page that launch something new when clicked. Button frames determine the border appearance around buttons on the menu. Sonic MyDVD includes 15 different button frame styles.
TIP
Animated Buttons
When the Animated buttons option is checked in the Menu options, the first 60 seconds of the movie will loop in the center of the button while the menu is visible.
Adding a Custom Menu Soundtrack
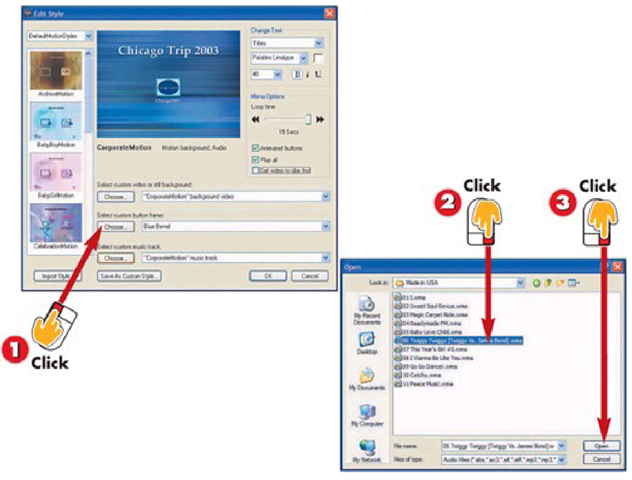
1 Click the Edit Style button to open the Edit Style dialog box and then click the Choose button under Select custom music track.
2 Browse to the folder where the audio clip is located.
3 Select the audio clip and click Open.
INTRODUCTION
DVD menus often include audio either excerpted from the full soundtrack or specifically tailored to the menu. Customize the audio on your menus to achieve a more robust experience for viewers. Audio is not a required element of the menu screens and can be eliminated if preferred.
HINT Menu Audio Duration
Menu loop time is limited to 15 seconds. Choosing a short selection or clipping an instrumental segment of a song will sound better than importing a full song.
HINT Movie Maker Audio
For a customized menu audio track, save out the audio from your movie maker project as a .WMA file and then add it to your custom menu in MyDVD.
Creating Chapters in a Movie
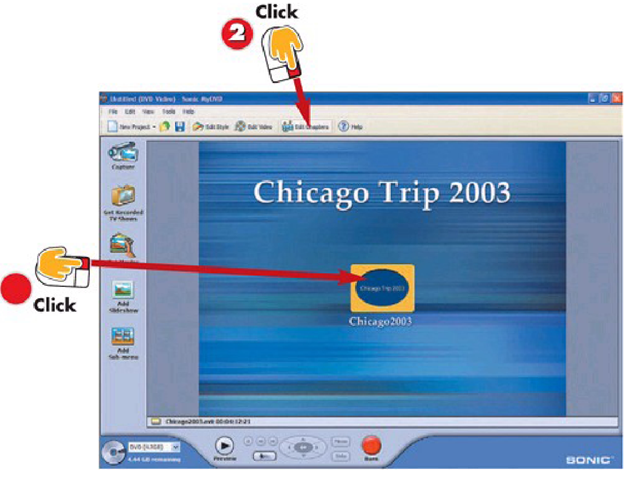
1 Click the movie button in the center of the project space to select it.
2 Click the Edit Chapters button on the toolbar.
INTRODUCTION
Chapters allow movie viewers to skip to favorite parts of the movie or quickly pick up where they left off. Chapter markers are reference points used by a DVD player’s operating system to jump to a specific point in a movie. MyDVD allows you to create chapters in your movie so finding a specific scene is easier.
TIP Play All
The Edit Styles menu includes a Play All check box. If this is checked, MyDVD configures the DVD to play all content on the DVD before returning to the main menu. Unchecking this box causes the DVD to return to the menu screen after each feature executes, similar to the behavior of special features on consumer DVD titles.
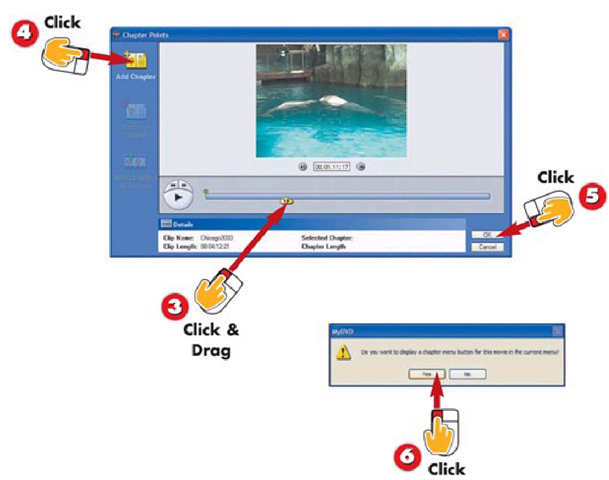
3 Click and drag the slider to the desired chapter point.
4 Click the Add Chapter button. Repeat steps 3 and 4 until all chapter points are added.
5 Click OK.
6 Click Yes to create a chapter menu button in your menu.
TIP
Where Did the Movie Button Go?
Creating a chapter menu button will hide the Movie button. T o restore the Movie button, right- click the chapter button and select Copy from the menu. Right-click again and choose Paste. Click on the button copy and select View as Movie Button from the View menu.
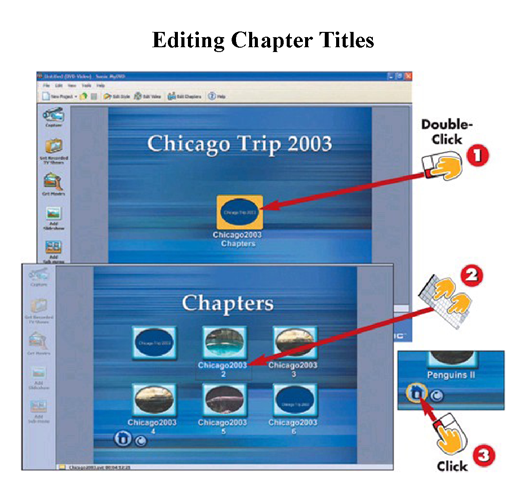
Editing Chapter Titles
1 Double- click the movie chapter button on the main menu screen.
2 Click the title under a chapter button and type a new name for the chapter.
3 Return to the main menu level by double-clicking the Home button.
INTRODUCTION
Sonic MyDVD labels each chapter using the movie title plus an incremental number. To give the chapters more meaningful names, edit them on the chapter submenu.
TIP
Chapters Menu
MyDVD automatically adds the word Chapters to the title of the Chapters screen. For instance, if you simply wanted the title to say Chapters and typed the word Chapters, MyDVD would add Chapters to the end of the title, making it Chapters Chapters. To get around this, leaving the title blank results in MyDVD defaulting to the word Chapters as the title for the screen.

