Making great digital movies requires knowing some of the basics about digital video cameras. Electronics stores tend to advertise features with exciting statistics, hoping marketing hype will reel you in to the store and convert you from gawker to DV camcorder owner. This part of the topic will help direct you toward important camcorder features, while ignoring the features that just don’t matter.
Basics related to use of tripods, extending battery life, and a few important camcorder features are also covered here. While the onscreen menu system found on each camcorder varies by manufacturer, the features covered are found on camcorders of all budget ranges.
This part of the topic should help you make a decision about which type of camcorder will suit your needs, if you don’t currently own a DV camcorder. While each feature is numbered, the features described aren’t necessarily in declining order of importance.
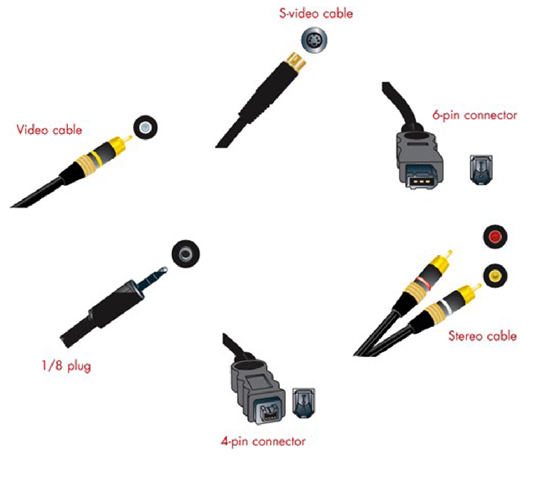
Hardware Connectors
Identifying "Can’t Live Without" Camcorder Features
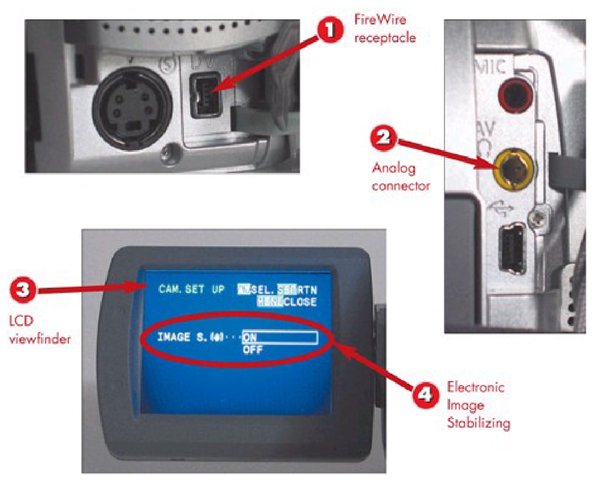
1 FireWire is a must for transferring digital video from the camera to the computer.
2 Analog connectors are used to transfer old footage from a VCR or Hi8 camcorder to your computer.
3 LCD viewfinders help in framing your shot. A bigger LCD makes viewing what you record easier.
4 The Electronic Image Stabilizing feature (Sony calls this Steadyshot) keeps the picture from jumping around when recording with the camcorder in your hand. INTRODUCTION
Camcorders offer more features than most users ever use. This task helps you identify features you need.
TIP
Bigger Isn’t Better
While a bigger LCD screen does make monitoring what you record easier, it also drains the battery more quickly. This is an important consideration when planning to use a camcorder away from an available power outlet.
HINT
Out with the Old
If you don’t have any old videos, having an analog connector on your camcorder isn’t necessary. However, it will save you money on buying other hardware if you do have a collection of old media that you want to import.
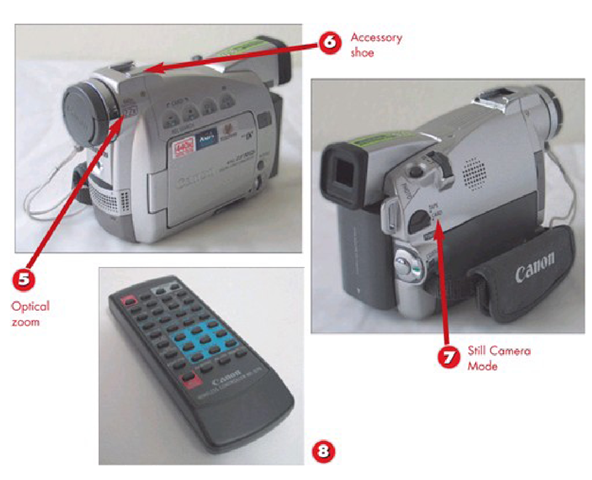
5 Optical Zoom is important for capturing distance shots or closing in on nearby action.
6 An accessory shoe, sometimes called a hot shoe, is ideal for adding an outboard light or microphone to the camera.
7 Still Camera Mode won’t take pictures as well as a digital still camera, but works as a great substitute when no other option exists.
8 A remote, for controlling recording when you aren’t standing next to the camcorder.
TIP
When to Zoom
Using zoom to close in on something while the camcorder is recording isn’t recommended—it might make viewers ill. Instead, zoom the shot with recording paused, and then start recording only after achieving the desired shot in the viewfinder.
TIP
Two Ways to Take Stills
Most digital camcorders offer two methods for taking still images. When recording to tape, the camcorder will freeze on an image for a few seconds, often allowing the audio track to continue recording. When recording to the flash memory card, the camcorder takes a still picture just like a digital still camera would.
Picking the Right Tripod
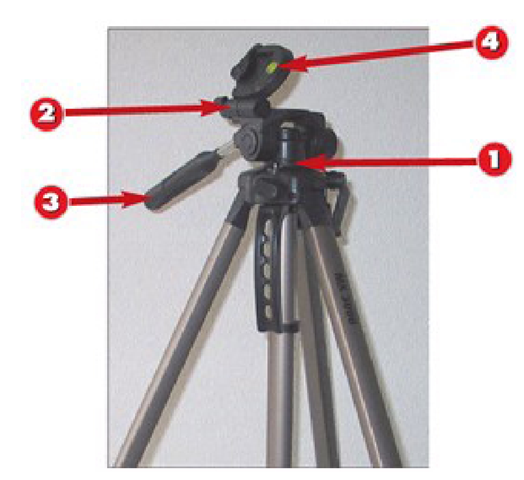
1 Smooth panning via a fluid head is a must for following action without jerky camera movement. Panning should function both horizontally and vertically.
2 Tilt is an additional feature of the tripod head designed for composing shots at angles ranging from horizontal to 90 degrees.
3 Pan handles are standard on most tripods, assisting in the production of smooth movements when following action.
4 Level the tripod using onboard leveling bubbles.
INTRODUCTION
A tripod is the most important DV camcorder feature not built in to the camcorder. No matter how steady your hand may be, putting the camcorder on a tripod will improve the appearance of your video drastically.
TIP More Leveling Bubbles
Better tripods provide individual leveling bubbles for the leg portion of the tripod, as well as for the head portion where the camcorder actually rests. Using both bubbles will help you achieve more accurate camcorder positioning.
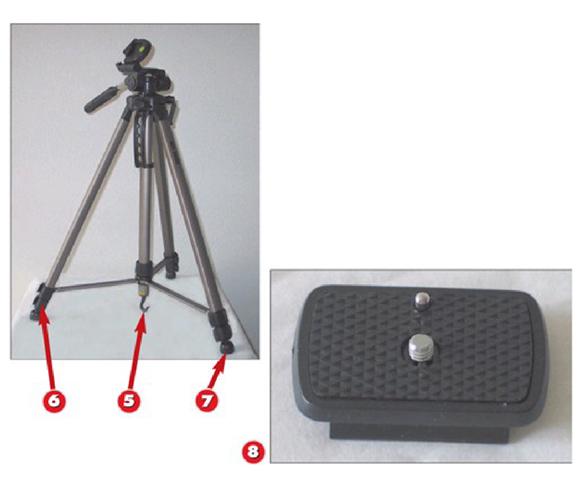
5 Hang additional weight from the center weight hook to counter the weight ofyourcam-corder and prevent tipping.
6 Telescoping legs compact for easy carrying while expanding to achieve optimum height for camcorder positioning. Look at two features here, maximum height and closed length.
7 Adjustable no-slip rubber feet increase stability on any surface.
8 Quick release plates make switching from tripod to handheld recording faster.
HINT
Tripod Not Found
When no tripod is available, stabilize your body against a tree, building, or any other stationary object. Use both hands on the camera to help prevent shaky images.
HINT
Affordable Stability
Tripods are manufactured using a variety of materials, including aluminum, carbon fiber, and alloy steel. Find the perfect tradeoff between durability of the tripod and the resulting weight by testing models at the store.
Using the Zoom Feature
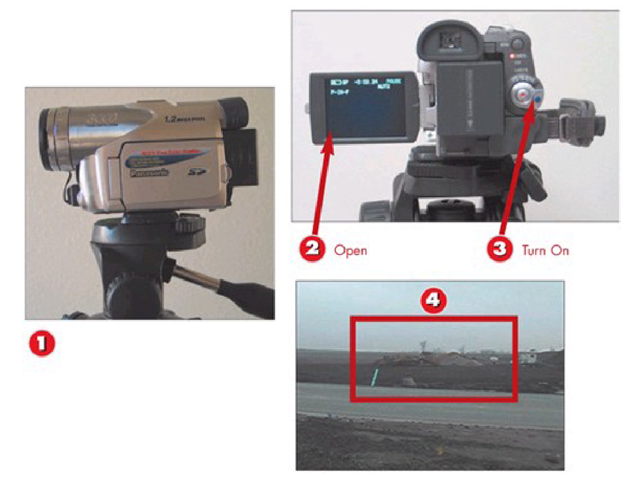
1 Mount the camcorder on your tripod.
2 Open the LCD display.
3 Power on the camcorder in camera mode.
4 Frame the subject you want to record in the viewfinder.
INTRODUCTION
While getting the camcorder physically close to whatever you are recording is always the best option for great video quality, there are times this isn’t possible. Fortunately, camcorders include a zoom feature to bring far away objects closer to the viewer.
TIP Use a Tripod When Zooming
Zoom magnifies the image the camcorder is capturing. It also magnifies any shaking of the camera or sudden movements. To keep zoomed images looking their best, use a tripod when zooming.
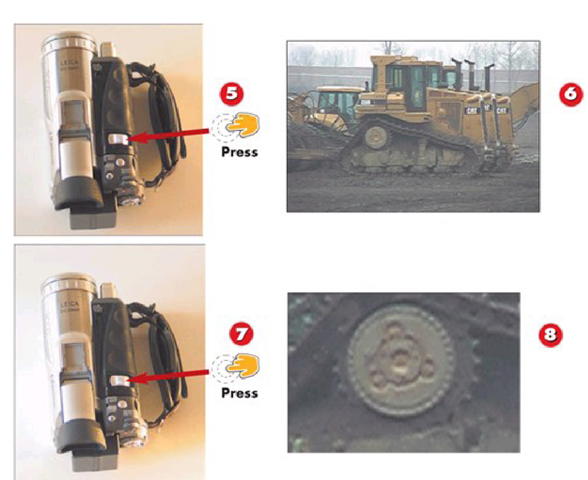
5 Zoom in to the maximum optical zoom by pushing the zoom button toward the T to get a close up.
6 Notice the image quality.
7 Zoom in further using digital zoom by pushing the zoom in button toward the T again.
8 Notice the extremely grainy quality of the image, which doesn’t translate to movies anyone will want to watch.
CAUTION Digital Zoom Beware
Digital zoom numbers represent how large the camera can increase the size of individual pixels in an image. This doesn’t actually get you a close-up shot of the subject you are trying to record. Using digital zoom can result in grainy looking video if you try to zoom in on something from too far away, as evidenced in the examples.
Using the DV Camcorder LCD
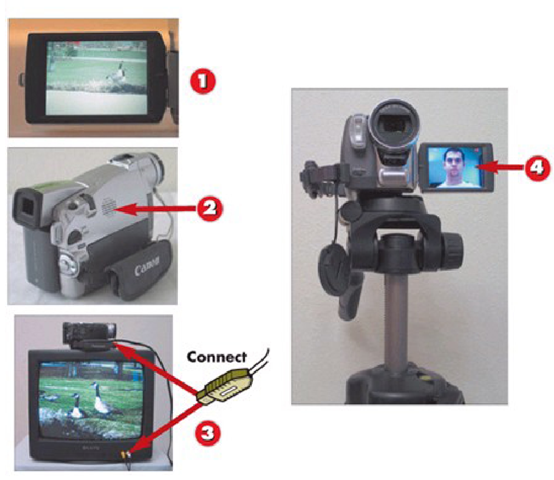
1 Monitoring recording with the LCD viewfinder approximates the shot composition of your final movie.
2 Use the onboard speaker, in conjunction with the LCD for instantaneous feedback about image and sound quality.
3 Connect the camcorder to a TV via the AV jack and then adjust brightness on the LCD monitor for a more accurate view of what the camcorder is seeing.
4 Flip the LCD around to monitor the recording when you are the movie subject.
INTRODUCTION
The DV camcorder LCD viewfinder is a versatile tool for creating great-looking movies. Using the LCD during both recording and playback helps achieve more accurate results.
TIP Hoodman Camcorder Hoods
Glare from the sun can render the LCD viewfinder almost useless. Hoodman Camcorder hoods (hood-manusa.com) attach to the LCD via a hook and latch system, shading the viewfinder from excessive glare.
Using an External Monitor
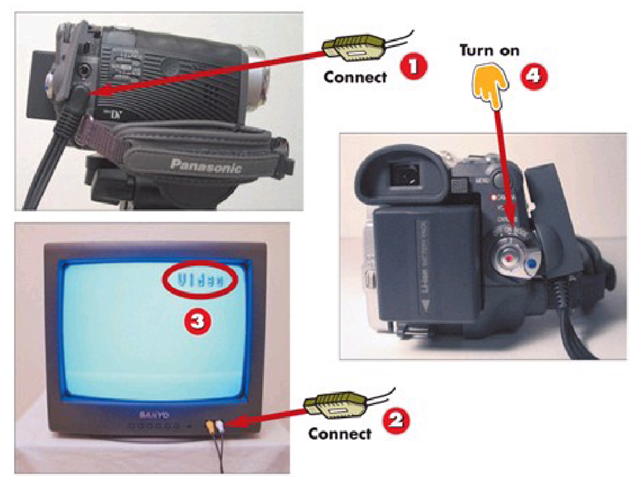
1 Connect the mini-plug side of the A/V cable included with your camcorder to the A/V In/Out connection on the camcorder.
2 Connect the RCA plug side of the A/V cable to the TV, connect the yellow plug to the video in, and optionally connect one of the audio plugs to the audio in.
3 Power on the TV and switch it to the Video channel to monitor camcorder output.
4 Turn on the camcorder to start monitoring output on the TV.
INTRODUCTION
The LCD screens included with most camcorders are too small to achieve an accurate sense of what is being recorded. Using a small TV to monitor video recording results in better-looking videos because you can actually see what is being recorded.
Extending Battery Life
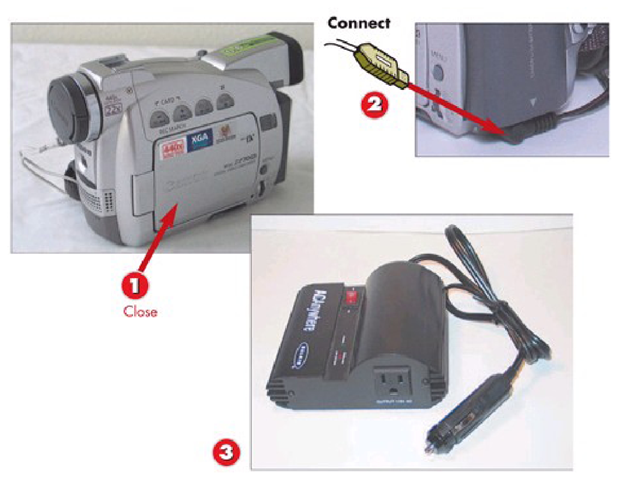
1 Close the LCD viewfinder whenever you aren’t monitoring recording. The LCD screen is the single biggest drain on a camcorder battery.
2 Plug in your camcorder when transferring video to your computer or playing back video on a TV to ensure the battery doesn’t die in the middle of viewing or transfer.
3 Carry a power inverter in your car, which converts the cigarette lighter in your car to a conventional outlet, to recharge during down time.
INTRODUCTION
When you are capturing video, whether it’s a sporting event, family gathering, or an amateur movie shoot, if the battery dies the movie is over. There are several ways to extend battery life.
TIP Carry a Spare
Even if you minimize battery use, there are times when one battery won’t be enough. Backup batteries typically last longer than the factory model and they insure you won’t run out of juice early.
CCDs Matter
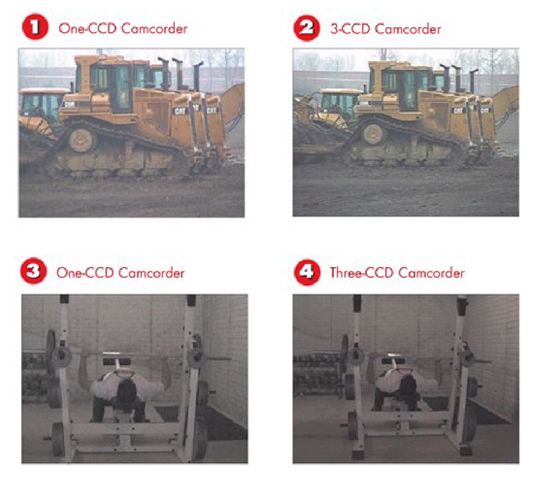
1 An image taken outdoors with a one-CCD camcorder.
2 The same image taken outdoors with athree-CCD camcorder.
3 Image taken indoors in low light with a one-CCD camcorder.
4 The same image using a three-CCD camcorder.
INTRODUCTION
Charged-coupled devices (CCDs) are what a DV camcorder uses to capture images. One-CCD camcorders capture images by interpreting RGB (red, green, an blue) colors with one chip. Three- CCD cameras capture image data by assigning one color to each chip, resulting in more accurate color information. If you can aff a three-CCD camera, get one.
TIP Panasonic Three-CCD Camcorders
Until March 2004, three-CCD camcorders were generally priced in a range of $1200 or more. Panasonic recently released three models, the PV-GS70, PV-GS120, and PV-GS200, starting at $699. This makes better quality video affordable for many more home movie makers.
