Normalizing Audio with Roxio Easy Media Creator
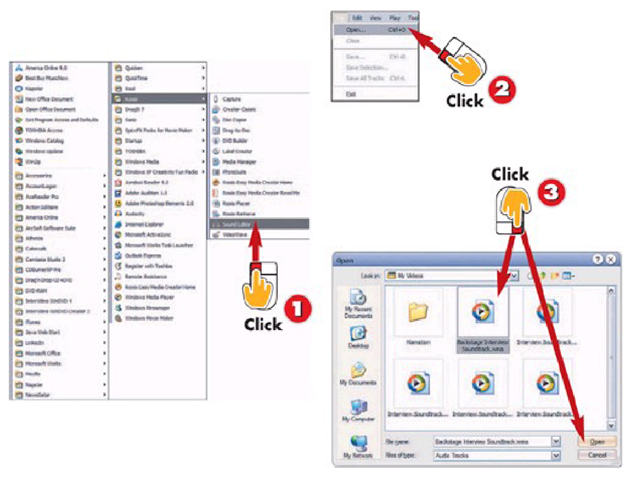
1 Open Roxio Sound Editor by clicking Start, AU Programs, Roxio, Sound Editor.
2 Open the audio file we created in Movie Maker by clicking FUe, Open in the Sound Editor menu.
3 Select the file and click Open.
INTRODUCTION
Easy Media Creator includes a sound editor with a number of audio processing effects. By editing the soundtrack file with Easy Media Creator, you can normalize the audio, before adding it to the final Movie Maker project. Easy Media Creator is available from www.Roxio.com.
TIP
Normalizing a Portion of the Soundtrack
If you only want to edit part of the soundtrack, Sound Editor lets you click and drag anywhere in the workspace to select a segment of audio.
4 Select the entire soundtrack by pressing Ctrl+A on the keyboard.
5 From the Tools menu, choose Apply Effect to Selection, Normalize.
6 Click File, Save. Keep the same name as the original file, and Ihen close Sound Editor.
HINT
Other Sound Editor Features
In addition to applying audio effects like Normalize, Sound Editor can import additional audio to your soundtrack, insert silence if you need it, and eliminate portions of the audio completely.
Adding the Normalized Soundtrack to Your Movie
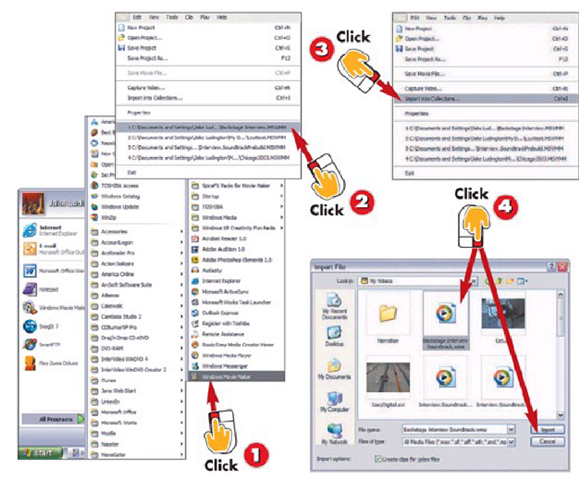
1 Open Movie Maker by clicking Start, All Programs, Windows Movie Maker.
2 Click File and select your project from the list of recent projects.
3 Import the normalized audio file by clicking File, Import into Collections.
4 Choose the normalized audio file you saved in Sound Editor and click Import.
INTRODUCTION
Once the audio track has been normalized, it’s time to add it to the movie project in Movie Maker. The final audio sound-track can then be added to the project timeline.
TIP
Importing Shortcut
Using the keyboard shortcut Ctrl+I launches the Movie Maker import function.
5 Drag the audio file to the Audio/Music section of the timeline, making sure the left edge of the file lines up with the left edge of the movie.
6 Save the project file so it includes your audio soundtrack by clicking File, Save Project on the menu.
TIP
Editing the Normalized Audio
Normalizing the soundtrack would typically be the last step in editing audio; however, if you need to edit a small section of the audio soundtrack, use the Split Clip button under the preview monitor to divide the soundtrack into smaller sections that you can then edit in an outside editor.

![tmp2510-43_thumb[2][2] tmp2510-43_thumb[2][2]](http://what-when-how.com/wp-content/uploads/2012/06/tmp251043_thumb22_thumb.png)

![tmp2510-45_thumb[2][2] tmp2510-45_thumb[2][2]](http://what-when-how.com/wp-content/uploads/2012/06/tmp251045_thumb22_thumb.png)
