Web Tools
InDesign’s Button tool gives you various options to use in a web publication. You can set button actions so that when the reader clicks on it an action occurs, such as movement to another page or a sound playing.
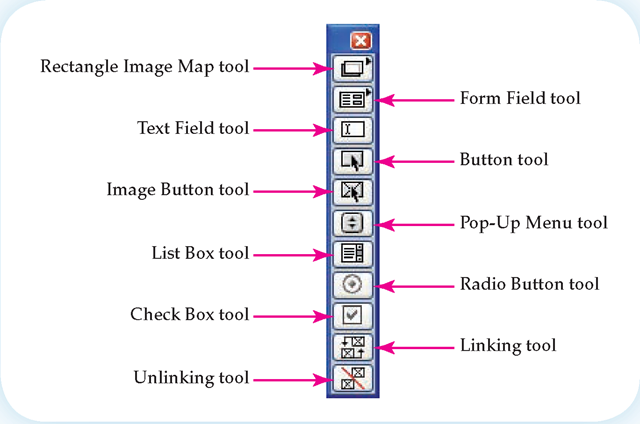
QuarkXPress has a separate toolbox for web functions as shown in Figure 3.11.
Figure 3.11
QuarkXPress web tools provide many web functions to simplify the process of creating a digital desktop published document.
Frames
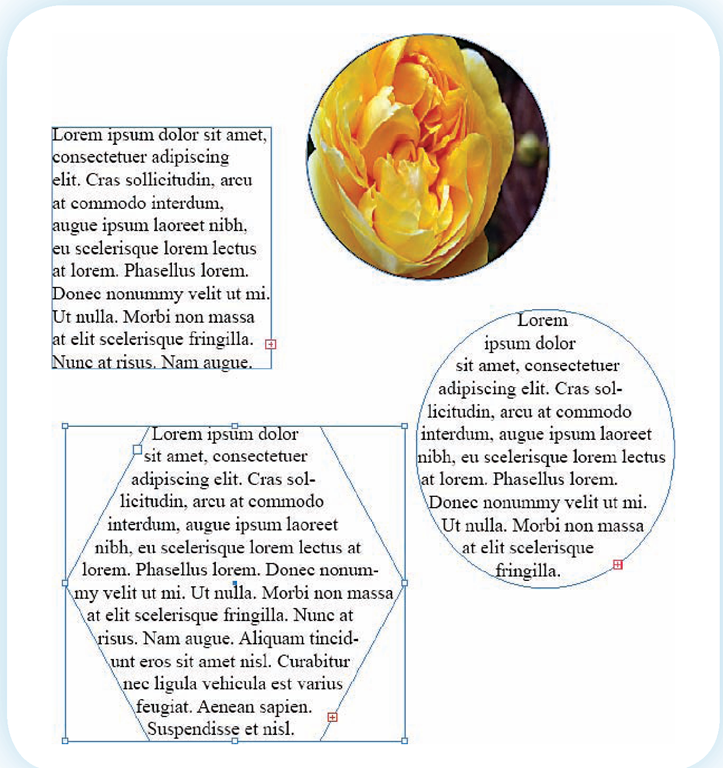
Because text and images are handled in DTP as separate units, they are placed on the page as frames surrounded by bounding boxes. These frames can then be changed in size or position using the bounding boxes. Frames allow for complete control of the page design. Text frames can also be linked to allow text to flow from one column to another or one page to another. Frames can be a rectangle, an oval, or a polygon. Polygon frames can be changed to any shape. Frames can contain text, a graphic, or be empty. Figure 3.12 shows a variety of frames.
Figure 3.12
Frames are the basic unit of DTP layout.
Continuation
When you link the text from one frame into a second frame, DTP software anticipates that you will want to show the page number where the continued frame is located. The "continued on" information is called a jump line.
Text Boxes
Before you begin work on a document, you need to understand how DTP software handles the formatting of text boxes. Which formatting options are available is dependent upon whether you are making changes to an entire paragraph or only to specific characters within that paragraph. Paragraph formatting includes details such as tabs, indents, alignment, leading, and spacing. Character formatting applies to the fonts used, the color, the spacing between letters, and other attributes.
A frame is a DTP enclosure for text or images that allows you to move the information as a unit.
Bounding box is the area surrounding a frame.
A jump line is the statement at the end of text on one page indicating the page on which the text continues (or was continued from).
InDesign uses the Control palette for all formatting, including text. The options shown in this palette will change depending upon what tool is currently selected in the Toolbox. If the Text tool is selected, text options will appear within the Control palette. A toggle will also become available to move you between character and paragraph options within this palette. Figures 3.13a and 3.13b show the two different text option palettes in InDesign.
Figure 3.13a
The InDesign text Control palette toggles between this palette for characters and a different one for paragraphs.
Figure 3.13b
The paragraph symbol on the InDesign text Control palette indicates these options are used for formatting paragraphs.
Desktop publishing programs make it easy to import text that has already been written by someone else. In a team environment, this is a very useful collaboration tool. However, it can be misused. It is very easy to use this tool to place text that you did not write without getting permission from the author. Even pouring in a few paragraphs or a single image is ethically wrong if you are doing this without telling the person who produced it. This is true even if you give that person credit for the work. Make sure that all the material you include in a document is acceptable to use.
Figure 3.13c
If you have used Microsoft Word, you are already familiar with the Formatting toolbar in Publisher.
Microsoft Publisher uses the toolbar shown in Figure 3.13c, which is similar to the toolbar found in Microsoft Word.
QuarkXPress provides several options for formatting text. The Measurement palette shown in Figure 3.13d includes the most frequently used text formatting choices. Selecting the pop-up that appears above the palette takes you to either the Character or Paragraph palette with more choices (see Figures 3.13e and 3.13f).
Figure 3.13d
The QuarkXPress Measurement palette provides options identifiable by their icons.
Figure 3.13e
The QuarkXPress character palette provides options specifically related to character formatting.
Figure 3.13f
The QuarkXPress paragraph palette restricts you to paragraph formatting choices.
Placing Text and Graphics
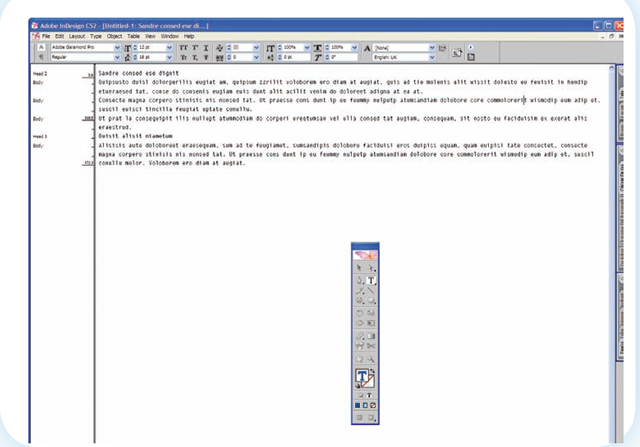
Text can be keyed directly into your DTP software using a text box. In QuarkXPress text is keyed directly into a text frame. In InDesign you have the option of keying into a text box, but the Story Editor (see Figure 3.14) is a better choice. The Story Editor allows you to concentrate on the formatting of your text, without worrying about copy that is running longer than your frame. Formatting text within the Story Editor is also simpler. In Publisher, you have the option of editing in Microsoft Word. When you are finished keying and formatting your text, you simply close the Word document and your Publisher document is automatically updated.
Figure 3.14
Importing or placing text makes it possible to produce DTP documents much more quickly.
You are not restricted to keying text directly into a DTP document. Often you will want to add text that already exists within a word processing document. DTP programs anticipate this and include an option for importing or placing text directly from an existing document. Graphics or images are usually created in other programs and then imported or placed, as well.
QuarkXPress requires that a frame first be created, and then text imported into the frame. InDesign allows you the option of either creating a frame first or merely placing the text first. If you choose to place the text first, the program will automatically create a frame.
When text is imported into InDesign, the cursor changes to the symbol shown in Figure 3.15. This symbol indicates that text is "loaded" into the cursor. To "release" this text, simply click within a frame box. Or you can use the cursor to draw a frame box, which will then release the text into the new frame.
Since text is often several pages in length, you may want to pour text into your document creating additional pages as they are needed. InDesign allows you to place all of the text by holding down the Shift key as you release the mouse. This will create new pages as necessary.
In Quark, text is flowed using the master pages.
Figure 3.15
The cursor changes in InDesign to indicate when text is loaded and ready to be placed.
Master Pages
One of the major productivity tools available in DTP software is the ability to create master pages. These are pages that have elements that are repeated from one page to another. For example, if your page design calls for a vertical stripe to appear on the outside corner of each page, the stripe could be added to the master page. It would then appear on every page that used the master. If you decide to change the color or style of the line, you would only need to make the change to the master page. Multiple master pages are possible so that different recurring page elements can be added as you need.Two master pages would be your solution.
Master pages can be created as a single page or as facing pages with different information on each side. Individual names can be assigned to each master page, making it easy to know which one to apply.
Headers and Footers
Headers and footers are two of the most common recurring elements on a page. Headers or footers are generally used for recurring headings and other information that applies to every page.If it appeared at the top of the page, it would be a header.
Page Numbers
Page numbers are commonly inserted into master pages. This ensures that the number of each page is always correct, even if you move or delete a page. Page numbers are usually placed in a header or footer.
Palettes
Palettes provide additional design features for your DTP document, allowing you more flexibility. Palette types include color and swatch palettes, character and paragraph palettes, pages and layers palettes, as well as a variety of others. They can be toggled on and off and grouped together to make it easier to use the ones you want. You can also create a work area that opens just the palettes you use most often.
Web Palettes
InDesign interactive palettes, consisting of Bookmarks, Hyperlinks, and States, give you options to use in a web publication. You can insert bookmarks to identify specific locations in a page. You can create hyperlinks to other pages or other web pages. With the States palette you can set button actions using the Button tool.
Mistakes are likely to be missed in the headers and footers of a document. Since these are set in the master pages just once, any mistake that occurs here will be reproduced on every page. It’s easy to skim over these areas when you are proofreading. Make it a habit to read headers and footers just like you would the text on the rest of the page. It’s embarrassing enough to miss a single mistake. It’s even worse to find that mistake repeated on every page.
Master pages contain recurring items such as page numbers as well as other design elements.
A footer is recurring information that appears at the bottom of the page.
A header is recurring information that appears at the top of the page.
A palette is a bar or area on the screen that provides additional features for tools.
Shortcuts
The more time you spend working with desktop publishing software, the more you will appreciate the shortcuts available in each program. These shortcuts appear to the right of their respective menu options. Because DTP software requires multiple mouse actions to manage a project, you will find that learning the keyboard shortcuts can speed up your work. True professionals seldom have to search for a tool. Instead, they use shortcuts almost as if by magic.
InDesign tool shortcuts use single keyboard letters to select a tool. Learning these is the best place to start. When you have these mastered, you will want to learn shortcuts for placing text and zooming in and out. The QuarkXPress shortcut list can be found in the software’s Help menu.
Saving
Do not forget to save your DTP document often. These files can be very demanding of your computer’s memory, making sudden crashes not uncommon. Saving changes at regular intervals can save you much heartache and headache when the perfect design is lost. Each DTP software program saves files produced by that software with a different extension. InDesign files end with .indd. Publisher files have a .pub extension. QuarkXPress uses the .qxp extension. Generally, each of these files can only be opened by the software that created it. Later, you will learn about ways to export a document, making it readable in other ways.
|
InDesign Tool Shortcuts |
|
|
Selection tool |
V |
|
Direct Selection tool |
A |
|
Pen tool |
P |
|
Type tool |
T |
|
Pencil tool |
N |
|
Line tool |
\ |
|
Rectangle Frame tool |
F |
|
Rectangle tool |
M |
|
Rotate tool |
R |
|
Scale tool |
S |
|
Shear tool |
O |
|
Free Transform tool |
E |
|
Eyedropper tool |
I |
|
Measure tool |
K |
|
Gradient tool |
G |
|
Button tool |
B |
|
Scissor tool |
C |
|
Hand tool |
H |
|
Zoom tool |
Z |
|
Fill and Stroke |
X |
SUMMARY
In this topic you learned the makeup of your desktop publishing software. You learned about default settings, picas, and points. You saw how to use the pasteboard (also called the scratch area) and read about bleeds and slugs. You saw that DTP rulers provide movable zero points and multiple nonprinting guides. You learned that frames are the foundation of DTP design and how to add text without keying it into your document. You saw that master pages can be a useful tool and that shortcuts can speed up your design activities.
Key Terms
|
bleed |
header |
point |
|
bounding box |
jump line |
scratch area |
|
default |
master pages |
slug |
|
fill |
pagination |
spread |
|
footer |
palette |
stroke |
|
frame |
pasteboard |
zero point |
|
guides |
pica |


