To have a successful voice deployment with 792x phones, not only do you need a professional site survey, you also need to make sure that the controller and the switched network are properly configured for voice.
Controller
The controller has several settings for a proper voice configuration:
■ Set the WLAN QoS policy to Platinum.
■ The Platinum QoS profile should be set for 802.1p with a tag of 6.
■ WMM must be enabled to use U-APSD.
■ A Delivery Traffic Indication Message (DTIM) of 2 is recommended.
■ A Beacon Interval of 100 is recommended.
■ Dynamic Host Configuration Protocol (DHCP) address assignment should not be required.
■ Aggressive Load Balancing should be disabled.
■ ARP Unicast should be disabled; this was deprecated in 5.1 code and is disabled by default on older codes.
■ Peer-to-Peer Blocking (P2P Blocking) Public Secure Packet Forwarding (PSPF) should be disabled.
■ Client Management Frame Protection (MFP) should be disabled or optional.
■ Symmetric Tunneling should be enabled if the network is configured for Layer 3 mobility.
■ If you are using 2.4 GHz, enable short preambles if no legacy clients will be using the network.
■ CCKM is recommended when using 802.1x authentication.
■ Enable CAC.
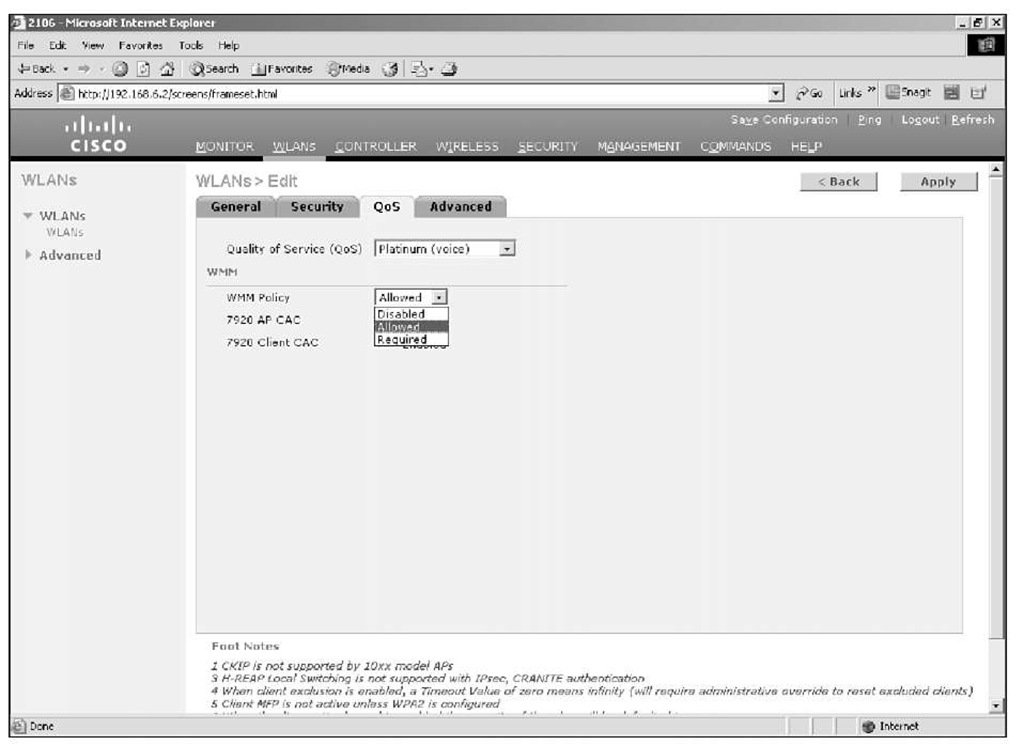
You should treat voice packets with the highest priority. When you configure the voice WLAN on the controller, make sure that the QoS is configured for Platinum and WMM is set to Allowed or Required (see Figure 11-5).
Figure 11-5 WLAN QoS Configuration
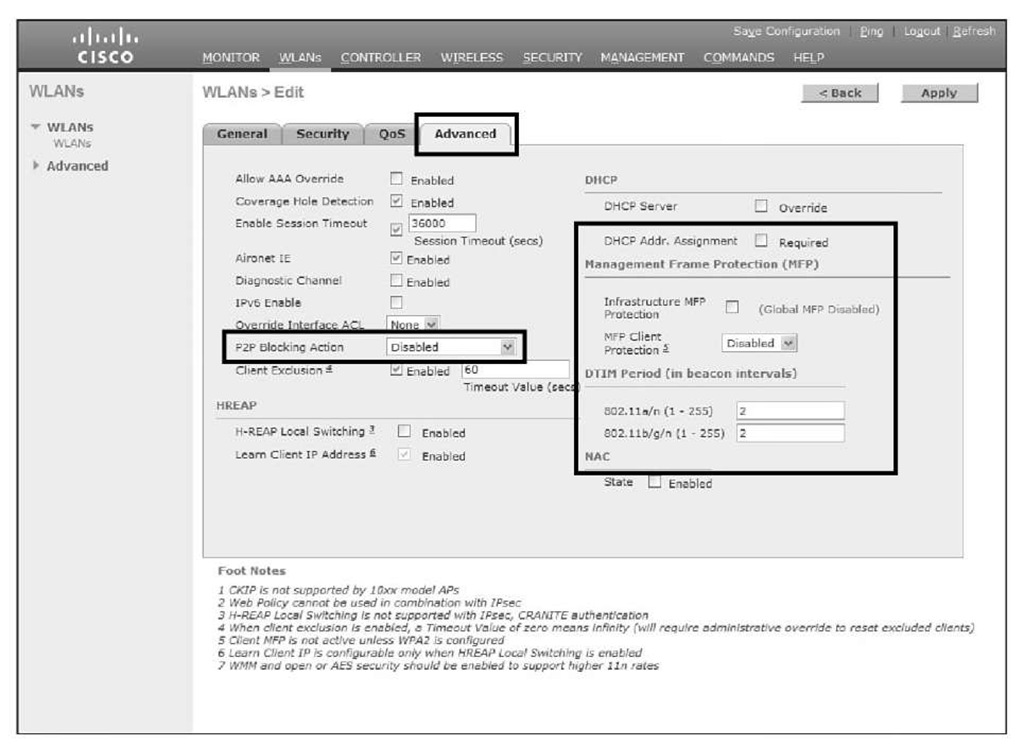
Under the Advanced tab for the WLAN, make sure that DHCP Addr. Assignment is disabled. The short time it takes for a phone to go through a DHCP request when it roams from one AP to another is more than enough to cause audio problems. Make sure that P2P Blocking is disabled. If it is enabled, wireless-to-wireless phone calls can fail. You should disable or set Management Frame Protection to optional. DTIM is no longer a global 802.11 setting and is now WLAN specific. A DTIM of 2 is recommended for optimal battery life. Figure 11-6 shows the Advanced tab for a voice WLAN.
Figure 11-6 WLAN Advanced Configuration
For client MFP to function, the clients must be CCXv5 compliant and using WPA2 with either TKIP or AES. Because the 792x phones are only CCXv4, they will not be able to connect to a WLAN requiring MFP.
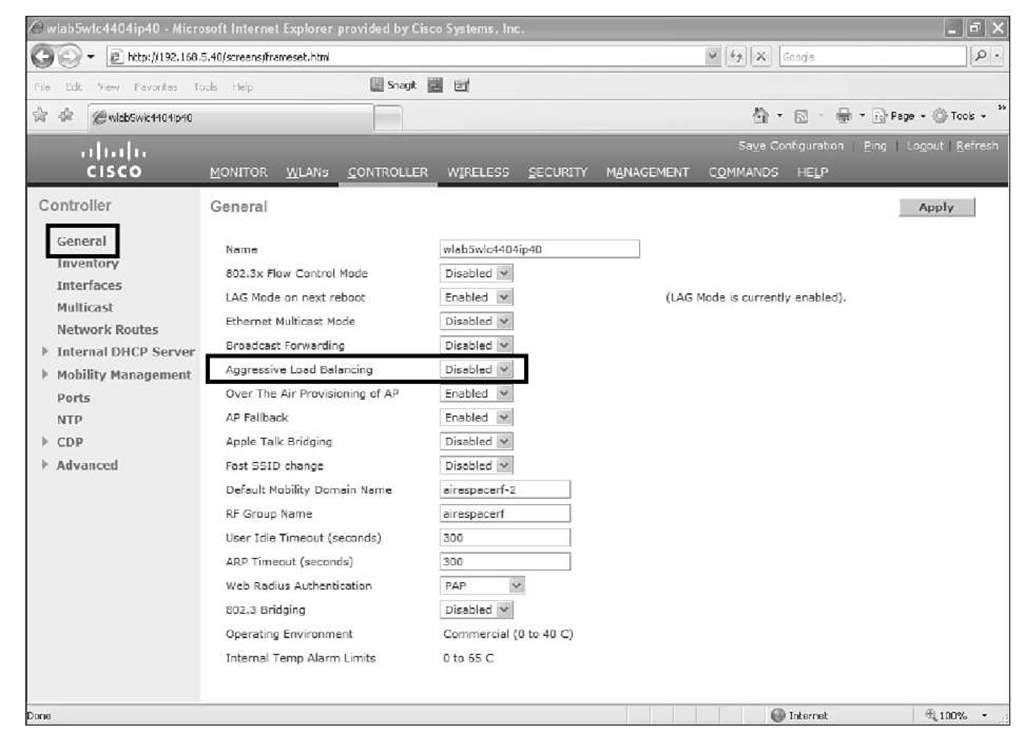
Aggressive load balancing is a controller feature that tries to redistribute clients more evenly between APs to prevent an excessive load on one AP while another AP has only a few clients associated. Although in theory this sounds like a great feature, the controller ignores association requests for clients when an AP is overloaded to see if they will associate with another AP. Should this take place during a voice call, you can imagine that the voice quality would suffer. You want to make sure that the Aggressive load balancing option is disabled (default) on the controller (see Figure 11-7). AP-assisted roaming and CAC function to help a 792x connect to the proper APs.
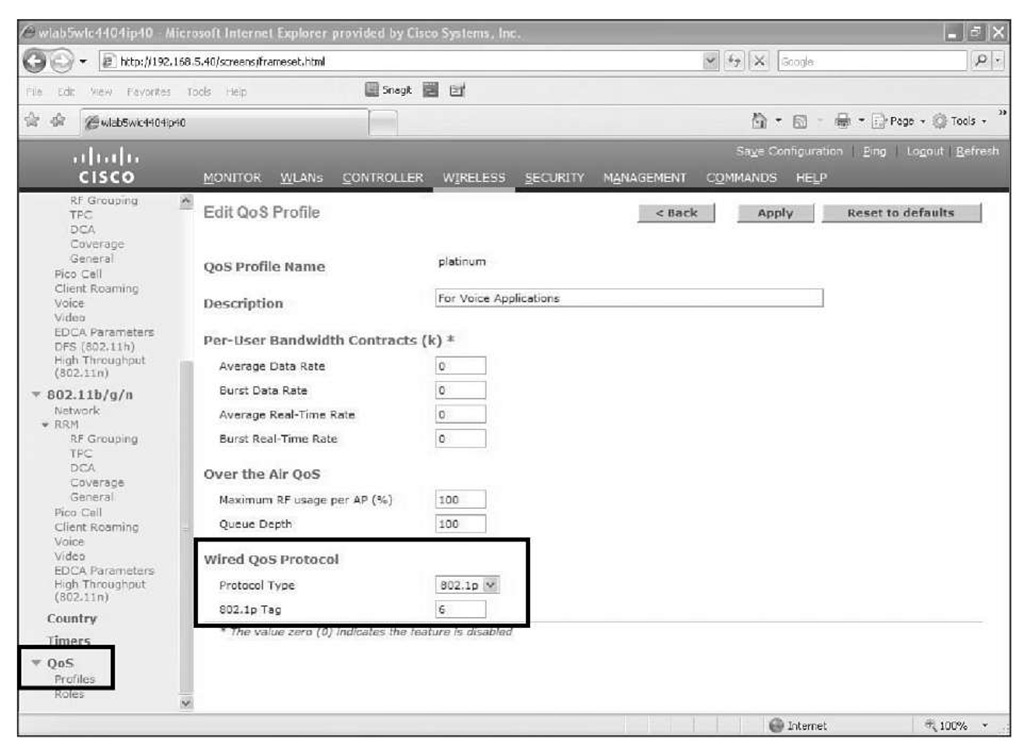
To ensure proper DCSP mappings for QoS take place, you should configure the Platinum profile for 802.1p with a tag of 6 for the Wired QoS Protocol. Remember that everything on the controller is from a wireless point of view, IEEE 802.11e. Figure 11-8 shows the proper configuration for the QoS profile.
Figure 11-7 Disable Aggressive Load Balancing
Figure 11-8 Platinum QoS Configuration
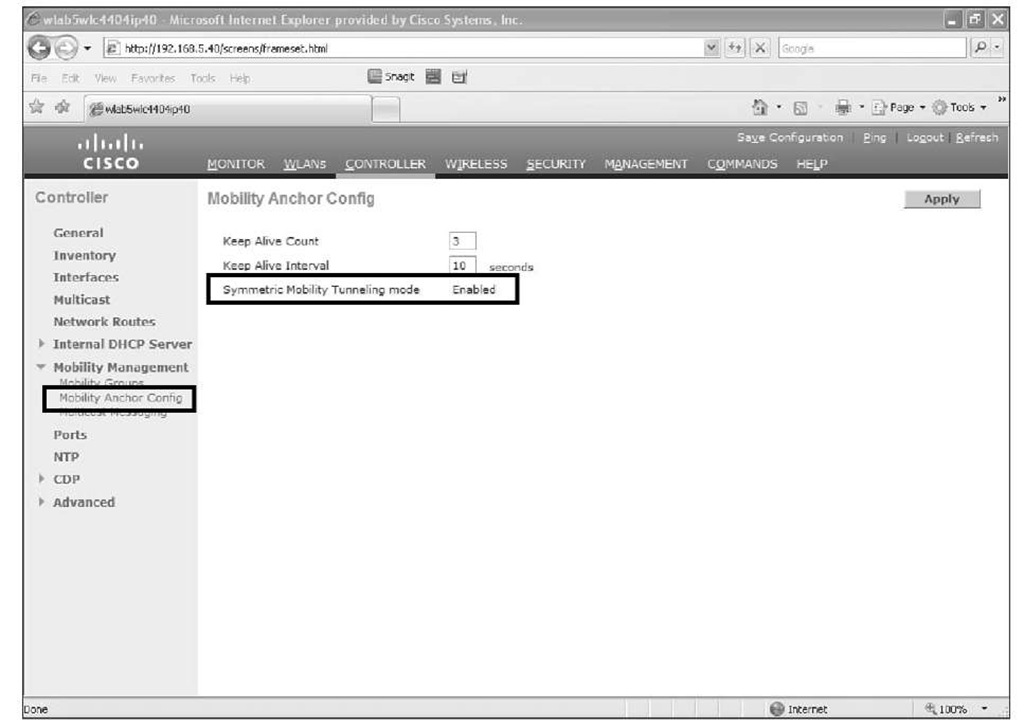
Enabling symmetric mobility tunneling, introduced in code Release 4.1, allows for better inter-controller roaming. Starting in code Release 5.2, symmetric mobility tunneling is the default and asymmetric tunneling is deprecated.Figure 11-9 shows symmetric mobility enabled on a controller running 5.2 code.
Figure 11-9 Enabling Symmetric Mobility Tunneling
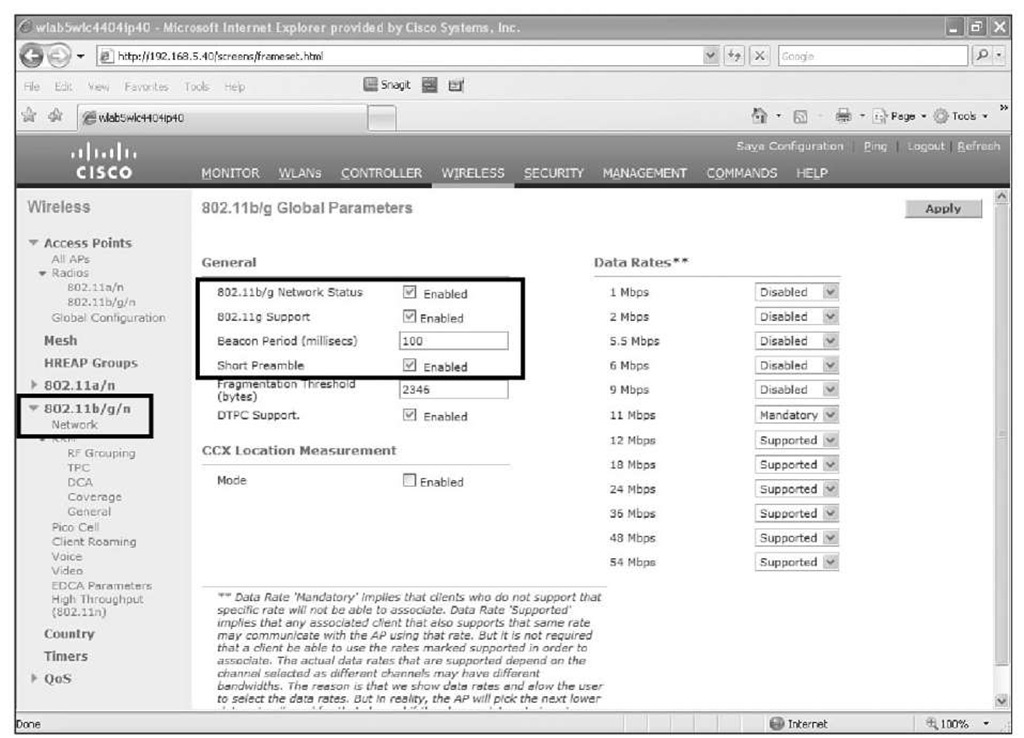
If you are planning to use the wireless phones on the 2.4 GHz band, you will want to enable short preambles under the 802.11b/g/n network configuration (see Figure 11-10). Short Premable is enabled by default.
With Short Preamble enabled, the 802.11g clients do not have to send Request To Send (RTS)/CTS messages before sending traffic. This improves voice quality. Keep in mind that enabling short preambles can disrupt 802.11b clients. Figure 11-10 also shows the Beacon interval set to 100. In older code, you would also see the DTIM period here, but in newer code, DTIM is a WLAN-specific configuration (refer to Figure 11-6).
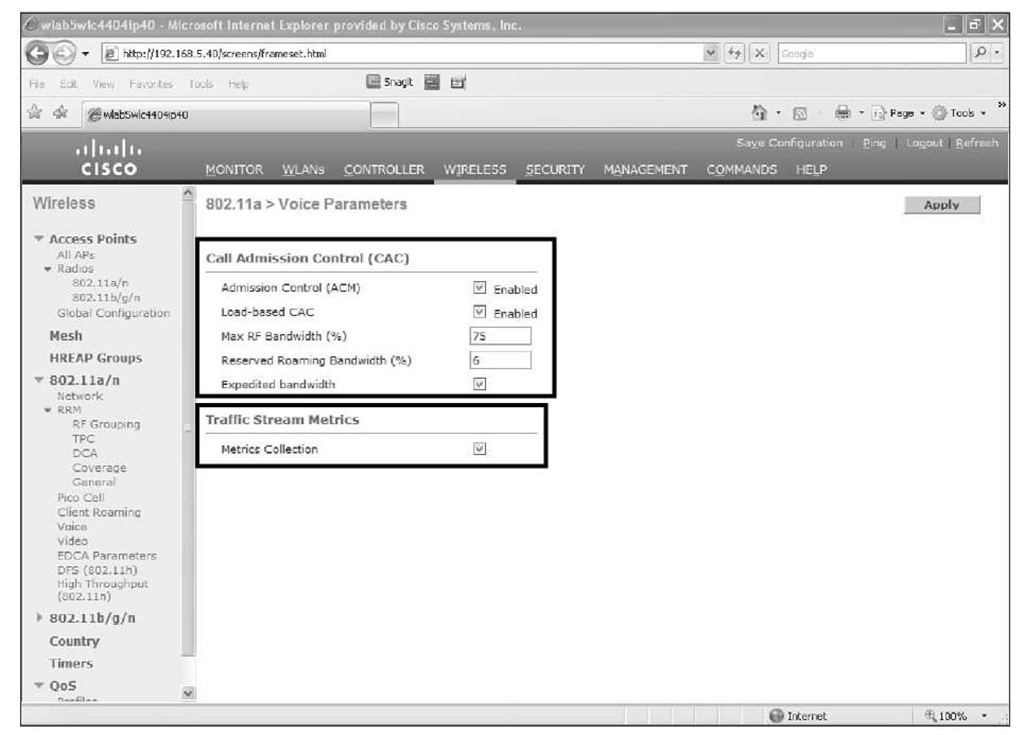
To use TSPEC, CAC must be enabled for the wireless network. The default bandwidth percentages are sufficient for the majority of installations. By default, the maximum setting is 75 percent, with 6 percent of the 75 percent reserved for roaming clients. To account for non-TSPEC clients or other energy that might be on the channel and used by the AP, enable load-based CAC. Figure 11-11 shows the CAC configuration for the 802.11a network.
With Expedited Bandwidth enabled, CCXv5 clients are able to use TSPEC to indicate to the controller that a call is urgent. An example would be an e911 call. As long as the controller can facilitate the urgent call without disrupting the quality of existing calls, it will do so.
Figure 11-10 Enabling Short Preamble
Figure 11-11 CAC
Enabling Traffic Stream Metrics (TSM) collection allows you to view the call statistics. You can enable TSM in the same area as CAL in the controller GUI (see Figure 11-11).
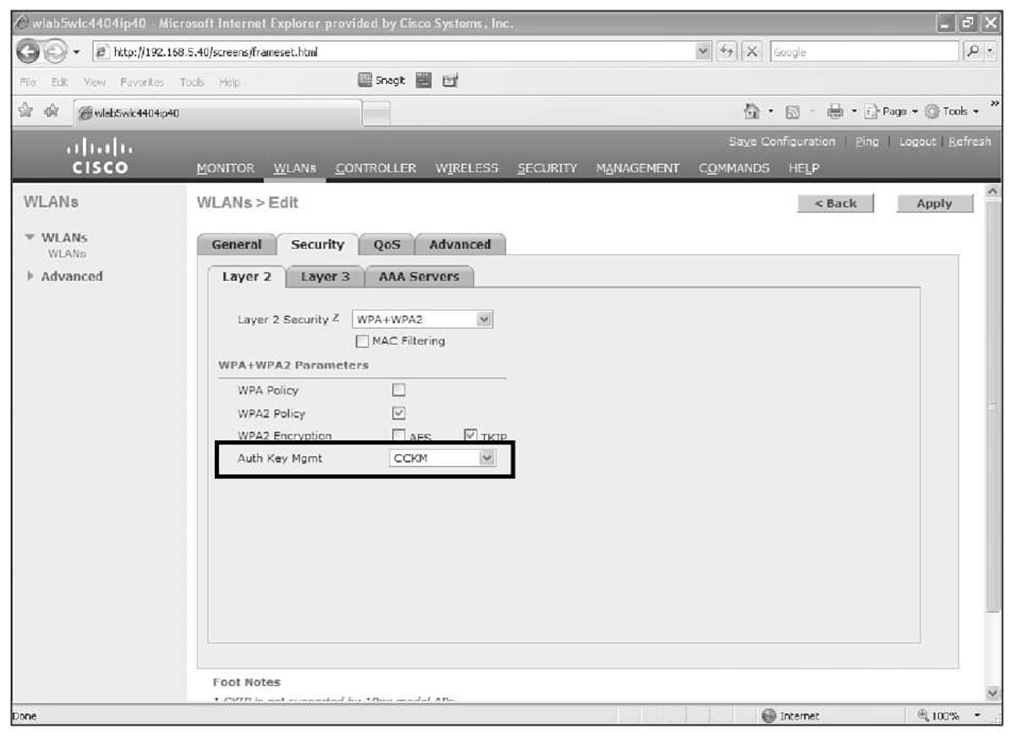
If you plan to use 802.1x authentication, LEAP, PEAP, and EAP-FAST for the voice WLAN security, Cisco recommends that you use CCKM for the key management (see Figure 11-12).
Figure 11-12 CCKM for Key Management
During a roaming event, the full reauthentication required by 802.1x can introduce some delay, which might adversely affect voice quality. With centralized key management available with CCKM, however, key exchanges do not occur during a client reassociation, so a roaming event experiences less delay. Currently, the Cisco wireless phones cannot use CCKM with AES encryption, so you need to use TKIP instead.
Switch Ports
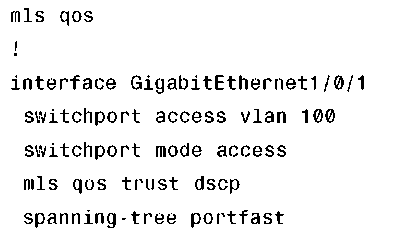
For the switch port connected to the AP, make sure you are trusting DSCP. The LWAPP/CAPWAP frames generated by the AP have no CoS marking. The controller configuration determines the DSCP marking of the encapsulated packet between the WLC and AP, and you want to ensure that the switch handles the packet correctly.
If, for example, you are deploying your AP in VLAN 100 on a 3750 access switch, the port would have the configuration shown in Example 11-1.
Example 11-1 Switch Port QoS Configuration
The configuration of the switch port connected to the controller, however, is a bit more complicated. You have to decide if you want to trust CoS or DSCP. When making your decision, you need to take the following into account:
■ Traffic leaving the controller can be either network upstream or downstream, as shown previously in Figure 11-4. The downstream traffic is Range A. The upstream traffic is from the AP and WLAN client and is in Range B when leaving the controller.
■ The QoS policies on the controller dictate the DSCP values of LWAPP/CAPWAP packets (Range A). The encapsulated packet QoS marking is not altered.
■ The QoS policies on the controller set the CoS values of frames leaving the controller regardless of whether they are in Range A or B.
With the following interface configuration shown in Example 11-2, the switch is going to trust DSCP and not CoS.
Example 11-2 show interface Command Output Trust DSCP
WLAN Profile on the Phone
To configure the WLAN profiles on the phone, go to Settings > Network Profiles and select the profile you want to configure. From here you can set the profile name and configure the WLAN settings. The WLAN setting includes the SSID, security method, and any usernames and passwords that might be required. To unlock the Network Profile menu, use the key sequence **#.
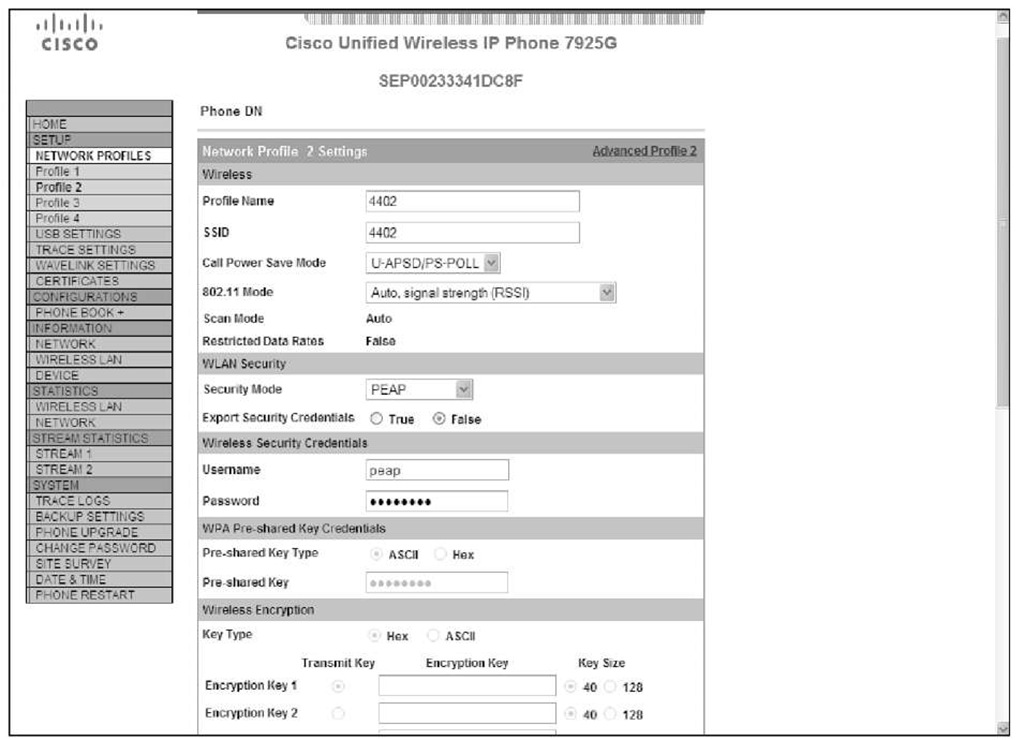
You can also configure the phone using the Universal Serial Bus (USB) connection to access the web configuration pages. The default username and password to access the phone web page is "admin" and "Cisco", respectively. Figure 11-13 shows the WLAN configuration for a 7925 phone.
Figure 11-13 7925 Web Page Configuration
You have to install the USB adapter software on your machine to access the phone web pages. The USB software is found on the Cisco website at http://www.cisco.com/pcgi-bin/tablebuild.pl/ip-7900ser-crypto.
You also can make configuration changes to the phones using CallManager, but that is outside the scope of this topic.
