In This Chapter
Switching from an old BlackBerry to a BlackBerry Curve
Switching from a PDA to a BlackBerry Curve
Wouldn’t it be nice if you could just make one device’s data available to another? That’s the future. But right now, RIM (Research In Motion) wants to make switching devices as painless as possible. That’s why Device Switch Wizard is part of the suite of applications in BlackBerry Desktop Manager.
Device Switch exists in Windows, but we’re sure that by the time you read this, a Mac version will be available. We included screenshots of the prerelease version of Device Switch on the Mac, but be aware that the actual release version may differ slightly.
Switching to a New BlackBerry
Switching from an older BlackBerry to your new Curve is no big deal. When you want to transfer application data (e-mails and contacts, for example) to your new Curve, BlackBerry Desktop Manager Device Switch Wizard backs up your old BlackBerry and loads that backup to your new device.
On your PC, the following steps help you transition from your old device to your new BlackBerry Curve:
1. On your PC, choose Start All Programs BlackBerry Desktop Manager.
The Desktop Manager screen opens, where you can find Device Switch Wizard, as shown in Figure 17-1.
2. Click the Device Switch Wizard icon.
The Device Switch Wizard screen lets you choose whether to switch from BlackBerry to BlackBerry Curve or from non-BlackBerry to BlackBerry Curve. The BlackBerry-to-BlackBerry section tells you to connect your current (old) BlackBerry to your PC.
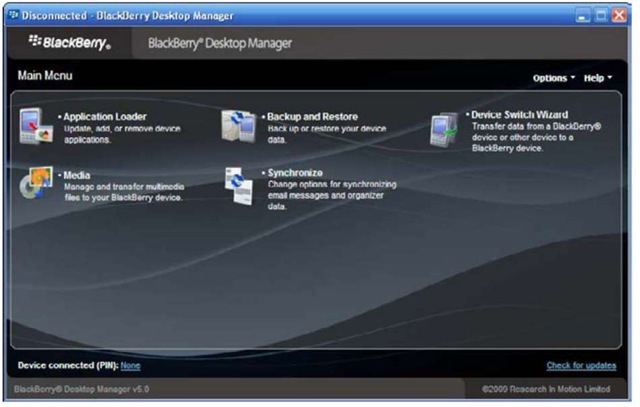
Figure 17-1:
Launch Device Switch Wizard here.
3. Connect your old BlackBerry to your PC with the USB cable.
Keep your BlackBerry on when connecting.
4. Click the Start button below Switch BlackBerry Devices.
The next screen lets you verify the PINs for both devices — the old BlackBerry on the left and your new Curve on the right, as shown in Figure 17-2. Because you connected only your old BlackBerry, it should be preselected.
Your BlackBerry PIN isn’t a password — it’s your BlackBerry smart-phone identifier. You can find the PIN by choosing Options Status on your BlackBerry.
5. Decide whether to include user data and third-party applications and then click Next.
If you want all the data, leave the screen untouched; this backs up everything. Third-party applications are all the programs you installed — the ones that didn’t come with the device originally.
A status screen appears, showing the progress of the backup operation. When the backup is finished, the next screen prompts you to connect your new BlackBerry Curve.
6. Connect your BlackBerry Curve to your PC with the USB cable.
The next screen, as shown in Figure 17-3, lets you verify that your Curve is connected properly, with your Curve’s PIN preselected in the drop-down
list. It also asks for the password. Because data is already backed up from the old BlackBerry, the old device is no longer needed on succeeding steps, and it doesn’t matter whether you keep the old one connected.
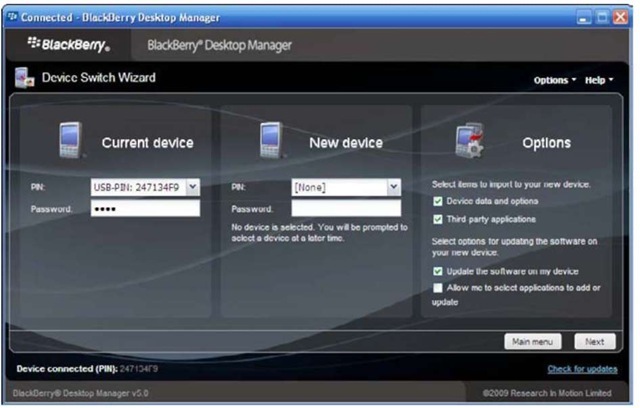
Figure 17-2:
Verify that your old BlackBerry is connected to the PC and decide what data to include here.
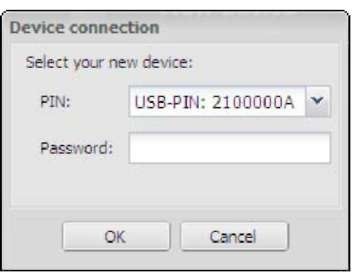
Figure 17-3:
Type your device password here.
7. Enter the password of your Curve and then click OK.
A screen similar to Figure 17-4 tells you what will be restored to the new device. Nothing has been done to your new BlackBerry Curve yet, and this is your last chance to cancel the process.
8. Click Finish.
A progress screen shows you the loading process.
9. When the Success screen appears, click the Close button.

Figure 17-4:
Confirming loading data onto your new BlackBerry Curve.
Figures 17-5 and 17-6 show how to switch your device from an old BlackBerry to your new Curve on a Mac. Again, these screenshots are the prerelease version, so it’s possible that the process is a little different on your version. After launching BlackBerry Desktop Manager, you can run Switch Device by going to the Device menu and selecting Switch Device. The screen shown in Figure 17-6 appears with a few options that allow you to move your old BlackBerry data to your new Curve.
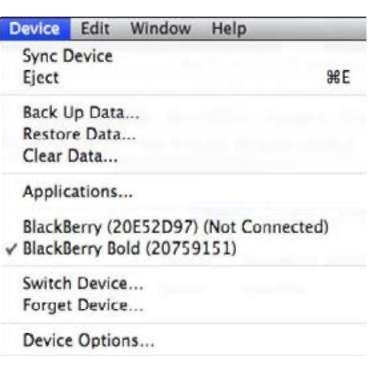
Figure 17-5:
On the Mac,choose Switch Device here.
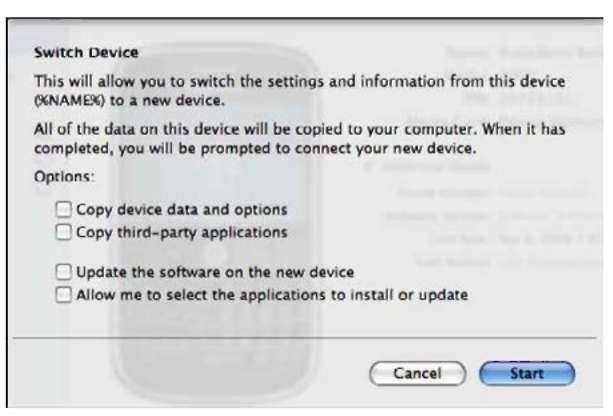
Figure 17-6:
Switch Device on a Mac version of BlackBerry Desktop Manager.
Switching from a Non-BlackBerry Device
This section is applicable only to Windows. The prerelease version of BlackBerry Desktop Manager on the Mac does not show support for any other devices.
Device Switch Wizard supports two types of non-BlackBerry devices:
Palm
Microsoft Windows Mobile
This doesn’t mean that you can’t import your old data if you have another device; Device Switch Wizard just makes it simpler for these two types of devices. Check Chapter 16 for synchronization options for your Desktop PIM application if your old device is neither a Palm nor a Microsoft Windows Mobile device.
Palm device requirements
Your PC and Palm have to meet three prerequisites for Device Switch Wizard to import data from Palm to your BlackBerry Curve:
Your PC must be running Windows 2000 or later.
One of the following Palm Desktop Software versions must be installed on your desktop: 4.0.1, 4.1, 4.1.4, or 6.0.1.
The Palm Desktop software installed is synchronizing properly with the Palm device.
You can check your Palm user guide for more details about your Palm device and synchronizing it to your PC. You can also download the user guide from www.palm.com/us/support/index.hml. Navigate to this page by selecting the Palm model you have and the wireless network provider on which it runs.
Windows Mobile device requirements
You need the following for Device Switch Wizard to work properly with a Windows Mobile device:
Your PC must be running Windows 2000 or later.
Microsoft ActiveSync versions must be installed on your PC.
The mobile device must run one of the following operating systems: Microsoft Windows Mobile 2000, 2002, 2003, 2003SE, or 2005/5.0 for Pocket PC or Microsoft Windows Mobile SmartPhone software 2002, 2003, or 2003 SE.
Running the wizard
Before you run the wizard, make sure that all the requirements for your device are in place.
We recommend hot-syncing or synchronizing your Palm or Windows Mobile device; this ensures that the data you’re sending to your Curve is current. Palm Desktop Software, as well as Microsoft ActiveSync, should come with help information on how to hot-sync.
Although the following steps migrate Windows Mobile data to the Curve, the steps are similar for Palm. We indicate at what point the steps vary. Do the following to get your other device’s data migrated to your new Curve:
1. Connect both the Windows Mobile device and BlackBerry Curve to your desktop computer.
2. On your PC, choose Start All Programs BlackBerry Desktop Manager.
The Desktop Manager screen appears (refer to Figure 17-1).
3. Click the Device Switch Wizard icon.
4. When Device Switch Wizard appears, click the image next to Switch from Another Device to BlackBerry Device.
The Welcome screen, as shown in Figure 17-7, describes what the tool can do.
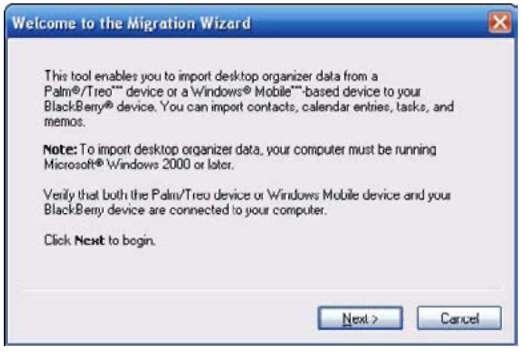
Figure 17-7:
Migrating data from a non-BlackBerry device.
5. Click Next.
A screen prompts you to decide whether you’re migrating from Palm or Windows Mobile, as shown in Figure 17-8. The wizard is intelligent enough to enable the option associated to the connected device, which in this figure is a Windows Mobile device.
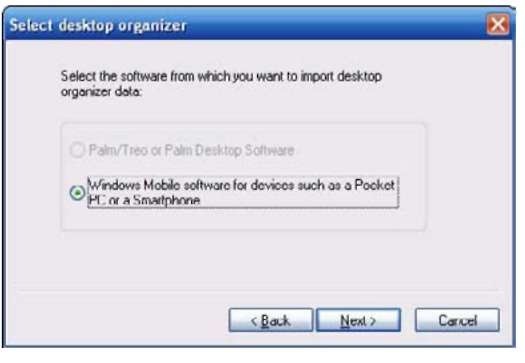
Figure 17-8:
The wizard has already selected which device to port.
6. Click Next.
Hot-syncing the Windows Mobile device kicks in at this point. You see a series of screens for each of the application’s data, such as Calendar, Contacts, and MemoPad. A sample for the Calendar data is shown in Figure 17-9. The screen indicates what to sync and will be empty if you already performed a hot-sync before running the wizard. Otherwise, it will take some time, depending on how much data there is to sync between the device and the desktop software.
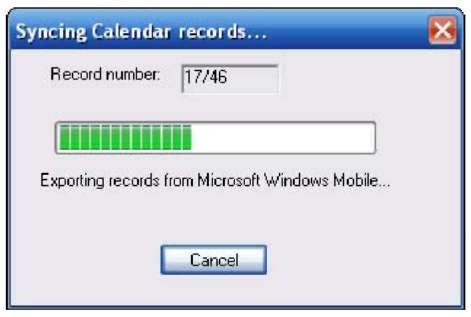
Figure 17-9:
A message showing hot-syncing on your device.
7. Click OK.
A progress screen appears. Before the data is applied to your Curve, the wizard prompts you about the change, as shown in Figure 17-10. Click the following buttons on this screen to either confirm or reject the change:
• Details: You want to know the records the wizard is trying to apply.
• Accept: You just want the data migrated.
• Reject: Ignore this data and continue.
• Cancel: Change your mind and cancel the whole operation.
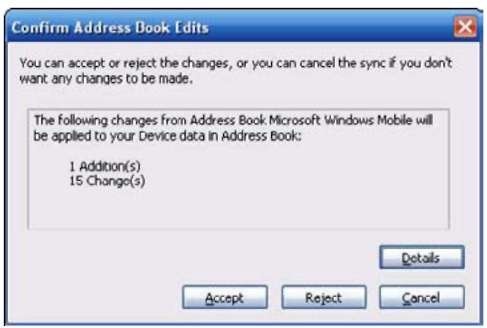
Figure 17-10:
Confirm the importing of data here.
8. Click the Accept or the Reject button on any confirmation screens that appear.
The wizard migrates all the data you accepted. Obviously, the wizard skips everything you rejected. When the migration process is finished, a success screen appears.
9. Click Finish.
