In This Chapter
Linking your e-mail accounts to your BlackBerry Curve
Adding your own e-mail signature
Reconciling e-mails on your Curve and PC
Receiving, sending, and spell-checking e-mails
Deleting and filtering your e-mails
Searching your e-mail
Saving messages
Your BlackBerry Curve brings a fresh new face to the convenience and ease of use that you associate with e-mail. You can “hook” as many as ten e-mail accounts (from your work e-mail to personal e-mail from providers such as Yahoo! and AOL) to your Curve. You can set up an e-mail signature, configure e-mail filters, and search for e-mails.
In this chapter, you find answers on how to use and manage the e-mail capabilities of your Curve to their full potential. From setup to sorts, it’s all covered here.
Getting Up and Running with E-Mail
Regardless of your network service provider (such as T-Mobile, or Rogers, or Vodafone), you can set up your Curve to receive mail from at least one of your e-mail accounts. Thus, with whatever address you use to send and receive e-mail from your PC (Yahoo!, Gmail, and so on), you can hook up your Curve to use that same e-mail address. Instead of checking your Gmail from your desktop, for example, you can now get it on your Curve.
Most network service providers allow you to connect as many as ten e-mail accounts to your Curve. This provides you with the convenience of one central point from which you can get all your e-mail, without having to log on to multiple e-mail accounts. Such convenience!
In an enterprise environment — depending on your company policy — you might not be able to access the BlackBerry Internet Service site to link your personal e-mail accounts to your Curve. If you work for a Fortune 500 company, most likely you can’t access BlackBerry Internet Service. However, you can still configure e-mail settings (such as the BlackBerry e-mail filter and BlackBerry e-mail reconciliation) to make your e-mail experience that much better. (See the upcoming section “Enabling Wireless Reconciliation.”) If you’re an enterprise user, skip to the parts where you see the Enterprise icon to configure your e-mail settings. If you haven’t set up e-mail on your company-owned Curve, see the upcoming section “Setting up e-mail in an enterprise environment.”
Using the BlackBerry Internet Service client
You can pull together all your e-mail accounts into one by using the BlackBerry Internet Service client (formerly known as the BlackBerry Web client). The BlackBerry Internet Service client allows you to do the following:
Manage multiple e-mail accounts: As we mention earlier, you can combine as many as ten of your e-mail accounts onto your Curve. See the next section for details.
Use wireless e-mail reconciliation: No more trying to match your Curve e-mail against e-mail in your combined account(s). Just turn on wireless e-mail reconciliation, and you’re good to go. For more on this, see the upcoming section “Enabling Wireless Reconciliation.”
Create e-mail filters: You can filter e-mails on your Curve so that you get only those messages that you truly care about. See the “Filtering your e-mail” section, near the end of this chapter.
Think of the BlackBerry Internet Service client as an online e-mail account manager, but one that doesn’t keep your e-mails. Instead, it routes the e-mails from your other accounts to your Curve (because it’s directly connected to your Curve.
Combining your e-mail accounts into one
To start aggregating, or combining, e-mail accounts (such as Gmail) onto your Curve, you must first run a setup program from the BlackBerry Internet Service client. You can access the Service client from your Curve or from your desktop computer.
To access the BlackBerry Internet Service client from your PC, you need the URL that is specific to your network service. Contact your network service provider (T-Mobile, Verizon, and so on) directly to get that information.
After you’ve logged on to the BlackBerry Internet Service client, you should see a screen similar to Figure 8-1. If your network provider has activated your account, you should see one e-mail address — the default address of your account.
You will see a set of options on the left navigation bar. The Email Accounts option allows you to add, edit, and delete e-mail accounts. In addition, for each e-mail address, you can set up filters and an e-mail signature.
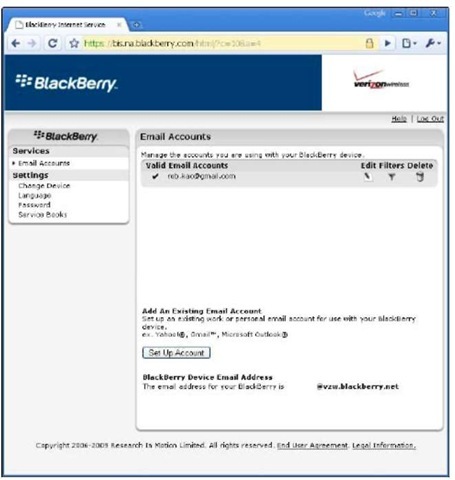
Figure 8-1:
Set up an e-mail account here.
As we mention previously, your Curve already has a default e-mail address that you can use to receive and send e-mail. If you don’t have any other e-mail account that you want to meld into your BlackBerry e-mail account, simply skip to the upcoming “Configuring Your E-Mail Signature” section.
Adding an e-mail account
To add an e-mail account to your BlackBerry account, follow these steps from your desktop PC:
1. From the BlackBerry Internet Service client (refer to Figure 8-1), click the Set Up Account button.
2. On the e-mail account screen, enter the e-mail address and logon credentials for that e-mail address:
• E-mail address: The address from which you want to receive e-mail
• Account logon: The one you use to log on to this e-mail account
• Password: The one you use with the logon
3. Click Next.
You’re finished. It’s that easy!
You can also manage your accounts from your Curve. From the Home screen, press the menu key and select Set Up Internet E-Mail. The rest is pretty much the same on the Curve as it is on a PC.
With your BlackBerry Curve, you can create and set up the BlackBerry Internet Service account as you would on your PC. Although you could do this even before OS 5.0, the new interface has made setting up a BlackBerry Internet Service account much easier.
To add an e-mail account to your BlackBerry account from your BlackBerry, follow these steps:
1. From your BlackBerry Home screen, select Setup Folder.
2. Select the Person E-mail Setup icon.
You are prompted with a login screen similar to Figure 8-2. If you haven’t created your account, you see a Create button to create your BlackBerry Internet Service account username and a password for you to log in.
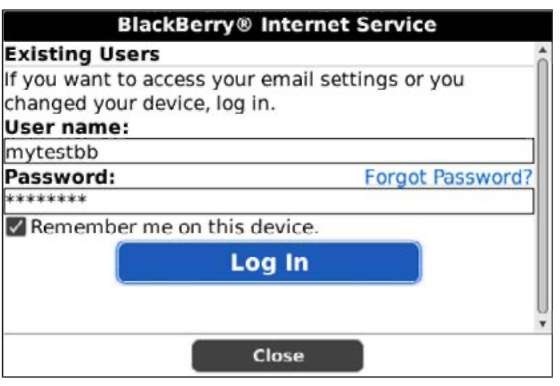
Figure 8-2:
BlackBerry Internet Service setup on BlackBerry OS 5.0.
3. After you log in, click Add.
A screen with different e-mail domains (such as Yahoo! and Google) appears, as shown in Figure 8-3.
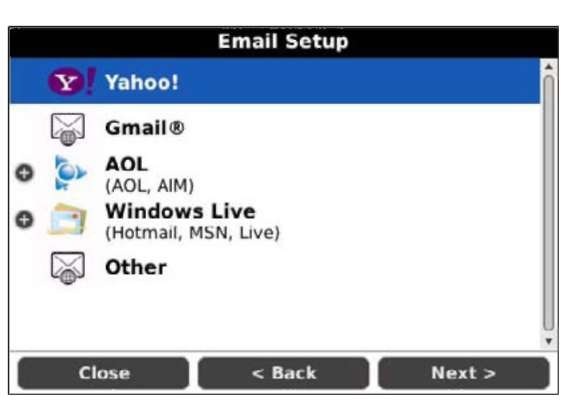
Figure 8-3:
Select an e-mail domain.
4. Select an e-mail domain.
5. Enter the e-mail address and password, and then select Next.
You see a setup confirmation screen.
If you have OS 4.6, follow these steps to add e-mail accounts to your BlackBerry:
1. From your BlackBerry Home screen, select Setup Folder.
2. Select the Person E-mail Setup icon.
You are prompted with a login screen. If you haven’t created your account, you see a Create New Account link to create your BlackBerry Internet Service account username and a password for you to log in.
3. After you log in, click the Add My Existing E-mail Account link.
A screen with a different text field appears. This is where you can enter an e-mail address and the password associated with that e-mail account.
4. Enter the e-mail address and password, and click Next.
You see a setup confirmation screen.
Setting up e-mail in an enterprise environment
This section is for you if your Curve can’t receive and send e-mail yet — such as when you first get your Curve or you swap an old model for a new one.
If your e-mail function works properly on your Curve, you can skip this section.
Follow these steps to activate your BlackBerry Curve for enterprise use:
1. From the Home screen, press the menu key and then select Enterprise Activation.
The Enterprise Activation screen opens, with two fields for you to fill in:
• Your corporate e-mail address
• Your password: From your IT department
2. Type your corporate e-mail account along with the appropriate password.
If you don’t know this information, contact your corporate system administrator.
3. Press the menu key and then select Activate.
Your Curve attempts to activate itself with your corporation.
Some corporations don’t allow any employee-purchased BlackBerry smartphones to be activated with corporate e-mail. Check with your system administrator for corporate BlackBerry policies.
Getting e-mail in an enterprise environment using Desktop Redirector
If you are a sole proprietor or consultant who works in a corporation that runs Exchange or Lotus, and you would like to get enterprise e-mails on your Curve, this section is for you.
Typically, to get enterprise e-mail, your Curve would have to be configured with the BlackBerry Enterprise Server. Expect this if your employer hands you a Curve. However, if you work for a company as a contractor, you probably won’t be getting a BlackBerry from that company. When you want to get enterprise e-mail so that you don’t fall behind, you need Desktop Redirector so that you can get company e-mail on your personal BlackBerry.
To start using Desktop Redirector, you first need to install BlackBerry Desktop Manager; see Chapter 16 for details about how to do this. After you install Desktop Manager with Redirector, make sure that Redirector starts every time you boot your PC.
Depending on the corporate security policy, some corporations allow Desktop Redirector, and some do not. Before you start using Desktop Redirector, contact the IT department in the company you work for.
Here are just a few caveats when using Desktop Redirector:
You can get enterprise e-mail as long as your PC is turned on and has an Internet connection.
When someone sends you an attachment, you can’t retrieve it from your Curve. Unfortunately, that is the limitation for Desktop Redirector.
When someone sends you a meeting notice, you can’t accept or reject it.
Configuring Your E-Mail Signature
If you’re tired of writing Regards, John Smith over and over to close an e-mail, set an e-mail signature. By default, your e-mail signature is something like “Sent via My BlackBerry,” which can be cool in the first week, showing off to people that you are a la mode with your BlackBerry. But sooner or later, you may not want people to know that you are out and about while answering e-mail. Or you may want something more personal.
Follow these steps to configure your e-mail signature by using the BlackBerry Internet Service client:
1. Log on to the client on your PC.
2. In the BlackBerry Internet Service client (refer to Figure 8-1), click the Edit icon for the desired e-mail account.
The edit screen appears, as shown in Figure 8-4.
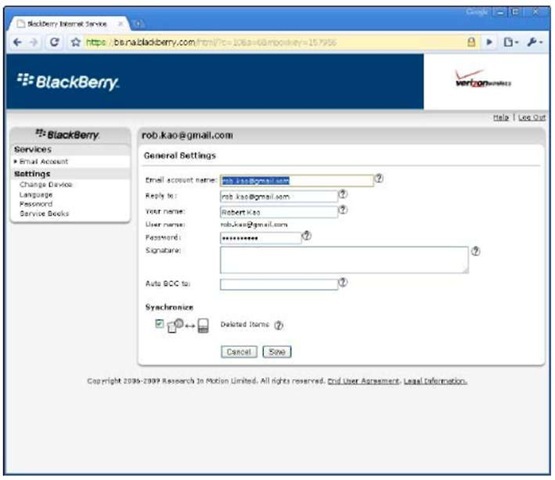
Figure 8-4:
The e-mail account edit screen.
3. In the Signature field, type the desired text for your e-mail signature.
4. Click Save.
Enabling Wireless Reconciliation
With wireless reconciliation, you don’t need to delete the same e-mail in two places (on your computer and on your Curve). The two e-mail inboxes reconcile with each other — hence, the term wireless reconciliation. Convenient, huh?
Enabling wireless e-mail synchronization
You can start wireless e-mail synchronization by configuring your Curve. Follow these steps:
1. From the Home screen, press the menu key and then select Messages.
This opens the Messages application. You see the message list.
2. In the message list, press the menu key and then select Options.
The Options screen appears, with two option types: General Options and E-mail Reconciliation.
3. Select E-mail Reconciliation.
This opens the E-mail Reconciliation screen, which has the following options:
• Delete On: Configures how BlackBerry handles your e-mail deletion.
• Wireless Reconciliation: Turns on or off the wireless sync function.
• On Conflict: Controls how BlackBerry handles any inconsistencies between e-mail on your Curve and the BlackBerry Internet Service client.
With this option, you can choose who “wins”: your Curve or the BlackBerry Internet Service client.
4. Select Delete On and then select one of the following from the dropdown list:
• Handheld: A delete on your Curve takes effect only on your Curve.
• Mailbox & Handheld: A delete on your Curve takes effect on both your Curve and your inbox on the BlackBerry Internet Service client.
• Prompt: This option prompts your Curve to ask you at the time of deletion where the deletion takes effect.
5. Select Wireless Reconciliation and then select On from the drop-down list.
6. Select On Conflict, and make a selection from the drop-down list.
If you choose Handheld Wins, the e-mail messages in your e-mail account will match the ones on the handheld.
Next, you need to configure BlackBerry Internet Service to ensure that Synchronize Deleted Items is selected:
1. Log on to the client on your PC.
2. In the BlackBerry Internet Service client (refer to Figure 8-1), click the Edit icon for the desired e-mail account.
The edit screen appears (refer to Figure 8-4).
3. In the Synchronize Deleted Items field, make sure the check box is selected.
4. Click Save.
Unfortunately, some e-mail accounts might not work well with the e-mail reconciliation feature of the BlackBerry, so you still may have to delete an e-mail twice.
Permanently deleting e-mail from your Curve
When deleting e-mail on your Curve, the same message in that e-mail account is placed in the Deleted folder. You can set up your Curve to permanently delete e-mail, but use this option with caution because after that e-mail is gone, it’s truly gone.
To permanently delete e-mail on your BlackBerry Internet Service client from your Curve, follow these steps:
1. Open the Messages application.
2. In the message list, press the menu key and then select Options.
3. On the Options screen, select E-mail Reconciliation.
4. On the E-mail Reconciliation screen, press the menu key and then select Purge Deleted Items.
You see all your e-mail accounts.
5. Choose the e-mail account from which you want to purge deleted items.
A screen appears, warning you that you are about to purge deleted e-mails on your Service client.
6. Select Yes.
Deleted e-mails in the selected e-mail account are purged.
Unfortunately, some e-mail accounts may not work with the Purge Deleted Items feature.
Working with E-Mail
From the Messages application, you send and receive your e-mails and also configure wireless e-mail reconciliation with your e-mail account(s). See the preceding section for information on e-mail reconciliation.
To access Messages, press the menu key from the Home screen and then select Messages. The first thing you see after opening Messages is the message list. Your message list can contain e-mail, voice mail messages, missed-phone-call notices, Short Messaging Service (SMS) messages, and even saved Web pages.
Receiving e-mails
Whether you’re concerned about security or speed of delivery, with BlackBerry’s up-to-date secured network, you’re in good hands when receiving e-mail on your Curve.
And whether you’ve aggregated accounts or just use the plain-vanilla BlackBerry e-mail account, you receive your e-mail the same way. When you receive an e-mail message, your Curve notifies you by displaying a numeral next to a mail icon (an envelope) at the top of the screen. This number represents how many new (unread) e-mails you have (see Figure 8-5). A red asterisk next to the envelope indicates that you have new mail and that you haven’t opened the Messages application yet. Your Curve can also notify you of new e-mail by vibration, a sound alert, or both. You can customize this from the Profile application, detailed in Chapter 3.
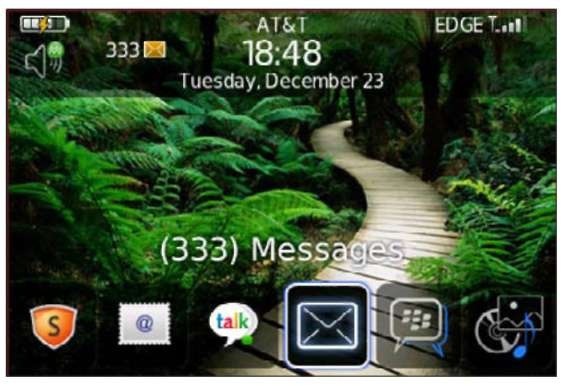
Figure 8-5:
You’ve got (333) e-mails!
Retrieving e-mail
Retrieving your e-mail is simple. Follow these steps:
1. From the Home screen, press the menu key and then select Messages.
2. In the message list, scroll to any e-mail, and press the trackball or trackpad.
You can tell whether an e-mail is unopened by the small, unopened envelope icon on the left side of the e-mail. A read e-mail bears an opened envelope icon, a sent e-mail has a check mark as its icon, and a document icon represents a draft e-mail.
3. After you finish reading the message, press the escape key to return to the message list.
Sorting the message list
Your Curve mail lists messages in order by the date and time they were received, but you can sort by different criteria. For example, to see only incoming e-mail, press Alt+I. (For more predefined hot keys, see the upcoming section “Reusing saved searches.”)
Sorting and searching are closely related on your Curve. In a sense, searching is really sorting your e-mail based on your search criteria. You can search your e-mail by the name of the sender or by keywords. Or you could run a search as broad as looking through all the e-mail that has been sent to you. See the later section “Searching through Messages Like a Pro” for more on searching and sorting.
Saving a message to the saved folder
You can save any important e-mail in a folder so that you can find it without sorting through tons of e-mail. To do so, simply scroll to the e-mail you want to save, press the menu key, and then select Save from the menu. A pop-up message confirms that your e-mail has been saved. Your saved e-mail remains in the message list.
To retrieve or view a saved e-mail, follow these steps:
1. Open the Messages application.
2. In the message list, press the menu key and then select View Saved Messages.
You see the list of messages you saved.
3. Select the message you want and then press the trackball or trackpad to open it.
Viewing attachments
Your Curve is so versatile that you can view most e-mail attachments just like you can on a desktop PC. And we’re talking sizable attachments, too, such as JPEGs (photos), Word docs, PowerPoint slides, and Excel spreadsheets. Table 8-1 shows a list of supported attachments viewable from your BlackBerry.
If you are using BlackBerry Desktop Redirector to get your e-mail onto your Curve, you won’t get attachments on your Curve.
| Table 8-1 | BlackBerry-Supported Attachments | |
| Supported Attachment Extension | Description | |
| .bmp | BMP image file format | |
| .doc/.docx | MS Word document | |
| .dot | MS Word document template | |
| .gif | GIF image file format | |
| .htm | HTML Web page | |
| .html | HTML Web page | |
| • jpg | JPEG image file format | |
| Adobe PDF document | ||
| • png | PNG image file format | |
| .ppt/.pptx | MS PowerPoint document | |
| .tif | TIFF image file format | |
| .txt | Text file | |
| .wpd | Corel WordPerfect document | |
| .xls/xlsx | MS Excel document | |
| .zip | Compressed file format | |
To tell whether an e-mail has an attachment, look for the standard paper-clip icon next to your e-mail in the message list.
You retrieve all the different types of attachments the same way. This makes retrieving attachments an easy task. To open an attachment, follow along:
1. While reading an e-mail, press the menu key and then select Open Attachment.
You see a screen that contains the name of the file, a Table of Contents option, and a Full Contents option. For Word documents, you can see different headings in outline form in the Table of Contents option. For picture files, such as JPEGs, you can go straight to the Full Contents option to see the graphic.
For all supported file types, you see Table of Contents and Full Contents as options. Depending on the file type, use your judgment on when you should use the Table of Contents option.
2. Scroll to Full Contents, press the menu key, and then select Retrieve.
Your Curve attempts to contact the BlackBerry Internet Service client to retrieve your attachment. This retrieves only part of your attachment. As you peruse a document, your Curve retrieves more as you scroll through the attachment.
Editing attachments
Your Curve comes with Documents To Go, which means that out of the box, you not only can view, but also edit Word and PowerPoint documents. You can even save the documents to your Curve and transfer them later to your PC.
As an example, imagine editing a Word document that you received as an attachment to an e-mail:
1. Open the e-mail.
2. In the message list, open an e-mail with a Word document attached.
This opens the e-mail for you to read. Notice the little paper clip, indicating that it has an attachment.
3. Press the menu key and then select Open Attachment.
You’re prompted with a pop-up that asks whether you want to view the Word document or edit with Documents To Go.
4. Select Edit with Documents To Go.
Here, you can view and edit a document.
5. Press the menu key and then select Edit Mode.
In Edit mode, you can edit your document.
6. When you are finished editing and viewing, you can either save the document on your Curve or e-mail it:
• To e-mail the edited document, press the menu key and then select Send via E-mail.
You see an e-mail message with the Word document. Follow the steps described in the next section to send this e-mail attachment as you would any other e-mail.
• To save the document, press the menu key and then select Save.
If you want to save the attachment to your Curve, you have to navigate its folder structure. For documents, the default save location usually is the Documents folder.
Sending e-mail
The first thing you probably want to do when you get your BlackBerry to write an e-mail to let your friends know that you just got a BlackBerry. Follow these steps to send an e-mail message:
1. Open the Messages application.
2. In the message list, press the menu key, and select Compose E-mail.
You are prompted with a blank e-mail that you need to fill out, just like you would do on your PC.
3. In the To field, type the recipient’s name or e-mail address.
As you type, you see a list of contacts from your Contacts that match the name or address you’re typing. You can make a selection from this list.
4. Enter a subject in the Subject field, and type your message in the Body
field.
5. When you’re finished, press the menu key and then select Send.
Your message has wings.
Forwarding e-mail
When you need to share an important e-mail with a colleague or a friend, you can forward that e-mail. Simply do the following:
1. Open the e-mail.
For information on opening e-mail, see “Retrieving e-mail,” previously in this chapter.
2. Press the menu key and then select Forward.
3. Type the recipient’s name or e-mail address in the To field and then add a message if needed.
When you start typing your recipient’s name, a drop-down list of your contacts appears, and you can choose the recipient from it.
4. Press the menu key and then select Send.
Your message is on its way to your recipient.
Sending e-mail to more than one person
When you need to send an e-mail to more than one person, just keep adding recipient names as needed. You can also add recipient names to receive a Cc (carbon copy) or Bcc (blind carbon copy). Here’s how:
1. Open the e-mail.
For information on opening e-mail, see the previous section “Retrieving e-mail.”
2. Press the menu key and then select Compose E-mail.
3. Specify the To field for the e-mail recipient and then press the Return key.
Another To field is added automatically below the first. The Cc field works the same way.
4. To add a Bcc recipient, press the menu key and then select Add Bcc.
You see a Bcc field. You can specify a Bcc recipient the same way you do To and Cc recipients.
Whether you’re composing a new e-mail, replying, or forwarding an e-mail, you add new Cc and Bcc fields the same way.
Attaching a file to your e-mail
Many people are surprised that you can attach any document on your Curve or on the microSD card. You can attach Word, Excel, and PowerPoint documents as well as pictures, music, and videos. To send an e-mail with a file attached, follow these steps:
1. Open the Messages application.
2. In the message list, press the menu key and then select Compose E-mail.
You are prompted with a blank e-mail that you can fill out as you would on your PC. Enter the recipient’s name in the To field and then enter the subject and body of the message.
3. Press the menu key and then select Attach File.
You’re prompted with a list of your folders. Think of these as the folders on your PC.
4. Navigate to the file of your choice, and press the trackball or trackpad.
After you select a file, you see the file in the e-mail message.
5. When you’re finished, press the menu key and then select Send.
Your message and attached file wing their way to the recipient.
Spell-checking your outgoing messages
Whether you’re composing an e-mail message or an SMS text message, you can always check your spelling with the built-in spell checker. Simply press the menu key and then select Check Spelling. When your Curve finds an error, the spell checker makes a suggestion, as shown in Figure 8-6. To skip the spell check for that word and go on to the next word, press the escape key. If you want to skip spell-checking for an e-mail, simply press and hold the escape key.
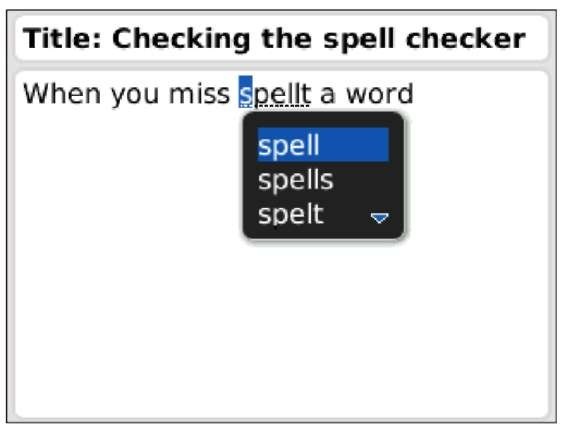
Figure 8-6:
The BlackBerry spell checker in action.
Your Curve, just like Microsoft Word, underlines a misspelled word.
By default, the spell checker doesn’t kick in before you send your message, but you can configure it to check spelling before you send an e-mail. Follow these steps:
1. Open the Messages application.
2. Press the menu key and then select Options.
3. Select the Spell Check option.
4. Select the Spell Check E-mail before Sending check box.
5. Press the menu key and then select Save.
The underline feature is a default setting called Check Spelling as You Type. To turn off this feature, disable the Spell Check option in Message Options.
Deleting e-mail
If you want to really clean up your old e-mails, and you don’t want to scroll through tons of messages, you can do the following:
1. Open the Messages application.
2. From the message list, highlight a horizontal date mark, press the menu key, and then choose Delete Prior.
The date mark is simply a horizontal bar with dates. Just like you can highlight e-mails in the message list, you can highlight the date mark. You are prompted to confirm the deletion.
Before you take the plunge, remember that going ahead will delete all the e-mails before the particular date mark. You cannot retrieve deleted items from your BlackBerry.
3. Select Delete to confirm your deletion.
All your e-mails before the date mark are history.
Filtering your e-mail
Most of us get e-mail that isn’t urgent or doesn’t concern us. Instead of receiving these e-mails on your Curve — and wasting both time and effort to check them — you can filter them out. While in the BlackBerry Internet Service client, set up filters to make your BlackBerry mailbox receive only the e-mails that you care about. (Don’t worry; you’ll still receive all your e-mails on your main computer.)
To create a simple filter that treats messages as urgent and forwards them to your Curve, follow these steps. In this example, we’re setting a filter to mark work-related messages as urgent.
1. From your PC, log on to the BlackBerry Internet Service client (refer to Figure 8-1).
2. Click the Filter icon for the desired e-mail account.
The Filter screen that appears shows a list of filters that have been created. Figure 8-7 doesn’t have any filters yet.
3. Click the Add a filter link.
The Add Filter screen appears, as shown in Figure 8-8.
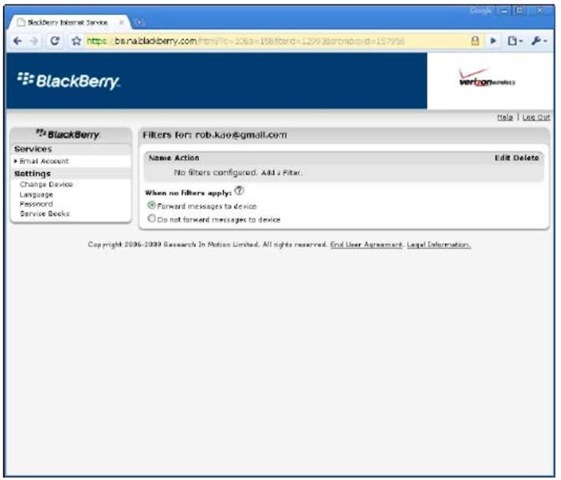
Figure 8-7:
Filter list screen.
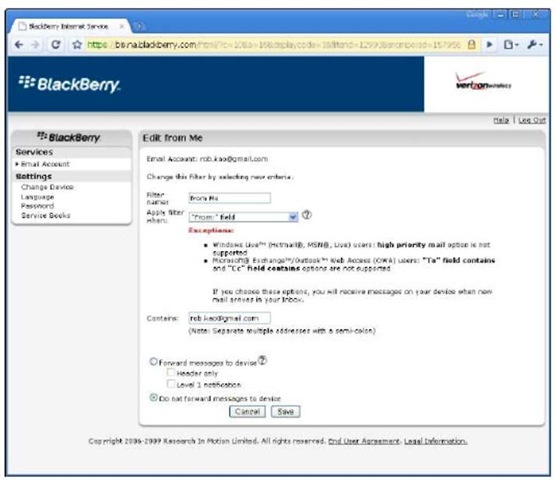
Figure 8-8:
Create a filter for your e-mail here.
4. Enter a name in the Filter Name text box.
The filter name can be anything you like. We’re using “from Me”.
5. From the Apply Filter When drop-down list, choose the condition to place on the filter:
• A High-Priority Mail Arrives: The filter applies only to urgent e-mail.
• Subject Field Contains: The Contains field is enabled (you can type text in it). You can specify what keywords the filter will look for in the subject field. Separate entries with a semicolon (;).
• From Field Contains: The Contains field is enabled (you can type text in it). You can type full addresses or part of an address.Separate entries with a semicolon (;).
• To Field Contains: Similar to From Field Contains, enter e-mail address(es).
• CC Field Contains: Similar to From Field Contains, enter e-mail address(es).
If you need more conditions, just add filters. Each filter can have one condition.
For this example, we select From Field Contains.
6. Specify the text in the Contains field.
See the details in Step 5 for what to enter in the Contains field. Continuing this example, type the domain of your work e-mail address.
7. Select one of the following options:
Forward Messages to Device: Select this radio button, and you can then select either or both check boxes below it:
• Header Only: You want only the header of the e-mails that meet the condition(s) you set in Steps 3, 4, and 5 to be sent to you. (A header doesn’t contain the body of the e-mail — just who sent it, the subject, and the time it was sent.) Choose this check box if you get automated alerts, where receiving only the subject is sufficient.
• Level 1 Notification: Level 1 Notification is another way of saying urgent e-mail. When you receive a Level 1 e-mail, it appears in bold in Messages.
Do Not Forward Messages to Device: Any e-mail that meets the conditions you set in Steps 3, 4, and 5 aren’t sent to your BlackBerry.
8. Confirm your filter by clicking the Save button.
You return to the Filter screen, where you can see your newly created filter in the list.
If you have a hard time setting the criteria for a filter, just make a best guess and then check it by having a friend send you a test e-mail. If the test e-mail isn’t filtered correctly, set the conditions until you get them right.
Searching through Messages Like a Pro
Searching is a function you probably won’t use every day, but when you run a search, you usually need the information fast. Take a few minutes here to familiarize yourself with general searching.
The BlackBerry Messages application provides three ways to search through your messages. Two of the three ways are specific, and one is a broad search:
Search by sender or recipient: Specific. This method assumes that you already know the sender or recipient.
Search by subject: Specific. This approach assumes that you already know the subject.
General search: Broad. You don’t have a specific assumption.
You can search through anything listed in the messages list. This means that you can search through SMS and voice mail as well as e-mail.
Searching by sender or recipient
Search by sender or recipient when you’re looking for a specific message from a specific person. For example, suppose that your brother constantly sends you e-mail (which means your message list has many entries from him). You’re trying to locate a message he sent you approximately two weeks ago regarding a fishing-trip location. You scrolled down the message list, but you just can’t seem to find that message. Or maybe you want to find a message you sent to Sue but can’t lay your hands on it.
To find a message when you know the sender or recipient, follow these steps:
1. Open the Messages application.
2. In the message list, highlight a message that you sent to or received from that particular person.
The choice you get in the next step depends on whether you highlighted a sent message or a received message.
3. Press the menu key and then select one of these options:
• To search for a message from someone specific: Because that certain someone sent you the message, choose Search Sender.
• To search for a message to someone specific: Because you sent that certain someone the message, choose Search Recipient.
This starts the search. Any results appear onscreen.
Searching by subject
Search by subject when you’re looking for an e-mail titled by a specific subject that you already know. As is the case when running a search by sender or recipient, first scroll to an e-mail that bears the same subject you’re searching for. Then follow these steps:
1. Open the Messages application.
2. In the message list, highlight an e-mail titled by the specific subject you’re searching for.
3. Press the menu key and then select Search Subject.
The search starts, and the results appear onscreen.
Running a general search
A general search is a broad search from which you can perform keyword searches of your messages. To run a general search, follow these steps:
1. Open the Messages application.
2. In the message list, press the menu key and then select Search.
3. In the Search screen that appears, fill in your search criteria (see Figure 8-9).
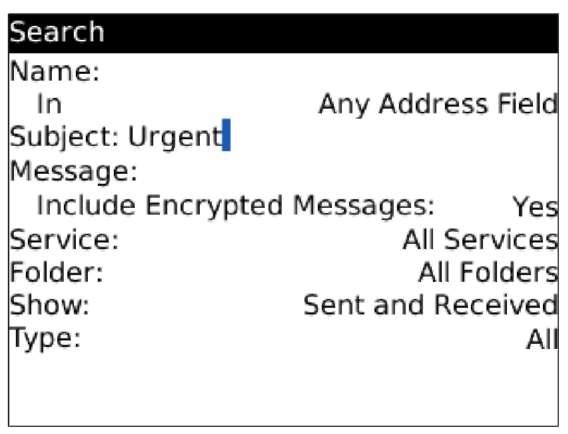
Figure 8-9:
The Search screen in Messages.
The search criteria for a general search follow:
• Name: This is the name of the sender or recipient to search by.
• In: This is related to the Name criterion. Use this drop-down list to indicate where the name may appear, such as in the To or Cc field. From the drop-down list, your choices are From, To, Cc, Bcc, and any address field.
• Subject: This is where you type some or all keywords that appear in the subject.
• Message: Here, you enter keywords that appear in the message.
• Service: If you set up your BlackBerry to receive e-mail from more than one e-mail account, you can specify which e-mail account to search.
• Folder: This is the folder in which you want to perform the search. Generally, you should select All Folders.
• Show: This drop-down list specifies how the search result will appear — namely, whether you want to see only e-mails that you sent or e-mails that you received. From the drop-down list, your choices are Sent and Received, Received Only, Sent Only, Saved Only, Draft Only, and Unopened Only.
• Type: This drop-down list specifies the type of message that you’re trying to search for: e-mail, SMS, or voice mail. From the dropdown list, your choices are All, E-mail, E-mail with Attachments, PIN, SMS, Phone, and Voice Mail.
From the Search screen shown in Figure 8-9, you can have multiple search criteria or just a single one. It’s up to you.
4. Press the menu key and then select Search to launch your search.
The search results appear onscreen.
You can narrow the search results by performing a second search on the initial results. For example, you can search by sender and then narrow those hits (results) by performing a second search by subject.
You can also search by sender or recipient when you’re looking for a specific message from a specific person. Scroll to an e-mail that bears the specific sender or recipient. Press the menu key and then select Search Sender or Search Recipient. If the e-mail that you highlighted is an incoming e-mail, you’ll see Search Sender. If the e-mail is outgoing, you’ll see Search Recipient.
Saving search results
If you find yourself searching with the same criteria over and over, you may want to save the search and then reuse it. Here’s how:
1. Follow Steps 1-3 in the preceding section for an outgoing e-mail search.
2. Press the menu key and then select Save.
The Save Search screen appears, from which you can name your search and assign it a shortcut key (see Figure 8-10).
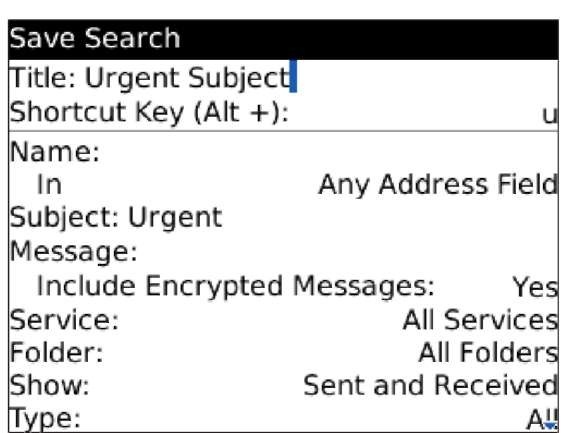
Figure 8-10:
Name your search, and assign it a shortcut key.
3. In the Title field, enter a name.
The title is the name of your search, which appears on the Search Results screen.
4. Scroll to the Shortcut Key field, press the trackball or trackpad, and select a letter from the drop-down list.
You can choose among ten letters.
5. Confirm your saved search by pressing the menu key and then selecting Save.
Reusing saved searches
Right out of the box, your BlackBerry comes with five saved search results. Any new saved result will make your search that much more robust.
Follow these steps to see all saved search results:
1. Open the Messages application.
2. In the message list, press the menu key and then select Search.
3. Press the menu key and then select Recall.
The recall screen opens, and you can see the five preloaded search shortcuts, as well as any searches you saved, as shown in Figure 8-11.
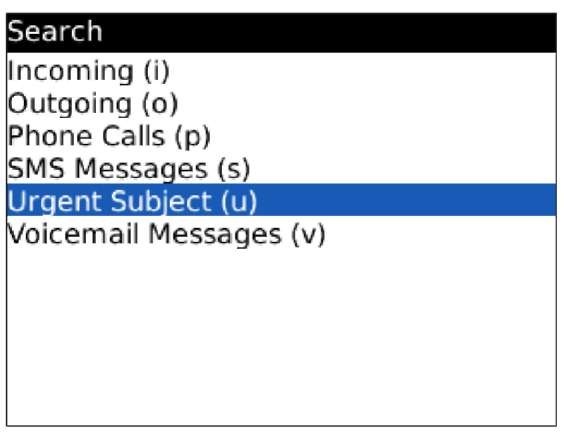
Figure 8-11:
The Recall screen, showing default search hot keys.
To reuse one of the saved search results, simply select a desired search from the list, press the menu key, and select Search.
If you have multiple e-mail accounts set up, you can set up a search shortcut so that you view only one specific account. For example, say you have both your personal e-mail and your small-business e-mail accounts set up on your BlackBerry. In the Message application, you see e-mails from both, which can be overwhelming at times. From the general Search screen (refer to Figure 8-9), set the Service drop-down list to the one you want, and follow the preceding steps to save the search and assign a shortcut key. The next time you want to see only a certain account, you can get to it in an instant!
Follow Up Your E-Mail
With OS 5.0, your can automatically add reminders to any e-mail that you want to follow up. This is similar to the follow-up flag in Microsoft Outlook. Why would you want to do this on your BlackBerry? If you get a flurry of e-mail in the morning and read through them before replying, sometimes you’ll forget which ones need a response. This is one example where a follow-up flag would help.
To add a follow-up flag:
1. Open the Messages application.
2. Highlight the e-mail in need of a follow up, and press the menu key.
3. Select Flag for Follow Up.
You see a red flag next to your message.
4. While the flagged e-mail is still highlighted, press the menu key again.
5. Select Flag Properties.
You can select the following:
• Request: This is the type of follow up. You can choose from Call, Review, Forward, and more.
• Color: Yup, you guessed it. This is the color of the flag.
• Status: You can choose whether the status is completed or not.
• Due: This is the due date for this follow up. When the due date arrives, you get a pop-up reminder, similar to a calendar reminder.
Long Live E-Mail
No closet has unlimited space, and your BlackBerry e-mail storage has limits, too. You’ve likely pondered how long your e-mails are kept in your BlackBerry. (The default is 30 days. Pshew.) You can choose several options: from 15 days to forever (well, for as long as your BlackBerry has enough space for them).
Because any message you save is kept for as long as you want, a good way to make sure that you don’t lose an important message is to save it.
To change how long your e-mails live on your BlackBerry, follow these steps:
1. Open the Messages application.
2. Press the menu key and then select Options.
3. Select General Options.
4. Scroll to the Keep Messages option and then press the trackball or trackpad.
5. From the drop-down list that appears, choose the time frame that you want and then press the trackball or trackpad:
• Forever: If you choose Forever, you’ll seldom need to worry about your e-mails being automatically deleted. On the downside, though, your BlackBerry will eventually run out of memory. At that point, you must manually delete some e-mails to free space to accept new e-mails.
A good way to archive your e-mail is to back up your e-mails by using BlackBerry Desktop Manager. See Chapter 18 for more on backing up your BlackBerry on your PC.
• Time option: If you choose a time option, any message older than that time frame is automatically deleted from your BlackBerry the next time you reboot your BlackBerry. However, the message will be deleted only on your BlackBerry — even if you turn on e-mail reconciliation — because these deletions are only on the device.
6. Confirm your changes by pressing the menu key and then selecting Save.
