3.13.
Connecting Rod
The connecting rod joins the piston to the crankshaft and transfers piston reciprocating force
to crankshaft rotation. The small end of the connecting rod reciprocates and the large end follows
the crank pin rotational pattern. For this dynamic movement, the connecting rod should be as
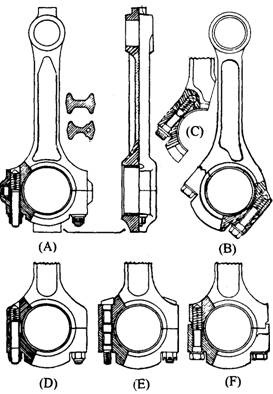
light as possible while maintainin0 its rigidity. The connecting rod (Fig. 3.77A and B) is basically
of two ring forms, which encircle the piston pin and the crankshaft rod journal. From each of
these ring forms a tangential fillet blends into a tapered H-section of the rigid rod strut. Each
connecting rod is fastened to the piston by piston pins and to the crank pin (journal) of the
crankshaft by a plain split bearing.

Fig. 3.77. Connecting-rod construction.
A. Straight-cut rod with dowel joint location. B. Oblique-cut rod with serrated joint location.
C. Groove-and-tongue joint location. D. Collar joint location.
E. Fitted bolt joint location. F. Stepped joint location.
The offset design connecting rods provide the most economical distribution of main bearing
space and crankshaft cheeks. Usually, the offset is divided equally between each end, maintain-
ing the connecting rod column perpendicular. Offset connecting rods do not have as good a
bearing endurance quality like symmetrical connecting rods.
The reciprocating-inertia loads of the piston produce both tensile and compressive stresses
in the connecting-rod, whereas the combustion gas load develops purely compressive stress of
considerable magnitude at all engine speeds. To withstand these loading the connecting-rod
shank is made in an H-section with a central web and two end flanges (Fig. 3.78A). This
construction provides the highest rigidity to bending for a given weight of connecting-rod as well
as offers adequate resistancstto twist between the gudgeon-pin and the big-end crankpin axes.
The shank section joins smoothly to both the big- and small-end-bearing hole bosses. A rib
is formed between the bolt or stud hole bosses, which improves rigidity of the cap to counteract
the very large stresses and strains imposed by the inertia forces at high engine speed. The
big-end housing is made adequately rigid and the bolt or stud hole bosses sufficiently hard on
the surface. Any uneven contact of the bolt head or nut with its housing seat introduces reversing
bending stresses into the bolt or stud shank, eventually causing fatigue failure. Some connect-
ing-rods use balancing lugs at the two extreme ends so that metal may be removed from either
end to achieve the desired weight ratio between small-end to big-end and also to match the
weights of individual connecting-rods.
For the lubrication of the small-end, a hole is drilled along the shank so that it intersects
the big-end bore circumferentially, to one side of the mid-position. This hole should not be too
close to the central axis of the connecting-rod, otherwise the inertia of the oil-column pulls oil
in the shank drilling. This causes insufficient lubrication in the highly loaded region between
the journal and the big-end bearing, where it is highly essential.
Connecting rods are manufactured by both drop forging and casting processes. The steel
forging produces lighter weight but more expensive connecting rods. Malleable or spheroidal-
graphite iron casting or sinter forgings are being used for small to medium sized petrol engines.
A popular material used for both connecting rod forging and their clamping bolts or studs is
manganese-molybdenum steel, the composition of which is 0.35% carbon, 1.5% manganese, 0.3%
molybdenum, and 97.85% iron. Steel connecting-rod uses a bronze (or brass) small-end bush
and a detachable white metal big-end shell bearing. Aluminium alloy is also occasionally used
for connecting-rods. The aluminium alloy connecting rods have the advantage over steel
connecting rods in that they are lighter in weight and both small-end and big-end bearings can
be directly bored into the parent metal of rod and need not be separate. The thin wall bearing
is most commonly used for the big-end and main bearing. Bearings with babbitt lining are used
on small, light duty petrol engines and those with copper-lead lining is used in compression
ignition engines.
The big-end bore of the connecting-rod must be truly cylindrical. Generally two or, for some
heavy-duty applications, four studs or bolts and nuts are used to fasten the caps to the shank
part of the connecting rod. The slightest misalignment between the shank and cap creates a
step in the two half bores. This imposes uneven loading on the shell bearing liners. For providing
maximum support to the bearing liner, the bolts or studs should be located as near to the bore
wall edge as possible without any interference with the fitted shell. Big-end-housing bore
alignment can be achieved by a number of methods as follows.
(a) Dowel-located Joint.
Pieces of rod or tube is forced into small blind holes drilled in the
joint faces (Fig. 3.77A) of the shank and cap, furthest from the housing bore to provide space for
the bolt holes.
(b) Collar-located Joint.
Tubes or collars are slipped over the studs or bolts with a
clearance gap, which are countersunk into each half of the bore housing at the split joint face
(Fig. 3.77D).
(c) Fitted-bolt Joint.
Fitted bolts (Fig. 3.77E) have reduced diameters along their length
except at the ends and in the centre region where they intersect the split joint. This profile of
the bolt provides a close fit at the joint faces and tends to reduce the stress concentration at the
bolt head and in the threaded nut region.
(d) Stepped Joint.
Connecting rod caps are machined with lips at the end of the split joint
face. These projections slot tightly over adjacent flats machined on the shank perpendicular to
the joint face. This arrangement (Fig. 3.77F) provides positive alignment of the two bore
half-housings.
For least distortion of the big-end bore, the bore housing is generally split perpendicular to
the connecting-rod centre line, forming the straight-cut caps. Connecting-rods also use split joint
cut at an oblique angle to the cylinder axis, to allow the big-end part to pass through the cylinder
bore, so that the piston-and-rod assembly can be removed through the top of the cylinder bore.
The oblique-cut cap gives rise to additional loading on the clamping bolts and joint so that some
form of extra support is required at the joint face. Two most commonly used oblique-cut
connecting-rod joints are as follows.
(i) Serrated Joint.
This joint (Fig. 3.77B) has V-shaped grooves cut across both joint faces.
When two halves are positioned and tightened together, they form a firm multi-wedge type of
joint without any relative movement.
(ii) Groove-and-tongue Joint.
This joint faces are machined providing a rectangular
projection on the shank joint faces and corresponding slots on the cap joint faces so that they
form a groove and tongue joint (Fig. 3.77C) when both halves are tightened together.
3.13.1.
Connecting-rod Shell Liner Bearings
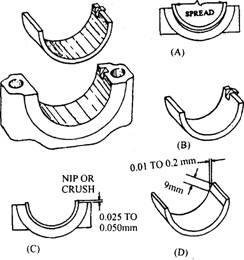
The big-end-housing bore of the connecting-rod uses split half-shell thin-wall bearings (Fig.
3.78) and each half works under different conditions. The connecting rod shank half-shell mainly

Fig. 3.78. Big-end connecting-rod cap and shell liner.
A. Shell free spread. B. Shell locating lag. C. Shell spin prevention. D. Shell bore relief.
experiences the high gas pressure generated by combustion over a very short period of time.
The cap half-shell receives the inertia loads from both rotating and reciprocating portions of the
connecting rod and these forces exist for a longer period of time. Therefore, for maximum service
life, these bearings must be properly aligned, located, and secured in their housing bore.
The surface finish of the bearing is important because it reduces rate of wear, improves
fatigue resistance, permits close working tolerances between journal and bearing, and improves
heat transfer. The surface finish should be in the order of 0.5 (im.
Liner half-shells are slightly spread open in their free state (Fig. 3.79A), which is relatively
more for thin liners than for thick ones. This allows them to spring or snap into position against
their respective bore half-housing walls, which ensures complete circumferential contact with
the bore walls. The liner half-shells have a pressed-out lug at one joint face (Fig. 3.78B), which
engages with a notch cut in the housing bore. This arrangement provides a quick and effective
method of aligning the shell centrally in its housing bore.
For arresting the liner half-shells from rotating by the frictional force created between the
shell backing and the bore-housing walls, the half-shells protrude above the joint face (Fig.
3.78C) by around 0.025 to 0.05 mm when positioned in their bores. When two half-joint faces
are clamped together the excess overlap portion of the shell is crushed or nipped. This causes
the complete liner to have an interference fit in the big-end housing thereby developing radial
outward force and the frictional resistance to prevent shell spin.
To achieve bore relief, a slight taper is provided at each end of the two liner half-shells on
the inner circumferential bearing surface (Fig. 3.78D). This prevents bulging inwards of the
internal faces of the bearing or becoming burred at the joint when the shank and cap are
compressed lightly together. Incase of oblique-cut connecting rod, where the bearing load is
already high at the joint face, the relief should be reduced or in certain cases omitted.
The liner must be in cylindrical shape after assembly in the big-end housing, but the housing
bore itself may be out-of-roundness due to several reasons, which include the following :

Fig. 3.79. Out of roundness of housing bore.
A. Stepped connecting-rod joint. B. Squashed connecting-rod big-end bore.
C. Stretched connecting-rod big-end bore.
(a) Stepped Cap (Fig. 3.79A).
This condition arises due to (i) a shifted cap-and-shank split
joint; (ii) reversing the cap relative to the shank; (Hi) enlarged cap-bolt holes; (iv) insufficient
or uneven torquing of the cap bolts or studs; and (v) interference between the recessed shoulder
of the cap and the side of the torquing socket while fitting the nut or bolt head.
(b) Squashed-out Bore (Fig. 3.79B).
This may happen due to (i) over-torquing the
big-ends; (ii) fitting down the cap to reduce journal-to-big end bearing clearance; and (Hi)
sandwiching the insufficient shims between the cap and shank joint-face housing.
(c) Stretched-out Bore (Fig. 3.79C).
Excessive alternating reciprocating-inertia loading
and flexing at very high speeds can cause permanent elongation of the big-end bore in the
direction of the rod length. This happens if the big-end is not designed properly and the
appropriate material has not been used for its manufacturing.

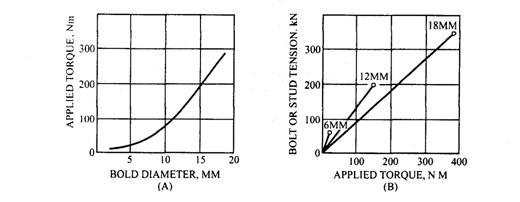
Fig. 3.80. Relationship between diameter, applied torque, and axial tension of bolts and studs.
Big-end Cap Tightness.
The bolts or studs should be torqued down sufficiently so that the bearing housing becomes
truly cylindrical and the frictional force created by the compressive stresses is high enough to
prevent fretting between the joint faces when the big-end is subjected to both combustion gas
loads and reciprocating-inertia loads. Although it is difficult to measure the roundness of the
bore as well as frictional grip at the joint face, but the torque required to achieve these conditions
can be predetermined, which is specified by the manufacturer for reassembling the big-end.
The recommended torque to be applied for bolts and nuts of different nominal diameters is
presented in Fig. 3.80A. The required holding torque increases with square of diameter. Figure
3.80B illustrates the relationship between the tightening torque and the clamping tension
produced in bolts or studs for three different nominal diameters. The recommended torque for
a safe working strength, considered as 80% of the yield strength of the steel, is represented by
the circles at the end of each curve.
3.13.2.
Plain Journal Bearings
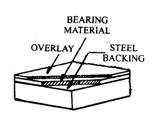
Shell bearing liners use a cylindrical backing strip of low-carb-
on-steel and principal bearing material is cast or roll-bonded (Fig.
3.81) above this strip. This combination is called a bi-metal bearing.
The inner-metallic bonding between the bearing alloy and the steel
backing supports the bearing material. Also it arrests progressive
spreading of material outwards due to the oil-film pressure
produced by both the gas and the inertia loads. A very thin overlay
of a soft anti-friction alloy is required for some bearings, which is
electroplated over the surface of the bearing matrix. This composite
bearing is known as a tri-metal bearing.

Fig. 3.81 Shell-bearing
construction.
