In this topic, you’ll learn about macros. You’ll see how to use them as stand-alone programs for completing simple tasks, as well as for running applications. You’ll also gain experience using the editing features of the IDE to help you enter code and to do the typing of code elements for you.
A macro is a block of code statements that perform a particular task. The task might be as simple as displaying a dialog box to remind users to update something on their drawing, or it might be starting up a VBA application. Macros are normally quite short and contain only a few lines of code.
Macros are great relief for those boring repetitive jobs we all have to do from time to time. By creating macros to do these jobs for you, you are left with time free to concentrate on the creative work that’s more enjoyable. So macros will not only improve your workflow but also add to your job satisfaction!
Only macros placed inside the ThisDrawing object or a standard module are included in the list of macros available from the AutoCAD window. (Remember, a module is just a container for VBA code.) The next two sections describe these two important VBA elements and explain when to use one or the other for your macros.
ThisDrawing Object
The ThisDrawing object contains all the property settings to control the attributes for the active drawing, as well as all the methods and procedures to manipulate the active drawing. For example, the following statement sets the height of the active drawing to 12 units:
ThisDrawing.Height = 12
And this statement saves the changes to the active drawing:
ThisDrawing.Save
The drawing object has its own Code window in the IDE, with two items in the Object list—General and AcadDocument (see Figure 2.1).
Figure 2.1 Code window for the ThisDrawing object
Macros that directly refer to specific objects in a one-off drawing should be placed in the ThisDrawing object, because these macros are dependent on the specific drawing objects’being available at run time.
Standard Modules
A standard module is where you put macros that aren’t associated with any particular UserForm or with the drawing document. Then you can reuse the code from the standard module by including it in various other applications. This is also a good place to put macros that are called from several other modules within the same application, because this avoids any duplication of code.
To insert a standard module into your project from the IDE, you can choose Insert ^ Module. You can also insert a standard module from the AutoCAD window by following these steps:
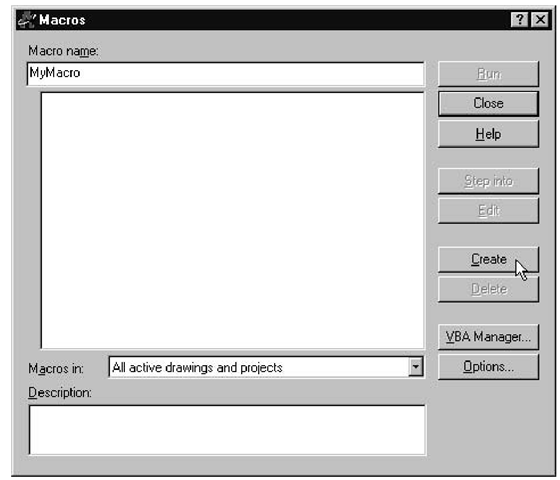
1. Choose Tools ^ Macro ^ Macros. Figure 2.2 shows the Macros dialog box.
Figure 2.2 Macros dialog box in AutoCAD
2. Type the name of your macro into the Macro Name text box. The Create button becomes available for selection.
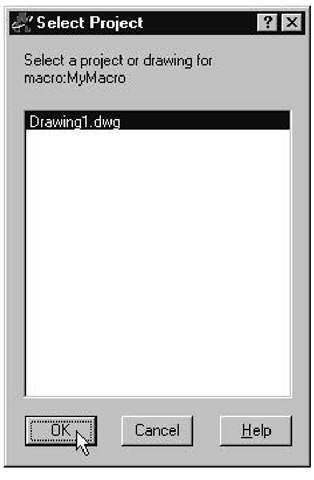
3. Click the Create button. The Select Project dialog box appears, with the macro’s name displayed in the “Select…” instruction at the top of the dialog box. In the list of projects, Drawingl.dwg is the only item that appears:
4. Select Drawingl.dwg and click OK.
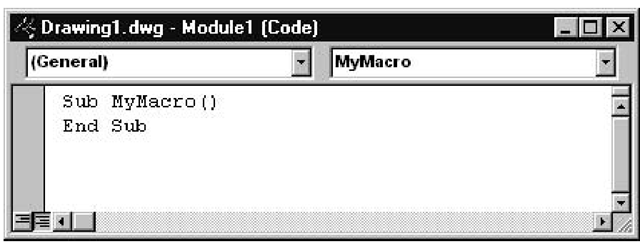
A standard module is created and given the name Modulel. The IDE opens, displaying Modulel’s Code window as shown in Figure 2.3. The macro appears in the Code window with the first and last lines already in place.
Figure 2.3 Code window for Module1
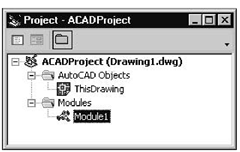
The Project Explorer now contains Modulel in its Modules list for the Drawingl.dwg project, and ThisDrawing in its AutoCAD Objects list, as shown here:
These lists can be expanded and contracted by clicking the little + and – symbols, just as you do files in Windows Explorer.


