General Options
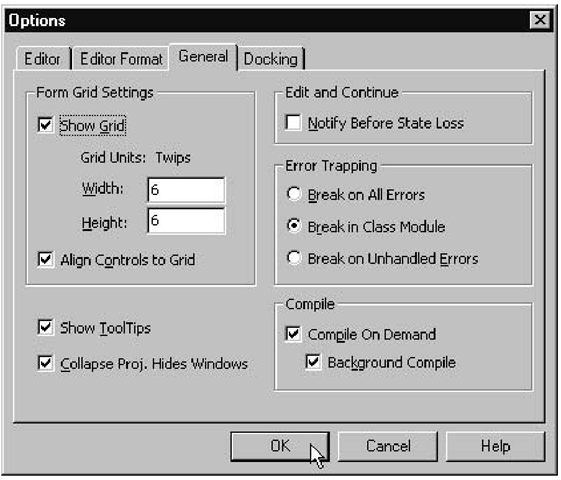
The options on the General tab of the Options dialog box, shown in Figure 3.5, help you control the grid that is displayed as dots on the UserForm. You can make the grid dots visible or invisible, or adjust the spacing between them. You can also choose whether or not to display ToolTips, the little rectangles containing descriptive text that pop up when you pause the mouse cursor over a button or control. Also available here are settings that determine if and when your project is compiled into p-code if it is run from the IDE. When you start running your code with the Compile On Demand option turned on, only the coding statements visited during a particular run are compiled. When you run your code with Background Compile turned on, statements continue to be compiled while your application waits for you to perform the next interaction.
Figure 3.5 General settings in the Options dialog box
The IDE’s Toolbars
The VBA IDE has four helpful toolbars. You can make them visible (or invisible) by choosing the View ^ Toolbars command and selecting or deselecting them from the list (shown here):
The toolbar buttons provide a fast path to some menu commands. You’ll probably find them easier to use after you become accustomed to what menu commands are represented on each toolbar. The following sections briefly describe the buttons on the four toolbars.
The Customize command on the Toolbars menu is covered in the sections "Customizing Menu Commands" and "Creating Your Own Toolbar".There I’ll show you how to build toolbars for running commands from your applications, and how to customize existing toolbars to suit the needs of your applications.
Standard Toolbar
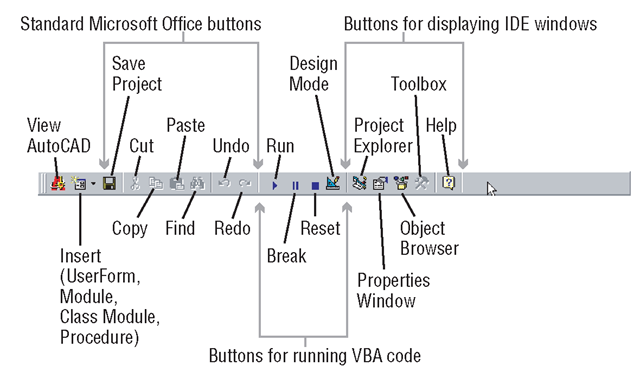
The standard toolbar, shown in Figure 3.6, is also the default toolbar. It is normally placed along the top of the window directly under the menu bar.
Figure 3.6 The standard toolbar
The Changing Face of the Insert Button
The Insert button has two parts—a button part and a drop-down list. This button is metamorphic, in that it changes its icon and function according to the last type of object inserted. So clicking the icon part of the button will insert the last inserted object type in your project.
Clicking the down-arrow on the button displays a drop-down list of all the objects that can be inserted using this button:
Selecting an item from this list inserts the object into your project, and updates the button’s icon and function so that they reflect what you just selected.
In addition, the ToolTip text changes to match the button’s new function. For example, after inserting a module into your project, the function of the Insert button changes to
Until you get used to the icons representing each type of object, use the ToolTips to find out the type of object that will be inserted if you click the button. To see the ToolTip for any toolbar button, simply pause the mouse cursor over the top of it. If the ToolTip doesn’t appear, choose Tools + Options, click the General tab, and make sure that the Show ToolTips check box is selected.
Components in the Project Explorer Window
Any macros, programs, or applications you develop in the IDE are all considered a part of the current project and are all stored in a single file with the extension .dvb. You can view all the parts of a project in the Project Explorer window, which displays a hierarchical structure similar to the Microsoft Windows Explorer window (which I’m sure you’re already familiar with). The Project Explorer window, shown here, can be viewed by selecting View + Project Explorer or by pressing the Ctrl+R key-combination.
Notice the numbers appended to the end of the component names in the Project Explorer window (UserForml, UserForm2, etc., Classi and Class 2). These numbers uniquely identify the components. Since there is only one ThisDrawing component, it doesn’t need a number.
Until a project has been saved for the first time, it is given the default filename Globali, which is just a temporary file. Once a file gets saved, Globali is replaced by the new filename.
Edit Toolbar Buttons
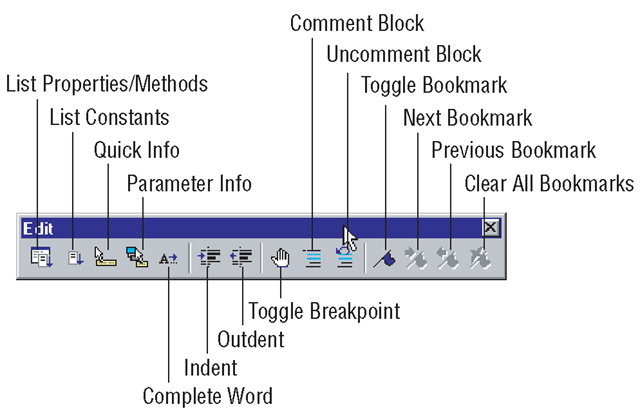
The Edit toolbar (Figure 3.7) provides direct access to some of the commands from the Visual Basic Editor’s Edit menu and a couple of other commands for handling comments. The icons displayed on the buttons are identical to those shown beside the commands in the Edit menu’s drop-down list.
The Comment Block button is extremely useful during the debugging phase. It allows you to highlight adjacent lines of code and click to add the single quote character (‘) to the beginning of each selected line, which stops that code from being executed. If you want to execute these lines at any time after debugging, you can reverse the commenting by highlighting the lines again and clicking the Uncomment Block button.
Figure 3.7 The Edit toolbar

![tmp757e-87_thumb[2] tmp757e-87_thumb[2]](http://what-when-how.com/wp-content/uploads/2012/07/tmp757e87_thumb2_thumb.png)

![tmp757e-89_thumb[2] tmp757e-89_thumb[2]](http://what-when-how.com/wp-content/uploads/2012/07/tmp757e89_thumb2_thumb.png)
![tmp757e-90_thumb[2] tmp757e-90_thumb[2]](http://what-when-how.com/wp-content/uploads/2012/07/tmp757e90_thumb2_thumb.png)
![tmp757e-91_thumb[2] tmp757e-91_thumb[2]](http://what-when-how.com/wp-content/uploads/2012/07/tmp757e91_thumb2_thumb.png)
![tmp757e-92_thumb[2] tmp757e-92_thumb[2]](http://what-when-how.com/wp-content/uploads/2012/07/tmp757e92_thumb2_thumb.png)

