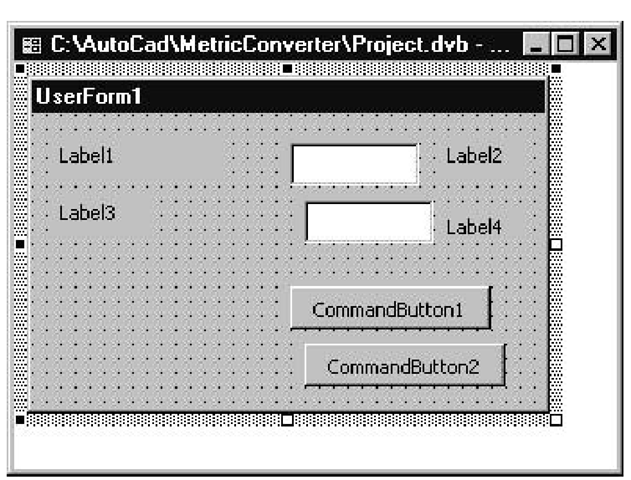
For your first application, we’ll work with the Metric-Imperial Converter application, which converts metric measurements to imperial, and vice versa. This application uses two text boxes as shown in Figure 1.4. The interface allows the user to enter imperial measurements in yards into the first text box, then converts the measurement to metric and displays the results in the second text box. Alternatively, the user can enter metric measurements in meters into the second text box, and the application converts the value to imperial and displays it in the first text box.
Figure 1.4 GUI for the Metric-Imperial Converter application before any properties have been updated
One command button is needed for the user to click in order to tell the application that the measurement has been entered. The second command button allows the user to stop the application.
Creating the GUI
Creating the GUI for the Metric-Imperial Converter application can be achieved using a single UserForm. Exercise 1.1 takes you through the steps required.
Exercise 1.1: Metric-Imperial Converter Application
1. Choose Tools ^ Macro ^ Visual Basic Editor to open the IDE.
2. Choose Insert ^ UserForm to create a UserForm. The graphical representation of the UserForm is displayed, along with the Toolbox.
3. Drag and drop a TextBox control from the Toolbox onto the UserForm and place it near the top right. In Figure 1.4, the two empty boxes are TextBox controls.
The Name property of this text box is assigned as TextBox1 by default. The Name property of a control is the first item listed in the control’s Properties window, which you’ll see in the upcoming section “Setting Captions in the Properties Window.” Default names all start with the type of control followed by a number to denote its place in the sequence of controls of the same type. So the next text box you add will be named TextBox2.
4. Drag and drop a Label control (shown here) and place it to the left of the TextBox control.
The Name property of this Label control is Label1 by default, which is also the initial value assigned to its Caption property. The Label1 control is used to label the TextBox so that the user knows what its contents represent and can enter appropriate values.
5. Drag and drop a second label and position it to the right of the TextBox control. The Name property of this Label control is Label2 by default.
6. Drag and drop a second text box with two accompanying labels, and place them immediately below the first text box and labels. The default Name properties of these controls are TextBox2, Label3, and Label4.
7. Drag and drop a command button (shown here) from the Toolbox onto the UserForm, placing it below the second text box. The default Name and Caption properties of this command button are both CommandButton1.
8. Drag and drop a second command button and place it directly below the first. The Name and Caption properties of this command button are—you guessed it—CommandButton2.
9. Now that all the controls required by the GUI have been added to the UserForm, adjust the UserForm’s dimensions by dragging and dropping its borders until it is a snug fit for all the controls you’ve placed inside it. The layout of controls should look similar to the one shown earlier in Figure 1.4.
How Default Settings Are Initiated
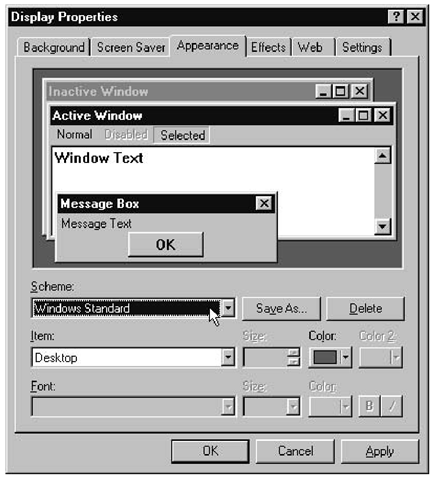
A lot of the default object settings, such as the color of the title bar and background, are retrieved from the display scheme set in the Microsoft Windows environment of the PC on which the application is running. In the examples throughout this topic, the Windows Standard display scheme is used. If your PC is set to a different scheme,your GUI will have a similar appearance to some of the other Windows applications that run on your PC. Some default settings such as those specifying position and dimensions are determined as you drag and drop controls onto UserForms.
You can find out the display scheme setting for your PC by clicking the Display icon in Control Panel and selecting the Appearance tab in the Display Properties dialog box—the current setting is displayed in the Scheme list box,as shown here:
Setting Captions in the Properties Window
The following tutorial shows you how to set the Caption property of UserForm1 in the Metric-Imperial Converter application:
1. If the Properties window is not already on display, choose View ^ Properties Window.
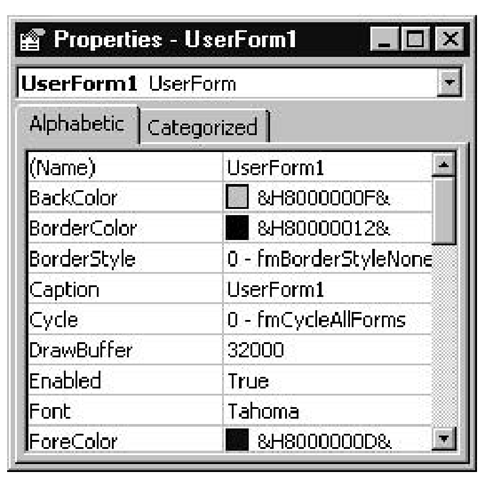
2. The Properties window appears, with property names listed in the left column and their settings listed in the right column. Select the appropriate tab to list the properties in this window alphabetically, as shown in Figure 1.5, or categorically, as shown in Figure 1.6. The list of properties belongs to the object named in the list box at the top (the active object), which is followed by the class the object belongs to.
Figure 1.5 Properties window Alphabetic tab
Figure 1.6 Properties window Categorized tab
3. If the object named at the top of the Properties window is not already User-Form1, click the down-arrow button at the right end of the Object box and select UserForm1 from the drop-down list.
This drop-down list contains all the objects associated with the active UserForm. When UserForm1 is selected, all the properties listed in the window now belong to UserForm1. The graphical representation of UserForm1 becomes the active object and appears with a thick border and eight sizing handles.
4. Scroll the list of properties until the Caption property becomes visible in the left column and select it by double-clicking it. Both the Caption property and the setting “UserForm1” are highlighted, and the insertion point (I-beam mouse pointer) blinks at the end of the highlighted text in the settings column on the right.
5. Type Metric-Imperial Converter. This replaces the highlighted setting for the Caption property, and the text in the title bar of UserForm1 is updated as you enter each keystroke.
Although the Name and Caption properties start off with the same default setting, they are still two distinct properties, so the Name property still remains set to UserForm1 even after you change the Caption.
6. Repeat steps 2 through 5 to change the Caption properties of the labels and command buttons to those shown in Table 1.1.
Table 1.1 Controls and Their Caption Properties
|
Control |
Caption |
|
Labell |
Imperial Units |
|
Label2 |
Yards |
|
Label3 |
Metric Units |
|
Label4 |
Meters |
|
CommandButton1 |
Convert |
|
CommandButton2 |
Close |
The Properties window can be opened by selecting any graphical object and choosing View + Properties Window, or by right-clicking and selecting Properties from the shortcut menu, or by pressing the F4 function key.
The VBA Code Window
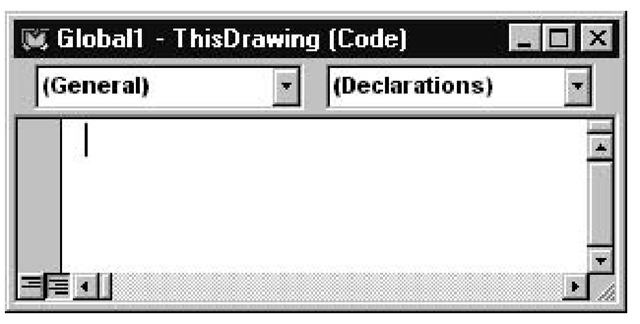
The Code window is where you enter the code that will interact with the user or manipulate AutoCAD objects. When you start a new AutoCAD project, a drawing object is automatically created and made the active document. You can refer to this object in code by its Name property, ThisDrawing. When you open the IDE and look in the Project Explorer window, the ThisDrawing object will be the only object listed (shown previously in Figure 1.1).
Every object listed in the Project Explorer window has its own Code window. One way to open the Code window for a particular object is to double-click it from the Project Explorer window. Here is the Code window for ThisDrawing:
