One of the things you do most frequently when you create a drawing is to add some text for a title, a label, your name, or simply the date and time the drawing was created. You probably routinely add the same kind of information to every drawing you create, so it would be nice to create a simple macro that does this for you. Let’s step through the code for such a macro, and see how to customize it to suit your specific needs.
The code for a macro is entered into a Code window in the IDE, which has some indispensable editing features that you’ll find extremely user-friendly, such as the Auto List Members and the Complete Word features. You’ll learn how to access and make full use of these features as you enter your macro’s code.
Using the IDE’s Editing Features to Enter Code
As you work through the steps of creating a macro to add text to a drawing, you’ll get a lot of help from the drop-down lists that appear as you enter your code. These lists not only shorten your typing tasks, but they also, and more importantly, provide you with names and keywords appropriate to what you are typing. That means you don’t have to memorize lots of programming details, and you’re less dependent on the online Help facility.
Listing 2.1 later in this topic gives the complete macro that you’ll create here step by step. The Analysis section after the listing describes what each line of the code actually does. Exercise 2.1 starts at the very beginning and takes you through all the steps required in coding your DrawText macro, making full use of the editing features as you go.
Exercise 2.1: Creating the DrawText Macro
1. Start AutoCAD and choose Tools ^ Macro ^ Visual Basic Editor. The VBA IDE appears, with one AutoCAD object named ThisDrawing listed in the Project Explorer window. If the Project Explorer window is not displayed, choose View ^ Project Explorer to make it appear.
2. Double-click ThisDrawing. The Code window shown earlier in Figure 2.1 will open, with the Insertion cursor blinking and ready for you to start entering your code.
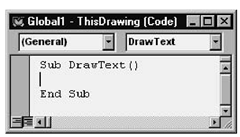
3. In the Code window, enter the text Sub DrawText and press Enter. The IDE appends a pair of parentheses to DrawText and adds an empty line followed by the End Sub statement, as shown here:
Sub and End Sub are colored according to your foreground setting for keyword text. (You’ll see how to change this color in the sidebar “Setting the Colors to Identify Keyword Text in the Code Window.”) The Insertion cursor now blinks in the empty line to let you know that the IDE is waiting for you to enter code.
4. In the empty line, type the following, including the single quote ( ‘ ) character at the beginning:
The single quote denotes that the line is a comment.
5. Press Enter. The comment text changes into the color specified as the foreground color for comment text.
Comments start with a single quote ( ‘ ) character. These lines are useful for jogging your memory if you ever need to revisit your code, or for clarification for someone else who is giving your code an update. Consider comments your opportunity to document what you’ve done.
Setting the Colors to Identify Keyword Text in the Code Window
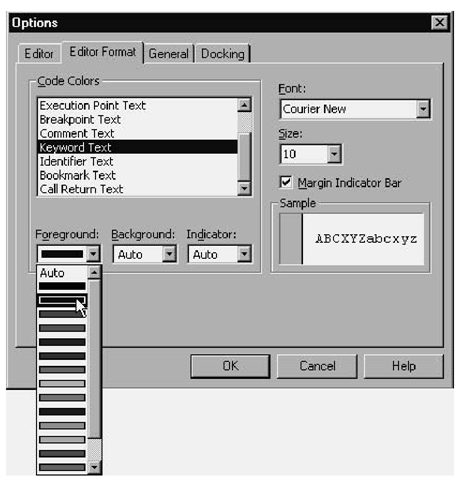
The default color for keyword text in the IDE Code window is blue, but that can be changed to any color you want. Follow these steps:
1. Choose Tools ^ Options to open the Options dialog box (shown here) and select the Editor Format tab.
2. From the Code Colors list, select Keyword Text. The text in the Sample frame changes to the color specified in the Foreground color box. Select your desired color from the drop-down list, and the color of the sample text will be immediately updated.
3. Click OK to finish and return to the Code window.
6. Next, type the following statement. Be sure to capitalize the T and P in TextPosition, and to end the line with a space.
dim TextPosition(0 To 2) as
This statement is how you declare an array named TextPosition that can contain three elements. This array passes the position where you want to place the text, to the AddText method (see step 17). The capitalization of the array name in this declaration is maintained throughout the code, wherever this name is used.
Capitalizing the first letter of individual words within a code element name not only enhances the readability of your code but also alerts you to any typing mistakes.
7. When you enter the space after the as in your dim statement, the Auto List Members feature of the editor displays the drop-down list of data types available for your array elements, as shown in Figure 2.4.
If this drop-down list doesn’t appear, you’ll need to change the editor settings on your PC and try this step again (see “Changing the Editing Features Settings” sidebar later in this topic if you need some help). Alternatively, you can leave the editor settings as they are and choose Edit ^ Complete Word from the Code window; the same drop-down list will appear.
Figure 2.4 The Auto List Members editor feature helps you complete the next part of a statement.
8. Continue entering the statement by typing do. Watch the list of data types scroll as each character is entered.
9. When the Double entry is highlighted,press Enter. Your do is extended to Double in the Code window. The dim becomes Dim, and its color changes to the Keyword Text color setting, as do the To and As Double. The cursor jumps to the start of the next line, where the Insertion cursor blinks in readiness.
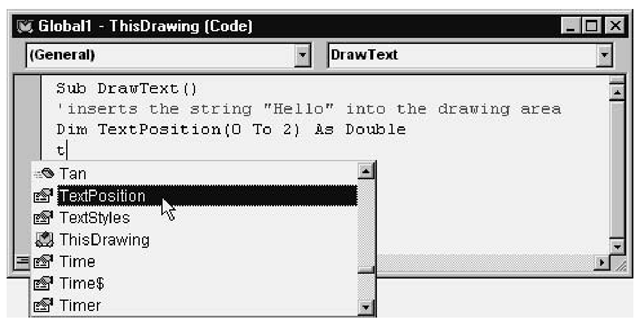
10. Type t and choose Edit ^ Complete Word (or use the key-combination Ctrl+spacebar). A drop-down list of possible names, all beginning with t, is displayed as shown in Figure 2.5. The TextPosition array name you’ve just declared appears in this list.
Figure 2.5 Selecting TextPosition from the list of possible words displayed by the Complete Word editing feature
11. Double-click TextPosition in the drop-down list.The tyou entered is automatically expanded into TextPosition. As an alternative, you can enter textposition in its entirety; when you press Enter to move to the next line, the t and p will change to uppercase to match the array name declaration.
Use upper- and lowercase when entering names in declarations, but use lowercase when entering the rest of the code. The Visual Basic compiler will change the case of any names entered to match their declarations—that way you’ll know if you’ve entered the name correctly.
12. Finish entering the line by typing (0)=1.5 and press Enter. Notice that spaces are inserted at each side of the equals character ( = ). The insertion cursor is positioned at the start of the next line.
13. Repeat steps 8 through 11 to enter the next two lines of code. Complete each line by pressing Enter.
Notice that the 0.0 you entered in the second line automatically changes to 0# when you press Enter, and the insertion cursor blinks patiently while it waits on the next line.
Figure 2.6 defines all the icons that represent the various objects, functions, properties, and methods provided by the Complete Word feature.
|
This Icon: |
Represents a: |
 |
Property |
 |
Default Property |
 |
Method |
 |
Default Method |
 |
Event |
 |
Constant |
 |
Module |
 |
Class |
 |
User Defined Type |
 |
Global |
 |
Library |
 |
Project |
 |
Built-in keywords and types |
|
Enum |
Figure 2.6 Meaning of icons next to items in the Complete Word list
When you enter a decimal fraction with a zero after the decimal point, as in 0.0, the Visual Basic interpreter changes the zero into a hash character (#). This can be disconcerting to new users of Visual Basic. The # is a type-declaration character used to specify that the number is to be treated as a double precision floating-point number (Double type).
14. In the Code window, type m and use the key-combination Ctrl+spacebar to display the drop-down list of all words starting with m that are possibilities for this statement.
15. Next, type o. ModelSpace appears highlighted in the drop-down list. (The ModelSpace collection of objects provides all the details needed to regenerate the Model Space. Later in this topic, the Analysis section after Listing 2.1 describes the ModelSpace collection, so I’ll skip the details for now.)
16. Type a period character (.) . The mo is extended to ModelSpace followed by a period.
17. Finish the line of code by typing the following:
Press Enter. Spaces are inserted as needed and letters capitalized where appropriate. Your finished line of code becomes
That completes our text-insertion macro. Listing 2.1 shows the code in full, and the Analysis section that follows gives a line-by-line account of what is happening.
Listing 2.1: Text-Insertion Macro
Analysis
• Line 1 declares the name of the procedure as DrawText. This allows you to identify it later and run it as a macro (see next section).
• Line 2 contains comment text that is ignored by the Visual Basic interpreter; it is there simply to describe what the procedure does. Comment text always begins with a single quote character ( ‘ ) so that it can be easily identified. Comments provide useful information to whoever is reading the code; I’m sure you’ll find your own comments helpful if you ever need to update the code at a later date.
• Line 3 uses the Dim statement to declare an array containing three numbers as the double-precision floating-point type. These numbers will be used to specify the x-, y-, and z-coordinates to be used in positioning the text in 3D inside the Model Space window. Using an array has the advantage of being able to refer to all three numbers using the same name and an index value, as shown in lines 3 to 5.
• Lines 4 to 6 assign values to the three numbers in the TextPosition array. In line 6, the interpreter program automatically replaces the string 0.0 with 0#, so don’t think you’ve made a typo.
• Line 7 calls the AddText method of the ModelSpace collection to add a Text object to this collection, with the Text object’s properties assigned to the values of the three arguments specified. The first argument is the text string to be displayed, followed by its position in the Model tab, and then by the height required for the text. If you want to experiment, try changing "Hello" into a string of your choice. (We’ll go through an example together in the section “Updating Your DrawText Macro.”)
• Line 8 ends the DrawText macro.
Now that you’ve gone to all the trouble of typing your code, it’s always best to save your macro before you try to run it—just in case it causes AutoCAD to stop responding and you have to stop running it. You wouldn’t want to start at the beginning again!


