The aims of this topic are:
1. To introduce the construction of 2D drawing in the 2D Drafting & Annotation workspace.
2. The drawing of outlines using the Line, Circle and Polyline tools from the Home/Draw panel.
3. Drawing to snap points.
4. Drawing to absolute coordinate points.
5. Drawing to relative coordinate points.
6. Drawing using the ‘tracking’ method.
7. The use of the Erase, Undo and Redo tools.
The 2D Drafting & Annotation workspace
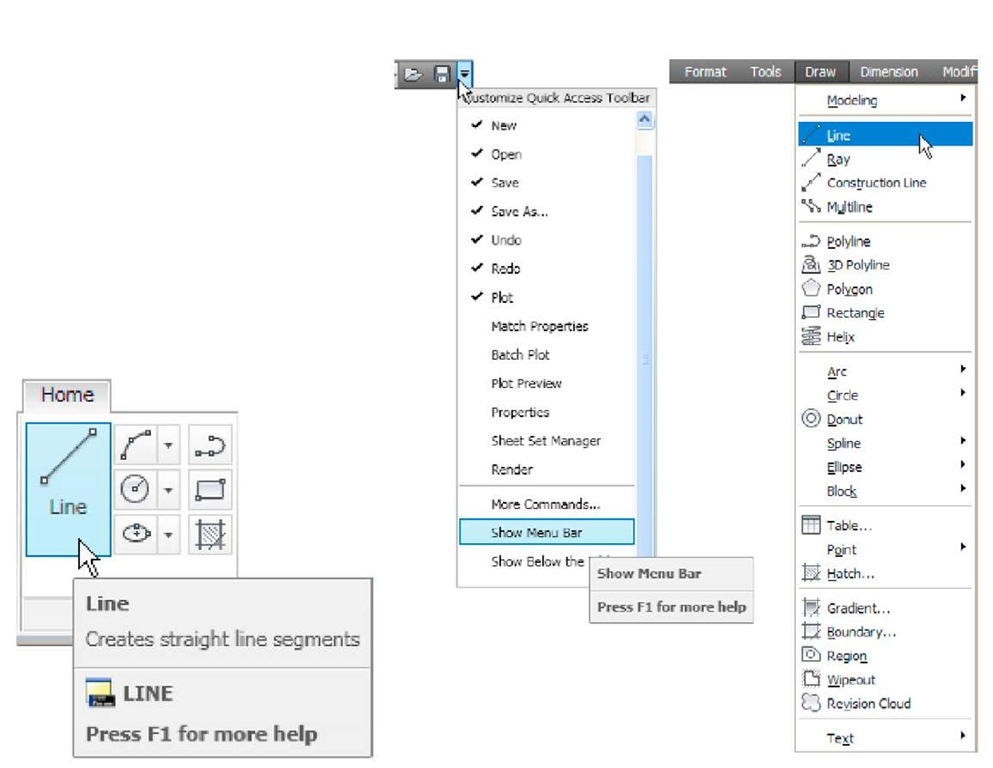
Illustrations throughout this topic will be shown as working in the 2D Drafting & Annotation workspace. In this workspace the Home/Draw panel is at the left-hand end of the Ribbon, and Draw tools can be selected from the panel as indicated by a click on the Line tool (Fig. 2.1). In this topic all examples will show tools as selected from the Home/Draw panel. However, methods of construction will be the same if the reader wishes to work by calling tools from the Draw drop-down menu. In order to bring drop-down menus on screen, first click the small arrow button on the right-hand end of the Quick Access toolbar, then click Show Menu Bar in the menu which appears. Menu titles appear above the Ribbon. Click Draw in this menu bar. From the drop-down menu which appears tools from the Draw list in the menu can be selected. Fig. 2.2 shows the Line tool being selected.
Fig. 2.1 The Line tool from the Home/Draw Fig. 2.2 Selecting the Line tool in the 2D Drafting & Annotation workspace Panel with its tooltip
Drawing with the Line tool
First example – Line tool (Fig. 1.3)
1. Open AutoCAD. The drawing area will show the settings of the acadiso.dwt template – Limits set to 420,297, Grid set to 10, Snap set to 5 and Units set to 0.
2. Left-click on the Line tool in the Home/Draw panel (Fig. 2.1), or click Line in the Draw drop-down menu (Fig. 2.2), or enter line or l at the command line.
Notes
a. The tooltip which appears when the tool icon is clicked in the Draw panel.
b. The prompt Command:_line Specify first point which appears in the command window at the command line (Fig. 2.3).
Fig. 2.3 The prompt appearing at the command line in the Command palette when Line is ‘called’
3. Make sure Snap is on by either pressing the F9 key or the Snap Mode button in the status bar. <Snap on> will show in the command palette.
4. Move the mouse around the drawing area. The cursors pick box will jump from point to point at 5 unit intervals. The position of the pick box will show as coordinate numbers in the status bar (left-hand end).
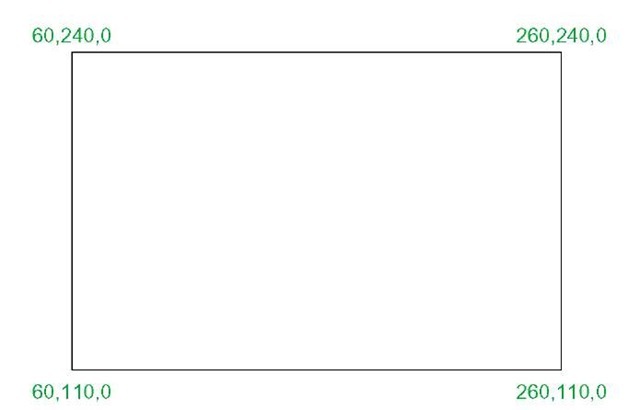
5. Move the mouse until the coordinate numbers show 60,240,0 and press the pick button of the mouse (left-click).
6. Move the mouse until the coordinate numbers show 260,240,0 and left-click.
7. Move the mouse until the coordinate numbers show 260,110,0 and left-click.
8. Move the mouse until the coordinate numbers show 60,110,0 and left-click.
9. Move the mouse until the coordinate numbers show 60,240,0 and left-click. Then press the Return button of the mouse (right-click).
The line rectangle Fig. 2.4 appears in the drawing area.
Fig. 2.4 First example – Line tool
Second example – Line tool (Fig. 2.6)
1. Clear the drawing from the screen with a click on the Close button of the AutoCAD drawing area. Make sure it is not the AutoCAD 2011 window button.
2. The warning window Fig. 2.5 appears in the centre of the screen. Click its No button.
Fig. 2.5 The AutoCAD warning window
3. Left-click New. button in the File drop-down menu and from the Select template dialog which appears double-click on acadiso.dwt.
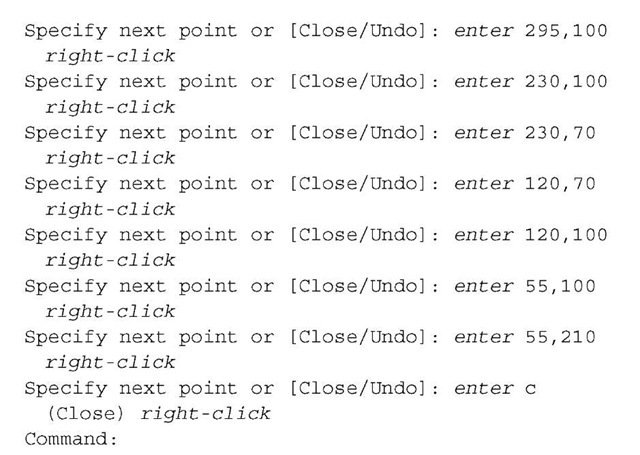
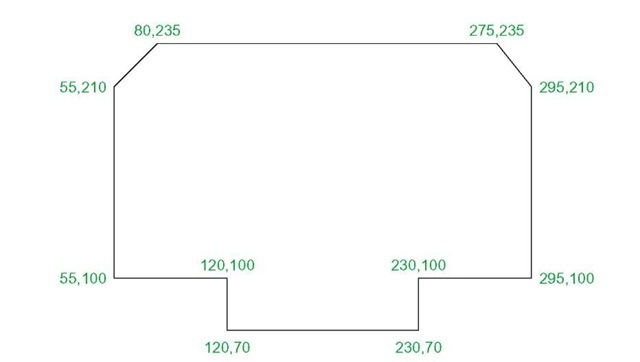
4. Left-click on the Line tool icon and enter figures as follows at each prompt of the command line sequence:
The result is as shown in Fig. 2.6.
Fig. 2.6 Second example – Line tool
Third example – Line tool (Fig. 2.7)
1. Close the drawing and open a new acadiso.dwt window.
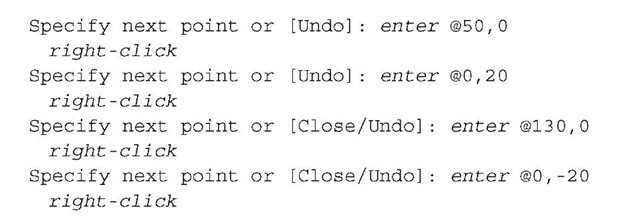
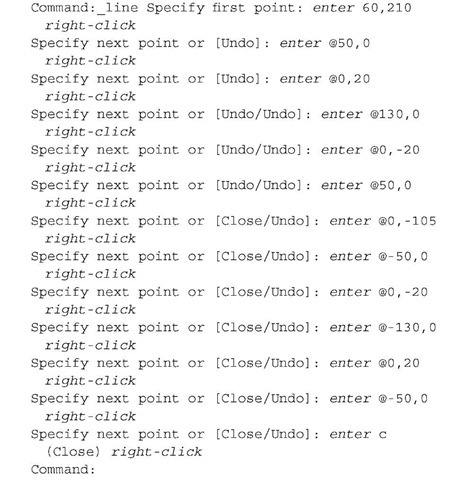
2. Left-click on the Line tool icon and enter figures as follows at each prompt of the command line sequence:
Third example – Line tool (Fig. 2.7)
1. Close the drawing and open a new acadiso.dwt window.
2. Left-click on the Line tool icon and enter figures as follows at each prompt of the command line sequence:
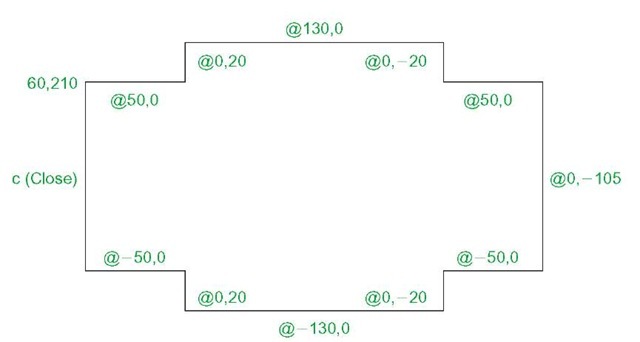
The result is as shown in Fig. 2.7.
Fig. 2.7 Third example – Line tool
Notes
1. The figures typed at the keyboard determining the corners of the outlines in the above examples are two-dimensional (2D) x,y coordinate points. When working in 2D, coordinates are expressed in terms of two numbers separated by a comma.
2. Coordinate points can be shown in positive or negative numbers.
3. The method of constructing an outline as shown in the first two examples above is known as the absolute coordinate entry method, where the x,y coordinates of each corner of the outlines are entered at the command line as required.
4. The method of constructing an outline as in the third example is known as the relative coordinate entry method – coordinate points are entered relative to the previous entry. In relative coordinate entry, the @ symbol is entered before each set of coordinates with the following rules in mind:
+ve x entry is to the right.
—ve x entry is to the left.
+ve y entry is upwards.
—ve y entry is downwards.
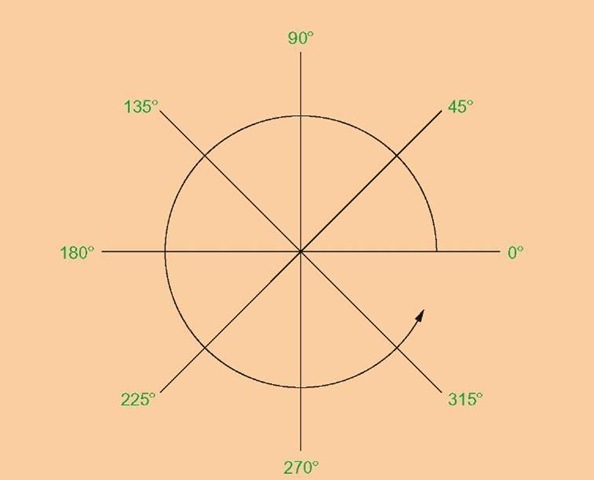
5. The next example (the fourth) shows how lines at angles can be drawn taking advantage of the relative coordinate entry method. Angles in AutoCAD are measured in 360 degrees in a counterclockwise (anticlockwise) direction (Fig. 2.8). The < symbol precedes the angle.
Fig. 2.8 The counterclockwise direction of measuring angles in AutoCAD
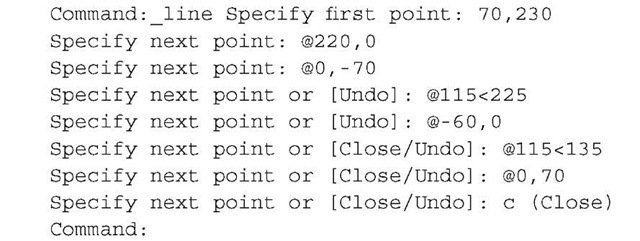
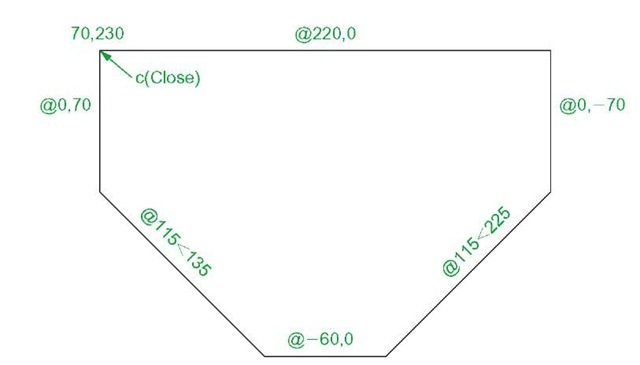
Fourth example – Line tool (Fig. 2.9)
1. Close the drawing and open a new acadiso.dwt window.
2. Left-click on the Line tool icon and enter figures as follows at each prompt of the command line sequence:
The result is as shown in Fig. 2.9.
Fig. 2.9 Fourth example – Line tool
Fifth example – Line tool (Fig. 2.10)
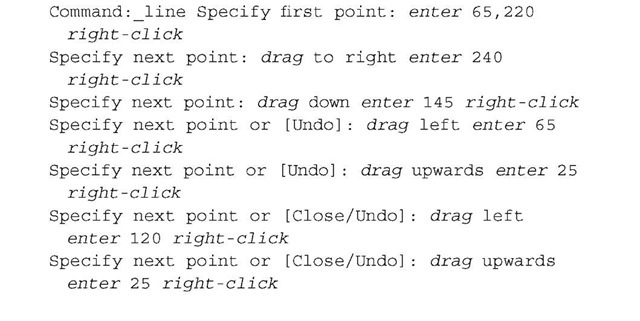
Another method of constructing accurate drawings is by using a method known as tracking. When Line is in use, as each Specify next point: appears at the command line, a rubber-banded line appears from the last point entered. Drag the rubber-band line in any direction and enter a number at the keyboard, followed by a right-click. The line is drawn in the dragged direction of a length in units equal to the entered number.
In this example because all lines are drawn in vertical or horizontal directions, either press the F8 key or click the ORTHO button in the status bar which will only allow drawing horizontally or vertically.
1. Close the drawing and open a new acadiso.dwt window.
2. Left-click on the Line tool icon and enter figures as follows at each prompt of the command line sequence:
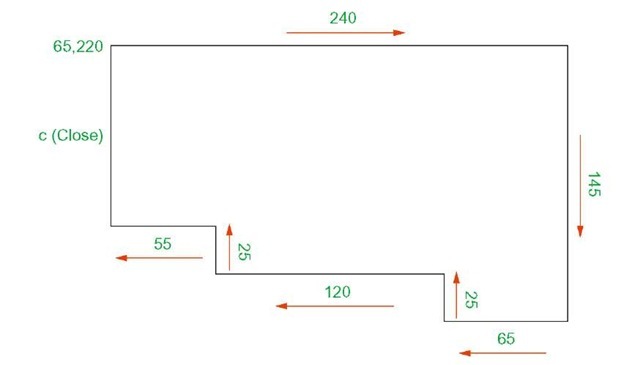
The result is as shown in Fig. 2.10.
Fig. 2.10 Fifth example – Line tool
