Even if you’re a member of the AAA or CAA, there’s always a chance that you’ll find yourself stuck with a flat tire on a remote road with no telephone in sight. On these occasions, all traffic generally vanishes, leaving you helpless unless you know how to change a tire yourself. Everyone should have a general idea of what’s involved:
1. Secure the vehicle so that it won’t roll.
2. Jack up the vehicle, following the instructions in the preceding section, “The Safe Way to Use a Jack.”
3. Remove the old tire.
4. Put on the new tire.
5. Put away the jacking stuff and the old tire.
6. Drive happily into the sunset.
But the job gets sticky in a couple of places. Unless you’re properly equipped, you can find yourself out of luck and in for a long wait for help to come along. The following sections explain in detail, and in order, how to change a tire. To make sure that you have the tools you need, read the section called “More Things to Carry in Your Car” in Chapter 2, and then stock up.
If you own a luxury car with an air suspension, you need to turn the system off before jacking up your car. Vehicles with air suspensions have an on/off switch located in the trunk area.

Removing a hubcap
If you have an older car that still has hubcaps (instead of the wheel covers on more recent models), the first task in changing a tire — after you pull to the side of the road and finish banging the heel of your hand against the steering wheel in frustration — is to remove the hubcap of the injured tire. The following steps tell you how:
1. Use a screwdriver or the flat end of a lug wrench (see Figure 2-20 in Chapter 2) to pry off the hubcap.
Just insert the point of the tool where the edge of the cap meets the wheel, and apply a little leverage (see Figure 1-3). The cap should pop off. You may have to do this in a couple of places; it’s like prying the lid off a can of paint.
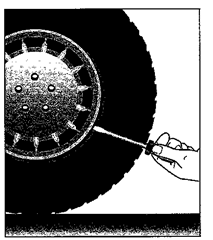
Figure 1-3:
You can use a screwdriver to pry a hubcap loose.
2. Lay the cap on its back so that you can put the lug nuts into it to keep them from rolling away and heading for the nearest sewer.
After you remove the hubcap, the next task is to loosen the lug nuts.
Loosening the tug nuts
Lug nuts are those big nuts that hold the wheel in place. Most garages retighten them with a power tool, and unless you’ve done the job yourself by hand, they’re going to be pretty hard to loosen. (Take my advice in Chapter 2 and buy a cross-shaft lug wrench. Figure 2-20 shows what one looks like.)
Before you begin, you have to ascertain whether the lug nuts on the wheel you’re working on are right-hand threaded or left-hand threaded. This isn’t a “left-handed hammer” joke; the threads determine which way you turn the wrench. The lug nuts on the right side of a vehicle are always right-hand threaded, but the nuts on the left side may be left-hand threaded. Look at the lug nuts on your car; in the center of the lugs you should see an R, an L, or no letter at all:
A lug with an R or with no letter is right-threaded. Turn it counterclockwise to loosen it.
A lugs with an L is left-threaded. Turn it clockwise to loosen it.
For the purposes of sanity, I’ll assume that your car has right-threaded nuts. If you have a couple of lefties, just turn the wrench in the opposite direction as you follow these steps to loosen the lug nuts:
1. Find the end of the wrench that fits the lug nuts on your car, and fit it onto the first nut.

Always work on lug nuts in rotation. That way, you won’t forget to tighten any later.
2. Apply all your weight to the bar on the left.
This starts turning the nut counterclockwise, which loosens it.
If the nut has been put on with a power tool and you can’t get it started, a piece of hollow pipe, fitted over that left-hand arm of the cross-shaft wrench, magically adds enough leverage to start the nut easily (see Figure 1-4). After you replace the nut yourself, this aid is no longer necessary. But remember, the longer the arms on your lug wrench, the more leverage you have.
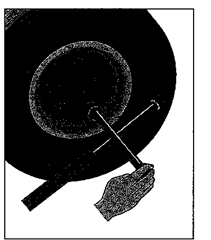
Figure 1-4:
A hollow pipe and a cross-shaft wrench can loosen the tightest lug nuts.

Don’t remove the lug nuts completely; just get them loose enough so that you can remove them by hand after raising the car (a feat explained in an earlier section of this chapter, “The Safe Way to Use a Jack”).
Changing the tire
Once the vehicle is safely jacked up and the lug nuts are off, follow these instructions to change the tire:
1. Remove the spare from the trunk if you haven’t already done so.
Actually, it’s easier to do this before jacking up the car. If you haven’t checked your spare recently, keep your fingers crossed that it has enough air in it! Roll the spare to the scene of the action.
2. Grasp the flat tire with both hands and pull it toward you.
The flat tire sits on the exposed bolts that the lug nuts screwed onto. As you pull the flat off, it should slide along the bolts until, suddenly, it

clears the end of the bolts and you find yourself supporting its full weight. Tires are heavy, and you’ll be quite happy to lower it to the ground (if you haven’t already dropped it).
3. Roll the flat along the ground to the trunk to get it out of the way.
4. Lift the spare onto the lug bolts.
Because tires are heavy, you may have a little trouble lifting the spare into place — especially if you’re not accustomed to lifting heavy things. If this is the case, a bit of ingenuity may help; see the sidebar “A little ingenuity goes a long way” for details.
5. After you have the spare tire in place, replace the lug nuts and tighten them by hand.
Give each lug nut a jolt with the wrench to get it firmly into place, but wait until the car is on the ground before you really try to tighten the lug nuts.
Remember, right-hand threaded nuts tighten in a clockwise direction; lefties go the other way.
6. Replace the jack, lift the car off the jack stands (If you used them), and lower the car to the ground.
7. Once the car is resting on the ground, use the lug wrench to tighten the lugs as much as you can.
You don’t want to twist them off the bolts or ruin the threads, but you don’t want the wheel to fall off, either. Use your hollow pipe if you’re worried about tightening them sufficiently, or step on the right-hand arm of the lug wrench after the nut is tight.
8. If your car has hubcaps, place the hubcap against the wheel and whack it into place with the heel of your hand.
Cushion your-hand with a soft rag first so that you won’t hurt it. And don’t hit the hubcap with a wrench or hammer — you’ll dent it. Whack it a couple of times, in a couple of places, to be sure that it’s on evenly and securely. (Even secondhand hubcaps can cost from $20 to more than $100 apiece to replace.) If it’s too much of a hassle, or if you don’t have the time to replace the hubcap, you can take it home and install it later; it’s mostly ornamental, and you can drive for a while without it. But do replace it soon because it helps keep dust and dirt out of your brakes and bearings.
9. Put the flat in the trunk where the spare was located, and put your tools away.
Don’t forget to remove the wheel blocks, and don’t forget to have that flat fixed!


A little ingenuity goes a long way
I have a friend who is a female of small stature. When her first flat occurred while she was on the road, she found herself in the infuriating position of being unable to lift the heavy spare onto the lug bolts—while a macho truck driver, whose offers of help she had spurned, enjoyed the scene. (He’d decided to hang around and watch the “little lady” change her tire;) After hearing her sad tale, I suggested that she cut an old wooden crate into a ramp that could getthe tire high enough to fit onto the lug bolts and that she keep the ramp in the trunk of her car for
future tire changes. She did it and is now gloriously independent once more. Here’s how to v make a ramp like hers:
1. Measure the distance from the ground (A) to the bottom of the tire (B) while the car is jacked up.
2. Nail some boards together to form a ramp of the same height as AB in Step 1.
3. Now you can roll your wheel up the ramp and just push it into place without having to lift it yourself!
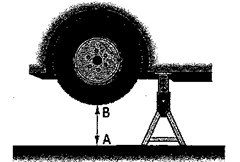
1. Measure the distance from the ground (A) to the bottom of the tire (B) while the car is jacked up.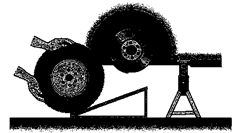
3. Now you can roll your wheel up the ramp and just push it into place without having to lift it yourself!
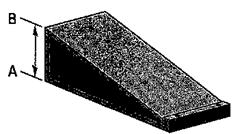
2. Nail some boards together to form a ramp of the same height as AB in Step 1.

Make sure that your flat tire is repaired properly. Instead of dismounting the tire from the wheel rim, inspecting it, fixing it, and remounting it, some service stations simply plug the flat from the outside. Several states now outlaw this procedure, known as “outside-in” repair. To avoid this, tell the service facility that you don’t want the tire plugged from the outside; you want the flat corrected the proper way.

If you get caught in the middle of nowhere with a flat tire and are unable to change it yourself, you can get rolling again without riding on the flat. If you carry an aerosol can of nonflammable inflator/sealant, simply screw the nozzle of the can onto the valve stem of the flat tire, and it fills the tire with air and some sort of goo that temporarily seals the puncture. Because there’s still some question about how permanent this fix is and its ultimate effects on your tire, use inflator/sealant only in emergencies, get to a service station as soon as possible, and ask the attendant to try to remove the stuff before fixing the tire.

You may not find the prospect of changing your own flat tires especially alluring. But isn’t it nice to know that if a crisis does occur and you’re not near a phone or don’t have the time to wait for the auto club, you can get yourself rolling again in less than 15 minutes?
If reading these instructions makes you think that you’d rather languish by the side of the road for hours than undertake changing a tire yourself, you might consider outfitting your vehicle with run-Rat tires. Although these tires will set you back a couple of hundred bucks, you’ll be able to drive with a flat to the nearest service station without ruining the tire.
To make the job easier should an emergency arise, you may want to go out and check the lug nuts on your car now. If they’re on hideously tight, loosen them with a lug wrench and a pipe and retighten them to a reasonable tension so that you won’t have to struggle at the side of the road.
