Connecting to a Remote Site
Now that you have completed the remote site information and tested your connection, you can interact with the remote server. The remote site folder on the Web server for your Web site must be established before a connection can be made. This folder, called the remote site root, generally is created automatically by the Web server administrator of the hosting company or by your instructor. The naming convention generally is determined by the hosting company.
This topic uses the last name and first initial of the author for the user name of the remote site folder. Naming conventions other than your last and first name may be used on the Web server to which you are connecting. Your instructor will supply you with this information. If all information is correct, connecting to the remote site is accomplished easily through the Files panel.
To Connect to a Remote Site
The following steps illustrate how to connect to the remote server and display your remote site folder.
1
• Click the ‘Expand to show local and remote sites’ button to expand the Site pane and show both a right (Local Files) and left (Remote Server) pane (Figure C-8).
Figure C-8
2
• Verify that the root folder for the site is selected in the Local Files pane.
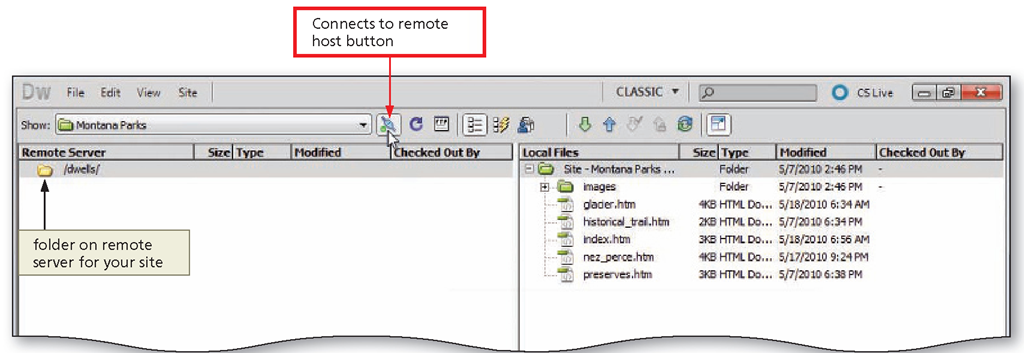
• Click the ‘Connects to remote host’ button in the Remote Server pane to make the connection (Figure C-9).
Figure C-9
Uploading Files to a Remote Server
Uploading is the process of transferring your files from your computer to the remote server. Downloading is the process of transferring files from the remote server to your computer. Dreamweaver uses the term put for uploading and get for downloading.
To Upload Files to a Remote Server
The following steps illustrate how to upload your files to the remote server.
1
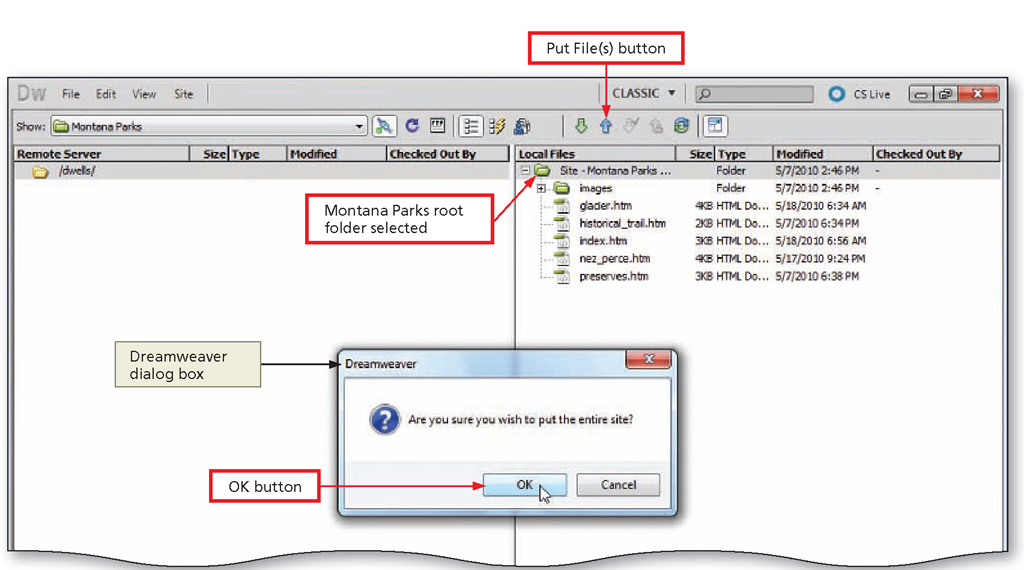
• If necessary, click the Montana Parks root folder in the Local Files panel to select the root folder.
• Click the Put File(s) button on the Files panel toolbar to begin uploading the files and display a Dreamweaver dialog box.
• Point to the OK button in the Dreamweaver dialog box (Figure C-10).
Figure C-10
2
• Click the OK button to begin uploading the files and to display a dialog box that shows progress information (Figure C-11).
Figure C-11
3
• Quit Dreamweaver.
Remote Site Maintenance and Site Synchronization
Now that your Web site is on a Web server, you will want to continue to maintain the site. When you are connected to the remote site, you can apply many of the same commands to a folder or file on the remote site as you do to a folder or file on the local site. You can create and delete folders; cut, copy, delete, duplicate, paste, and rename files; and so on. These commands are available through the context menu.
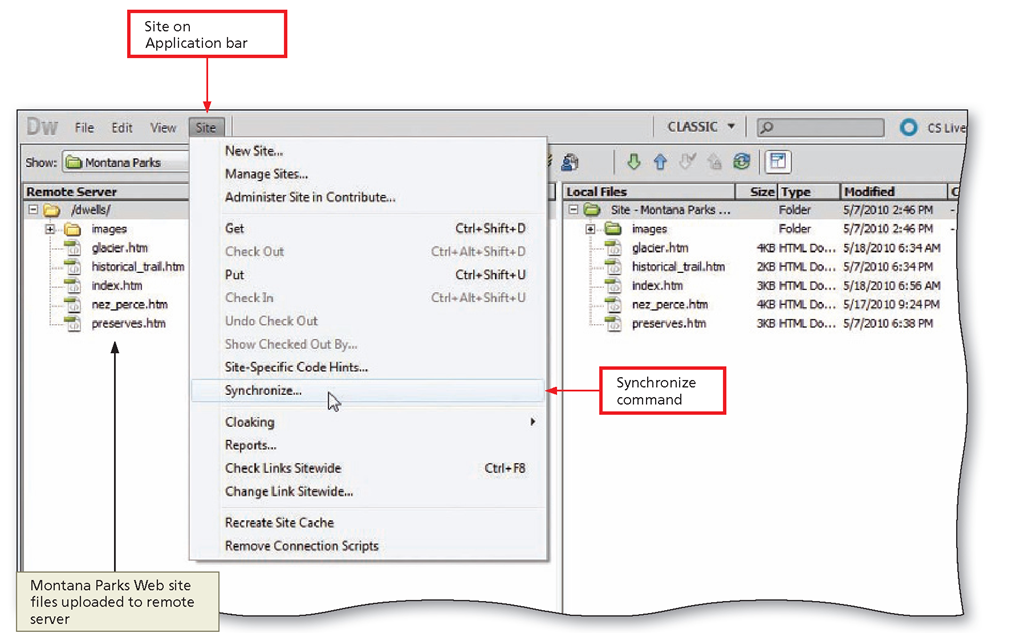
To mirror the local site on the remote site, Dreamweaver provides a synchronization feature. Synchronizing is the process of transferring files between the local and remote sites so both sites have an identical set of the most recent files. You can choose to synchronize the entire Web site or select only specific files. You also can specify Direction. Within Direction, you have three options: upload the newer files from the local site to the remote site (put), download newer files from the remote site to the local site (get), or upload and download files to and from the remote and local sites. Once you specify a direction, Dreamweaver automatically synchronizes files. If the files are already in sync, Dreamweaver lets you know that no synchronization is necessary. To access the Synchronize command, you first connect to the remote server and then select Synchronize on the Site menu (Figure C-12).
Figure C-12
To save the verification information to a local file, click the Save Log button at the completion of the synchronization process. Another feature within Dreamweaver allows you to verify which files are newer on the local site or the remote site; choose the Remote view by selecting Select Newer Local or Select Newer on Remote Server commands. These options are available through the Files panel Edit menu when the Remote site panel is displayed.
Defining and Uploading the Bryan’s Computer Repair Services Web Site to a Remote Server
Instructions: Perform the following tasks to define and upload the Bryan’s Computer Repair Services Web site to a remote server.
1. If necessary, start Dreamweaver. Click Site on the Application bar, click Manage Sites, and then click Computer Repair Services. Click the Edit button to display the Site Setup dialog box.
2. In the Site Setup dialog box, click the Servers category, fill in the information provided by your instructor, and then test the connection. Click the Save button to close the Site Setup dialog box, and then click the Done button to close the Manage Sites dialog box.
3. Click the ‘Expand to show local and remote sites’ button on the Files panel toolbar and then click the ‘Connects to remote host button.’
4. Click the local file root folder and then click the Put File(s) button on the Site panel toolbar to upload your Web site. Click the OK button in response to the “Are you sure you wish to put the entire site?” dialog box.
5. Review your files to verify that they were uploaded. The files on the remote server may be displayed in a different order from those on the local site.
6. Click the ‘Disconnects from remote host’ button on the Files panel toolbar. Click the ‘Collapse to show only local or remote site’ button on the Files panel toolbar to display the local site and the Document window.
Defining and Uploading the Baskets by Carole Web Site to a Remote Server
Instructions: Perform the following tasks to define and upload the Baskets by Carole Web site to a remote server.
1. If necessary, start Dreamweaver. Click Site on the Application bar, click Manage Sites, and then click Gift Basket Designs. Click the Edit button to display the Site Setup dialog box.
2. In the Site Setup dialog box, click the Servers category. Fill in the information provided by your instructor, and then test the connection. Click the Save button to close the Site Setup dialog box, and then click the Done button to close the Manage Sites dialog box.
3. Click the ‘Expand to show local and remote sites’ button on the Files panel toolbar and then click the ‘Connects to remote host’ button.
4. Click the local file root folder and then click the Put File(s) button on the Files panel toolbar to upload your Web site. Click the OK button in response to the “Are you sure you wish to put the entire site?” dialog box.
5. Review your files to verify that they were uploaded. The files on the remote server may be displayed in a different order from those on the local site.
6. Click the ‘Disconnects from remote host’ button. Click the ‘Collapse to show only local or remote site’ button on the Files panel toolbar to display the local site and the Document window.
Defining and Uploading the Credit Protection Web Site to a Remote Server
Instructions: Perform the following tasks to define and upload the Credit Protection Web site to a remote server.
1. If necessary, start Dreamweaver. Click Site on the Application bar, click Manage Sites, and then click Credit Protection. Click the Edit button to display the Site Setup dialog box.
2. In the Site Setup dialog box, click the Servers category. Fill in the information provided by your instructor, and then test the connection. Click the Save button to close the Site Setup dialog box, and then click the Done button to close the Manage Sites dialog box.
3. Click the ‘Expand to show local and remote sites’ button on the Files panel toolbar and then click the ‘Connects to remote host’ button.
4. Click the local file root folder and then click the Put File(s) button on the Files panel toolbar to upload your Web site. Click the OK button in response to the “Are you sure you wish to put the entire site?” dialog box.
5. Review your files to verify that they were uploaded. The files on the remote server may display in a different order from those on the local site.
6. Click the ‘Disconnects from remote host’ button. Click the ‘Collapse to show only local or remote site’ button on the Files panel toolbar to display the local site and the Document window.


