Publishing to a Remote Site
In creating the projects in this topic, you have added Web pages to the local site, which resides on your computer’s hard drive, a network drive, a USB drive, or possibly a CD-RW.
To prepare a Web site and make it available for others to view requires that you publish your site by uploading it to a Web server for public access. A Web server is an Internet- or intranet-connected computer that delivers the Web pages to online visitors. Dreamweaver includes built-in support that enables you to connect and transfer your local site to a Web server. Publishing to a Web server requires that you have access to a Web server. Your instructor will provide you with the location, user name, and password information for the Web server on which you will publish your site.
After you establish access to a Web server, you need a remote site folder. The remote folder will reside on the Web server and contain your Web site files. Generally, the remote folder is defined by the Web server administrator or your instructor. The name of the local root folder in this example is the author’s first and last name. Most likely, the name of your remote folder also will be your last name and first initial or your first and last name. You upload your local site to the remote folder on the Web server. The remote site connection information must be defined in Dreamweaver through the Site Setup dialog box. You display the Site Setup dialog box, select the Servers category, and then enter the remote site information. Dreamweaver provides five different protocols for connecting to a remote site. These methods are as follows:
• FTP (File Transfer Protocol): This protocol is used on the Internet for sending and receiving files. It is the most widely used method for uploading and downloading pages to and from a Web server.
• Local/Network: This option is used when the Web server is located on a local area network (LAN) or a company, school, or other organization intranet. Files on LANs generally are available for internal viewing only.
• RDS (Remote Development Services) and WebDAV: These protocols are systems that permit users to edit and manage files collaboratively on remote Web servers.
Most likely you will use the FTP option to upload your Web site to a remote server.
Defining a Remote Site
You define the remote site by changing some of the settings in the Site Setup dialog box. To allow you to create a remote site using FTP, your instructor will supply you with the following information:
• Server name: The name of the server where your remote site will be stored
• FTP address: The Web address for the remote host of your Web server
• Username: Your user name
• Password: The FTP password to authenticate and access your account
• Web URL: The URL for your remote site
To Define a Remote Site
Assume for the following steps that you are defining a remote site for the Montana Parks Web site.
1
• If necessary, start Dreamweaver, select the Montana Parks site, and then open the index.htm page.
• Click Site on the Application bar and then click Manage Sites to open the Manage Sites dialog box.
• If necessary, click Montana Parks to select the Montana Parks Web site (Figure C-1).
Figure C-1
2
• Click the Edit button to open the Site Setup for Montana Parks dialog box (Figure C-2).
Figure C-2
3
• Click Servers to display an area for entering the server settings in the Site Setup for Montana Parks dialog box (Figure C-3).
Figure C-3
4
• Click the plus button to display the Basic server information (Figure C-4).
Figure C-4
5
• If necessary, click the Connect using button, and then click FTP to select FTP as the protocol for connecting to a remote site.
• In the appropriate text boxes, enter the Server Name, FTP Address, Username, Password, and Web URL information provided by your instructor (Figure C-5).
Figure C-5
6
• Click the Test button to test the connection and to display the Dreamweaver dialog box (Figure C-6).
Figure C-6
Q&A
What should I do if a Q security dialog box is displayed?
If a Windows Security Alert dialog box is displayed, click the Allow access button.
What should I do if my connection is not successful?
If your connection is not successful, review your text box entries and make any necessary corrections. If all entries are correct, check with your instructor. The Site Setup dialog box should look similar to Figure C-5.
7
• Click the OK button to close the Dreamweaver dialog box.
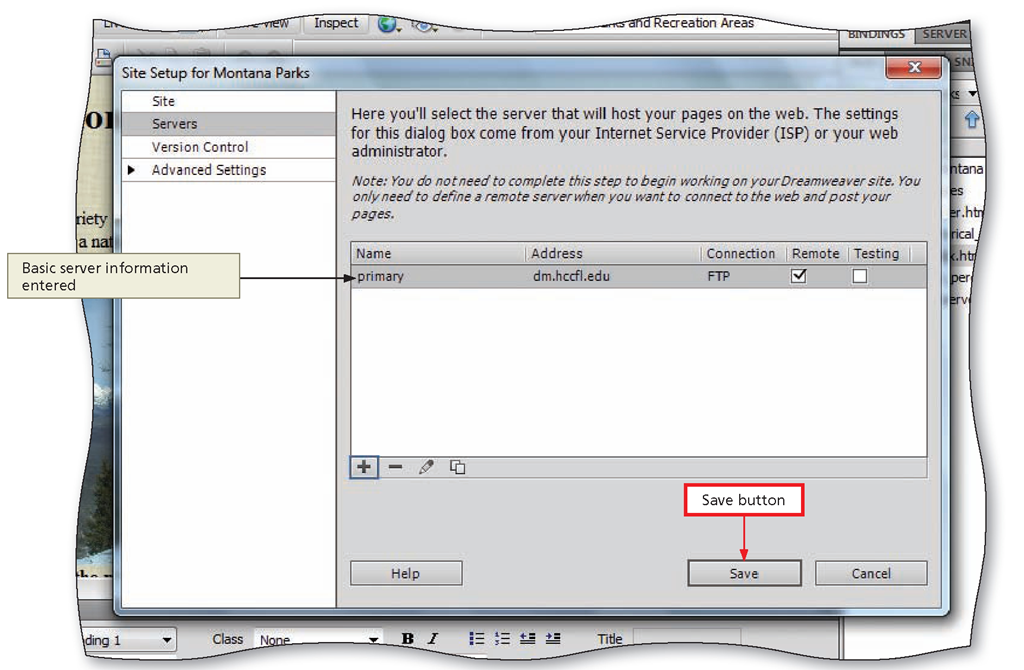
• Click the Save button in the Site Setup for Montana Parks dialog box to save the Basic server information and display the server information (Figure C-7).
Figure C-7
8
• Click the Save button to save the site information for the Montana Parks Web site.
• Click the Done button to close the Manage Sites dialog box.


