Bold Formatting
Other text formatting options are applying bold or italic styles to text. Bold characters are displayed somewhat thicker and darker than those that are not bold. Italic characters slant to the right. The Property inspector contains buttons for both bold and italic font styles. To bold text within Dreamweaver is a simple procedure. If you have used word-processing software, you are familiar with this process. You italicize text in a similar way.
To Bold Text
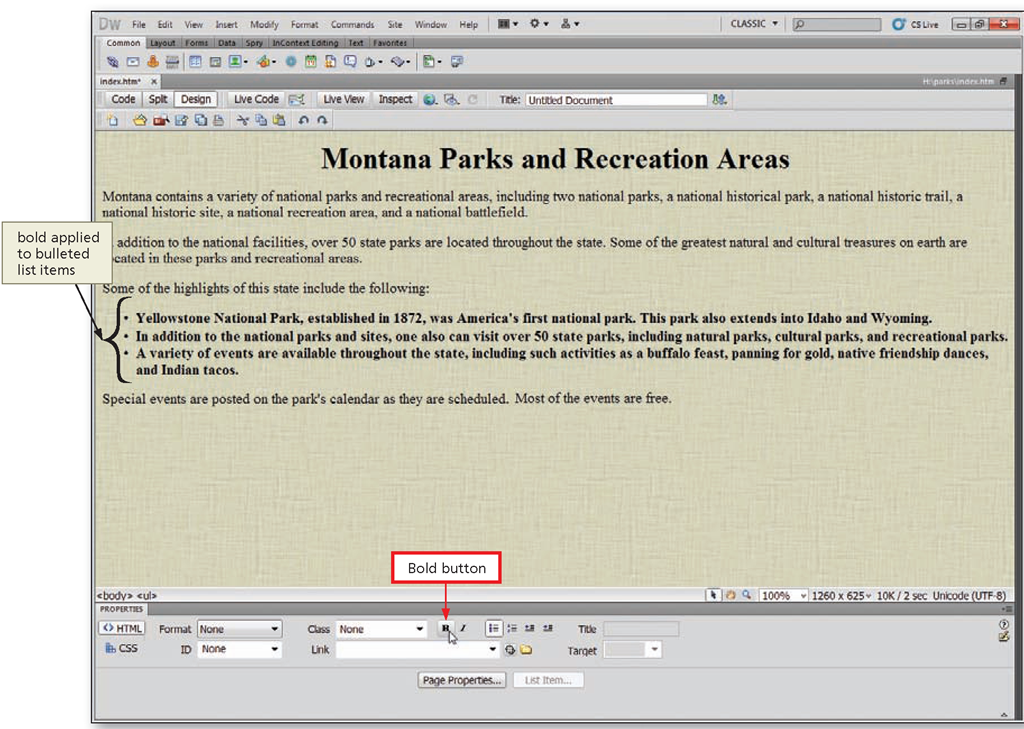
The following steps illustrate how to emphasize the bulleted items by applying bold formatting.
Figure 1-54
• If necessary, drag to select all of the lines of the bulleted points to prepare for formatting the lines.
• Click the Bold button in the Property inspector to bold the selected text.
• Click anywhere in the Document window to deselect the text (Figure 1-54).
Q&A
What other types Q of formatting can I apply to text?
To select fonts, apply underlining, colors, and other attributes to text, you can use the commands and submenus on the Format menu.
Understanding Line Breaks
When you added bullets to the items list earlier in this topic, the blank line between each item was removed. Removing the blank line between items is a result of how Dreamweaver interprets the HTML code. A blank line between the bulleted items, however, will provide better spacing and readability when viewing the Web page in a browser. You can add blank lines in several ways. You might assume that pressing the ENTER key at the end of each line would be the quickest way to accomplish this. Pressing the ENTER key, however, adds another bullet. The easiest way to accomplish the task of adding blank lines is to insert line breaks. Recall that the line break starts a new single line without inserting a blank line between lines of text. Inserting two line breaks, however, adds a single blank line.
Dreamweaver provides a Line Break command through the Insert HTML Special Characters submenu. It is easier, however, to use the shift+enter keyboard shortcut.
To Add a Line Break
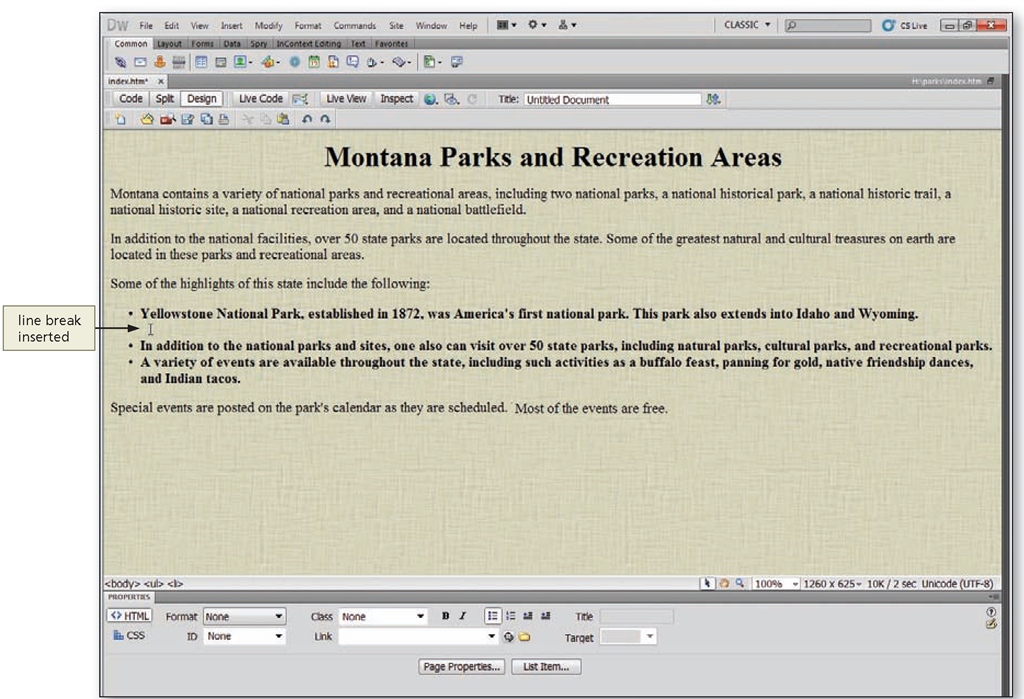
The following steps show how to add a blank line between each of the bulleted items.
Figure 1-55
1
• Click at the end of the first bulleted item to prepare for adding a line break.
2
• Press the SHIFT+ENTER keys two times to insert a blank line (Figure
1-55).
Figure 1-56
3
• Press the SHIFT+ENTER keys two times at the end of the second bulleted item to insert a blank line between the second and third bulleted list items (Figure 1-56).
To Add Your Name and Date
When creating a Web document, it is a good idea to add your name and date to the document. Insert a single line break between your name and the date. The following steps show how to add this information to the page.
Figure 1-57
1
• If necessary, scroll down to display the closing paragraph.
• Click at the end of the closing paragraph to prepare for adding your name to the document.
• If necessary, press the ENTER key to move the insertion point to the next paragraph (Figure 1-57).
Figure 1-58
2
• Type your name and then press the SHIFT+ENTER keys to insert a line break.
• Type the current date and then press the ENTER key to add your name and the current date to the Web page (Figure 1-58).
Plan Ahead
Review final tasks.
Before completing a Web page, perform the following tasks to make sure it is ready for others to view:
• Give your Web page a title.
• Consider enhancements such as special characters to make the page look professional.
• Check the spelling and proofread the text.
• Preview the page in one or more browsers to see how it looks when others open it.
Web Page Titles
A Web page title helps Web site visitors keep track of what they are viewing as they browse. It is important to give your Web page an appropriate title. When visitors to your Web page create bookmarks or add the Web page to their Favorites lists, they use the title for reference. If you do not title a page, the browser displays the page in the browser window, Favorites lists, and history lists as Untitled Document. Because many search engines use the Web page title, use a descriptive and meaningful name. Giving the document a file name when saving it is not the same as giving the page a title.
To Change the Web Page Title
The following steps show how to change the name of the Web page to Montana Parks and Recreation Areas.
Figure 1-59
1
• Drag to select the text. Untitled Document, in the Title text box on the Document toolbar to prepare for replacing the text.
• Type Montana Parks and Recreation Areas in the Title text box and then press the ENTER key to enter a descriptive title for the Web page (Figure 1-59).
2
• Click the Save button on the Standard toolbar to save the document.
Other Web Page Enhancements
Dreamweaver includes many other features that you can use to enhance your Web page. Some of the more commonly used enhancements that you may want to apply to a Web page are special characters.
Special Characters
Sometimes you need to enter special characters such as quotation marks and ampersands as well as non-keyboard symbols like trademarks and registrations into a Web page. To have the browser display these special characters requires a character code. Character entities, another name for character codes, allow a browser to show special characters. HTML represents these codes by a name (named entity) or a number (numbered entity). Both types of entities begin with an ampersand (&) and end with a semicolon (;). HTML includes entity names for characters such as the copyright symbol (©), the ampersand (&), and the registered trademark symbol (®). Some entities, such as the left and right quotation marks, include a number sign (#) and a numeric equivalent (such as —). Table 1-2 lists the HTML entities that Dreamweaver supports. To add an entity to your Web page, you click Insert on the Application bar, point to HTML, point to Special Characters on the HTML submenu, and then click the entity name on the Special Characters submenu.
Table 1-2 Character Entities
|
Name |
Description |
HTML Tags and Character Entities |
|
Nonbreaking Space |
Places a nonbreaking space at the insertion point |
&#nbsp; |
|
Left Quote |
Places an opening, curved double quotation mark at the insertion point |
$#147; |
|
Right Quote |
Places a closing, curved double quotation mark at the insertion point |
$#148; |
|
Em Dash |
Places an em dash at the insertion point |
$#151; |
|
Pound |
Places a pound (currency) symbol at the insertion point |
£ |
|
Euro |
Places a euro (currency) symbol at the insertion point |
€ |
|
Yen |
Places a yen (currency) symbol at the insertion point |
¥ |
|
Copyright |
Places a copyright symbol at the insertion point |
© |
|
Registered Trademark |
Places a registered trademark symbol at the insertion point |
® |
|
Trademark |
Places a trademark symbol at the insertion point |
™ |
|
Other Characters |
Provides a set of special characters from which to select |
Other ASCII characters |
Check Spelling
After you create a Web page, you should check it visually for spelling errors. In addition, you can use Dreamweaver’s Check Spelling command to identify possible misspellings. The Check Spelling command ignores HTML tags and attributes. Recall from the Introduction that attributes are additional information contained within an HTML tag.


