To Copy Data Files to the Local Web Site
You can copy the data files one by one through the Dreamweaver Files panel as you progress through this topic. Alternatively, using the Windows Computer tool, you can establish the basic framework for the parks Web site by copying all the files and images at one time. The following steps illustrate how to copy data files to the local Web site.
Figure 1-22
1
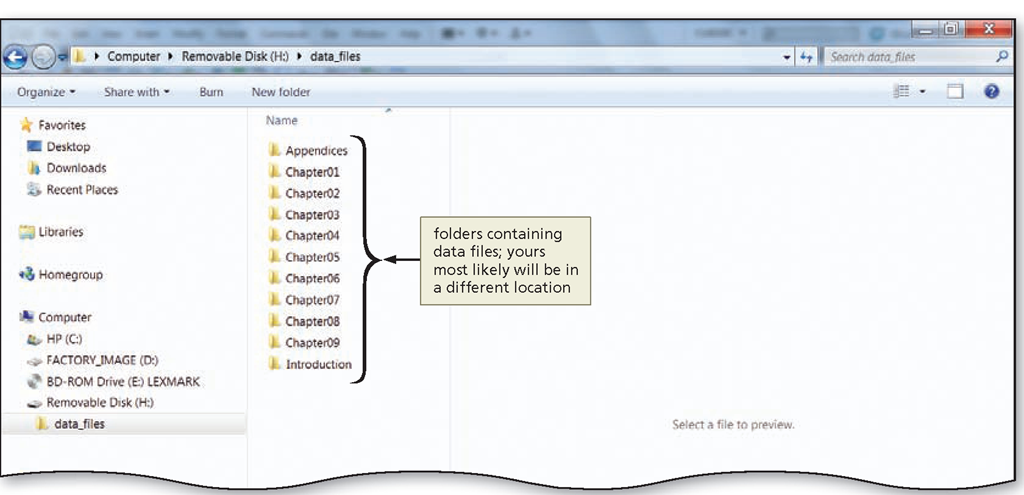
• Click the Start button on the Windows taskbar and then click Computer to display the Computer window. If necessary, right-click the background of the folder window, point to View on the context menu, and then click List.
• Navigate to the location of the data files for this topic to display the files in the Computer window (Figure 1-22).
Q&A
What if my data files are located on a different drive or folder?
In Figure 1-22, the location is Removable Disk (H:), a USB drive. Most likely your data files are stored in a different location. Your data files also could be stored in a folder with a name other than "data_files."
Figure 1-23
2
• Double-click the Chapter01 folder to open it (Figure 1-23).
Figure 1-24
3
• Double-click the parks folder to open it (Figure 1-24).
Figure 1-25
4
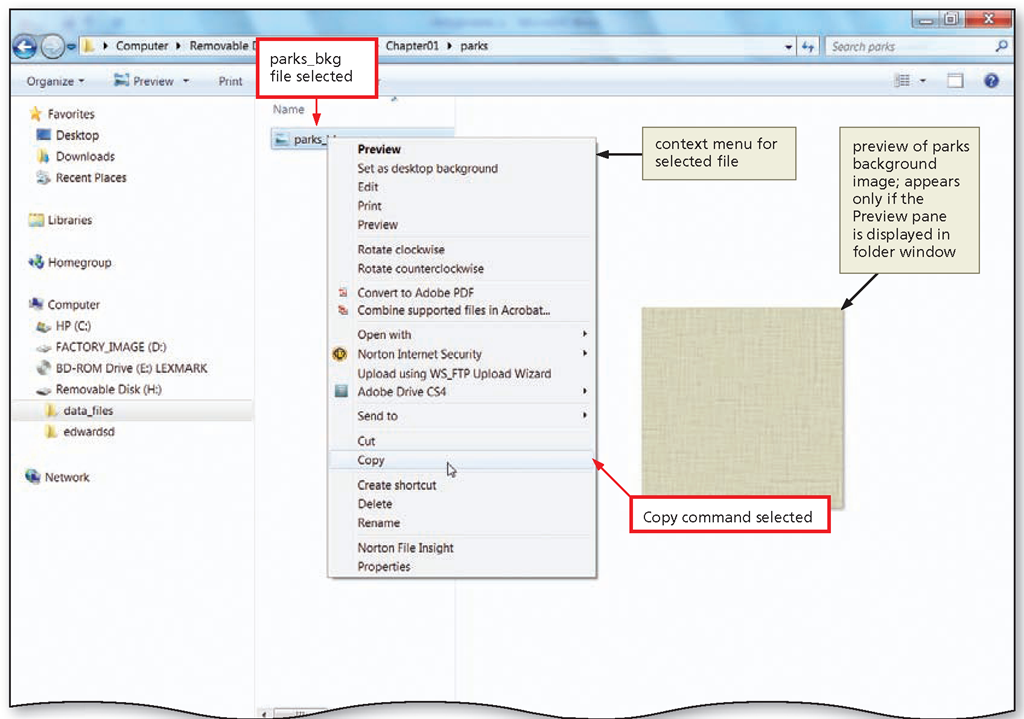
• Right-click the parks_bkg image file to display a context menu.
• Point to the Copy command on the context menu to highlight the command (Figure 1-25).
Q&A
My context menu contains different commands. Is that a problem?
No. A file’s context menu often changes depending on the programs on your computer. The Copy command, however, always appears on this menu.
Figure 1-26
5
• Click Copy and then click the Back button the number of times necessary to navigate to the Computer window.
• Navigate to the drive containing the your name folder.
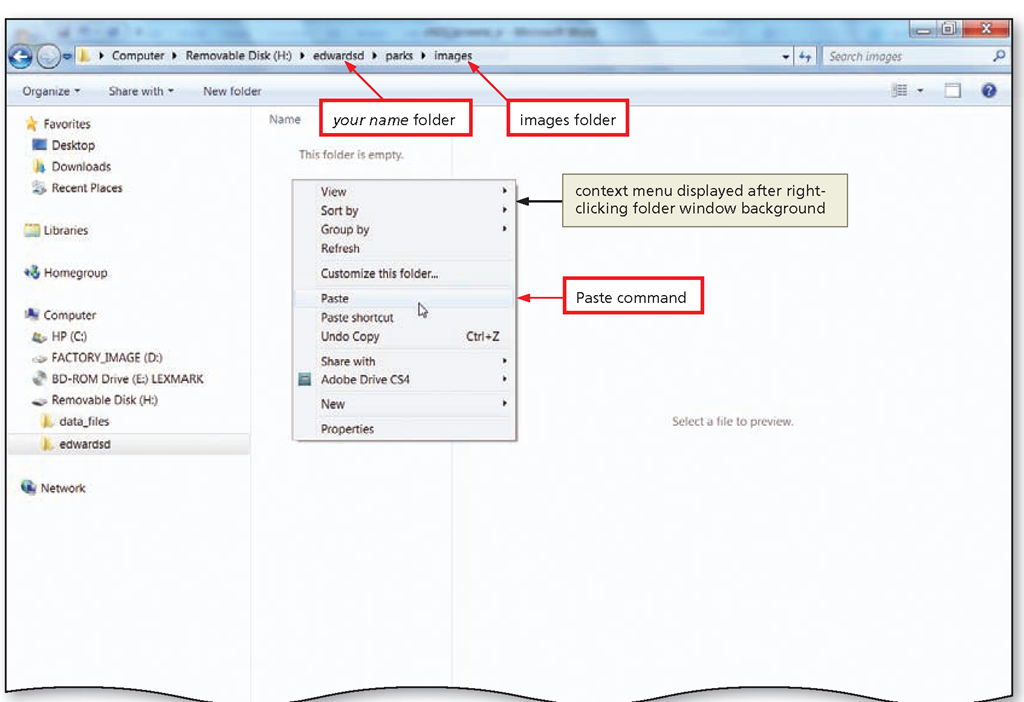
• Double-click the your name folder, double-click the parks folder, and then double-click the images folder to open the images folder for your Web site.
• Right-click anywhere in the open window to display the context menu.
• Point to the Paste command to highlight it (Figure 1-26).
Figure 1-27
6
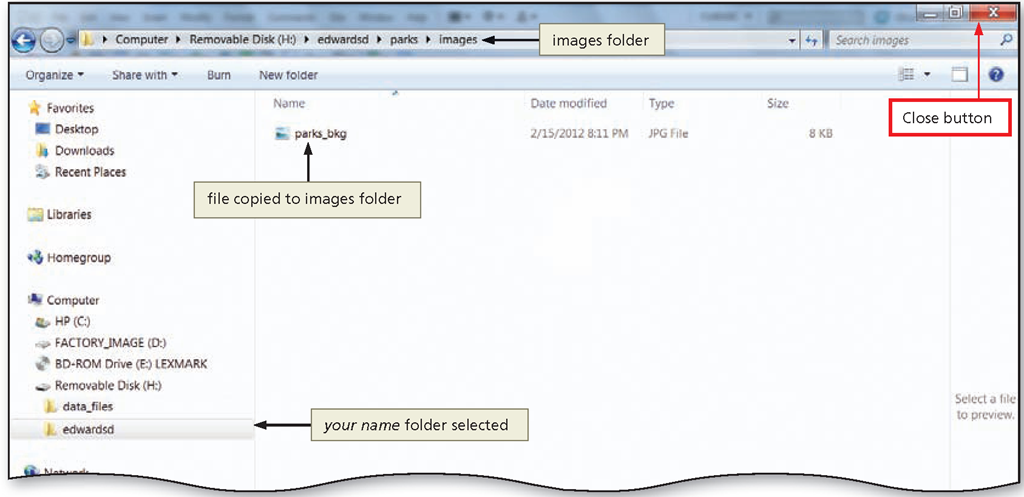
• Click the Paste command to paste the parks_bkg image into the your name\parks\images folder, which is the images folder for the Montana Parks Web site (Figure 1-27).
Figure 1-28
7
• Click the images window’s Close button to close the images folder window.
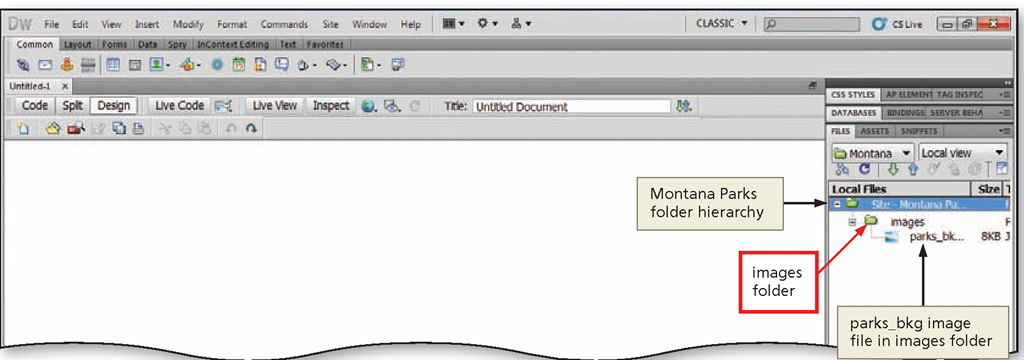
• Double-click the images folder in the Dreamweaver Files panel to open the images folder (Figure 1-28).
Removing or Editing a Web Site
On occasion, you may need to remove or edit a Web site. To remove or edit a Web site, click Site on the Application bar and then click the Manage Sites command. This displays the Manage Sites dialog box. Select the site name and then click the Remove button to remove the site. Dreamweaver displays a caution box providing you with an opportunity to cancel. Click the No button to cancel. Otherwise, click the Yes button, and Dreamweaver removes the site. Removing a site in Dreamweaver removes the settings for the site. The files and folders remain and must be deleted separately.
To edit a site, click the site name and then click the Edit button. Dreamweaver displays the Site Setup dialog box; from there, you can change any of the options you selected when you first created the site.
Preparing Your Workspace and Saving a Web Page
With the Montana Parks site defined and the data file copied to the site, the next step is to save the untitled Dreamweaver document. When you defined the site, you designated the local root folder (your name\parks). You can copy and paste files into this folder using Windows, or you can use Dreamweaver’s file management tools to copy and paste. You also can save a Dreamweaver document into this folder. Dreamweaver treats any item placed in the folder as part of the site.
When a document is saved as a Web page, the Web page also remains in the computer’s memory and is displayed in the Document window. It is a good practice to save when you first open the document and then save regularly while you are working in Dreamweaver. By doing so, you protect yourself from losing all the work you have done since the last time you saved.
Rulers
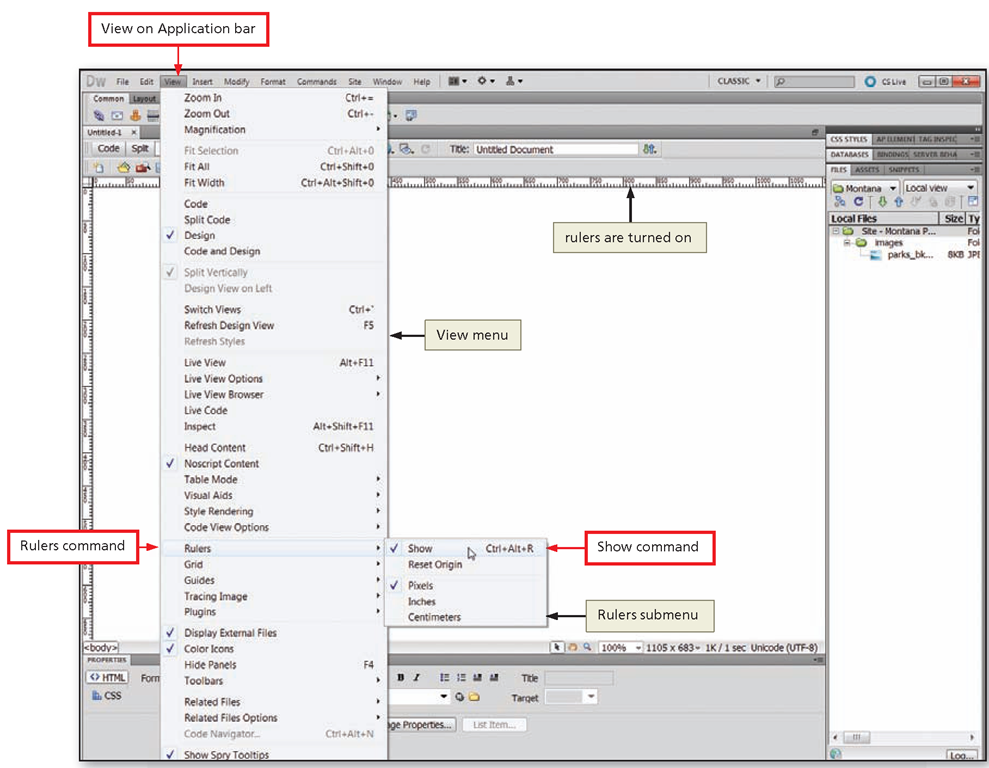
Rulers help you measure, organize, and plan your layout. They are turned off by default in the Classic workspace. When rulers are turned on, they appear on the left and top borders of the page, marked in pixels, inches, or centimeters. They especially are helpful when working with tables or layers. Rulers, however, sometimes can be distracting when first learning how to use Dreamweaver, so you will make sure they are turned off shortly.
The Index Page
The home page is the starting point for the rest of your Web site. For most Web sites, the home page is named index. This name has special significance because most Web servers recognize index.htm (or index.html) as the default home page.
Dreamweaver comes with a number of default commands. These defaults are stored in different categories in Dreamweaver’s Preferences dialog box. Dreamweaver’s default extension for new documents is .html. Although there is some debate about which extension to use — .htm or .html — most Web sites use .htm. You change the default through the Preferences dialog box. Therefore, when you save your document, Dreamweaver automatically adds the extension .htm to the file name. Documents with the .htm extension are displayed in Web browsers.
To Hide the Rulers, Change the .html Default, and Save a Document as a Web Page
The home page for your Montana Parks Web site is named index.htm. The following steps show how to prepare your workspace by turning off the rulers, if necessary, and changing the .html default extension to .htm. You then save the untitled document as index.htm in the parks local root folder. If the Rulers are not displayed in your Document window, omit Steps 1 and 2.
Figure 1-29
1
• If Rulers are turned on, click View on the Application bar, point to Rulers, and then point to Show on the Rulers submenu to highlight the command (Figure 1-29).
Q&A
What should I do if rulers are not displayed in my Document window?
Skip Steps 1 and 2 and start with Step 3 to change the default file name extension.
Figure 1-30
2
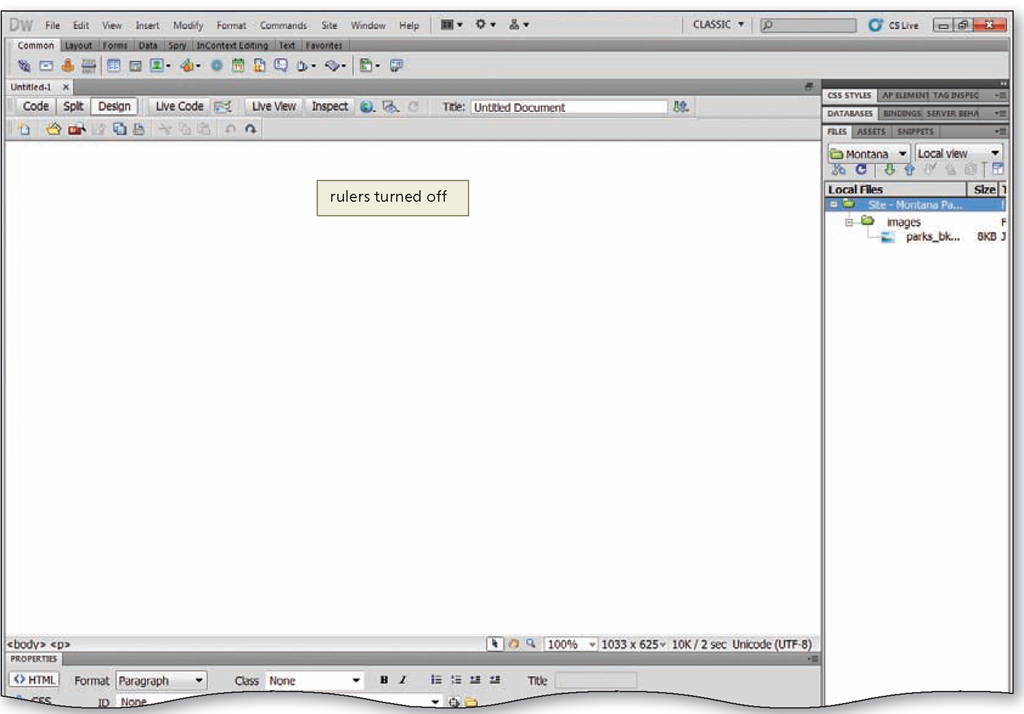
• Click Show to turn off the rulers (Figure 1-30).
Q&A
How can I display the rulers again later?
Perform Steps 1 and 2 again: click View on the Application bar, point to Rulers, and then click Show.
Figure 1-31
3
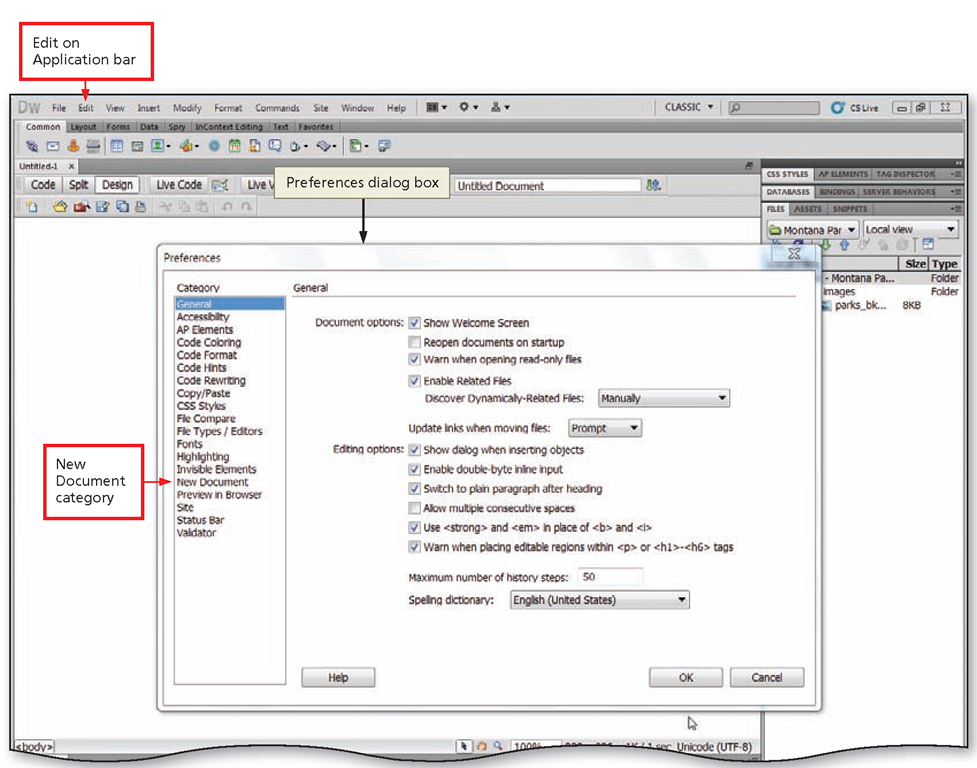
• Click Edit on the Application bar, and then click Preferences to display the Preferences dialog box (Figure 1-31).
Q&A
What if the O’ Preferences dialog box displays a category of options different from the one shown in Figure 1-31?
The Preferences dialog box displays the last category of options used on your computer. You’ll select the category for changing the default extension in the next step.
Figure 1-32
4
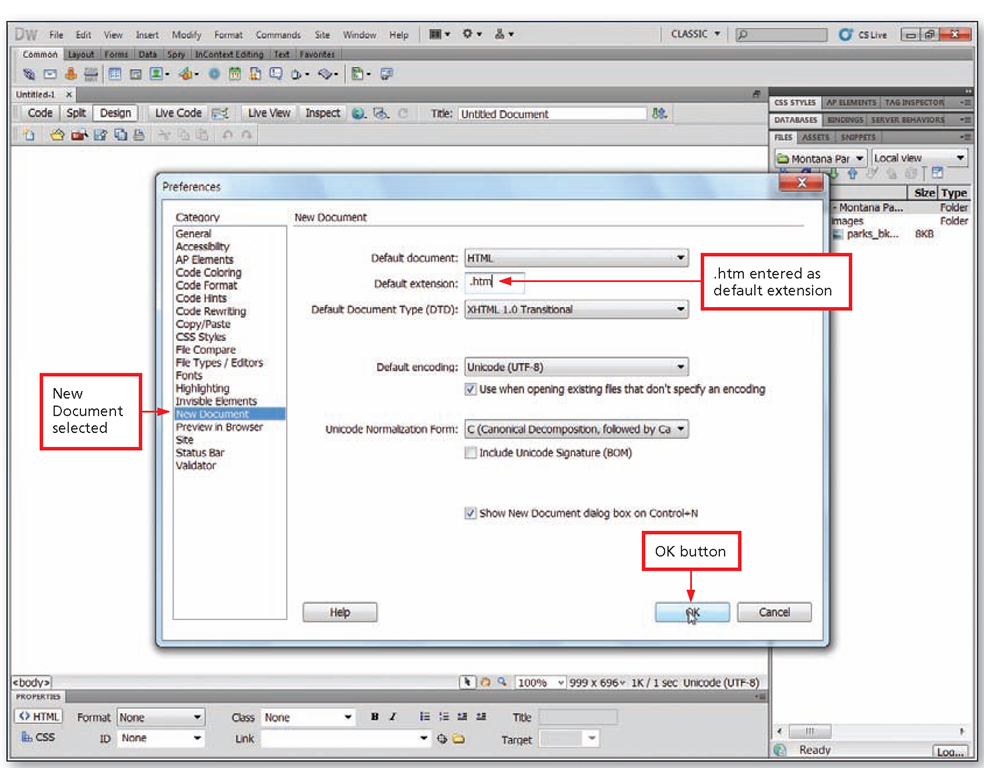
• Click the New Document category, if necessary, delete .html as the Default extension, and then type .htm to change the Default extension (Figure 1-32).
Figure 1-33
5
• Click the OK button in the Preferences dialog box to accept the setting and display the Document window.
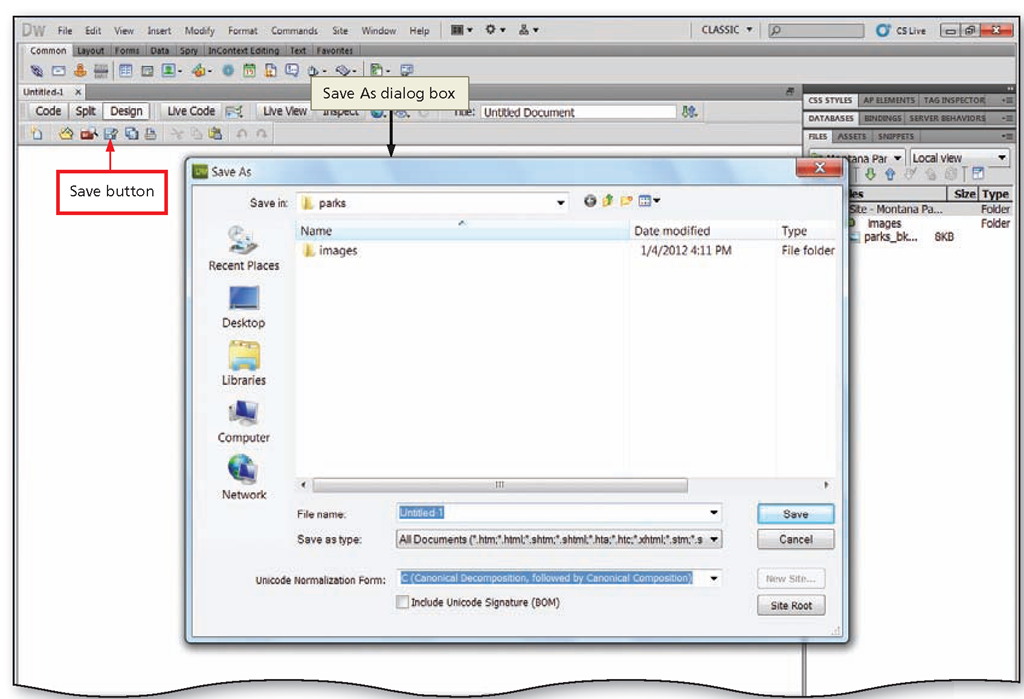
• Click the Save button on the Standard toolbar to display the Save As dialog box (Figure 1-33).
Figure 1-34
6
• Type index as the file name of the new document (Figure 1-34).
Q&A
Why is the file Q name specified in all lowercase characters?
Some Web servers are case sensitive, which means that they consider a file named "index" different from one named "Index." It’s common practice among Web designers to use only lowercase characters for the names of all Web site files, including documents and images.
Figure 1-35
7
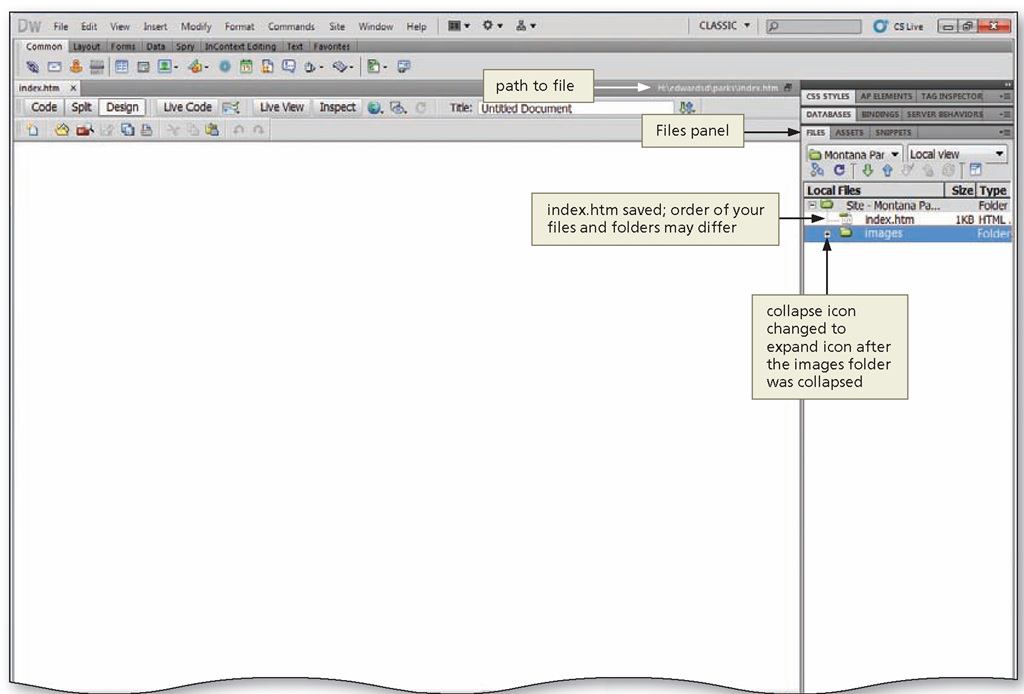
• Click the Save button to save the index. htm file in the Files panel under Local Files.
• Click the collapse icon next to the images folder to display only the images folder and the index.htm file in the Local Files list (Figure 1-35).
