Using Site Setup to Create a Local Site
You create a local site using Dreamweaver’s Site Setup dialog box. You work with two categories of settings:
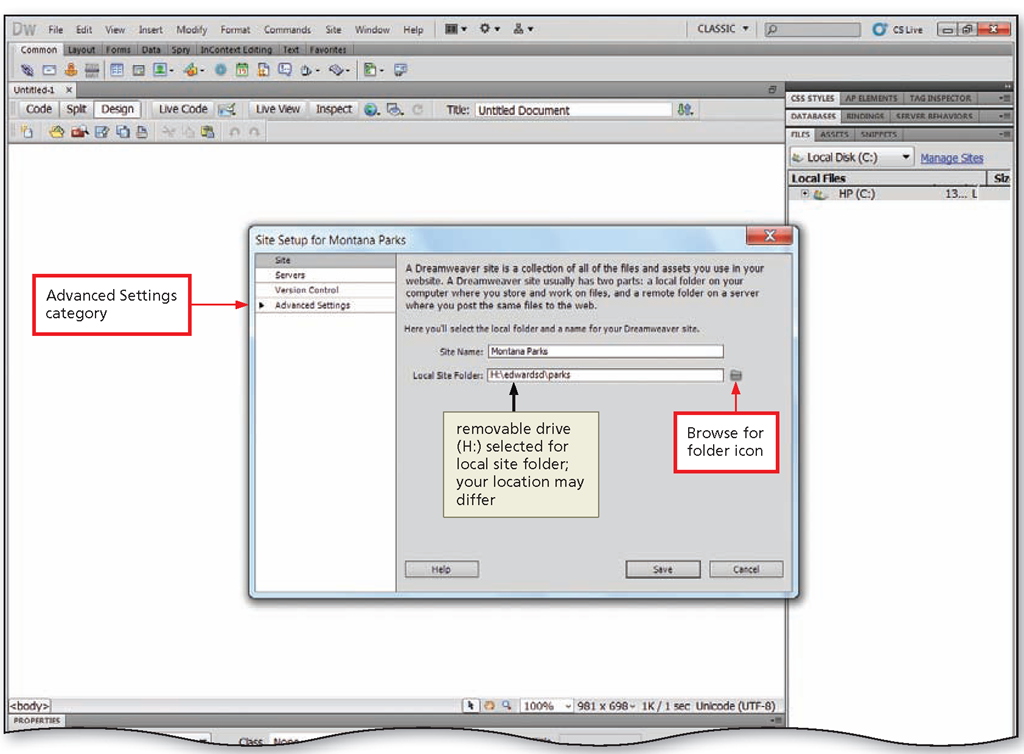
• Site category: Enter the name of your site and the path to the local site folder. For example, you will use Montana Parks as the site name and H:\edwardsd\parks as the path to the local site. You can select the location of the local site folder instead of entering its path.
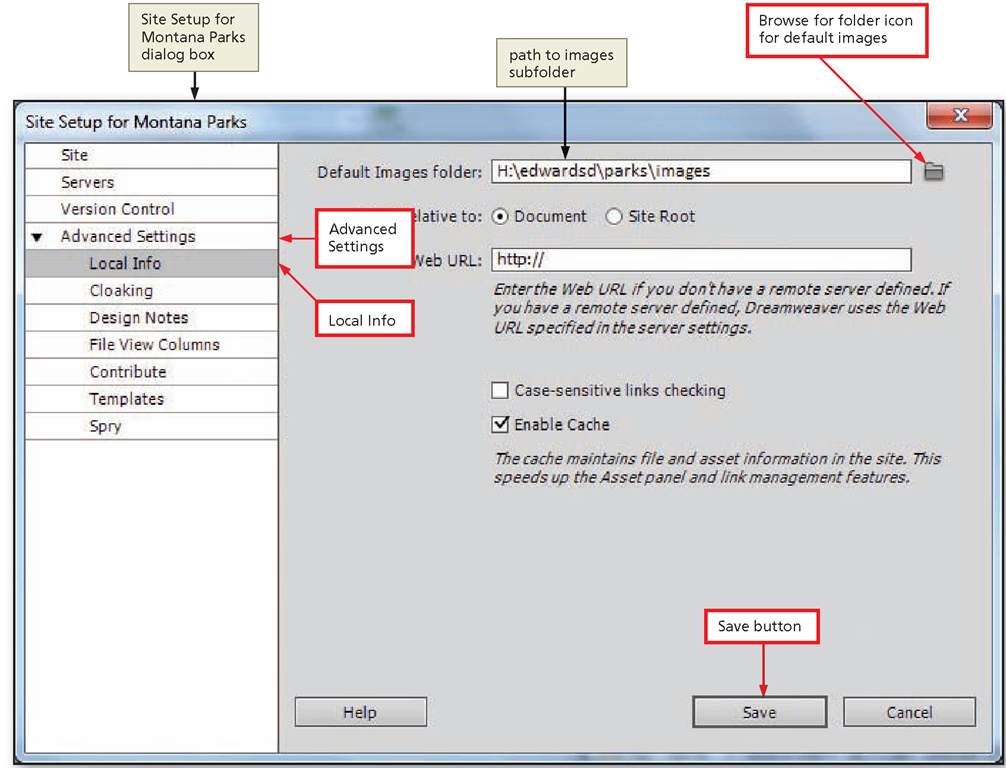
• Advanced Settings category: Enter Local Info settings, which include the path to the default images folder. For example, you will use H:\edwardsd\parks\images as the path to the folder containing the Web site images. You can select the location of the images folder instead of entering its path.
Local Info settings also include options for specifying the types of links you will create in your site (relative to the document or to the site), and entering the URL of your Web site if you are using site-relative links. You also can check links for case-sensitivity (useful if you are publishing your site on a UNIX server) and enable caching to store frequently used site data.
Note that the paths you enter to the local site folder and the images folder are included as part of the Web site. If you use removable media to store your files and move to another computer, you must recreate the local site setup on that computer.
After you have completed the site definition, the hierarchy structure is displayed in the Dreamweaver Local Files list in the Files panel. This hierarchy structure is similar to the Windows file organization. The Local Files list provides a view of the devices and folders on your computer and shows how these devices and folders are organized.
To Use Site Setup to Create a Local Web Site
You define a local site by telling Dreamweaver where you plan to store local files. Use the Site Setup dialog box and the following steps to create a local Web site. A USB drive is used for all exercises in this topic. If you are saving your sites at another location or on removable media, substitute that location for Removable Disk (H:).
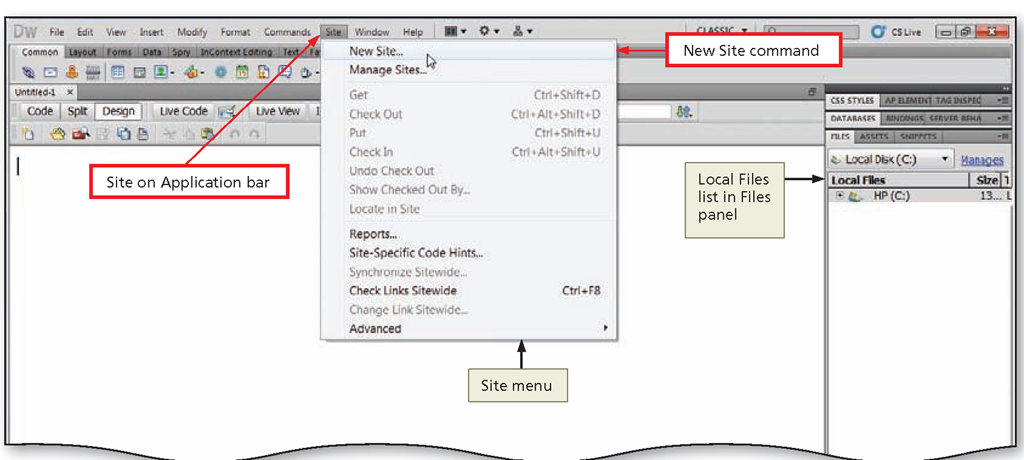
Figure 1-13
1
• Click Site on the Application bar to display the Site menu, and then point to New Site to highlight that command (Figure 1-13).
Figure 1-14
2
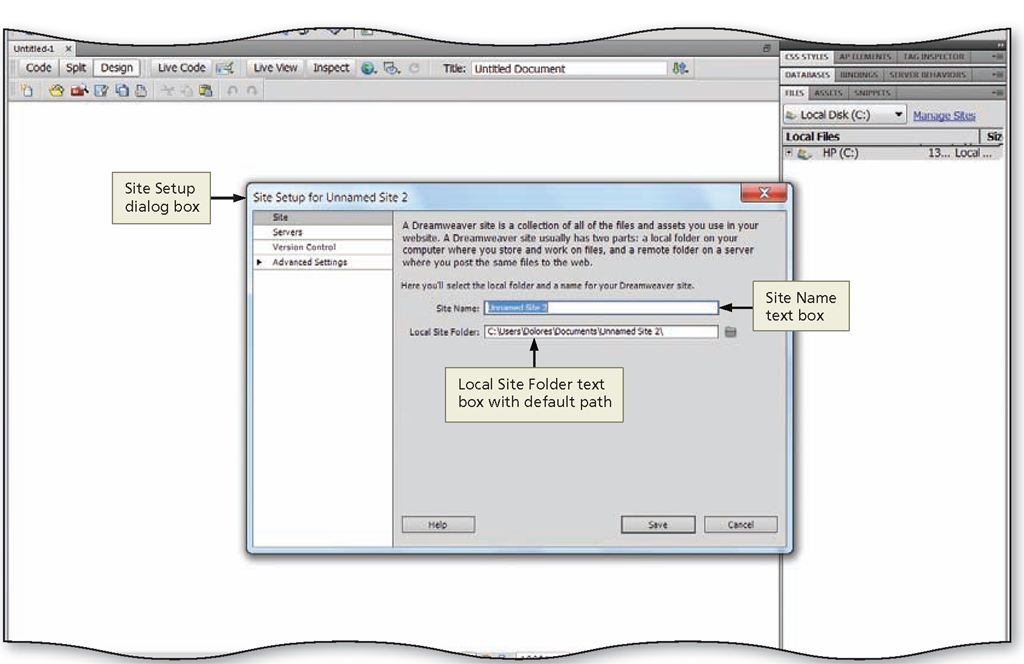
• Click New Site to display the Site Setup dialog box (Figure 1-14).
Q&A
Should the name that appears in the Site Name text box be Unnamed Site 2?
Not necessarily. Your site number may be different.
What is the difference between the Local folder and the Remote folder?
The Local folder contains information about a Web site that you create on your computer, which is the way you develop a site.
The Remote folder contains information about settings on a remote computer, such as a Web server, which is where you publish a site
Figure 1-15
3
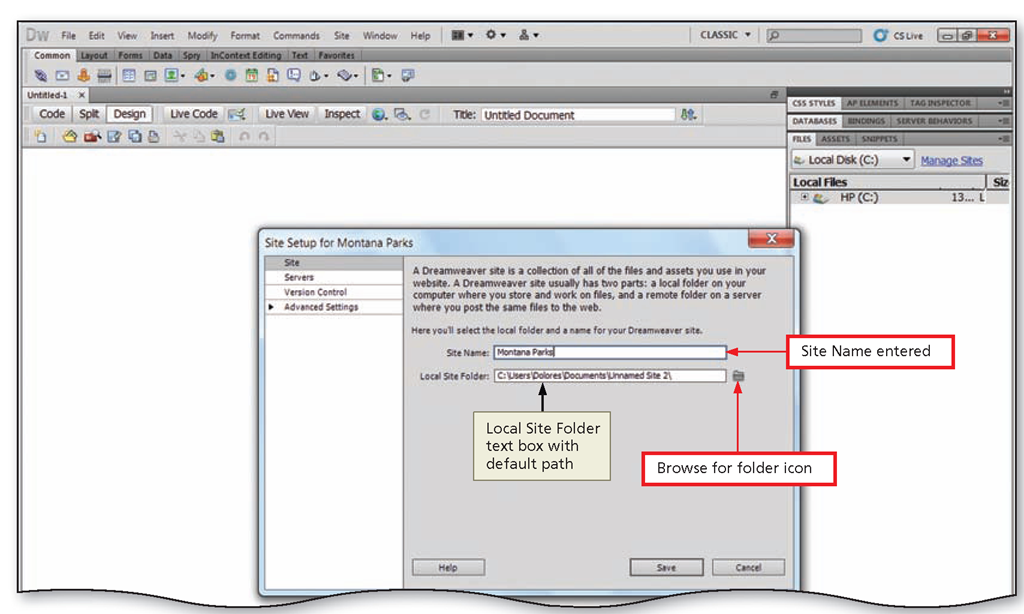
• Type Montana Parks in the Site name text box to name the site (Figure 1-15).
Figure 1-16
Q&A
Is the site name necessary?
This name is required, but it is for reference only. It is not part of the path and is not visible to viewers of your site.
4
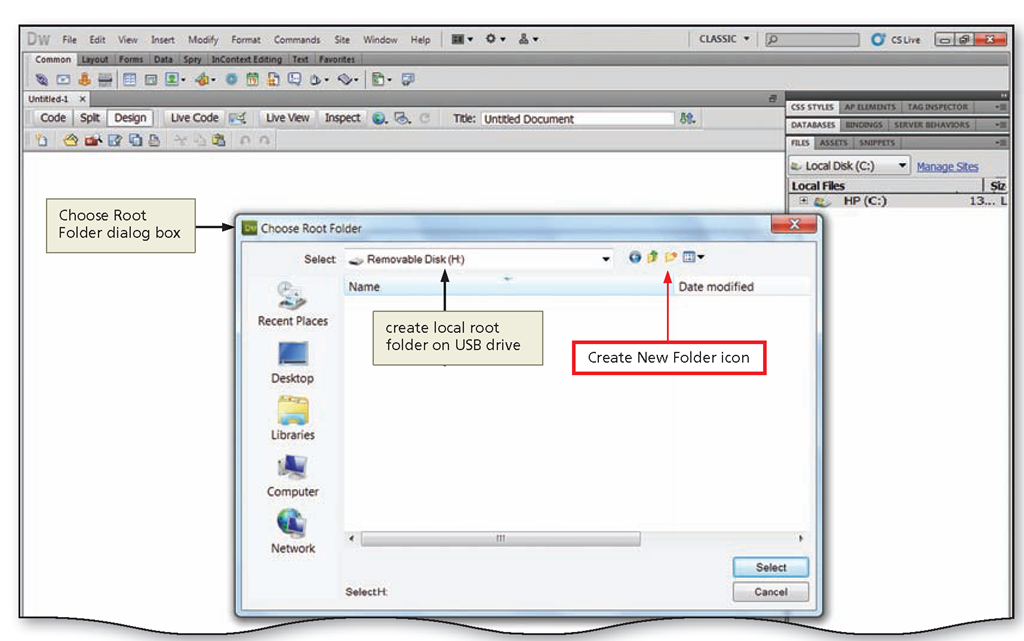
• Click the Browse for folder icon to display the Choose Root Folder dialog box.
• Navigate to where you will store your Web site files (Figure 1-16).
Q&A
On what drive should I store the Web site files?
Because most Web sites require many files, you should create the projects using a hard drive or removable drive with plenty of space — not the floppy drive (A:), if you have one. Steps in this topic assume you are creating the local site on a USB drive. Check with your instructor to verify the location and path you will use to create and save your local Web site. Other options may include a CD-RW disc or a network drive.
What if my USB flash drive has a different name or letter?
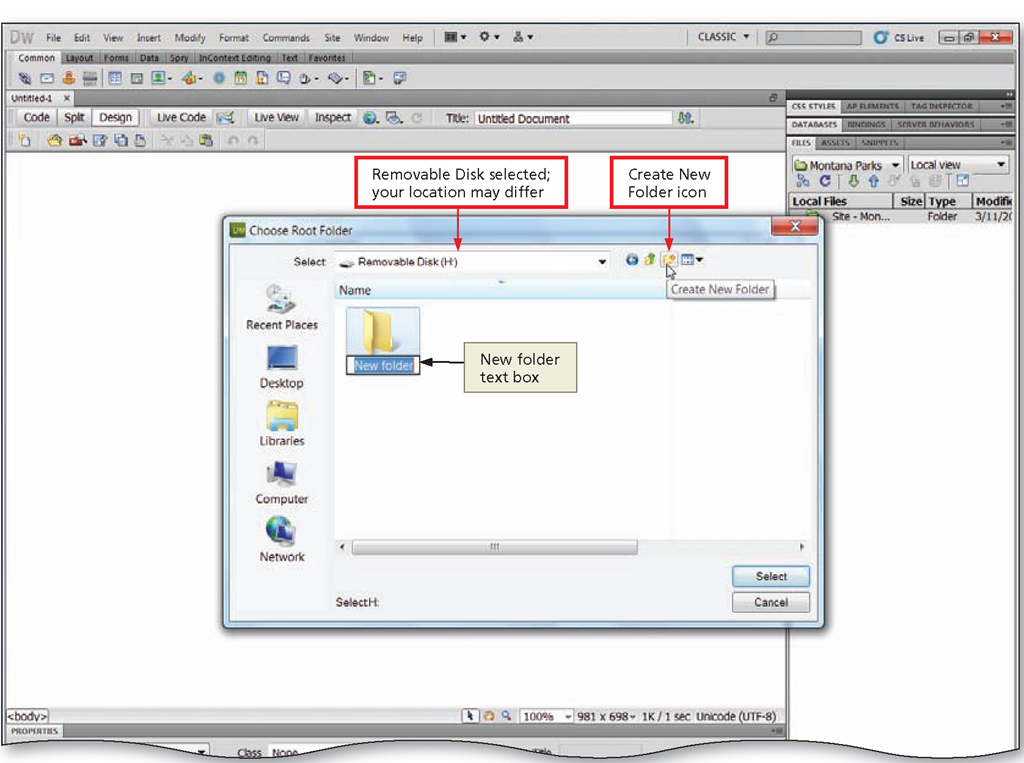
It is very likely that your USB flash drive will have a different name and drive letter from the one shown in Figure 1-16 and be connected to a different port. Verify that the device displayed in the Select text box is correct.
Figure 1-17
5
• Click the Create New Folder icon to create a folder for your local site (Figure 1-17).
Figure 1-18
6
• For the root folder name, type your last name and first initial (with no spaces between your last name and initial) in the New folder text box. For example, type edwardsd.
Press the ENTER key to rename the new folder, and then click the Open button to open the root folder (Figure 1-18).
Figure 1-19
7
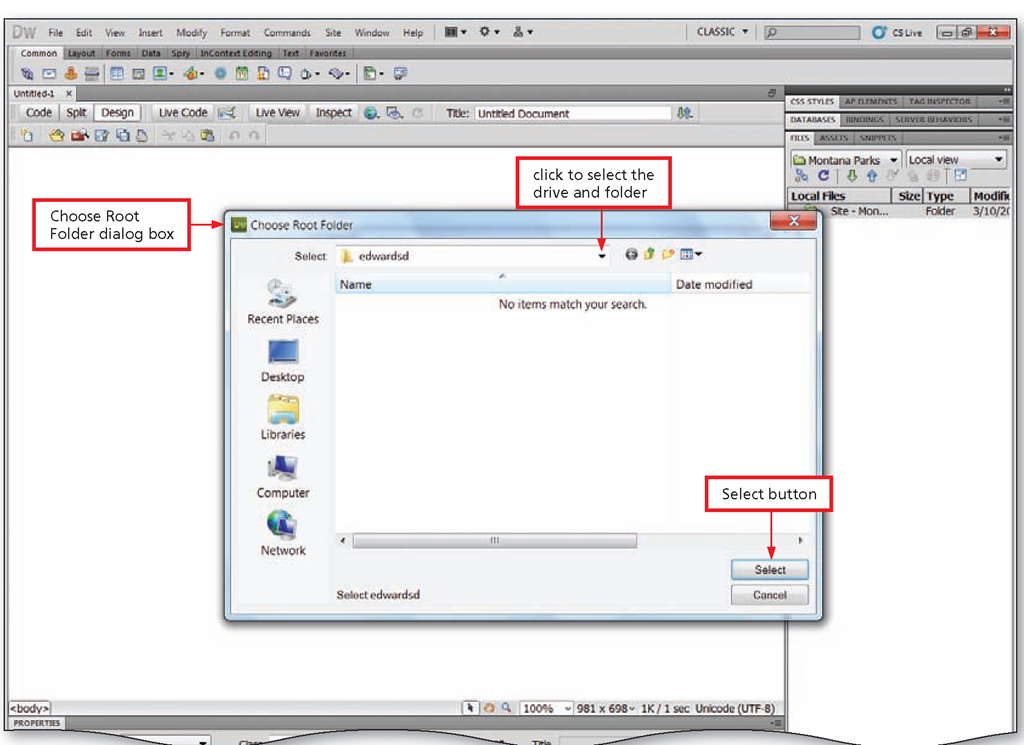
• Click the Create New Folder icon to create a folder for the Montana Parks Web site.
• Type parks as the name of the new folder, press the ENTER key, and then click the Open button to create the parks subfolder and open it.
• Click the Select button to display the Site Setup dialog box (Figure 1-19).
Q&A
Why should I create a folder on the drive for my Web site? Organizing your Web site folders now will save you time and prevent problems later. Create a main folder such as edwardsd for the sites in this topic. (Substitute your last name and first initial for "edwardsd.") Create a subfolder in that main folder for the Montana Parks Web site. Finally, create a subfolder in the Montana Parks Web site folder for images.
Which files will I store in the parks folder?
The parks folder will contain all the files for the Montana Parks Web site. In other words, the parks folder is the local root folder for the Montana Parks Web site.
Am I finished defining the new Web site?
Not yet. Nearly every Web site displays graphics, photos, and other images, and you need to create a subfolder for these images.
Figure 1-20
8
• Click Advanced Settings in the category list to display the option for selecting the default images folder.
• Click the Browse for folder icon to specify the folder for the images.
• Navigate to the your nameXparks folder.
• Click the Create New Folder icon to create a subfolder for images.
• Type images and then press the ENTER key to enter the name of the images subfolder.
• Click the Select button to select the images folder as the default folder for images and to display the Site Setup for Montana Parks dialog box (Figure 1-20).
Figure 1-21
9
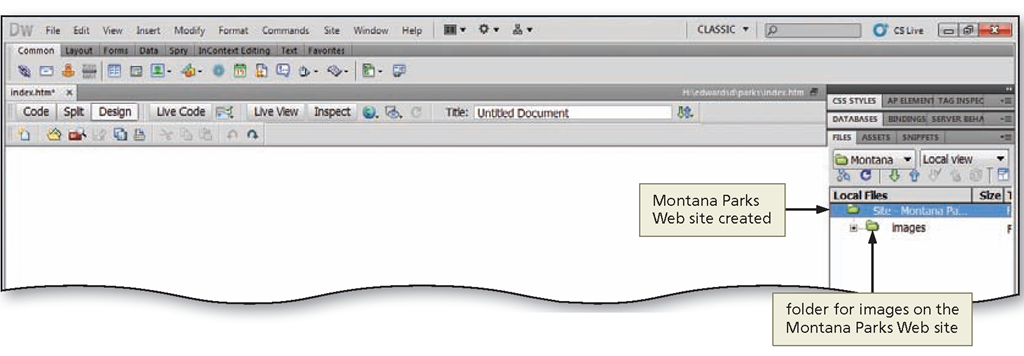
• Click the Save button to save the site settings and display the Dreamweaver workspace. The Montana Parks Web site hierarchy is displayed in the Files panel (Figure 1-21).
Q&A
What do the icons in the Files panel mean?
A small device icon or folder icon is displayed next to each object listed in the Files panel. The device icon represents a device such as the Desktop or a disk drive, and the folder icon represents a folder. Many of these icons have a plus or minus sign next to them, which indicates whether the device or folder contains additional folders. The plus and minus signs are controls that you can click to expand or collapse the view of the file hierarchy. In the Files panel, the site folders and files appear in a different color than non-site folders and files so that you easily can distinguish between the two.
What else does the Local Files list in the Files panel display?
The Local Files list displays a site, including local, remote, and testing server files associated with a selected site. In this topic, you view only the local site.
