What Is Adobe Dreamweaver CS5?
Adobe Dreamweaver CS5 is a powerful Web page authoring and Web site management software program with an HTML editor that is used to design, code, and create professional-looking Web pages, Web sites, and Web applications. The visual-editing features of Dreamweaver allow you to create pages without writing a line of code. Dreamweaver provides many tools and features, including the following:
• Automatic Web page creation: Dreamweaver provides tools you can use to develop Web pages without having to spend hours writing HTML code. Dreamweaver automatically generates the HTML code necessary to publish your Web pages.
• Web site management: Dreamweaver enables you to view a site, including all local and remote files associated with the selected site. You can perform standard maintenance tasks such as viewing, opening, and moving files and transferring files between local and remote sites.
• Standard Adobe Web authoring tools: Dreamweaver includes a user interface that is consistent across all Adobe authoring tools. This consistency enables easy integration with other Adobe Web-related programs such as Adobe Flash, Director, Shockwave, and ColdFusion.
Other key features include the integrated user interface, the integrated file explorer, panel management, database integration, and standards and accessibility support. Dreamweaver CS5 is customizable and runs on many operating systems including Windows 7, Windows Vista, Windows XP, Mac OS X, and others.
Project Planning Guidelines
The process of developing a Web site that communicates specific information requires careful analysis and planning. As a starting point, determine the type of and purpose of the Web site. Once the type and purpose are determined, decide on the content to be included. Design basics and Web site navigation then should be considered. Finally, creating a navigation map or flowchart will help determine the design that will be most helpful in delivering the Web site content. With the structure in place, the Web site is ready to be developed. Details of these guidelines are provided in the Introduction. In addition, each project in this topic provides practical applications of these planning considerations.
Project — Montana Parks Web Site Home Page
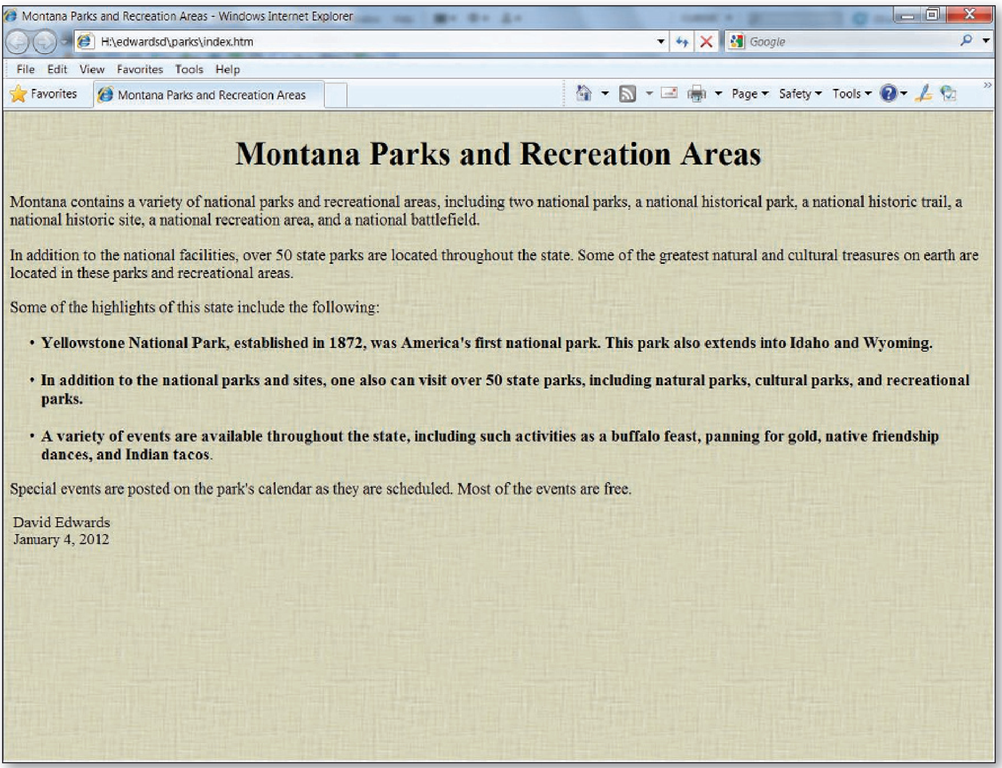
To create documents similar to those you will encounter on the Web and in academic, business, and personal environments, you can use Dreamweaver to produce Web pages such as the Montana Parks and Recreation Areas Web page shown in Figure 1-1. This Web page is the index, or home, page for the Montana Parks Web site and provides interesting facts about three of Montana’s parks and recreational areas. The page begins with a centered main heading, followed by two short informational paragraphs, and then an introductory sentence for a bulleted list. The list contains three bulleted items. A concluding sentence, the author’s name, and current date end the page. A background image is applied to the page.
Figure 1-1
Overview
As you read this topic, you will learn how to create the Web page shown in Figure 1-1 by performing these general tasks:
• Enter text in the document.
• Save the document.
• Add a background image.
• Format the text in the document.
• Insert a line break.
• Check spelling.
• Preview the Web page in a browser.
• Save and print the Web page.
Plan Ahead
General Project Guidelines
When creating a Dreamweaver Web site, the actions you perform and decisions you make will affect the appearance and characteristics of the entire Web site. As you create the home page, such as the page shown in Figure 1-1 on the previous page, you should follow these general guidelines:
1. Review the Dreamweaver workspace window. Become familiar with the various layouts and available panels.
2. Determine the location for the local site. Select the location and the storage media on which to save the site. Keep in mind that you will continue to modify pages and add new pages to the site as you progress through this topic. Storage media can be a hard disk, USB flash drive, or read/write CD. If you are using a flash drive and intend to complete all exercises, the media storage capacity should be a minimum of 25 MB.
3. Define the local site. Create the local site using Dreamweaver’s Site Setup dialog box.
4. Add a background for the Web page. Adding a background color or background image adds interest and vitality to a Web site.
5. Select the words and fonts for the text. Text accounts for the bulk of the content on most Web pages, but Web site visitors often avoid reading long blocks of text. It is best to be brief. Include headings to organize the text into sections. Use lists whenever possible. Use common words and simple language.
6. Identify how to format various elements of the text. Determine which text will be headings and subheadings, paragraphs, and bulleted and numbered lists on the Web page.
7. Review final tasks. Prepare to display a Web page to others by adding professional finishing touches such as a Web page title and by checking the spelling of the text.
When necessary, more specific details concerning the above guidelines are presented at appropriate points in the topic. The topic also will identify the actions performed and decisions made regarding these guidelines during the creation of the Web site home page shown in Figure 1-1.
Starting Dreamweaver
If you are using a computer to step through the project in this topic and you want your screen to match the figures in this topic, you should change your screen’s resolution to 1024 x 768. The browser used to display the Web page figures is Internet Explorer 8. The browser text size is set to Medium.
To Start Dreamweaver
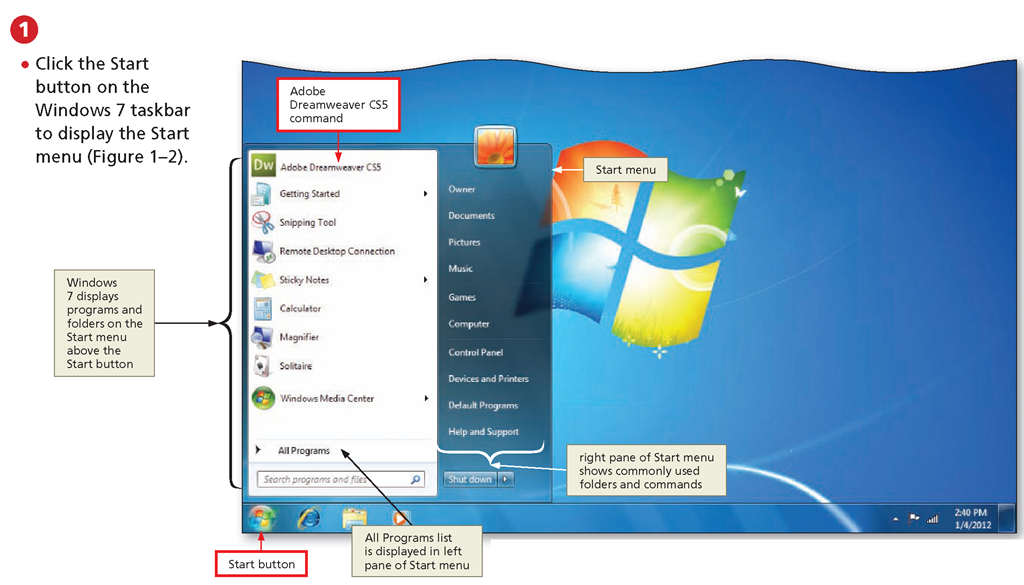
Getting started in Dreamweaver is as easy as opening an existing HTML document or creating a new document. The following steps show how to start Dreamweaver based on a typical installation. You may need to ask your instructor how to start Dreamweaver for your computer.
Figure 1-2
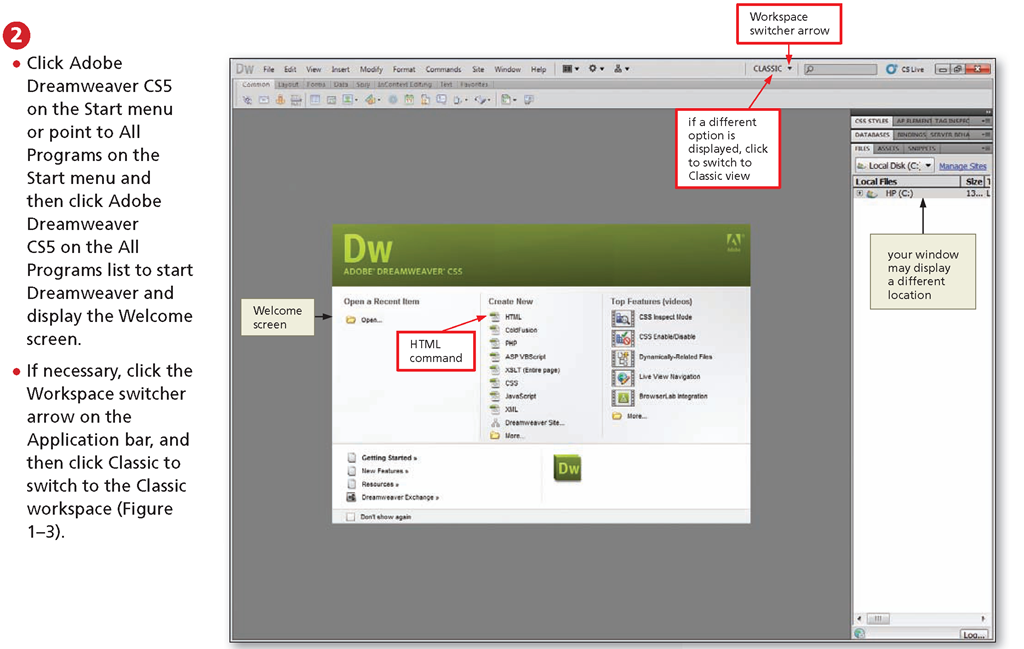
Figure 1-3
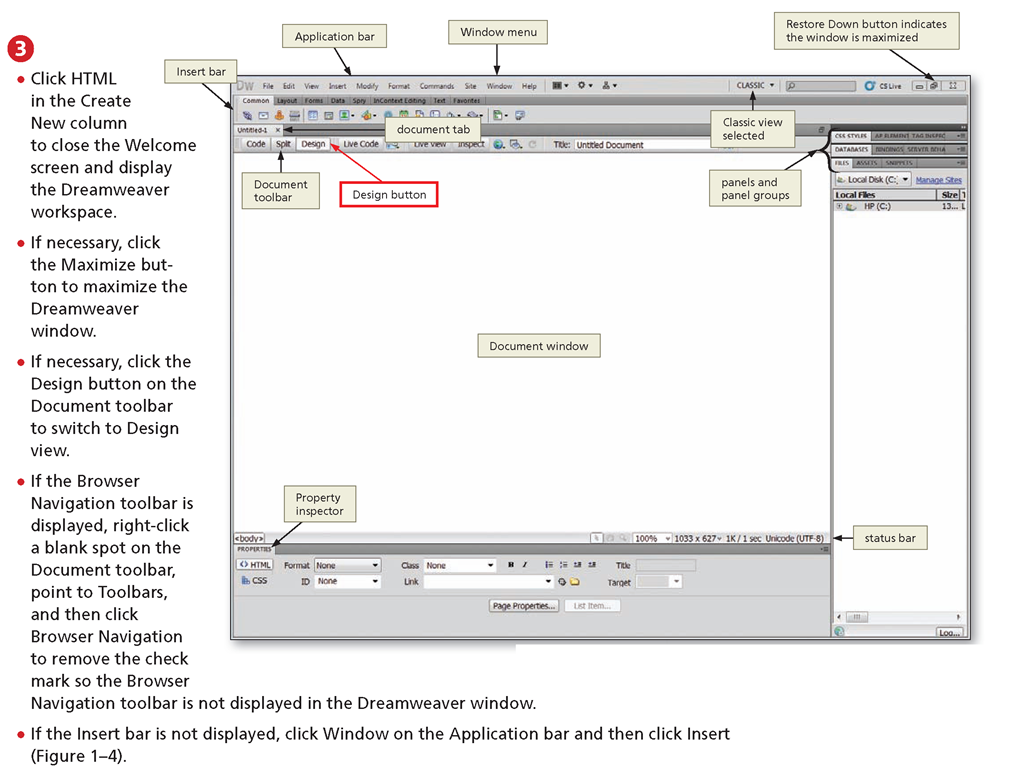
Figure 1-4
The Dreamweaver Environment and Workspace
The Dreamweaver environment consists of toolbars, windows, objects, panels, inspectors, and tools you use to create your Web pages and to manage your Web site. It is important to learn the basic concepts behind the Dreamweaver workspace and to understand how to choose options, use inspectors and panels, and set preferences that best fit your work style.
Dreamweaver provides the Web site developer with eight preset workspace layouts: App Developer, App Developer Plus, Classic, Coder, Coder Plus, Designer, Designer Compact, and Dual Screen. Programmers who work primarily with HTML and other languages generally select the Coder or App Developer workspace. The Dual Screen option requires two monitors. In this layout, the Document window and Property inspector are displayed on one monitor and the panels are displayed on a secondary monitor. The Classic workspace contains a visually integrated workspace and is ideal for beginners and nonprogrammers. The projects and exercises in this topic use the Classic workspace.
The settings on your computer determine what is displayed when the Dreamweaver CS5 program starts. By default, the Welcome screen is displayed each time you start Dreamweaver. The Welcome screen’s visual representation is a good tool for beginners, but more proficient Dreamweaver users generally disable this feature. You will disable the Welcome screen at the end of this topic. If you are opening Dreamweaver from a computer at your school or other location, most likely the program is set up and ready to use.
The screen in Figure 1-4 shows a typical Dreamweaver workspace, with some of the more commonly used components displayed. The Dreamweaver workspace is an integrated environment in which the Document window and panels are incorporated into one larger application window. The panel groups are docked, or attached, on the right. The Insert bar (also called the Insert panel) is located at the top of the Document window, and the Property inspector is located at the bottom of the Document window. You can move, resize, close, or collapse the panels to accommodate your individual preferences.
The next section discusses the following components of the Dreamweaver workspace: title bar, Document window, panels and panel groups, status bar, Application bar, and toolbars.
As you learn to use each of these tools, you will discover some redundancy. For example, to apply a font tag, you can access the command through the CSS Property inspector, the Format menu, or the Text category on the Insert bar. The different options accommodate various user preferences. The topics in this topic present the more commonly used methods. The Other Ways boxes describe additional methods to accomplish a task when they are available. As you become proficient working in the Dreamweaver environment, you will develop techniques for using the tools that best suit your personal preferences.


