To Open a New Document Window
The following steps show how to open a new Document window for the third Web page for the Montana Parks Web site — the Lewis and Clark National Historical Trail page.
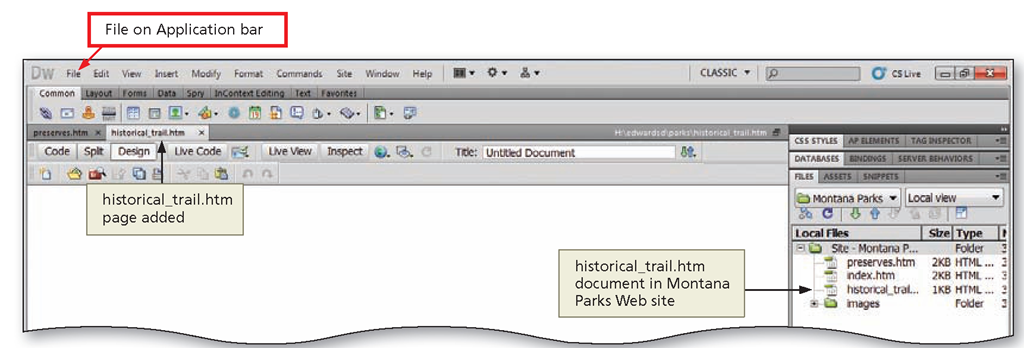
Click File on the Application bar, click New, and then, if necessary, click Blank Page.
If necessary, click HTML in the Page Type column to select the page type for the Web page.
If necessary, click <none> in the Layout column to specify no predefined layout.
Click the Create button to create and display the new blank Web page.
Save the Web page as historical_trail in the parks folder (Figure 2-13).
Figure 2-13
Entering Text for the Lewis and Clark National Historical Trail Web Page
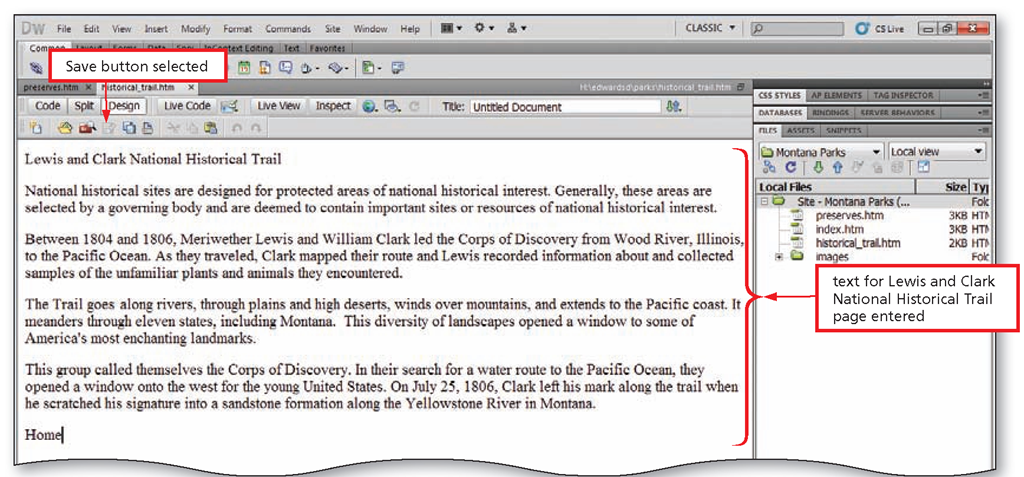
Type the text for the Lewis and Clark National Historical Trail Web page using Table 2-2 and the following steps. Press the ENTER key as indicated in the table.
Table 2-2 Lewis and Clark National Historical Trail Web Page Text
|
Section |
Text to Add |
|
Main Heading |
Lewis and Clark National Historical Trail < enter > |
|
Introduction |
National historical sites are designated for protected areas of national historical interest. Generally, these areas are selected by a governing body and are deemed to contain important sites or resources of national historical interest. < enter > |
|
Part 1 |
Between 1804 and 1806, Meriwether Lewis and William Clark led the Corps of Discovery from Wood River, Illinois, to the Pacific Ocean. As they traveled, Clark mapped their route and Lewis recorded information about and collected samples of the unfamiliar plants and animals they encountered. < enter > |
|
Part 2 |
The Trail goes along rivers, through plains and high deserts, winds over mountains, and extends to the Pacific coast. It meanders through eleven states, including Montana. This diversity of landscapes opened a window to some of America’s most enchanting landmarks. < enter > |
|
Part 3 |
This group called themselves the Corps of Discovery. In their search for a water route to the Pacific Ocean, they opened a window onto the west for the young United States. On July 25, 1806, Clark left his mark along the trail when he scratched his signature into a sandstone formation along the Yellowstone River in Montana. < enter > |
|
Closing |
Home < ENTER > |
To Create the Lewis and Clark National Historical Trail Web Page
The next task is to add text to the Web page and then format it. The following steps show how to enter and then format text for the Lewis and Clark National Historical Trail Web page.
Type the text of the Web page as shown in Table 2-2, and then click the Save button to save your changes (Figure 2-14).
Figure 2-14
If necessary, scroll to the top of the Web page, apply Heading 1 to the title, and then center the title.
Type Lewis and Clark National Historical Trail as the Web page title.
Click the Save button on the Standard toolbar to save your work (Figure 2-15).
Figure 2-15
Images
You have finished entering and formatting the text for the two new pages and copied the images to the images folder for the Montana Parks Web site. It is time to add other enhancements to your site.
If used correctly and with an understanding of the Web site audience, images add excitement and interest to a Web page. When you are selecting images for a Web site, you should understand that the size and type of image or images used within a Web page affect how fast the Web page downloads and is displayed in the viewer’s Web browser. A Web page that downloads too slowly will turn away visitors.
Image File Formats
Graphical images used on the Web are in one of two broad categories: vector and bitmap. Vector images are composed of key points and paths, which define shapes and coloring instructions, such as line and fill colors. The vector file contains a mathematical description of the image. The file describes the image to the computer, and the computer draws it. This type of image generally is associated with Adobe Flash or LiveMotion animation programs. One of the benefits of vector images is the small file size, particularly compared to the larger file size of bitmap images.
Bitmap images are the more common type of image file. A bitmap file maps out or plots an image pixel by pixel. A pixel, or picture element, is the smallest point in a graphical image. Computer monitors display images by dividing the display screen into thousands (or millions) of pixels, arranged in a grid of rows and columns. The pixels appear connected because they are so close together. This grid of pixels is a bitmap. The bit-resolution of an image is the number of bits used to represent each pixel. There are 8-bit images as well as 24- or 32-bit images, where each bit represents a pixel. An 8-bit image supports up to 256 colors, and a 24- or 32-bit image supports up to 16.7 million colors.
Web browsers currently support three bitmap image file types: GIF, JPEG, and PNG.
GIF (.gif) is an acronym for Graphics Interchange Format. The GIF format uses 8-bit resolution, supports up to a maximum of 256 colors, and uses combinations of these 256 colors to simulate colors beyond that range. The GIF format is best for displaying images such as logos, icons, buttons, and other images with even colors and tones. GIF images come in two different versions: GIF87 format and GIF89a format. The GIF89a format contains three features not available in the GIF87 or JPEG formats: transparency, interlacing, and animation. Using the transparency feature, you can specify a transparency color, which allows the background color or image to appear. The interlacing feature lets the browser begin to build a low-resolution version of the full-sized GIF picture on the screen while the file is still downloading, so something is visible to the visitor as the Web page downloads. The animation feature allows you to include moving images. Animated GIF images are simply a number of GIF images saved into a single file and looped, or repeated, over and over. A number of shareware GIF editors are available to create animated GIFs. If you do not want to create your own animations, you can find thousands of free animated GIFs on the Internet available for downloading.
JPEG (.jpg) is an acronym for Joint Photographic Experts Group. JPEG files are the best format for photographic images because JPEG files can contain up to 16.7 million colors. Progressive JPEG is a new variation of the JPEG image format. This image format supports a gradually built display similar to the interlaced GIFs. Older browsers do not support progressive JPEG files.
PNG (.png) stands for Portable Network Graphics. PNG, which is the native file format of Adobe Fireworks, is a GIF competitor, and is used mostly for Web site images. Some older browsers do not support this format without a special plug-in. Generally, it still is better to use GIF or JPEG images in your Web pages.
When developing a Web site that consists of many pages, you should maintain a consistent, professional layout and design throughout all of the pages. The pages in a single site, for example, should use similar features such as background colors or images, margins, and headings.
Prepare images.
Nearly every Web site displays images such as photographs, drawings, and background textures. Before you add images to a Web site, prepare them using the following guidelines:
• Acquire the images. To create your own images, you can take photos with a digital camera and store them in the JPEG format, use a scanner to scan your drawings and photos, or use a graphics editor such as Adobe Photoshop to design images. You also can download images from public domain Web sites, use clip art, or purchase images from stock photo collections. Be sure you have permission to reproduce the images you acquire from Web sites, unless the images are clearly marked as in the public domain.
• Choose the right format. Use JPEG files for photographic images and complicated graphics that contain color gradients and shadowing. Use GIF files for basic graphics, especially when you want to take advantage of transparency. You also can use PNG for basic graphics, but not for photos.
• Keep image file size small. Images with small file sizes appear in a browser faster than larger images. Use a graphics editor such as Adobe Photoshop to compress image files and reduce their file size without affecting quality. Background images in particular should have a small file size because they often appear on every page.
• Check the dimensions. Determine the dimensions of an image file in pixels. You can reduce the dimensions on the Web page by changing the width and height or by cropping the image. Enlarging images generally produces poor results.
Background Colors and Background Images
Many Web pages are displayed with a default white or gray background. Generally, the browser used to display the Web page determines the default background. Recall that you can enhance your Web page by adding a background image or background color.
If you use a background color, be sure to use Web-safe colors. This means the colors will be displayed correctly on the computer screen when someone is viewing your Web page.
Background images add texture and interesting color to a Web page and set the overall appearance of the document. Most browsers support background images.
A background image can be a large image, but more frequently it is a smaller image.
The image tiles to fill the screen in the Dreamweaver Document window and in the browser window.
To Add a Background Image to the Lewis and Clark National Historical Trail Web Page
Now you use the Page Properties dialog box to add the same image to the Lewis and Clark National Historical Trail Web page and the Montana National Parks and Preserves page. The following steps show how to add a background image to the Lewis and Clark National Historical Trail page.
If necessary, click the historical_trail.htm tab to display the page in the Document window.
Click Modify on the Application bar and then click Page Properties to open the Page Properties dialog box.
Click Appearance (HTML) in the Category column.
Click the Browse button to the right of the Background image text box to navigate to the images folder.
If necessary, navigate to and then open the images folder.
Click parks_bkg and then click the OK button in the Select Image Source dialog box to select the image.
Click the OK button in the Page Properties dialog box to apply the background image.
Click the Save button on the Standard toolbar to save your work (Figure 2-16 on the next page).
Q&A
Is it necessary to add a background image to a Web page?
No, you do not need to add a background image. If you do add a background image to your Web page, however, select an image that does not clash with the text and other content. The background image should not overwhelm the Web page.
How can I apply a background color instead of a background image?
To apply a background color to a Web page, you can click the Page Properties button in the Property inspector, click the Appearance (HTML) category, and then click the Background icon to display a color picker, which provides a palette of Websafe colors. Click a color in the palette, and then click the OK button to apply the color to the Web page background.
Figure 2-16
To Add a Background Image to the Montana National Parks and Preserves Web Page
The following steps illustrate how to add a background image to the Montana National Parks and Preserves page.
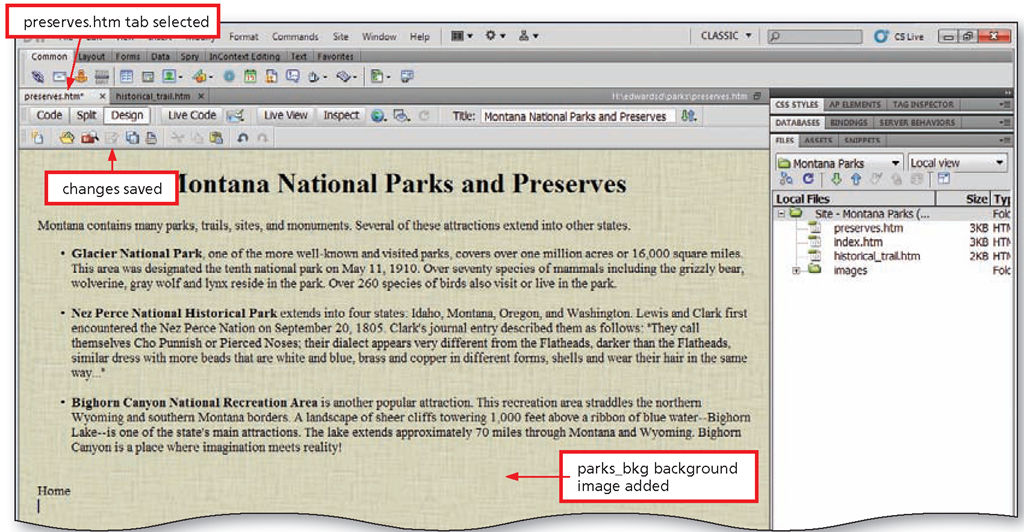
Click the preserves.htm tab to display the page in the Document window.
Click Modify on the Application bar and then click Page Properties to open the Page Properties dialog box.
Click Appearance (HTML) in the Category column.
Click the Browse button to the right of the Background image box to navigate to the images folder.
Click parks_bkg and then click the OK button in the Select Image Source dialog box. Click the OK button in the Page Properties dialog box to apply the background image. Click the Save button on the Standard toolbar (Figure 2-17).
Figure 2-17


