Refining a vector graphic with the Blob Brush tool
If you have been working with the brushes in Flash and Photoshop, you’ll find similarities in the Blob Brush in Illustrator, which enables you to generate a clean vector shape as you paint. Used in combination with the Eraser tool, the Blob Brush provides a truly painterly, intuitive way to create vector shapes—merging your brush strokes into a single, fluid outline that can then be filled with solid color or painted with a gradient or even a pattern.
In this exercise you’ll design a variation on an existing graphic by refining the outline of a masthead logo that was traced from handwritten artwork using Live Trace in Illustrator.
1 In your LessonOl folder, double-click the file check_masthead_black.ai.
2 In Illustrator, select the Zoom tool (¾) in the Tools panel, or press the Z key, and then click to zoom in close enough to scrutinize the outline of the logo in detail. Some of the unevenness you see along the edges can be smoothed out with the Blob Brush tool.
3 Before using the brush, first make sure the correct color for the check logo is active. The logo is filled with black and has no stroke. Select the Eyedropper tool (/) in the Tools panel and click on the logo. The Color panel will display a black fill and no stroke.
4 In the Tools panel, double-click the Blob Brush tool (&). When the Blob Brush Tool Options dialog box appears, choose Merge Only with Selection, drag the Fidelity slider to 3 pixels, and change the brush Size to 3 pt in the Default Brush Options. Then click OK.
5 To demonstrate the refinements possible with the Blob Brush, let’s have a closer look at the letter e in the check logo. Notice the dent in the lower-left side. With the Blob Brush still selected, add a few strokes to smooth the outline.
6 If you are not happy with the strokes you just painted with the Blob Brush tool, use the Eraser tool from the Tools panel to correct them—you can erase your strokes without ever breaking the outline.
7 Once you’re happy with your refinements to the logo, select the Zoom tool {Λ.), press the Alt/Option key for the Zoom Out mode, and then click on the logo to zoom out until you can see the entire document.
8 Choose File > Save As, navigate to your LessonOl folder, name the file check_ masthead_done.ai, and click Save. Then close the document.
Next, you’ll take advantage of another great feature of Illustrator CS5: multiple art-boards, which are like separate pages within one file. You’ll create another artboard for a copy of the logo.
Setting up multiple artboards
In Illustrator CS5 you can work with up to 100 different artboards in a single file. You have control of the size of the artboards as well as the spacing in between them. Multiple artboards can be named and organized in rows and columns, and can be printed, exported, and saved separately.
Being able to have several artboards within one file suits very much the way most designers work: Usually numerous iterations of a design concept are necessary to arrive at the polished final version. To help you create variations, you can quickly copy an object across all artboards.
1 In your LessonOl folder, double-click the file InteractiveBanner_artboards.ai.
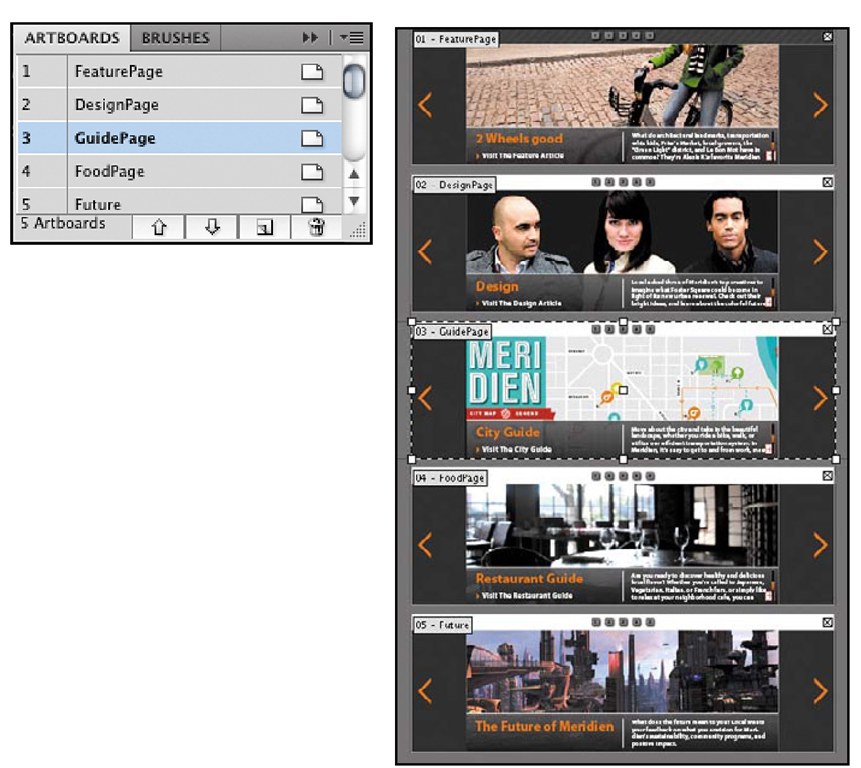
This file contains five artboards that are to become pages of an interactive banner later in the topic.
Note: During the process of creating a new Illustrator document you can specify the number of artboards you want and their size, position, and spacing in the New Document dialog box.
2 Choose Window > Artboards. In the Artboards panel, double-click Artboard 1. This is a quick way to zoom in on an artboard. You can use the Zoom tool and zoom out to see the entire canvas, which is quite large.
3 In the Tools panel, select the Artboard tool ( n ), or press Shift+O. This tool enables you to manipulate the position of an artboard or change its size, and also create new artboards.
With the Artboard tool selected, handles appear around the current artboard and the area surrounding the artboard, called the canvas, becomes gray. You can use the handles to resize that artboard.
4 In the Options bar, enter Future as the new Name for the selected artboard.
5 In the Artboards panel, use the Move Down button to move the Future artboard to the bottom of the list, because the Future panel is supposed to be the last page in the interactive banner. Select the GuidePage artboard and use the Move Down button to move it into the third position.
6 Choose View > Fit All in Window so that you can see all artboards, and then choose Rearrange Artboards from the Artboards panel menu. Specify options as shown in the following illustration, and click OK.

![tmpb110-49_thumb[4] tmpb110-49_thumb[4]](http://what-when-how.com/wp-content/uploads/2012/06/tmpb11049_thumb4_thumb.png)

![tmpb110-51_thumb[4] tmpb110-51_thumb[4]](http://what-when-how.com/wp-content/uploads/2012/06/tmpb11051_thumb4_thumb.png)
![tmpb110-52_thumb[7] tmpb110-52_thumb[7]](http://what-when-how.com/wp-content/uploads/2012/06/tmpb11052_thumb7_thumb.png)

![tmpb110-55_thumb[2] tmpb110-55_thumb[2]](http://what-when-how.com/wp-content/uploads/2012/06/tmpb11055_thumb2_thumb.png)
