Tracking text changes
Get to final copy faster by tracking text changes directly in your InDesign document. You can write, edit, and mark up text in InDesign CS5 without needing to import separate text files and remap styles every time there are copy changes.
1 Navigate to page l3. Choose Window > Editorial > Assignments, and then choose User from the Assignments panel menu. Enter a User Name, choose a Color, and click OK.
2 With the Type tool, click to place an insertion point inside the text story.
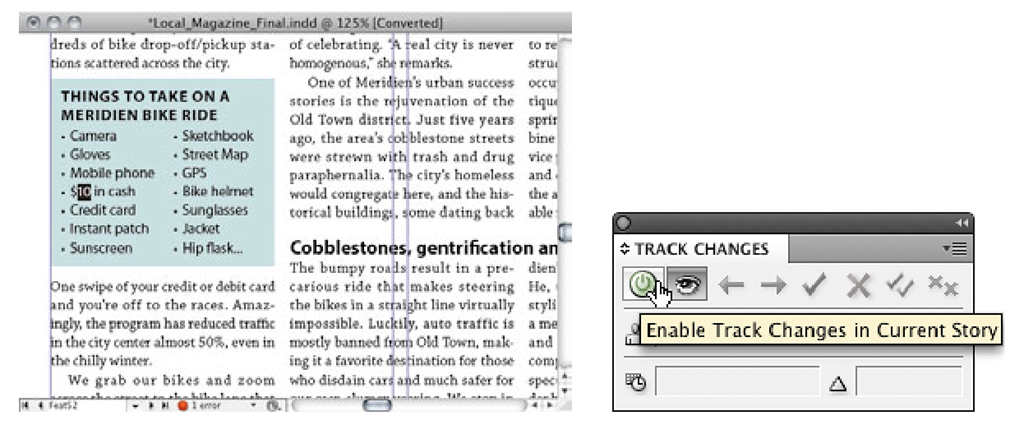
Choose Window > Editorial > Track Changes. The top-left button in the Track Changes panel controls whether change tracking is enabled, and the next button controls whether changes are visible. Make sure both buttons are on.
3 In the “Things to Take on a Meridien Bike Ride” sidebar, select the text 10 and type 25.
4 Choose Edit > Edit in Story Editor to open the Story Editor display and note the highlight color. Click in the highlighted text and notice that the Track Changes panel indicates that you are the user who edited the text.
If you see text highlighted in other colors, that’s text edited by other users whom you can identify in the Track Changes panel.
5 Click inside the highlighted text you edited and click the Accept Change button in the Track Changes panel.
6 When you’re done, close the Story Editor window and the Track Changes panel.
Getting review feedback
Using CS Review, an Adobe CS Live online service, you can create and share documents for online review without leaving InDesign. Colleagues and clients can view your document online and add comments directly using easy-to-use annotation tools that appear in their browsers. All comments appear within the context of your InDesign page layout. Simple sharing, easy access to reviews, and centralized comments speed up the review process so that you can finish your project on time and within budget.
To do this part of the lesson, make sure you’ve already set up an account on Acrobat.com.
1 Click the CS Live button at the top-right corner of the screen, and choose
Create New Review. Enter a review name and click OK. (If you don’t see the CS Live button, choose View > Application Bar.) You can also choose File > Create New Review. If you have not already signed into CS Live services, you may be asked to do so now”
2 In the Create New Review dialog box, the name of the document appears as the default Review Name. Add the words final draft to enter the complete review name Magazine_online Final Draft. If you are asked if you want to save the files, click Save
Note: CS Live online services are complimentary for a limited time. See page 25 for details and limitations related to all Adobe online services.
Tip: Another way to start a review is by choosing File > Create New Review.
Note: If you’re using CS Live services for the first time, you may be asked to review and accept the terms of use for the services before you continue.
3 In the Upload Settings dialog box, make sure Current Spread (13-14) is selected. Leave the other settings as shown, and click Upload. These settings control how much of the document is made available on the server for the review, and the quality of the display for the reviewers.
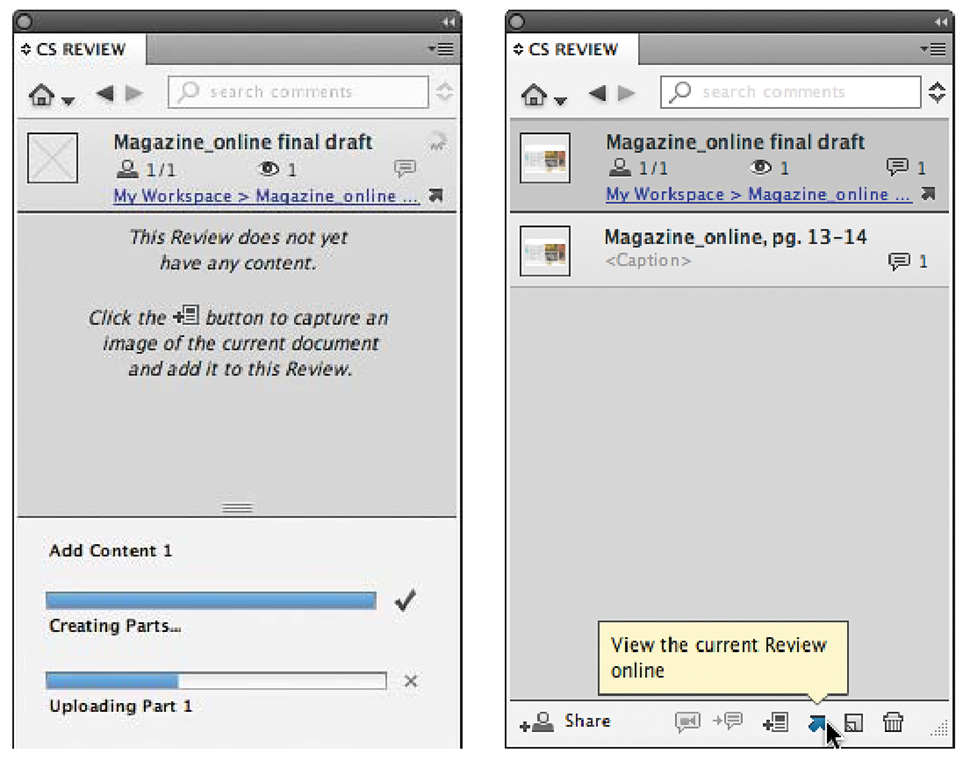
After you click Upload, the CS Review panel displays upload progress. You’ll use the CS Review panel to set up and monitor the review from within InDesign.
4 In the CS Review panel, click the View the current Review online button to display the review on Acrobat.com as your reviewers will see it. CS Review opens the document in your default web browser. To review the document, your reviewers only need a web browser running Flash; they don’t need InDesign.
Tip: To notify all of your reviewers about the review, simply click the Share button at the bottom of the CS Review panel.
Now you’ll make a couple of comments as if you were a reviewer.
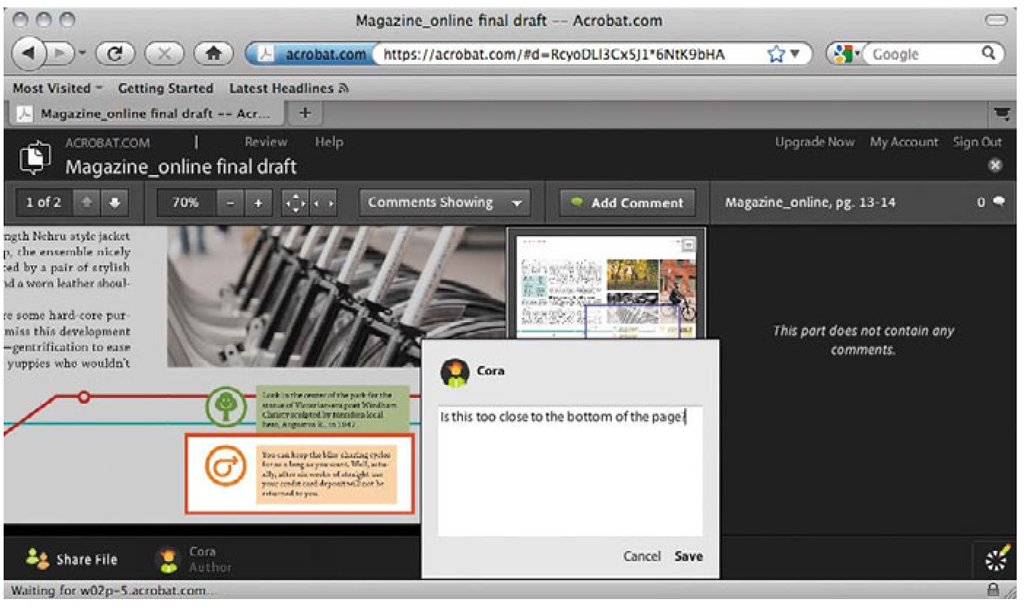
5 On the Acrobat.com page in your Web browser, Acrobat.com displays the pages you made available. You can use the zoom buttons and the page navigator proxy to inspect the pages. Drag the mouse around the orange box at the bottom of page l4, the right page in the spread.
6 A comment box opens. Enter the text Is this too close to the bottom of the page?, and click Save. The comment appears on the right side of the review web page.
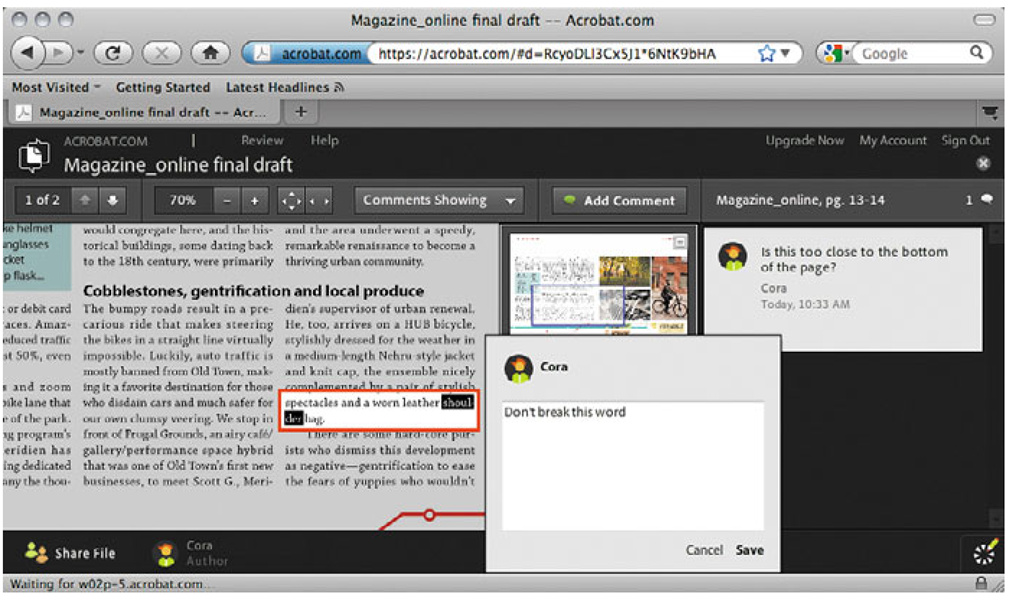
7 Position the mouse over the text near the lower-left corner of page 12. Notice that the cursor changes to a text cursor. Select the word shoulders at the end of the second-to-last paragraph on page 12 as shown.
Notice that you can use CS Review to add comments for specific text passages as well as on the layout.
8 In the comment box that appears, enter Don’t break this word, and click Save.
Now that you’ve made a couple of review comments, take a look at how you would see them as the InDesign user.
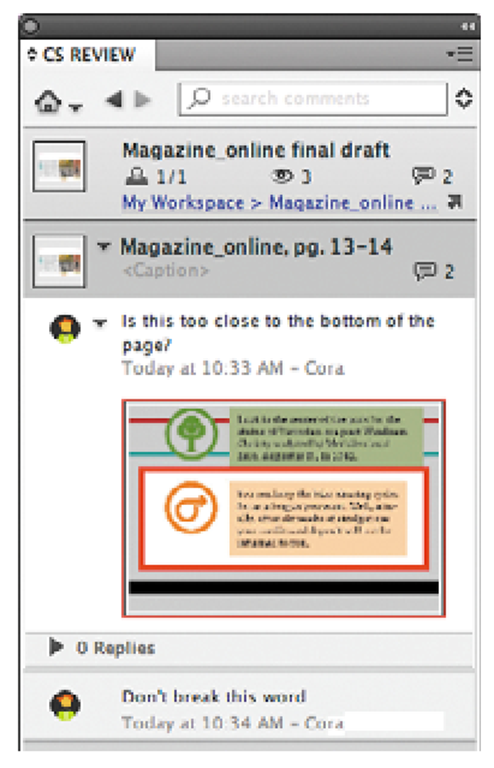
9 Switch to InDesign and then click Magazine_online, pg. l3-l4. In the CS Review panel, notice that the comments made online now appear in the CS Review pane. Comments made by any reviewer will appear here. You can then act on the comments as needed.
Tip: Right-click/ Control-click items in the CS Review panel to see a context menu with commands for viewing and managing comments.
10 You’re done exploring CS Review, so close the CS Review panel.
Preparing for printing
You’ve completed the design of the magazine. Since the document contains transparency effects, there are a few more adjustments necessary to get the best print results.
Transparent areas in a document need to be flattened—or rasterized—when printed. For best results, flattening should be done as the last possible step in your print workflow—normally performed by your print service provider. To keep transparency effects live until they need to be flattened, preserve the layers by saving your InDesign documents (or placed Illustrator or Photoshop files) in a native format.
You can help minimize the effects of flattening if you send your document output to devices that support the latest versions of PDF. To preserve transparency effects rather than flattening them when exporting a document as a PDF intended for printing, save your file in a format compatible with Adobe PDF l.5 (Acrobat 5.O) or later—by selecting the PDF/X-4 PDF export preset, for example. The Adobe PDF Print Engine (APPE)—widely embraced by OEM partners and print service providers since first released in 2OO6 and updated to version 2 in 2OO8—uses native rasterizing for PDF documents, ensuring file integrity from start to finish in a PDF-based design workflow. To learn more about the Adobe PDF Print Engine, go to www.adobe.com/products/pdfprintengine.
In InDesign, the Flattener Preview panel helps you identify which areas will be most affected by the flattening process. You’ll take a look at how that works.
Previewing how transparency will affect output
1 In InDesign, navigate to page 8 of the magazine document.
Note: If the backgrounds of the text frames display as solid white on your screen, choose View > Display Performance > High Quality Display. If you still don’t see the transparency, check your view settings preferences (in the Display Performance panel of the Preferences dialog box); set transparency to be rendered at high quality for your display performance mode. Your preferences for the display performance have no effect on how transparency is rendered when exported or printed.
2 To see which areas of your document are affected by transparency effects, open the Flattener Preview panel (Window > Output > Flattener Preview), select Transparent Objects from the Highlight menu, and choose [High Resolution] from the Preset menu. Then choose in turn in the Highlight menu: All Affected Objects, Affected Graphics, and All Rasterized Regions. When you’re done, choose Transparent Objects.
The areas affected by each Highlight option are highlighted in red, such as the text frame in the lower-right corner of the page. You can use the Effects panel to find out why that object is highlighted. Specifically, you’re looking for a blend mode other than Normal in the menu at the top of the Effects panel, an Opacity lower than 100%, or an applied effect.
3 Using the Selection tool, click the text frame. In the Effects panel (Window > Effects), note that it says Group and indicates no transparency. This means the transparency is probably applied to an object in the group.
4 Double-click the group to select the frame inside the group. Now that the text frame is selected, the Effects panel reveals that the Fill uses the Multiply blend mode and is set to 85% Opacity. These are the options that create transparency in this object.
If the Flattener Preview panel reveals potential issues with how transparency will affect part of your document during output, you can decide what to do about those issues. For example, if you see that type or highly detailed vector graphics will become rasterized, you might decide to change the design to avoid the problem by moving critical objects so that they don’t overlap objects that use transparency, or by avoiding the use of transparency in that area.
One thing to watch out for is text placed behind objects with transparency effects. Transparency affects all objects placed lower—or farther back—in the display stacking order. Printed text might not look as crisp as it should if it was converted to outlines and rasterized behind an object with a transparency effect, so when possible, it’s best to keep text in front of transparent objects in the layer order.
If you need to flatten your document as part of the export or print process, for best results set the document’s transparency blend space (Edit > Transparency Blend Space) to the color space (CMYK or RGB) of the target output device. For more information about working with transparency see “Best practices when creating transparency” in InDesign Help.
![tmpbd7a-68_thumb[2][2][2][2][2] tmpbd7a-68_thumb[2][2][2][2][2]](http://what-when-how.com/wp-content/uploads/2012/06/tmpbd7a68_thumb22222_thumb.png)

![tmpbd7a-71_thumb[2][2][2][2][2] tmpbd7a-71_thumb[2][2][2][2][2]](http://what-when-how.com/wp-content/uploads/2012/06/tmpbd7a71_thumb22222_thumb.png)
![tmpbd7a-72_thumb[2][2][2][2][2] tmpbd7a-72_thumb[2][2][2][2][2]](http://what-when-how.com/wp-content/uploads/2012/06/tmpbd7a72_thumb22222_thumb.png)
![tmpbd7a-73_thumb[2][2][2][2][2] tmpbd7a-73_thumb[2][2][2][2][2]](http://what-when-how.com/wp-content/uploads/2012/06/tmpbd7a73_thumb22222_thumb.png)
![tmpbd7a-74_thumb[2][2][2][2][2] tmpbd7a-74_thumb[2][2][2][2][2]](http://what-when-how.com/wp-content/uploads/2012/06/tmpbd7a74_thumb22222_thumb.png)
