Geoscience Reference
In-Depth Information
memory and battery capacity for the camera. This means you
can take many more photographs than you will eventually use.
The following tips may help give you a set of photographs that
cover all eventualities.
•
Make the fi rst photograph at a locality a general view; this
will remind you of where the photographs that follow on
were taken.
12
•
Take both general views and close-up views of different
features.
(a)
•
Take note of the lighting conditions. The best view under
sunny conditions is often with the sun behind you, so this
may mean returning to a locality at a different time of day
to get the best lighting. Cloudy conditions provide a more
even light, but sunny conditions can show some geological
features better.
•
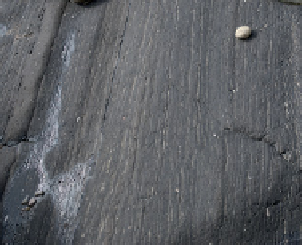
If the lighting conditions are poor or variable take several
shots with different settings. Note that underexposed digital
photographs can be processed later to achieve a good image
whereas overexposed photographs do not record all of the
information. In Figure 12.1, (b) is better than (a).
(b)
Figure 12.2
Two images of
grey mudstones from the Monterey
Formation, California, USA
showing the large colour difference
when using a different white
balance setting. Images are 1 m
high. (a) Auto setting. (b) After
using a white balance card to
adjust the balance for the lighting
conditions (seek advice from
professional photographer/
photographic shop). All other
camera light settings are exactly
the same. (a and b: Angela L.
Coe, The Open University, UK.)
•
The lighting late in the day and early in the morning (i.e.
low-angle lighting) can bring out small- and medium-scale
topographical features such as trace fossils and sedimentary
structures.
•
If you are using the photograph for image analysis ensure
that it does not have any edge distortion, for instance that
produced by using a wide-angle setting, or taking photos
with the lens set to 50 mm or longer focal length. You will
also need to take account of white balance under different
lighting conditions (see manufacturer's instructions and
Figure 12.2).
•
Under low lighting conditions a tripod is useful; if you do
not have a tripod with you try setting the camera up on a
rock and using the self timer or a remote shutter release.
•
If you are working where weather conditions are bad
consider purchasing a waterproof camera case of the type
used by divers for underwater photography.
•
If you are taking a lot of photographs, for instance of shell
beds or fi ne-scale detail, take the photographs in
stratigraphic order to avoid confusion and consider marking
the rocks in some manner, for instance with a marker pen,
correction fl uid or a tile scribe, so you know how the
different photographs relate to each other.