Geoscience Reference
In-Depth Information
10.5.1 Traverse mapping
This method is often adopted for reconnaissance mapping of a
large region, at relatively small scales (1:250,000 to 1:50,000). It
may also be the only approach possible where rock exposures
are restricted to stream sections or roads, or where access is
limited to streams, roads, ridge crests, etc. (Figure 10.9). River
sections in mountainous regions are commonly subparallel and
quite evenly spaced, presenting the opportunity for multiple
traverses. The geology can be interpolated between them if the
structure is broadly simple, especially if aerial photographs or
satellite images can be used to help trace units or boundaries
across sparsely vegetated areas.
10
Traverse mapping involves simply recording the geology as you
walk along a predetermined route. This may be a straight line,
or series of straight 'legs', between two defi nite points on the
map. Typically, however, traverses follow linear features such
as roads, tracks, streams, wadis or ridge crests, because these
provide good exposure and/or easy access (or perhaps the only
feasible access!). Such routes may be recorded automatically on
GPS units. In open country, binoculars may be handy for
examining the traverse route; in addition, high-resolution
satellite imagery can be examined (and printouts taken) prior to
the mapping season (via online services such as Google
Earth™) to plan potential routes.
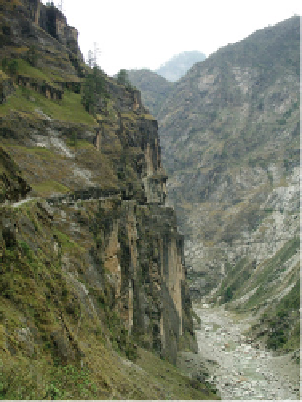
Figure 10.9
River gorge at
Wangtu, northwest India,
illustrating the point that in very
mountainous regions, the only
practical mapping approach may
be traverses along river sections or
roads. In this view, the road is cut
into the cliff on the left-hand side of
the photograph, about half way up
the image. (Tom W. Argles, The
Open University, UK.)
Linear traverse
Ideally, a traverse runs perpendicular to the strike of
stratigraphy or structure, yielding the most information on
the regional geology. If the traverse is along a well-defi ned
linear feature (e.g. road or stream), plot the geology as you
go. Mark the units you encounter on the map using the
appropriate colour or lithology code, and indicate whether
they are well- or poorly-exposed (e.g. by marking the
traverse line as solid or dashed, respectively). Structural data,
faults, fold axes and other geological information can all be
recorded on the traverse; an example is shown in Figure
10.10a.
Closed compass traverse
Another way to create a traverse is by pacing out a polygon on
a set of compass bearings; some correction for minor bearing
errors may be required when you fi nally reach the end point
(Figure 10.10b, p. 224). In this case, it is advisable to record the
geology in a notebook with the paced distances, and make the
required correction for each traverse point before plotting the
geology on the fi eld map.
Traverses perpendicular to the regional strike form a good basis
for sketching a cross-section in the fi eld (Section 10.4.3) or in