Graphics Programs Reference
In-Depth Information
brush. In the same way he created the arm link, hand, and elbow swatches for the
pattern brush tiles. He made sure that the various pieces were facing in the correct
direction relative to the pattern tiles, which run at right angles to the path, before
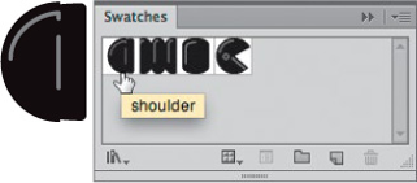
individually dragging each one into the Swatches panel (alternatively, you can select
art and click the New Swatch icon, or choose Object> Pattern> Make).
1
Creating the various robot arm elements, oriented in the outward-
facing position that pattern brushes use for
their tiles
Dragging objects for pattern brushes into the Swatches panel and
naming them
2 Making and using the pattern brush.
To build the pattern brush for the robot arm, Lar-
rett opened the Brushes panel, clicked New Brush in Pattern Brush Options, and
then clicked OK. He clicked in the Side Tile box and selected the desired pattern
swatch for the arm (CS6 and
CC
tile order and swatch selection methods differ slight-
ly). Next he placed the other tiles in the appropriate position: the shoulder as the
Start Tile, the hand as the End Tile, and the elbow as the Inner Corner Tile. He
named the new pattern brush Robot Arm, and clicked OK.
To use his new pattern brush, Larrett selected the brush in the Brushes panel, then
drew a path for the robot arm using the Pen tool (P). He clicked where the Start Tile
(the shoulder) should go, clicked again to place a corner anchor point (necessary
for the elbow tile, the Inner Side Tile, to load), and finally clicked to place the hand
element (the End Tile) at the end of the path. He also sometimes drew with the
Paintbrush tool or applied the brush to a drawn path.