Graphics Programs Reference
In-Depth Information
Stephen Klema's Students:
Cinthia A. Burnett, James Cassidy, Kenneth Albert, Jamal Wynn, Suzanne Drapeau, Mahalia
Johnson
Using the same techniques described on the previous page, additional student
creations are shown above. In some of these illustrations, artists applied art and
calligraphic brushes to paths drawn with the Pencil or Pen tools, by selecting the
path, and then choosing a brush from the Brushes panel. You can find many
additional brushes in the Brushes library. To access more art brushes, click on the
Brush Libraries Menu icon found in the lower left corner of the Brushes panel.
Choose Open Brush Library> Artistic, then select the brushes you want to add to
the Brushes panel. Find more artwork from Professor Klema's students on his
website at:
www.StephenKlema.com/wow
.
STEUER
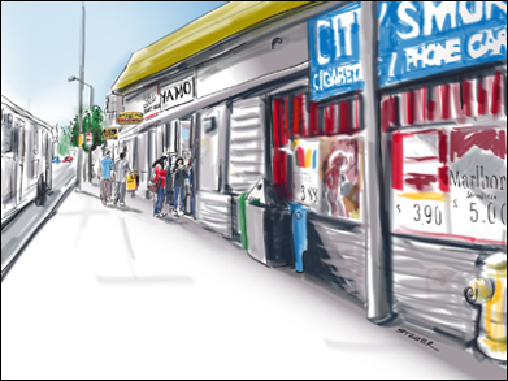
Sharon Steuer
To create this illustration for her “Good Food in the Microhood”
UntappedCities.com
posting, Sharon Steuer began in Photoshop, where she collaged photos she'd
taken from different vantage points into one imaginary cityscape. After placing it as
a JPG template in Illustrator, from another image, she copied objects styled with her
custom calligraphic brushes and pasted the objects into her new file, which added
the custom brushes to her current Brushes panel. She then deleted the objects and
used these brushes to paint her black line drawing. In a new layer she added color
using default bristle brushes and a pressure-sensitive Wacom tablet and Art Pen. To
easily switch between brushes, colors, and layers, she started by selecting a path
styled similarly to the one she wanted to make, then deselected ( -Shift-A/Ctrl-
Shift-A). To draw a new, blue, wide transparent bristle brush stroke on the Color
layer, she selected a blue-wide stroke on the Color layer, then deselected, and
drew. Next, to draw a new calligraphic path on the lines layer, she selected then
deselected one of those. With Edit Selected enabled in Brush Options, if she kept a
brush stroke selected, she could redraw the path (instead of draw a new one). After
adding a few more detail layers, she created an “unwanted lines layer” and hid it,
so she could then select and move unwanted lines to that hidden layer. Lastly she
created two overlapping artboards: one to frame the crop when featured on the
website front page, and the other sized for insertion within the post. To see this
posting, which also contains a link to an article on CreativePro.com detailing how
this image was created, go to UntappedCities.com and enter “CreativePro” in the
search field.