Hardware Reference
In-Depth Information
Solution
Recipe 2.3
shows how to read a pushbutton switch and
Recipe 3.2
controls an external
LED. This recipe combines the two to read the switch and turn on the LED in response to
it. To make this recipe, you will need:
▪ Breadboard and jumper wires (see
“Prototyping Equipment”
)
▪ Pushbutton switch (see
“Miscellaneous”
)
▪ 220 Ω resistor (see
“Resistors”
)
▪ LED (see
“Opto-Electronics”
)
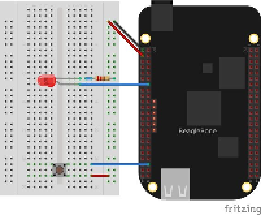
Wire up the pushbutton and LED as shown in
Figure 8-1
.
Figure 8-1. Diagram for wiring a pushbutton and LED with the LED attached to P9_12
and turns on the LED attached to
P9_12
when the button is pushed.
Example 8-1. Monitoring a pushbutton using a callback function (pushLED.js)
#!/usr/bin/env node
var
b
=
require
(
'bonescript'
);
var
button
=
'P9_42'
;
var
LED
=
'P9_14'
;
b
.
pinMode
(
button
,
b
.
INPUT
,
7
,
'pulldown'
,
'fast'
,
doAttach
);
function
doAttach
(
x
) {
if
(
x
.
err
) {